
Installing a new ceiling fan can dramatically improve your home’s comfort while reducing energy costs—yet many homeowners avoid this project because they don’t know how to assemble a ceiling fan properly. The good news is that with basic DIY skills and the right approach, you can complete this project in just 2-3 hours without professional help. This guide cuts through the confusion by providing clear, actionable steps for assembling and installing your ceiling fan safely and correctly.
Before you begin, remember that this guide complements—not replaces—the specific instructions provided with your fan model. Always consult your manufacturer’s documentation first, as variations exist between brands and models. With proper preparation and attention to detail, you’ll have a beautifully functioning ceiling fan that provides years of reliable service and energy savings.
Gather Essential Tools Before Starting Assembly
Verify All Components Are Present
Open your ceiling fan box immediately and lay out all components in an organized workspace near your installation area. Check against the parts list in your manual to confirm nothing is missing or damaged. Missing parts will halt your progress, so address any discrepancies with the manufacturer before beginning. Keep small components like screws and wire nuts in a magnetic tray to prevent frustrating drops during assembly.
Assemble Your Tool Kit for Efficient Installation
You’ll need these essential tools before attempting to assemble a ceiling fan:
– Sturdy ladder tall enough to comfortably reach your ceiling
– Screwdriver set with both Phillips and flathead heads
– Wire tester or voltage meter for electrical safety verification
– Electric drill with appropriate bits including a 9/64-inch bit for pilot holes
– Pliers and wire strippers for proper electrical connections
– Magnetic screwdriver for better visibility when securing overhead components
A flashlight proves invaluable for seeing into electrical boxes, while wire cutters will likely be necessary to trim wires to appropriate lengths. Enlist a helper for this project—ceiling fan installation is decidedly not a solo endeavor as you’ll need assistance lifting heavy components and handing tools while positioned on your ladder.
Verify Electrical Box Safety Before Assembly Begins
Identify Proper Ceiling Fan-Rated Electrical Boxes
Your ceiling fan requires a specialized electrical box rated specifically for fan installation—standard light fixture boxes cannot safely support a rotating fan’s weight and vibration. Look for boxes labeled “Approved for Ceiling Fans” or “Rated for 70lbs” that mount directly to ceiling joists, woodblocks, or adjustable braces. If your existing box lacks these markings or appears flimsy, replace it with a fan-rated version before proceeding.
Confirm Box Positioning and Secure Mounting
The electrical box must sit flush with your ceiling drywall to provide solid support. If it protrudes or recesses, the fan may wobble during operation. Address non-flush boxes by:
– Adding spacers behind recessed boxes
– Replacing with standard depth fan-rated boxes
– Adjusting brace feet to lower settings for adjustable braces
Seal any gaps around the electrical box with caulk or spray foam before installation to prevent air infiltration. This simple step improves energy efficiency and creates a cleaner mounting surface for your fan assembly.
Install the Mounting Bracket Correctly

Prepare for Downrod Fan Installation
For standard downrod fans, begin by backing out the pre-installed set screw from the motor adaptor until threads remain engaged but the shank doesn’t protrude. This creates space for downrod insertion. The mounting bracket must face upward with four bumpers positioned toward the ceiling—install using either:
– Wood screws directly into ceiling structure (drill 9/64-inch pilot holes first)
– Machine screws into your fan-rated electrical box
Mount Low Profile (Hugger) Fans Properly
Hugger fans require a different bracket configuration since they mount flush against the ceiling. Lift the motor assembly and slide the square hanging ball into the ceiling bracket opening while keeping wires clear. Position the ground wire attached to the motor shaft to face out of the bracket’s large opening, then secure with two locking screws. Verify your specific model’s requirements as some low profile fans lack the square hanging ball design.
Assemble and Secure the Downrod Connection
Complete Downrod Installation Sequence
Feed the fan’s wires through the downrod before hand-tightening it onto the motor—this requires at least four to five complete turns for proper thread engagement. Never skip the critical step of using pliers to tighten the setscrew securely; hand-tightening leads to dangerous loosening from vibration during operation.
After securing the downrod, trim wires to leave approximately 8 inches extending from the top. Strip 3/8 inch of insulation from each wire end to expose bare metal for connections. Slide the canopy over the downrod and wires, positioning it to cover electrical connections once installed. Lift the fan by the downrod (never the blades) and insert the downrod ball into the ceiling bracket slot.
Make Proper Electrical Connections
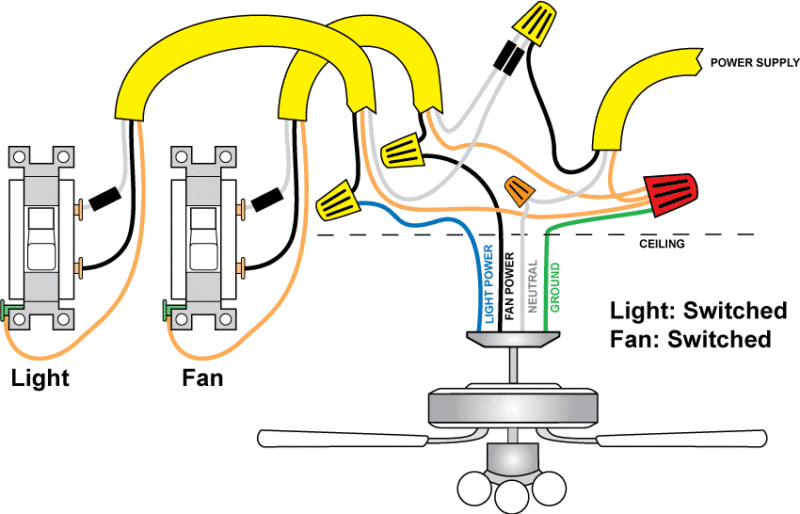
Single Switch Wiring Configuration
For fans controlled by one wall switch:
– Connect white (grounded) ceiling wire to white fan wire
– Connect black (ungrounded) ceiling wire to both black and blue fan wires
– Join all grounding wires (ceiling, downrod, and bracket) together
Dual Switch Wiring for Separate Fan/Light Control
When two switches control fan and light independently:
– White ceiling wire connects to white fan wire
– Black ceiling wire connects to black fan wire
– Second ungrounded (light) ceiling wire connects to blue fan wire
– All grounding wires connect together
Twist wire nuts clockwise until tight, then gently tug each wire to verify secure connection—a loose wire ranks among the most common causes of post-installation failure.
Secure Canopy and Motor Housing
Install Downrod Fan Canopy
Carefully tuck all wires and wire nuts into the junction box, then lift the canopy into position ensuring triangular openings align with the mounting bracket. A magnetic screwdriver proves invaluable here for better visibility in tight overhead spaces. Insert and securely tighten all canopy screws, checking that the fan hangs level without wobble before proceeding.
Mount Low Profile Fan Housing
For hugger fans, raise the motor housing until it properly positions over both the motor and ceiling brackets. Rotate until screw holes align with bracket holes, noting that an indentation inside the housing should lock into the ceiling bracket’s notch. Hold firmly in position while inserting and tightening all four motor housing screws.
Attach Fan Blades Without Causing Imbalance

Blade Iron Mounting Method
Insert grommets into each blade hole before attaching blades to blade irons with provided screws. Position blade irons on the motor with all screw holes aligned, then lightly hand-tighten before final securing. Never bend blade brackets during installation—this causes vibration and noise during operation.
Snap-On Blade Installation
For tool-free blade systems, align the three blade holes with the three blade iron posts, then squeeze firmly until the flared tops of the posts become fully visible above the blade. This indicates proper assembly with the posts fully engaged in the blade.
Install Light Kit Components Properly
Identify Quick Connect Technology
Determine if your fan uses Quick Connect by checking for a distinct locking mechanism and ring surrounding the switch housing. Quick Connect fans simplify light kit installation with plug-and-play wiring.
Complete Quick Connect Light Kit Setup
Remove the cardboard plug guard and connect fan and light fixture plugs, aligning colored markings for proper polarity. Push connectors and excess wire into the top hole of the light fixture. Position the light fixture with mounting ring holes aligned to the bracket spaces, then turn clockwise until you hear a click confirming secure placement. Install socket rings and glass components using the provided tool, then add bulbs.
Configure Remote Controls for Easy Operation
Activate Pre-Paired Handheld Remotes
Most remotes come pre-paired from the factory—simply install the battery to activate. Control fan operation by:
– Pressing fan button to turn on/off
– Using arrow buttons to change speed
– Holding fan button to reverse direction
– Pressing light button for illumination control
Set Up Smart Fan Controls
Wi-Fi enabled fans like Hunter’s SIMPLEconnect Collection connect to smartphone apps and integrate with Apple HomeKit, Amazon Alexa, and Google Assistant. Follow the manufacturer’s app instructions for initial setup, then enjoy voice control and scheduling capabilities that enhance convenience and energy efficiency.
Troubleshoot Common Assembly Problems
Fix Loose Wire Connections
If your fan doesn’t operate after installation, check all wire connections first. Turn off power at the breaker, then verify each wire nut is tight and no wires have slipped out. Retwist connections clockwise and tug test each wire to confirm security before restoring power.
Eliminate Fan Wobble Immediately
Wobbling typically stems from:
– Non-flush electrical box
– Loose blade screws
– Bent or damaged blades
– Improperly seated downrod ball
Tighten all connections and check blade alignment. If wobble persists, use the balancing kit often included with new fans to correct minor weight variations between blades.
Maintain Your Assembled Ceiling Fan for Longevity
Dust blades regularly to prevent performance issues and imbalance. Check that all screws remain tight, particularly the downrod setscrew which requires periodic tightening with pliers. Adjust fan direction seasonally—counter-clockwise in summer to cool rooms, clockwise in winter to circulate warm air. If you notice unusual noise, increased wobble, or electrical issues, turn off power immediately and investigate the cause or consult a professional electrician. With proper maintenance, your newly assembled ceiling fan will provide reliable comfort for years to come.
Leave a Reply