When your Hunter ceiling fan starts making grinding noises, wobbles excessively, or fails to start at certain speeds, you’re facing a potential motor issue that requires specific repair knowledge. Unlike generic ceiling fans, Hunter models have unique repair constraints that many homeowners don’t discover until they’re already searching for replacement parts. The critical fact you need to know immediately: Hunter doesn’t sell individual motor components like capacitors or switches for DIY repair. This guide reveals the manufacturer’s approved repair methods and helps you determine whether you can fix your Hunter ceiling fan motor yourself or need professional assistance—saving you time, money, and potential electrical hazards.
How to Find Your Hunter Ceiling Fan Model Number for Motor Repairs
Before ordering any parts or attempting repair, you must locate your Hunter ceiling fan’s exact model number—this is non-negotiable for successful motor repair. Hunter strategically places this critical identifier on the top of the fan motor housing under a Hunter-branded tag, visible without disassembly. Grab a flashlight and mirror to read this small label while your fan remains safely installed.
Once you’ve found the model number, immediately enter it into Hunter’s online ceiling fan manual and parts finder. This database connects your specific fan to its wiring diagrams, compatible parts, and repair procedures. Without this number, you risk ordering incompatible components that could create electrical hazards or damage your fan beyond repair. Take a clear photo of the tag with your smartphone as permanent reference—it will save hours of frustration when ordering parts or consulting support.
7 Warning Signs Your Hunter Ceiling Fan Motor Needs Repair
Recognizing specific symptoms helps determine whether your issue requires motor repair or simpler fixes. A loud grinding or clicking noise during operation almost always indicates failing motor bearings—a serious issue requiring professional attention. Excessive wobbling that persists after blade balancing suggests internal motor component wear rather than simple imbalance.
If your fan only operates at certain speeds or fails to start completely, check the wall switch and remote control functionality first—these often mimic motor problems. However, inconsistent speed control combined with humming noises typically points to capacitor issues within the motor assembly. Dimming lights on fan models with integrated lighting frequently signal wiring problems that affect motor performance.
Critical warning: Burning smells or visible smoke mean immediate shutdown and professional assessment—these indicate dangerous electrical failures that shouldn’t be ignored. Don’t risk fire hazards by continuing operation when these severe symptoms appear.
Where to Buy Genuine Hunter Ceiling Fan Motor Parts Online
Hunter’s official parts finder system is your only reliable source for motor-compatible components. Enter your model number to access the complete catalog of available parts specifically designed for your fan. While light kits, downrods, and replacement shades appear in this system, you’ll notice critical electrical components are conspicuously absent.
This intentional omission reflects Hunter’s quality control policy—they won’t sell capacitors, wattage limiters, or switches individually because improper installation creates safety risks. Instead, the system directs you to purchase complete wiring harness assemblies that include all necessary electrical components pre-configured to manufacturer specifications.
When viewing parts online, study the exploded diagram for your model to understand component relationships. This visual reference proves invaluable during installation and prevents ordering mistakes. Remember that third-party “compatible” motor components often lack proper safety certifications and may void any remaining warranty on your Hunter fan.
Why Hunter Doesn’t Sell Individual Motor Components for DIY Repair
Hunter’s policy of not selling individual motor components like capacitors stems from critical safety considerations, not corporate profit motives. These electrical components work as an integrated system where mismatched parts create fire hazards, electrical shock risks, and performance issues. A capacitor with incorrect microfarad rating can overload motor windings, while improper wattage limiters bypass essential safety protections.
The company designs its fans with proprietary electrical configurations that require precise component matching—something impossible for consumers to verify. Hunter’s decision to sell only complete wiring harness assemblies ensures every replacement meets strict safety standards and maintains proper electrical relationships between components.
Attempting to source individual components from third-party suppliers often leads to incompatible parts that damage your fan or create dangerous conditions. That $5 capacitor you find online might seem like a bargain until it causes your fan motor to overheat and ignite—making the complete harness solution a wise safety investment.
Complete Wiring Harness Replacement: The Only Approved Motor Repair Method
When electrical components fail in your Hunter ceiling fan, the manufacturer-approved solution is replacing the entire wiring harness specific to your model. This complete assembly includes all necessary electrical components—capacitor, wattage limiter, and switches—pre-wired to exact specifications. While more expensive than individual components, this approach transforms complex electrical work into a manageable DIY project.
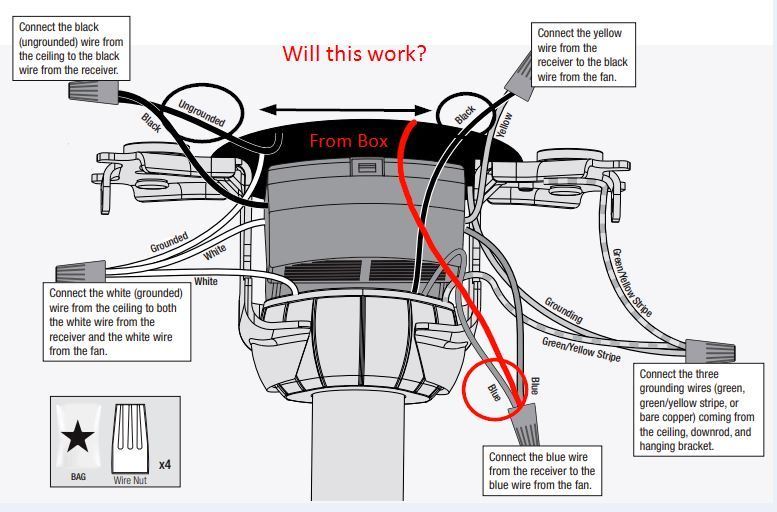
The harness replacement process typically takes 30-45 minutes for experienced DIYers and requires only basic tools. Hunter designs these assemblies for plug-and-play installation with color-coded connectors that prevent incorrect wiring. This system eliminates guesswork and ensures proper grounding—critical for preventing electrical shock risks during operation.
Pro tip: Before disconnecting wires, photograph the original configuration and label each connection point with masking tape. This simple step prevents confusion during reassembly and ensures you restore all connections to their correct positions. The complete wiring harness solution maintains your fan’s safety certifications and preserves any remaining warranty coverage.
Step-by-Step Hunter Ceiling Fan Motor Repair with Safety Precautions
Begin your repair by turning off the circuit breaker controlling your fan—not just the wall switch—and verifying power is disconnected with a non-contact voltage tester. Set up a stable ladder on level flooring with a helper if possible, and gather these essential tools:
- Non-contact voltage tester
- Needle-nose pliers
- Wire strippers
- Phillips and flathead screwdrivers
- Electrical tape
- Masking tape for labeling
Carefully remove the fan canopy to access the motor housing, documenting each step with photos. Disconnect wires by noting their original positions, then remove the old wiring harness. Install the new harness by connecting components in reverse order, ensuring all wire nuts are tight and connections secure. Before restoring power, double-check that no loose wires touch metal components and that all connections match your reference photos.
Critical safety step: After reassembly but before turning power back on, manually rotate the fan blades to ensure they move freely without obstruction—a safety check many DIYers skip that prevents motor damage during initial startup.
5 Critical Times to Hire a Professional for Hunter Fan Motor Repair
While wiring harness replacement seems straightforward, certain situations demand professional expertise. Call a qualified electrician immediately if you notice scorch marks on wiring connections or the motor housing—these indicate dangerous overheating that requires expert assessment.
If your fan is installed on a vaulted or cathedral ceiling over 12 feet high, the fall risk makes professional service worthwhile. Homeowners without electrical experience should also seek help when multiple symptoms appear simultaneously (like wobbling plus electrical issues), as this suggests complex problems requiring diagnostic expertise.
Don’t risk it: Attempting repairs without proper electrical knowledge on ceiling fans creates shock hazards that cause over 3,500 injuries annually according to CPSC data. Professional repair specialists carry insurance, understand local electrical codes, and can identify hidden issues you might miss—potentially saving you from costly mistakes.
Monthly Maintenance Routine to Prevent Hunter Ceiling Fan Motor Failure
Preventative maintenance extends your Hunter fan’s motor life significantly. Each month, turn off power and inspect the motor housing for dust accumulation around ventilation slots—use compressed air to clean without disassembly. Check all mounting screws for tightness, as vibration gradually loosens connections between the motor and mounting bracket.
Seasonally, examine electrical connections for corrosion (especially in humid environments) and verify blade alignment. Apply manufacturer-specified lubricant sparingly to motor bearings only if your specific model requires it—many modern Hunter fans use sealed bearings that shouldn’t be lubricated.
Pro tip: Balance your fan blades quarterly using a simple balancing kit—imbalance creates excessive vibration that accelerates motor bearing wear. This 15-minute task prevents the most common cause of premature motor failure in ceiling fans.
How to Find Hunter Ceiling Fan Motor Repair Manuals Online
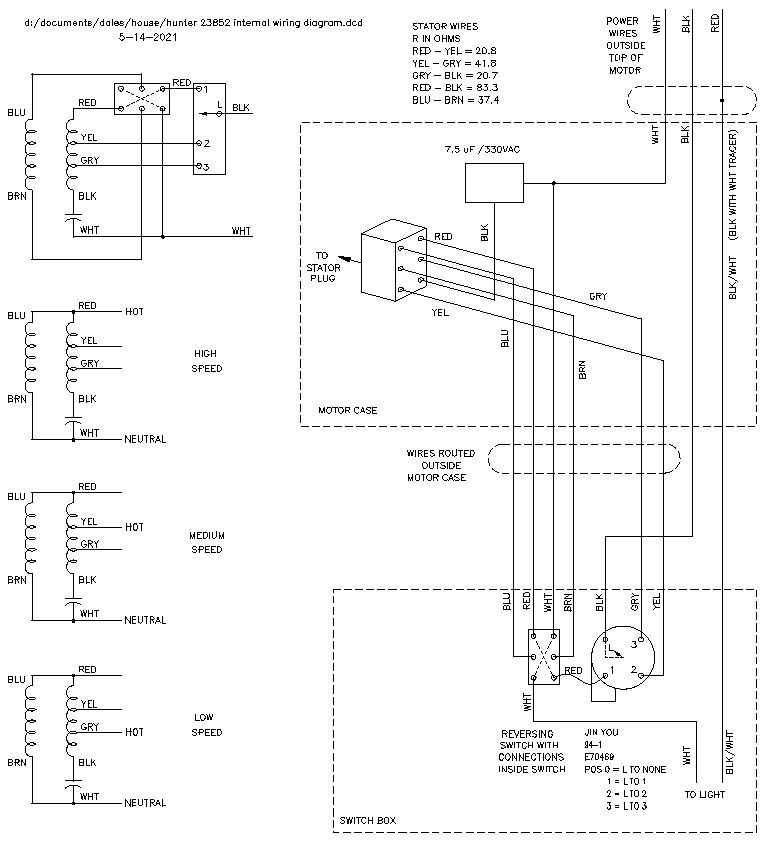
Hunter provides comprehensive digital documentation when physical manuals get lost. Enter your model number into their online manual finder to access complete wiring diagrams, repair procedures, and parts lists specific to your fan. These resources include critical safety warnings and step-by-step instructions you shouldn’t attempt repairs without.
If you can’t locate your model number, contact Hunter customer support with your fan’s physical description—they can often identify the model from photos of key features. Their technicians provide model-specific guidance that generic online tutorials can’t match, potentially saving you from costly mistakes.
Expert note: Always cross-reference any online repair advice with Hunter’s official documentation—many “helpful” YouTube tutorials demonstrate unsafe practices that violate electrical codes or void warranties on Hunter fans.
Hunter Ceiling Fan Motor Repair: Cost Analysis and Long-Term Solutions
When weighing repair options, consider that complete wiring harness assemblies typically cost $35-$65 depending on your model, while professional installation adds $75-$150. Compare this to new Hunter fan prices starting around $150—if your fan is over 10 years old, replacement might prove more economical than repair.
For fans under warranty, always contact Hunter first—attempting DIY repairs usually voids coverage. Even out-of-warranty, their authorized repair network provides certified service that maintains safety standards third-party technicians might overlook.
Final recommendation: Invest in regular maintenance and address minor issues immediately—this extends your Hunter fan’s lifespan significantly. When motor problems arise, the complete wiring harness solution represents the only safe, manufacturer-approved repair method that preserves your fan’s performance and safety features long-term.
Leave a Reply