You’ve noticed your Hunter ceiling fan wobbling excessively, making strange grinding noises, or failing to turn on completely. Like millions of homeowners who rely on Hunter fans for comfort, you need specific repair parts to fix the problem—but what happens when manufacturer documentation is unavailable? Many consumers face this frustrating scenario when trying to identify the exact replacement components for their Hunter ceiling fan models. Without access to official parts diagrams or model-specific repair guides, you might feel stuck with a malfunctioning fan and no clear path to resolution. This guide will help you navigate the repair process using practical identification techniques and alternative sourcing strategies when official Hunter ceiling fan repair parts information isn’t accessible.
Identifying Your Hunter Ceiling Fan Model Without Documentation
Before you can find the correct repair parts, you must positively identify your Hunter ceiling fan model. This step becomes critical when manufacturer documentation isn’t available through standard channels.
Where to Locate Your Fan’s Model Number Without Manuals
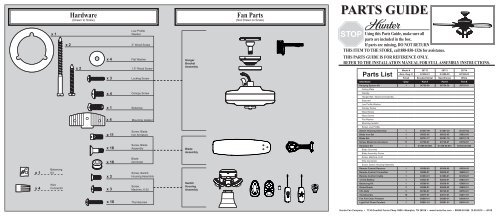
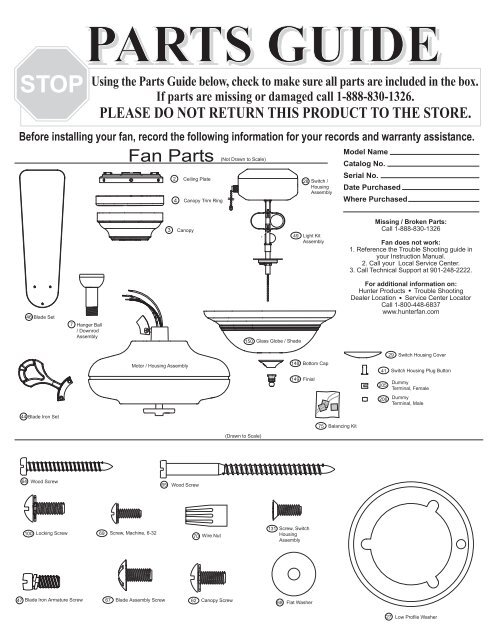
Hunter embeds model information directly on the fan itself, typically in one of three locations you can access without disassembly:
- Motor housing label: Remove the light kit (if applicable) to reveal a sticker on the top of the motor housing showing model number, voltage specifications, and manufacturing date
- Blade grip interior: Flip any blade over to find a stamped or printed model reference inside the blade grip attachment point
- Downrod canopy: With power safely disconnected, remove the decorative canopy covering the ceiling mount to expose identification labels
Pro Tip: Take multiple clear photos of each potential label location before stepping down from your ladder. Lighting conditions often make these small labels difficult to read in the moment.
Decoding Hunter’s Model Number System
Hunter’s model numbers follow a consistent pattern that reveals important information even without official documentation:
- First 2-3 digits indicate the fan series (e.g., “239” for popular Builder series)
- Following letters denote specific features (e.g., “BR” for bronze finish, “W” for white)
- Final numbers often represent blade span (e.g., “52” for 52-inch model)
When documentation is unavailable, this decoding process helps identify compatible parts across Hunter’s product lines since fans within the same series share many components.
Essential Hunter Ceiling Fan Components That Require Replacement
Certain parts fail more frequently than others across Hunter’s product line. Knowing which components commonly need replacement helps prioritize your troubleshooting when official repair guides aren’t accessible.
Motor Assembly Components Prone to Failure
Hunter fans typically experience these motor-related issues that require specific repair parts:
-
Capacitors: These small cylindrical components regulate electrical flow to the motor. When failing, fans may start slowly, run erratically, or only operate on certain speeds. Hunter uses model-specific capacitors with microfarad ratings printed directly on the component.
-
Wiring harnesses: Frayed or damaged wiring between the switch housing and motor often causes intermittent operation. Hunter integrates color-coded wiring that must match precisely during replacement.
-
Bearing assemblies: Grinding noises usually indicate worn bearings. Hunter fans use sealed bearing units specific to their motor design that cannot be serviced—only replaced as complete assemblies.
Blade Assembly Components Needing Replacement
Visible fan problems often trace back to these blade-related components:
-
Blade irons: The metal brackets connecting blades to the motor can bend or corrode, causing wobble. Hunter blade irons feature specific mounting angles unique to each series.
-
Blade grip screws: Stripped or missing screws create dangerous wobble conditions. Hunter uses proprietary screw types that match their specific blade iron designs.
-
Blade balancing kits: Included with most Hunter fans but often lost, these weights solve wobble issues without replacing major components.
Sourcing Genuine Hunter Ceiling Fan Repair Parts Without Official Documentation
When manufacturer resources aren’t available, these alternative methods help locate authentic replacement components.
Using Physical Parts for Direct Matching
When you’ve removed a failed component, this proven method identifies exact replacements:
- Clean the old part thoroughly to reveal any manufacturer markings
- Note color coding, size measurements, and connection types
- Visit a lighting specialty store with the physical component
- Match electrical specifications (voltage, amperage) rather than just physical appearance
Critical Warning: Never install replacement electrical components with mismatched specifications—this creates fire hazards and voids any remaining warranties.
Cross-Referencing Parts Through Retailer Resources
Major home improvement retailers maintain extensive Hunter parts databases that often remain accessible when manufacturer sites fail:
- Home Depot’s ceiling fan department keeps physical parts catalogs that staff can reference
- Lowe’s online parts lookup allows searching by visual component identification
- Amazon’s Hunter parts section features user-uploaded diagrams for hard-to-find models
Time-Saving Shortcut: Call the store before visiting and ask if they have “Hunter component cross-reference charts” available—many keep these behind the counter for professional installers.
Step-by-Step Process for Replacing Common Hunter Fan Components
When official repair guides aren’t available, follow this universal replacement protocol for most Hunter models.
Replacing a Faulty Hunter Capacitor
This critical electrical component failure causes most speed control issues:
- Disconnect power at the circuit breaker – Verify with voltage tester (never trust the wall switch alone)
- Access the capacitor – Remove the switch housing cover on the fan’s motor housing
- Document wiring configuration – Take photos before disconnecting any wires
- Remove old capacitor – Note microfarad (µF) rating printed on component
- Install matching replacement – Ensure identical µF rating and physical dimensions
- Test operation – Restore power and verify all speeds function properly
Common Mistake: Installing capacitors with incorrect microfarad ratings causes motor overheating and premature failure.
Fixing Wobble With Blade Component Replacement

Excessive wobble often stems from these correctable issues:
When Blade Irons Are Bent
- Remove all blades to access mounting points
- Compare each blade iron against a straight reference object
- Replace only the visibly bent components with identical Hunter parts
- Rebalance the fan after replacement using included weights
When Blade Grip Screws Are Missing
- Count screw holes on remaining blades to determine quantity needed
- Match screw type by comparing thread pattern and head style
- Apply thread-locking compound during installation to prevent future loosening
Preventing Future Parts Failures Through Proper Maintenance
Regular maintenance extends component life and reduces the need for Hunter ceiling fan repair parts.
Quarterly Maintenance Routine
- Tighten all visible screws (blade grips, mounting hardware)
- Clean blades with damp cloth to prevent dust buildup imbalance
- Lubricate motor housing seams with silicone spray (never oil)
Annual Deep Maintenance
- Inspect wiring for fraying or heat damage
- Test capacitor functionality with multimeter
- Verify blade balance using the paper test method (attach paper between blade and wall to check rotation consistency)
When to Consider Professional Repair vs. Replacement
Hunter fans represent a significant investment, but certain failures may make replacement more economical than continued repair:
- Replace when: Motor housing shows visible burn marks, multiple components fail simultaneously, or fan is over 15 years old
- Repair when: Single component failure on fans under 10 years old, especially if under warranty
Critical Consideration: Modern Hunter fans use improved energy-efficient motors that may justify replacement even if repair seems initially cheaper.
Knowing how to identify, source, and replace Hunter ceiling fan repair parts without official documentation puts you in control when manufacturer resources aren’t available. By focusing on physical component identification, leveraging retailer resources, and following systematic replacement procedures, you can maintain your fan’s performance safely and effectively. Remember that proper maintenance significantly extends the life of replacement parts—regular cleaning and tightening prevents many common failures that lead to unnecessary part replacements. When in doubt about electrical components or structural repairs, always consult a qualified electrician rather than risking improper installation. With these strategies, you’ll keep your Hunter ceiling fan operating smoothly for years to come, regardless of temporary documentation access issues.
Leave a Reply