Your ceiling fan suddenly sticks on one speed or refuses to change settings altogether—nothing disrupts home comfort like a fan that won’t respond to your speed adjustments. When ceiling fan speeds not working properly, you’re left either sweltering in stagnant air or battling an unnecessary gale. This guide cuts through the confusion with actionable steps to diagnose and fix the exact problem causing your fan’s speed failure, whether it’s a simple pull chain issue or a failing capacitor. You’ll learn how to identify the specific culprit based on your fan’s symptoms and determine if this is a fix you can handle in under an hour or when to call a professional.
Most residential ceiling fans operate using multi-speed motors controlled by pull chains, wall switches, or remote systems. When one or more speed settings fail, the problem almost always traces back to four key components: the speed selector mechanism, the capacitor regulating motor performance, wiring connections that degrade over time, or the motor windings themselves. Identifying which component matches your specific symptoms saves you unnecessary part replacements and prevents wasted effort on irrelevant fixes. Understanding these failure points puts you in control of the repair process rather than leaving you guessing at what might solve your ceiling fan speeds not working dilemma.
Identify Which Speed Settings Are Affected
Before grabbing tools, determine exactly how your ceiling fan speeds not working issue presents itself. This initial diagnosis directs you toward the most likely cause and prevents wasted effort on irrelevant repairs. Fans that run on only one speed—typically the highest setting—almost always indicate capacitor failure, as this component regulates voltage distribution across different motor windings. When the capacitor fails, power can only reach the winding associated with that single speed.
Fans that cycle through some speeds but skip others point directly to problems with the speed selector switch. Pull chain switches develop worn contacts over time, while wall-mounted controls accumulate dust in their internal mechanisms. Remote-controlled fans often exhibit speed skipping due to pairing issues between the remote and receiver unit. Conversely, fans that don’t respond to any speed changes typically suffer from complete switch failure, wiring disconnects, or power supply problems.
Note whether your fan makes unusual sounds when attempting speed changes. A humming noise without blade movement suggests capacitor issues or motor winding problems, while clicking sounds often indicate a failing pull chain switch. These auditory clues help confirm your visual observations and narrow down the potential causes before you even open the fan housing.
Replace the Pull Chain Switch in 30 Minutes
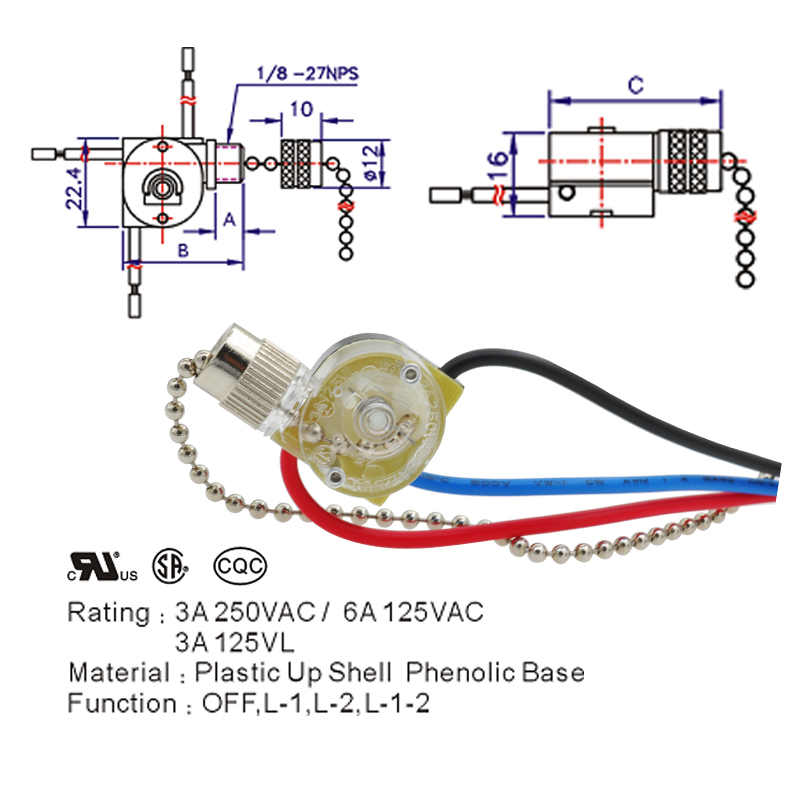
When ceiling fan speeds not working but the fan runs on at least one setting, the pull chain switch likely needs replacement. This small cylindrical component inside the fan housing contains contacts that engage as you pull the chain to route power to different motor windings. After years of use, these contacts wear out, corrode, or break completely.
Start by turning off the circuit breaker controlling the fan—never work on live ceiling fan wiring. Remove the canopy cover (usually secured by 2-3 screws) to access the switch housing. Locate the cylindrical switch with multiple wires connected to it. Before disconnecting anything, take a photo of the wiring configuration for reference during reinstallation.
Test the Switch with a Multimeter
Set your multimeter to continuity mode and disconnect the switch wires. Probe the contacts while operating the pull chain through all positions. A functioning switch shows continuity (beep sound) on at least some settings; a failed switch shows no continuity on any setting. If you confirm failure, purchase an exact replacement switch matching your fan’s specifications—most cost under $15.
Complete the Replacement
Remove the old switch by unscrewing its mounting and disconnecting wires according to your reference photo. Install the new switch in the same position, reconnect wires exactly as they were configured, and secure the housing. Reassemble the fan canopy, restore power, and test all speed settings. This straightforward repair resolves ceiling fan speeds not working issues in most older fans with pull chain controls.
Fix Capacitor Failure Causing Single-Speed Operation
If your ceiling fan runs only on high speed or requires manual spinning to start, the capacitor has likely failed. This component (typically rated at 4-6 microfarads for residential fans) regulates voltage distribution between motor windings to enable different speeds. When it fails, the motor can only access the winding associated with the highest speed setting.
Diagnose Capacitor Problems Visually
Locate the capacitor—usually mounted near the switch housing or on top of the motor—and inspect for physical damage. A healthy capacitor appears flat on top; failed units often show bulging, leaking electrolyte, or visible burn marks. Even without visible damage, a capacitor can lose capacity over time, causing speed control issues.
Replace the Faulty Capacitor
Purchase an exact replacement matching both microfarad rating and voltage specifications (typically 250VAC or higher). Before handling the capacitor, discharge it by touching its terminals together with an insulated screwdriver—capacitors store electrical charge even when power is off. Disconnect the old unit, connect the new one using the same wiring configuration, and secure it in place. This $8-$15 part usually solves ceiling fan speeds not working issues when only one speed functions.
Resolve Remote Control Speed Failures
Remote-controlled fans introduce unique troubleshooting challenges when ceiling fan speeds not working. Start with the simplest solution: replace the remote batteries with fresh ones, ensuring correct orientation. Test immediately after replacement—even if the remote worked partially before, weak batteries cause intermittent speed control failure.
Re-Pair Remote and Receiver
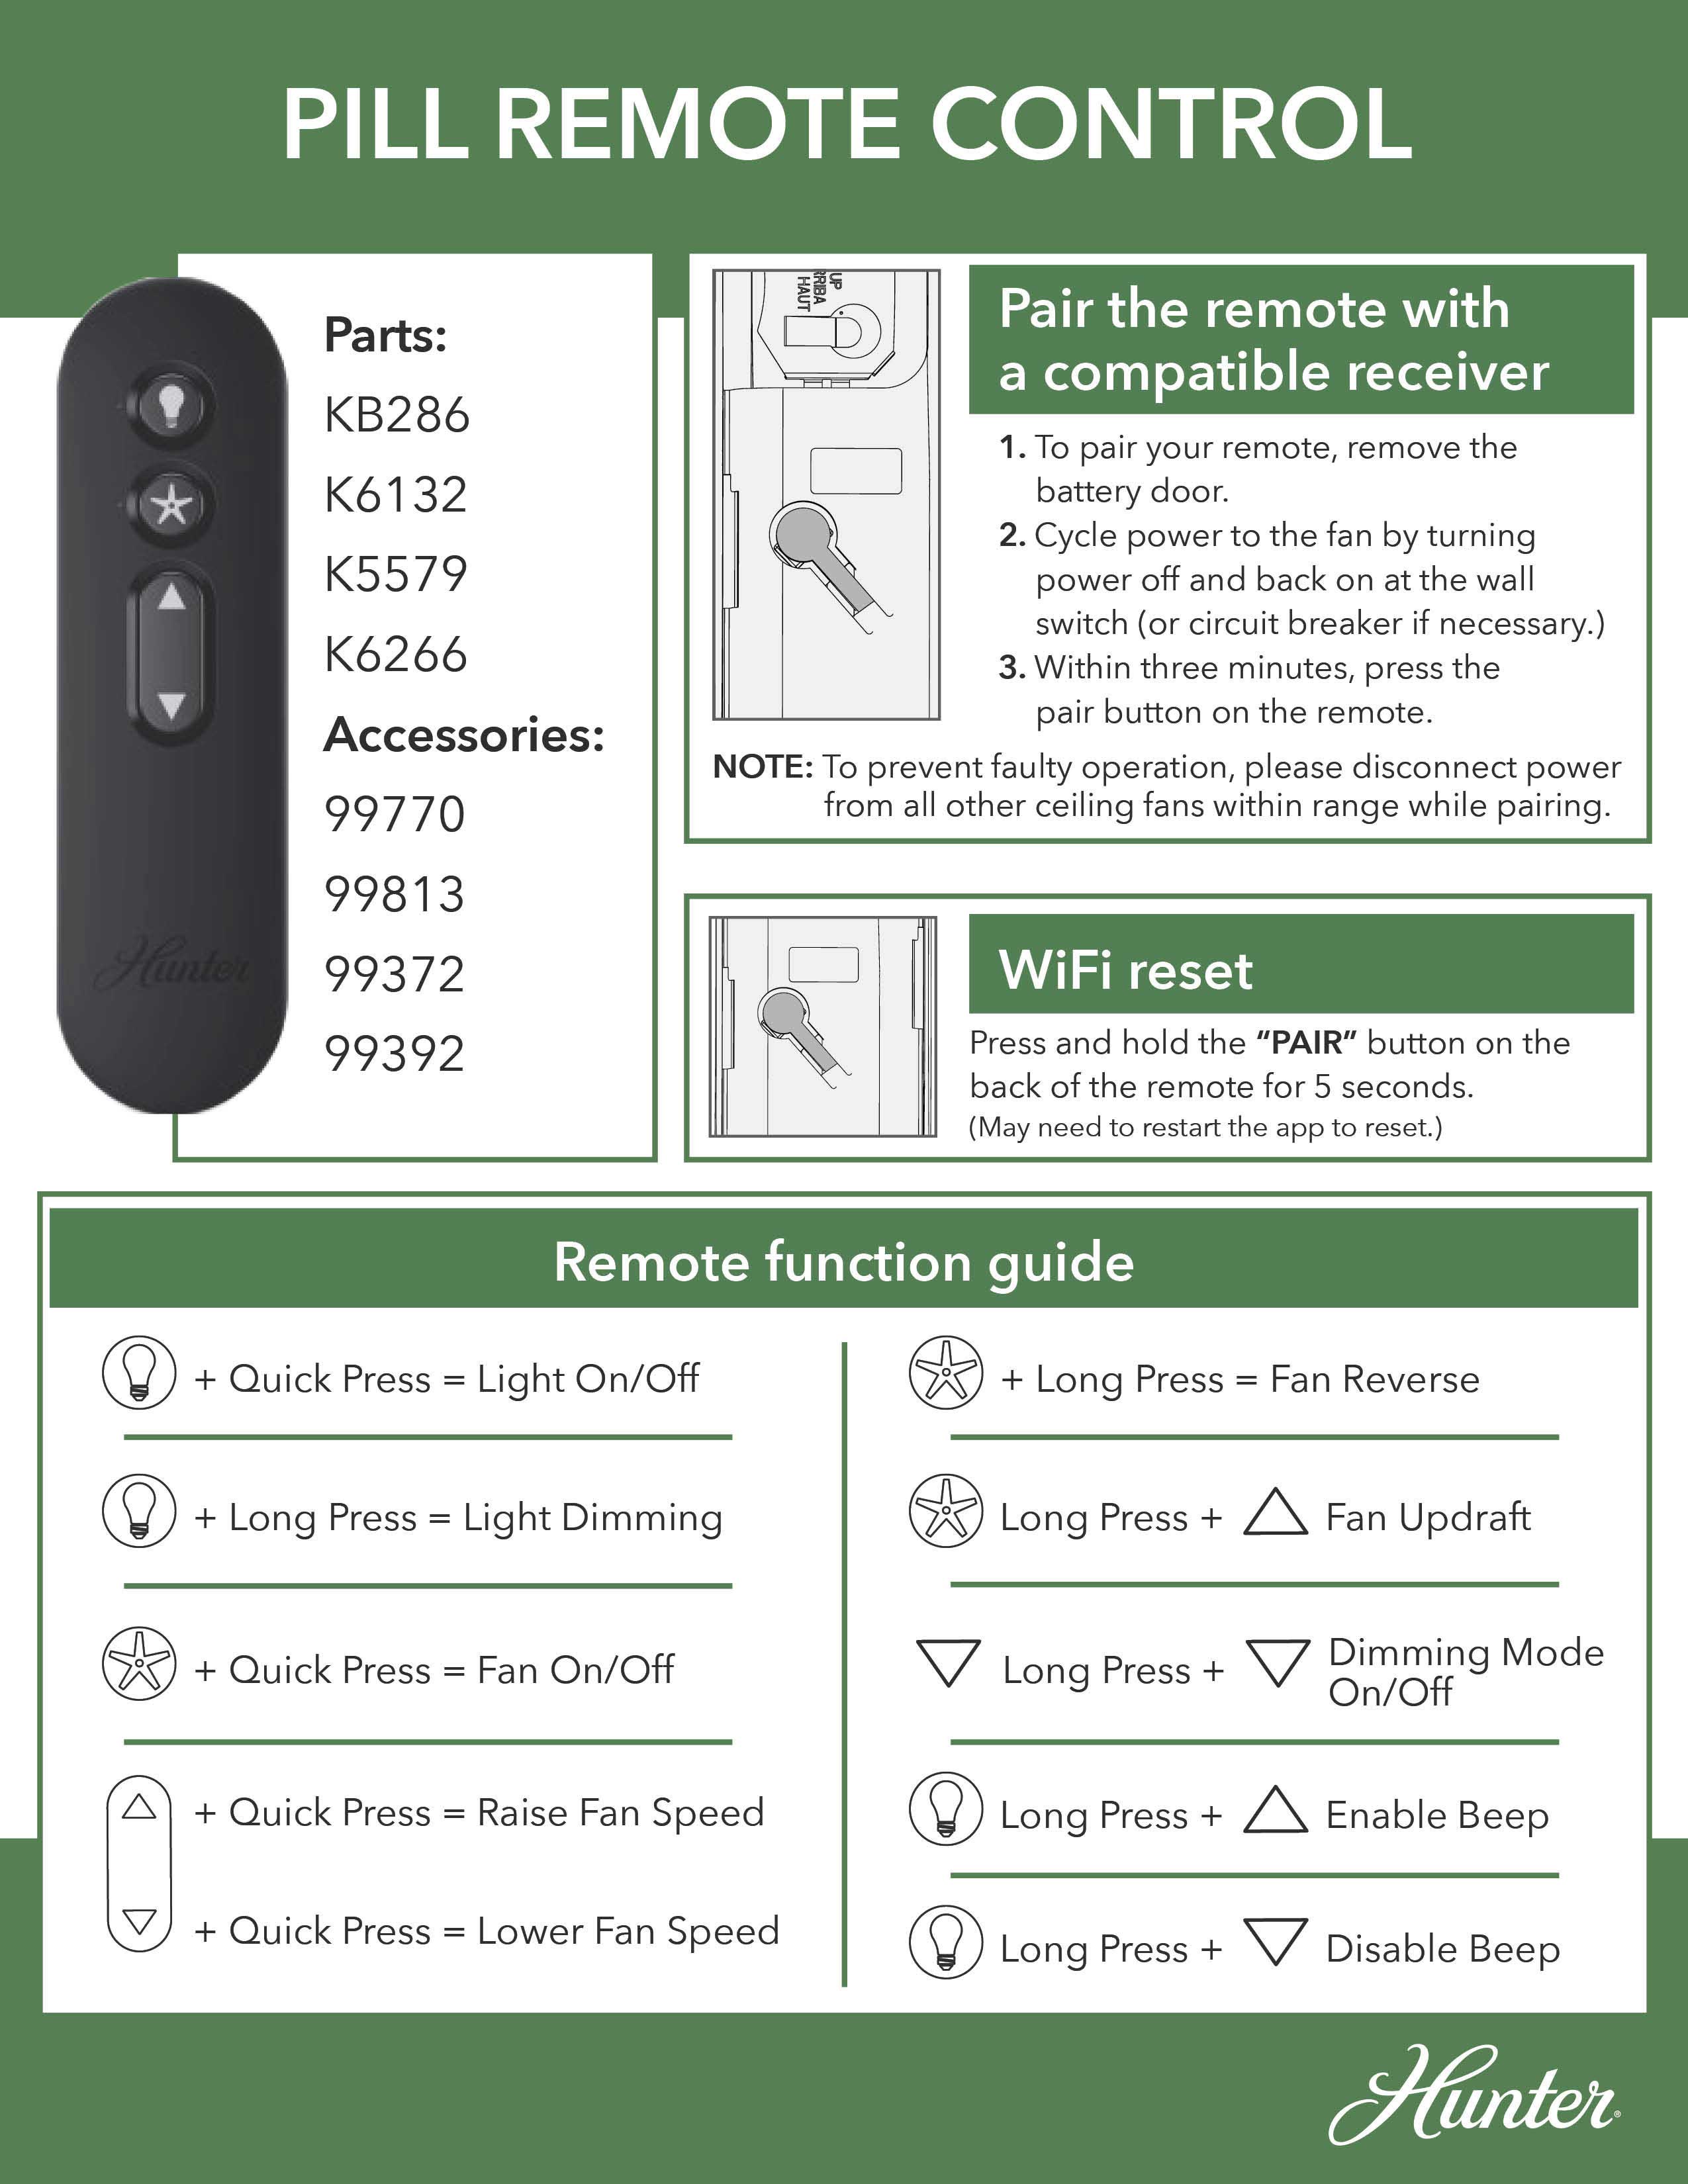
If new batteries don’t restore function, re-pair the remote with the receiver unit. Access the receiver in the fan canopy (with power off), locate the small pairing button (often recessed), and press it with a paperclip while simultaneously pressing buttons on the remote. Follow your specific fan model’s pairing sequence—usually involving holding specific buttons for 5-10 seconds until the fan responds.
Replace Faulty Receiver Units
When re-pairing fails, the receiver unit itself may have failed. Symptoms include complete non-response to remote commands or operation on only one speed despite correct pairing. Purchase a compatible replacement receiver for your fan model, disconnect the old unit while noting wire positions, and install the new receiver following the included wiring diagram. This repair typically resolves remote-specific ceiling fan speeds not working issues.
Check Wiring Connections Causing Intermittent Speed Failure
Loose wiring connections account for many ceiling fan speeds not working complaints, especially in older installations. Turn off power at the breaker and remove the fan canopy to inspect all wire connections. Look for:
- Wires pulled loose from wire nuts
- Wire nuts that are loose or missing
- Signs of burning or melting at connection points
- Corrosion or greenish buildup on copper wires
Tighten any loose connections using proper technique: strip 3/8 inch of insulation, hold wires parallel, and twist on a new wire nut until snug with no exposed copper. Also check connections at the wall control switch if your fan uses one—loose speed control wires often cause specific speeds to fail while others work normally.
Recognize When Motor Windings Have Failed

When ceiling fan speeds not working despite functional capacitors, switches, and wiring, motor winding failure becomes likely. Symptoms include:
- Burning smells from the motor housing
- Excessive heat during operation
- Speeds that cause the fan to stall or run roughly
- Complete failure to start despite humming sounds
Testing windings requires a multimeter set to resistance mode. With power off and motor wires disconnected, measure resistance between each pair of motor leads. Healthy windings show low, consistent resistance; failed windings show infinite resistance or significantly higher readings than other windings. Motor replacement becomes necessary when windings fail, though this repair often costs nearly as much as a new fan.
Prevent Future Speed Control Problems
Avoid recurring ceiling fan speeds not working issues with these maintenance practices:
- Clean dust from blades and motor housing monthly
- Tighten blade mounting hardware quarterly
- Inspect electrical connections annually
- Replace capacitors preventively every 5-7 years
These simple steps extend your fan’s operational life and prevent sudden speed control failures during hot weather when you need your fan most.
Know When to Call an Electrician
Seek professional help immediately if you encounter:
– Damaged or modified wiring
– Tripping circuit breakers during operation
– Burning smells or visible smoke
– Severe motor overheating signs
Capacitor and switch replacements are generally safe for homeowners, but motor repairs and complex wiring issues require professional expertise to ensure safety and proper function.
When ceiling fan speeds not working, systematic diagnosis based on your specific symptoms leads directly to the solution. Most speed control problems stem from accessible components you can fix yourself with basic tools and under $20 in parts. By following this guide’s targeted approach, you’ll restore proper speed control to your fan and avoid unnecessary professional service calls—getting back to comfortable, adjustable airflow in your space.
Leave a Reply