Nothing disrupts home comfort like a squeaking ceiling fan that turns a peaceful room into a noisy distraction. Learning how to oil a ceiling fan is one of the simplest yet most effective maintenance tasks you can perform to restore quiet operation and prevent costly repairs. Over time, the lubricants inside your fan’s motor bearings naturally break down from constant use, heat exposure, and dust accumulation, leading to increased friction that manifests as annoying squeaks, reduced airflow, and potentially premature motor failure. This comprehensive guide walks you through every step of the lubrication process, from identifying whether your specific fan model actually needs oiling to applying the right lubricant in the correct amount. By dedicating just 20-30 minutes to this essential maintenance task, you’ll extend your fan’s operational life by years while enjoying quieter, more efficient cooling performance.
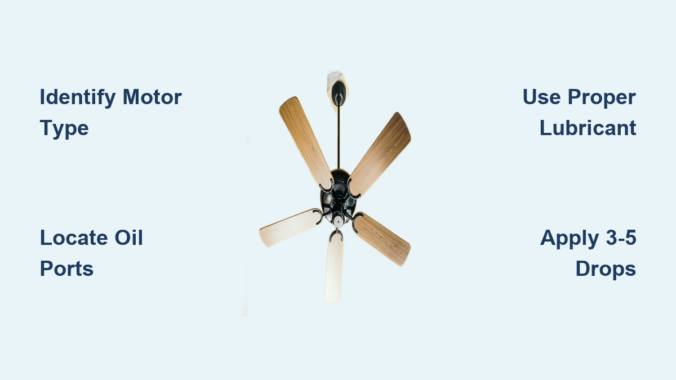
Identify Your Fan Motor Type Before Oiling
Before reaching for the oil bottle, determining your ceiling fan’s motor design is critical—some modern fans require zero lubrication while older models need regular attention. Using the wrong technique on the wrong motor type won’t just waste your time; it could damage your fan and void any remaining warranty. Take a moment to examine your fan’s motor housing before proceeding.
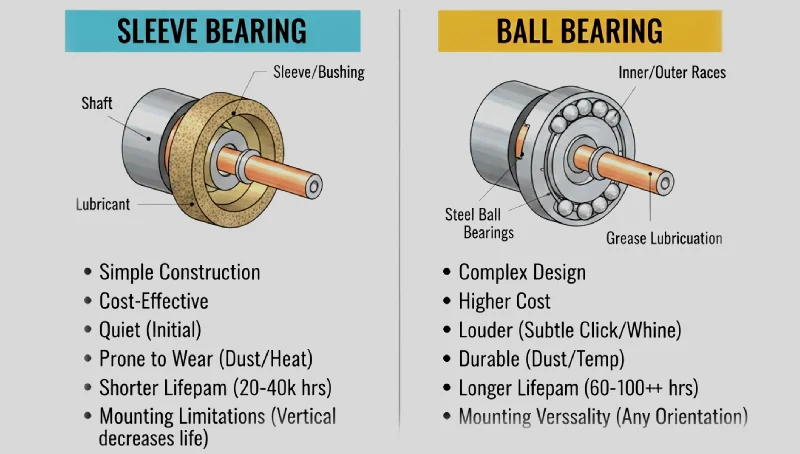
Sleeve Bearing Motors Need Regular Lubrication
Sleeve bearing motors dominate older ceiling fan models and budget-friendly contemporary units, featuring a metal shaft rotating within an oil-soaked sleeve that creates a protective hydrodynamic film. These fans typically require re-oiling every 12-24 months as the lubricant gradually depletes through normal operation and heat exposure. You’ll instantly recognize a sleeve bearing fan by the small circular oil port caps—usually one or two—located on the top or side of the motor housing. When these fans run low on lubricant, they produce distinctive squeaking or grinding noises that change with fan speed, often diminishing temporarily as the motor warms up but returning as the problem worsens.
Ball Bearing Motors: Sealed vs. Serviceable
Most modern ceiling fans feature sealed ball bearing motors pre-lubricated at the factory to last the fan’s entire lifespan without user maintenance. These sealed units lack visible oil ports and attempting to access them typically voids your warranty while risking damage to precision components. However, some commercial-grade or high-performance fans contain serviceable ball bearings with access ports requiring lubrication every 3-5 years, particularly in dusty environments. If you’re uncertain whether your fan has serviceable bearings, check for manufacturer documentation specifying lubrication requirements—never assume a modern fan needs oiling without verification.
Recognize When Your Fan Actually Needs Oil
Your ceiling fan communicates its maintenance needs through clear auditory and performance signals that help you address problems before they escalate into expensive repairs. Learning to recognize these indicators prevents unnecessary maintenance while ensuring timely intervention when lubrication is genuinely required.
Listen for These Warning Sounds
Squeaking, squealing, or grinding noises during operation represent the most obvious signs that your fan requires lubrication. These sounds may be continuous or intermittent, often intensifying as you increase fan speed. A rhythmic clicking sound suggests significant bearing wear from prolonged dry operation, while grinding noises indicate metal components making direct contact—a serious condition requiring immediate attention. Don’t confuse these bearing-related sounds with rattling noises, which typically indicate loose components rather than lubrication issues.
Watch for Performance Decline
Decreased rotational speed and reduced airflow often accompany lubrication problems as increased friction converts electrical energy to heat rather than mechanical rotation. This decline may be gradual, making it difficult to notice day-to-day but apparent when comparing current performance to the fan’s original capabilities. In severe cases, the fan struggles to start or fails to reach maximum speed even at the highest setting. Another subtle indicator is increased energy consumption—when the motor works harder to overcome friction, it draws more electricity, raising your utility costs without delivering improved cooling.
Choose the Perfect Lubricant for Your Fan

Selecting the appropriate lubricant ensures effective protection without damaging sensitive motor components. Using the wrong product can attract dust, degrade rubber parts, or even cause electrical issues—so choose wisely based on your fan’s specific requirements.
Mineral Oil: Best for Traditional Sleeve Bearings
High-quality, pure mineral oil serves as the ideal lubricant for sleeve bearing ceiling fans, offering the right viscosity for residential fan motor clearances. Purchase light mineral oil specifically designed for clocks or small mechanical devices rather than automotive motor oil, which contains additives unsuitable for fan motors. Avoid products with detergents or other additives that might degrade rubber components or attract excessive dust accumulation within the motor housing.
Synthetic Options for Extreme Conditions
Synthetic lubricants provide enhanced temperature stability and longer service life compared to mineral oils, making them ideal for fans installed in areas with extreme temperature variations or high humidity. While more expensive, their superior oxidation resistance can extend lubrication intervals, potentially offsetting the higher initial cost. Always verify compatibility with your specific fan model before using synthetic lubricants, as some older motors may not respond well to these advanced formulations.
Grease for Serviceable Ball Bearings
For fans with serviceable ball bearings, use motor-specific grease applied in minute quantities—approximately the size of a rice grain. Excessive grease creates drag that can cause overheating and damage seals. Apply grease directly to bearing surfaces after partial disassembly, then rotate the shaft manually to distribute the lubricant evenly before wiping away any excess that squeezes out during operation.
Gather These Essential Tools Before Starting
Having the right equipment ready prevents frustration and ensures efficient completion of your ceiling fan lubrication task. Proper preparation takes just minutes but significantly reduces the risk of accidents or damage to your fan.
Must-Have Application Tools
- Sturdy step ladder rated for your weight plus tools
- Precision dropper bottle or oil can with thin nozzle
- Phillips and flathead screwdrivers in multiple sizes
- Lint-free cloths for cleanup
- Compressed air for dust removal
- Non-contact voltage tester for electrical safety
Safety Gear You Shouldn’t Skip
- Safety glasses to protect against dust and lubricant splashes
- Work gloves to maintain grip and keep hands clean
- Circuit breaker lockout device (if available)
- Drop cloth to protect flooring below
Follow These Safety Steps Before Oiling
Electrical and physical safety precautions are non-negotiable when working with ceiling fans. Taking these critical steps protects you from potentially life-threatening hazards while ensuring the fan is properly prepared for maintenance.
Electrical Safety Protocol That Could Save Your Life
Before touching your fan, locate and turn off the circuit breaker controlling its power—don’t rely solely on the wall switch. Verify power disconnection using a non-contact voltage tester at both the wall switch and fan canopy. Wait 5 minutes after power-off to allow capacitors to discharge fully, as they can retain dangerous electrical charges even when the circuit appears dead. Never attempt to lubricate a fan while it’s operating, regardless of how tempting this might seem for immediate noise verification.
Ladder Safety Checklist
Position your ladder on a level surface with someone stabilizing the base if possible. Ensure the ladder extends at least three feet above your work area for secure handholds. Face the fan while working, maintaining three points of contact with the ladder at all times. Never stand on the top two rungs or overreach—reposition the ladder instead. Check that the fan is securely mounted by gently testing for wobble before beginning work; address any mounting issues before attempting lubrication.
Locate and Access Your Fan’s Oil Ports Properly
Identifying and accessing lubrication points varies by fan design but follows predictable patterns that make the process straightforward once you know what to look for. Proper access ensures effective lubrication without unnecessary disassembly.
Finding Hidden Oil Ports on Your Fan
Most sleeve bearing fans feature one or two oil ports covered by small circular caps on the motor housing. These caps may be pressed in, screwed, or held by clips—remove them carefully using appropriate tools and set them aside where they won’t get lost. If you can’t locate visible ports, your fan likely requires partial disassembly to access bearings. Remove canopy screws while supporting the cover, photographing each step to ensure correct reassembly. Once bearings are exposed, inspect for visible wear or debris before proceeding.
Critical Cleaning Before Lubrication
Blow dust from oil ports using compressed air before applying fresh lubricant. For stubborn debris, use a small brush to dislodge particles without damaging components. Wipe accessible surfaces with a clean, dry cloth—never introduce moisture near electrical components. This cleaning step prevents contaminants from mixing with new lubricant and accelerating bearing wear.
Apply Lubricant Using These Proven Techniques
Proper application technique ensures effective lubrication without over-applying product or causing damage to sensitive fan components. The right amount makes all the difference between quiet operation and messy leaks.
Oil Application for Sleeve Bearings: The 3-5 Drop Rule
Insert your dropper tip into the oil port until it nearly touches the bearing surface. Apply exactly 3-5 drops of lubricant—never more—as excess oil will drip onto blades or ceilings. If uncertain, start with fewer drops and add more only if noise persists after testing. After application, rotate the fan blades manually 5-10 times to help distribute the lubricant before reassembly.
Grease Application for Ball Bearings: Less Is More
For serviceable ball bearings, apply a rice-grain sized amount of motor-specific grease directly to bearing surfaces. Rotate the shaft manually to work the grease into position, then wipe away any excess that emerges. Too much grease creates drag that can overheat bearings and damage seals—precision matters more than quantity.
Test Your Fan After Lubrication
Restoring power and testing confirms successful lubrication while identifying any issues requiring immediate attention before regular use resumes.
Initial Power-Up Checklist
Restore power at the breaker and test each speed setting while listening carefully for unusual sounds. Run the fan continuously for 10-15 minutes to allow lubricant distribution. During this period, watch for smoke, unusual odors, or excessive heat that might indicate problems. Some initial noise that diminishes after a few minutes is normal as lubricant settles, but persistent squeaking requires reevaluation.
Performance Verification Steps
After the initial run period, verify airflow matches your expectations based on the fan’s specifications. Compare current operation to your memory of pre-lubrication performance—improved quietness and airflow confirm successful maintenance. If performance remains unchanged or worsens, double-check lubricant application and investigate other potential issues like loose components or electrical problems.
Establish Your Personal Lubrication Schedule
Create a maintenance calendar that matches your specific fan, usage patterns, and environmental conditions to maximize performance while minimizing unnecessary work.
Customized Lubrication Intervals
- Sleeve bearing fans: Every 12-24 months for normal residential use
- Heavy-use fans (24/7 operation): Every 6-12 months
- Seasonal-use fans: Before each cooling season
- Serviceable ball bearings: Every 3-5 years
Schedule lubrication during seasonal transitions when fans see increased use—spring for summer preparation or fall for winter storage. Fans in dusty environments or commercial settings require more frequent attention, potentially every 6 months. Keep a simple maintenance log noting dates, lubricant types, and observations to track patterns and identify developing issues early.
Troubleshoot Common Post-Lubrication Issues
Even with proper technique, problems sometimes arise after lubrication. Understanding these common scenarios helps you address them efficiently without unnecessary panic.
Persistent Noise: Diagnosis and Solutions
If squeaking continues after lubrication, isolate the noise source by operating the fan at different speeds. Speed-dependent sounds typically indicate bearing issues requiring additional lubricant or professional service. Constant noises often originate from loose components rather than bearings—check blade attachments, downrod connections, and mounting hardware. For grinding sounds that persist after proper lubrication, bearing replacement may be necessary.
Oil Leaks and Dripping: Immediate Action Steps
Excess lubricant causes most post-oiling leaks—turn off the fan immediately and allow excess oil to drain for several hours. Clean affected surfaces with appropriate solvents before testing again. If leaks persist despite proper application amounts, internal seal degradation may require professional repair or fan replacement. Never ignore persistent leaks, as oil can damage ceilings and create slip hazards.
Extend Your Fan’s Life With These Expert Tips
Professional technicians recommend these additional practices to maximize lubrication effectiveness and extend time between maintenance sessions:
- Keep fan blades and motor housing clean to minimize dust contamination
- Operate fans at moderate speeds rather than continuously at maximum
- Ensure proper installation with secure mounting to prevent vibration damage
- Store lubricants in tightly sealed containers away from temperature extremes
- Use dedicated applicators for fan maintenance to prevent cross-contamination
By following this complete guide on how to oil a ceiling fan, you’ve transformed a potentially problematic appliance into a reliably efficient cooling companion. The modest investment of time and materials provides substantial returns in comfort, energy efficiency, and avoided repair costs. Incorporate ceiling fan lubrication into your regular home maintenance routine, and these essential cooling devices will continue serving quietly and efficiently for many years to come. When performed correctly, this simple maintenance task extends fan lifespan by 3-5 years while eliminating annoying noises that disrupt your home’s peace and comfort.
Leave a Reply