When your ceiling fan suddenly stops spinning or struggles to reach full speed, the culprit is often a failing capacitor. Learning how to check ceiling fan capacitor issues can save you from unnecessary fan replacements and expensive service calls. This essential electrical component stores and releases energy to provide the starting torque your fan motor needs. Without a functioning capacitor, your fan may hum but not move, operate at reduced speeds, or produce unusual clicking noises. In this guide, you’ll discover the precise steps to diagnose capacitor problems, interpret test results, and determine whether replacement is necessary—putting you in control of your home’s comfort system.
Checking a ceiling fan capacitor requires basic electrical knowledge, a digital multimeter, and proper safety precautions. The entire diagnostic process typically takes 15-30 minutes and can be completed with minimal tools. By following this comprehensive approach, you’ll move from symptom recognition to definitive diagnosis, understanding exactly what’s happening inside your fan. Whether you’re a DIY enthusiast or simply want to verify a technician’s findings, mastering this skill ensures you’re never left in the dark when ceiling fan problems arise.
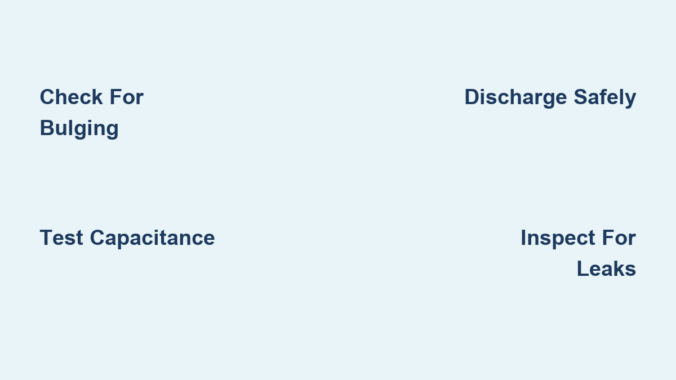
Recognizing Definite Signs of Capacitor Failure
Before grabbing your tools, identify whether your fan’s symptoms point specifically to capacitor issues rather than other electrical problems. Capacitors fail in characteristic ways that distinguish them from motor or wiring faults.
Fan hums but won’t start rotating. When you flip the switch and hear a steady humming sound without blade movement, this classic symptom indicates insufficient starting torque—exactly what the capacitor provides. Unlike motor winding failures that produce no sound at all, a humming-but-stationary fan strongly suggests capacitor issues.
Reduced speed performance across all settings. If your multi-speed fan now operates only at the lowest speed regardless of setting, or takes abnormally long to reach full speed, your capacitor is likely losing capacitance. This degradation happens gradually as electrolytes inside the component dry out over time.
Clicking sounds during startup attempts. Listen for rhythmic clicking as the fan tries and fails to start. This occurs when the motor repeatedly attempts to engage but lacks the necessary rotational force from the capacitor. The clicking represents the motor windings energizing then cutting off when rotation doesn’t occur.
Visible smoke or burning smell. While less common, catastrophic capacitor failure can produce visible smoke or a distinct burning odor near the fan housing. This requires immediate power disconnection and component replacement—do not continue operating the fan in this condition.
Conducting a Thorough Visual Inspection First
Skip this step at your peril—nearly 40% of capacitor failures show visible signs that make electrical testing unnecessary. Proper visual inspection takes less than five minutes but prevents unnecessary risk from handling potentially charged components.
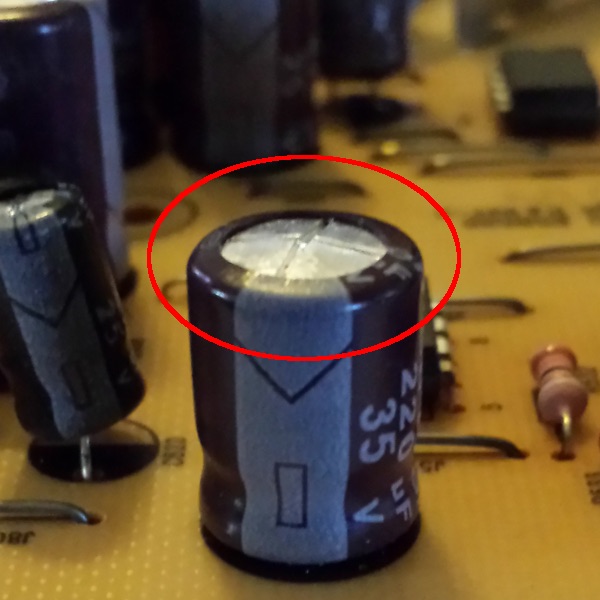
Locate the capacitor in your specific fan model. In most modern ceiling fans, the capacitor sits inside the motor housing near the switch housing or mounted directly to the mounting bracket. Look for a small cylindrical (round) or oval-shaped component typically measuring 1-2 inches in diameter with two or more wire terminals protruding from one end.
Check for physical bulging or swelling. Run your finger along the capacitor’s metal casing—healthy units have perfectly flat ends. Any convex distortion, particularly at the top or bottom, indicates internal gas buildup from electrolyte breakdown. Even slight swelling means immediate replacement is required.
Inspect for electrolyte leakage. Look for brown, yellow, or white crusty deposits around the capacitor’s base, terminals, or on nearby wiring. These residue patterns form as internal electrolytes escape through microscopic cracks. Any visible leakage means the capacitor has failed and must be replaced.
Examine for burn marks or discoloration. Darkened areas on the capacitor housing or surrounding components indicate overheating. Pay special attention to the terminal connections—discoloration here often means arcing has occurred due to poor connections or component failure.
Critical Safety Steps Before Testing
Capacitors store dangerous electrical charges long after power disconnection—ignoring these safety procedures risks severe electrical shock or equipment damage.
Complete power isolation procedure. Turn off the fan at both the wall switch AND the circuit breaker. Verify power is off using a non-contact voltage tester near the fan’s wiring compartment. Never rely solely on the wall switch—ceiling fans often have complex wiring that might maintain partial power.
Safe capacitor discharge method. Using an insulated screwdriver with rubber handle, carefully bridge the capacitor terminals by touching metal shaft to both terminals simultaneously. You may see a small spark—this confirms discharge. Repeat twice more for complete safety. Never use metal tools without proper insulation.
Personal protective equipment essentials. Wear rubber-soled shoes and avoid standing on conductive surfaces. If available, use electrical safety gloves rated for the voltage in your home (typically 120-240V). Keep one hand behind your back while working to prevent current from crossing your heart.
Workspace preparation checklist.
– Ensure solid footing on a non-conductive ladder
– Keep flammable materials at least 3 feet away
– Have a fire extinguisher rated for electrical fires nearby
– Work in well-lit conditions—never in dim lighting
Step-by-Step Multimeter Testing Procedures
With safety precautions complete, proceed to definitive electrical testing using either resistance measurement (for basic fault detection) or capacitance measurement (for precise diagnosis).
Performing Resistance Testing for Immediate Fault Detection
Resistance testing reveals catastrophic failures but doesn’t measure actual capacitance—perfect for quick go/no-go decisions.
- Set your multimeter to the highest resistance range (usually 20MΩ or 2000k)
- Touch probes to capacitor terminals (polarity doesn’t matter for this test)
- Observe the display behavior over 10-30 seconds
Interpreting resistance readings:
– Healthy capacitor: Reading starts low then steadily climbs to “OL” (over limit)
– Failed open: Shows “OL” immediately with no movement
– Shorted capacitor: Stays at zero or near-zero resistance
– Leaky capacitor: Climbs but stabilizes at a finite resistance value
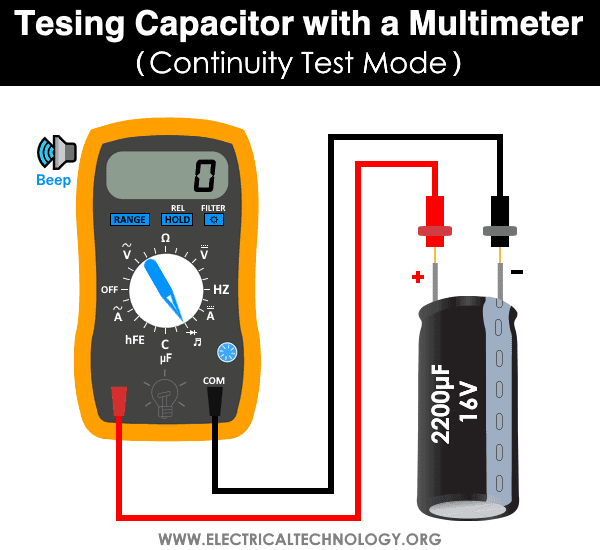
Measuring Actual Capacitance for Precise Diagnosis
For definitive results, measure actual capacitance using a multimeter with capacitance function (look for “F” or “C” symbol).
- Completely disconnect capacitor from fan circuit (remove both wires)
- Set multimeter to capacitance mode (µF)
- Touch probes to terminals (again, polarity irrelevant)
- Wait for stable reading (may take 10-30 seconds)
Capacitance interpretation guide:
– Within 10% of labeled value: Good condition
– 10-20% below rating: Degrading—monitor closely
– More than 20% below rating: Replace immediately
– No reading or “0”: Complete failure
Pro Tip: For dual capacitors (common in multi-speed fans), test each section separately according to the wiring diagram printed on the component. Most ceiling fan capacitors range from 3-10µF for main windings and 1-5µF for auxiliary windings.
Decoding Test Results and Replacement Decisions
Your testing reveals one of three scenarios—each requiring specific action for reliable fan operation.
Clear replacement needed when:
– Visual damage exists (bulging, leaking, burning)
– Resistance test shows open or shorted condition
– Capacitance measures more than 20% below rating
– Fan symptoms match failure patterns and no other issues found
Further investigation required if:
– Capacitance measures 10-20% low but symptoms are mild
– Resistance test shows slow charging without reaching infinity
– Multiple components test healthy but problems persist
Professional help recommended when:
– Dual capacitor sections show inconsistent failure patterns
– You’re uncomfortable working with electrical components
– Motor windings show resistance imbalances during testing
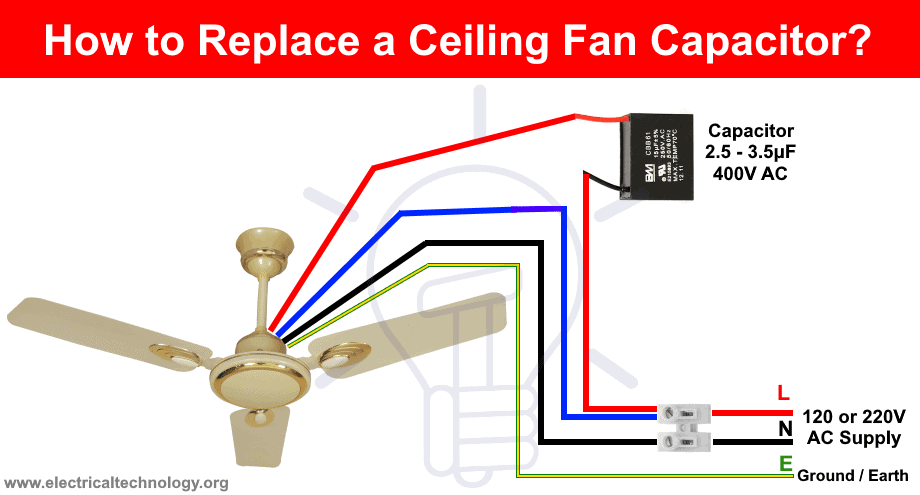
When replacing, match specifications exactly—capacitance (µF) must be identical, while voltage rating must be equal or higher. Using an undersized capacitor creates fire hazards and accelerates motor wear.
Extending Capacitor Lifespan with Preventive Maintenance
While capacitors eventually fail through normal use, these practices significantly extend their operational life.
Voltage stability matters more than you think. Install a whole-house surge protector if you experience frequent power fluctuations—these electrical spikes degrade capacitors faster than normal operation. Even minor voltage sags during startup stress components.
Dust management prevents overheating. Clean fan components every 6-12 months, paying special attention to areas near the capacitor. In kitchens or dusty environments, increase cleaning frequency to quarterly. Use compressed air to blow dust from motor housing without disassembly.
Address speed control issues immediately. If your fan develops inconsistent speed operation, diagnose and repair quickly. A failing speed switch creates irregular electrical loads that stress the capacitor.
Avoid excessive on/off cycling. Each startup cycle creates thermal stress on components. When possible, leave fans running continuously rather than frequent cycling—this reduces electrical stress on both capacitor and motor windings.
Final Diagnostic Checklist for Ceiling Fan Capacitors
Before concluding your capacitor diagnosis, verify these critical points:
- Power is completely disconnected at circuit breaker (double-verified with tester)
- Capacitor has been properly discharged multiple times
- Component is fully isolated from fan circuit during testing
- Multimeter leads make solid contact with terminals
- Test readings match failure patterns described
If testing confirms a healthy capacitor but your fan still malfunctions, shift focus to other potential issues: motor winding resistance imbalances, faulty speed switches, or wiring connection problems. Document your findings carefully—this information proves invaluable if professional assistance becomes necessary.
Checking a ceiling fan capacitor properly combines visual inspection, electrical testing, and symptom analysis. By following this systematic approach, you’ll accurately determine whether capacitor replacement solves your fan problems or if further diagnosis is needed. Remember that safety always comes first—never rush capacitor testing procedures or skip discharge steps. With practice, this essential home maintenance skill becomes second nature, keeping your living spaces comfortable while saving unnecessary service costs.
Leave a Reply