Ever wonder why your ceiling fan stays securely in place while spinning at high speeds? The answer lies in a specialized mounting system designed specifically to handle the unique stresses of rotating blades. Understanding how does a ceiling fan mount properly is crucial for safety, performance, and longevity—after all, you’re securing a 30-50 pound rotating machine to your ceiling. Unlike simple light fixtures, ceiling fans create dynamic forces through continuous rotation that demand specialized installation techniques. This guide reveals exactly how ceiling fan mounting systems work, what components make them secure, and why cutting corners during installation leads to wobbling, noise, or even dangerous failures months down the road.
The mounting system is the unsung hero of your ceiling fan setup, quietly supporting everything from the motor housing to the spinning blades. Without a proper mounting foundation, even the most expensive fan will develop problems within months. Standard electrical boxes designed for lighting fixtures simply cannot handle the vibration and movement generated by a rotating fan assembly. When you understand how does a ceiling fan mount correctly onto your home’s structure, you’ll appreciate why proper installation matters—and whether you should tackle the project yourself or call in a professional.
Why Standard Electrical Boxes Fail with Ceiling Fans
Attempting to mount a ceiling fan using a standard light fixture electrical box is one of the most dangerous mistakes homeowners make during installation. These boxes are designed only to support static loads of up to 50 pounds, but they completely fail when subjected to the dynamic forces created by a rotating fan. As your fan operates, the spinning blades generate continuous vibration that works loose the mounting screws in standard boxes over time.
The Physics Behind Mounting Failures
When a fan rotates, it creates centrifugal force that pulls outward on the mounting points with each revolution. This constant stress causes microscopic movement in the mounting hardware, which gradually widens the connection points in standard electrical boxes. Unlike static light fixtures that simply hang from the ceiling, ceiling fans experience these dynamic loads every time they operate. Within weeks or months, what started as a barely noticeable wobble can develop into dangerous instability as the mounting hardware continues to loosen with each use.
Recognizing Unsafe Mounting Situations
If your ceiling fan develops a wobble that progressively worsens over time, or if you hear clicking or creaking noises during operation, these are warning signs of an inadequate mounting system. Worse still, if you notice the entire fan assembly shifting position when you adjust the pull chains, this indicates serious mounting failure that requires immediate attention. Never ignore these symptoms—what begins as a minor annoyance can eventually lead to the fan detaching from the ceiling entirely.
UL-Rated Ceiling Fan Electrical Box Installation
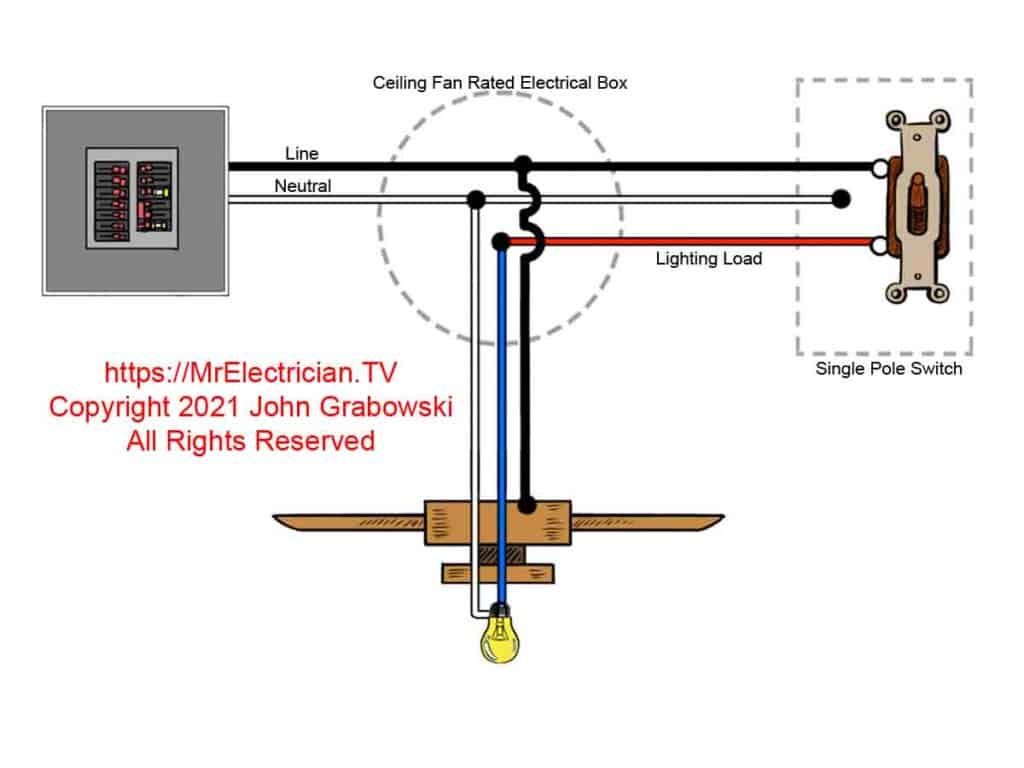
The foundation of any secure ceiling fan installation begins with a UL-listed electrical box specifically designed for fan mounting. This critical component serves as the primary attachment point between your fan and your home’s structure, while safely housing all electrical connections.
Identifying Proper Fan-Rated Boxes
When shopping for an electrical box, look for the explicit marking “For Use With Ceiling Fans” along with the UL certification label. Standard electrical boxes lack the reinforced mounting points and structural integrity needed to withstand fan operation. Fan-rated boxes feature heavy-duty metal construction with specially designed mounting brackets that securely anchor to ceiling joists or support beams. Some models include adjustable mounting arms that allow installation between joists when direct attachment isn’t possible.
Installing Fan-Specific Electrical Boxes
Replacing an existing light fixture box with a proper fan-rated box requires careful attention to structural support. First, turn off power at the circuit breaker and verify no electricity flows to the wires. Remove the old fixture and electrical box, then locate the nearest ceiling joist using a stud finder. Position the new fan-rated box so it attaches directly to the joist with the provided heavy-duty screws—never rely on drywall or plaster alone to support the fan’s weight. For retrofit installations where joists aren’t conveniently positioned, use a fan-rated “spider” or “crossbar” mounting system that spans between joists and provides secure attachment points.
Direct Joist Mounting vs. Spiked Bracket Systems

Your ceiling’s structural characteristics determine which mounting approach will provide the most secure installation. Understanding these options helps you select the right method for your specific situation.
Securing Fans to Ceiling Joists
Whenever possible, anchor your ceiling fan directly to a ceiling joist for maximum stability. This method transfers the fan’s weight and operational forces directly into your home’s structural framework. To locate joists, use a stud finder or measure from known structural points—typically spaced 16 or 24 inches apart. Once positioned, secure the mounting bracket with 3-inch lag screws driven completely through the bracket and into the joist. This creates an unbreakable connection that prevents wobble and ensures decades of reliable operation.
Using Spiked Mounting Brackets Between Joists
When your desired fan location falls between ceiling joists, a special mounting bracket with spiked ends provides the necessary support. These brackets span the gap between joists and use sharp metal spikes that penetrate the ceiling material to distribute the fan’s weight across a wider area. Proper installation requires precise measurement to position the bracket exactly midway between joists, then applying firm pressure to ensure the spikes fully engage with the ceiling structure. While not quite as secure as direct joist mounting, this method provides adequate support when installed correctly and according to manufacturer specifications.
Step-by-Step Mounting Process
Following these specific steps ensures your ceiling fan mounts securely and operates smoothly for years to come. Rushing through any phase compromises the entire installation.
Preparing Electrical Connections Safely
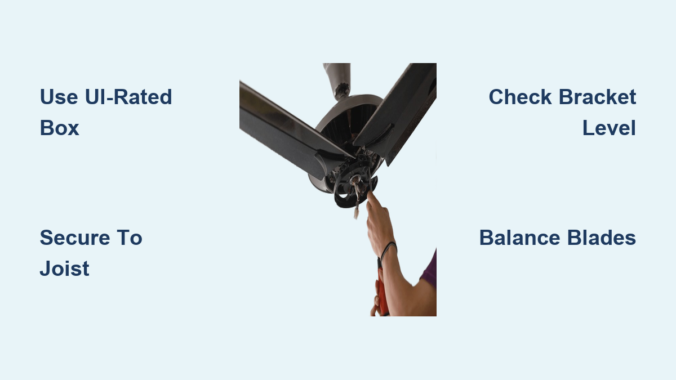
Before mounting any components, turn off power at the circuit breaker and verify no electricity flows to the wires using a non-contact voltage tester. Carefully feed the fan’s wiring through the center knockout of the electrical box, taking care not to damage insulation. Connect black to black (hot), white to white (neutral), and green or bare wires to the grounding screw—secure each connection with wire nuts and wrap with electrical tape for added security. Tuck all connections neatly into the box before proceeding to mounting.
Securing the Mounting Bracket Properly
Attach the mounting bracket to the electrical box using the manufacturer-provided screws, ensuring the bracket sits perfectly level. Any tilt in the bracket directly translates to fan wobble during operation. Double-check that all mounting screws are tightened to the specified torque—most require 35-45 inch-pounds of force. Use a torque screwdriver if available, as both under-tightening and over-tightening can compromise the mounting integrity. A properly secured bracket should show absolutely no movement when tested with firm hand pressure.
Attaching the Fan Assembly Correctly
Lift the fan motor assembly onto the mounting bracket’s attachment point, aligning it precisely with the mounting slots or hooks. Secure the motor housing with the provided bolts or screws, tightening them in a star pattern to distribute pressure evenly. Before installing blades, perform a final check that all mounting connections feel solid with no detectable movement. Only after confirming the motor assembly is securely mounted should you proceed to attach blades and complete the installation.
Solving Common Post-Installation Wobble Problems
Even with perfect mounting, some fans develop wobbling after installation. Don’t panic—this is often easily corrected with systematic troubleshooting.
Diagnosing Blade Alignment Issues
The most common cause of wobble is misaligned blades. Hold a yardstick vertically against the edge of each blade while the fan is stationary, measuring the distance from a fixed point on the ceiling. If any blade differs by more than 1/8 inch from the others, that’s your problem area. Gently bend the blade holder bracket for the offending blade until it aligns with the others—use slow, controlled pressure to avoid breaking the plastic component. Always check that all blade arm screws are fully tightened before assuming alignment is the issue.
Applying Professional Balancing Techniques
When alignment checks out but wobble persists, your fan needs balancing. Most manufacturers include a balancing kit with adhesive weights and testing clips. Start by attaching the test clip to one blade’s leading edge, then run the fan at medium speed. If wobble decreases, that’s your problem blade—move the clip toward the tip or base until wobble minimizes, then permanently attach the weight at that position. If wobble increases, try the next blade. This process typically identifies and corrects imbalance within 10-15 minutes of testing.
Critical Situations Requiring Professional Installation
While many homeowners successfully install ceiling fans themselves, certain scenarios demand professional expertise for safety reasons.
When Structural Concerns Demand Expertise
If your ceiling has unusual construction—such as cathedral ceilings, vaulted designs, or older homes with plaster and lath—you should consult a professional. These installations often require specialized mounting hardware and techniques that inexperienced installers might not recognize. Similarly, if you’re installing a heavy industrial-style fan weighing more than 35 pounds, the mounting requirements become more complex and warrant professional assessment.
Electrical Safety Considerations
Homeowners without electrical experience should never attempt ceiling fan installation. Working with household wiring carries serious shock and fire risks if connections aren’t made properly. A licensed electrician understands local building codes, can identify potential wiring hazards, and ensures all connections meet safety standards. The relatively small cost of professional installation provides peace of mind that your fan will operate safely for decades.
Understanding how does a ceiling fan mount properly transforms what seems like a simple home improvement project into a safe, long-lasting installation. The right electrical box, proper mounting technique, and attention to detail during installation prevent the common problems that plague improperly mounted fans. Whether you tackle the project yourself or hire a professional, knowing these mounting fundamentals ensures your ceiling fan provides years of quiet, wobble-free operation while keeping your family safe. Remember—when it comes to ceiling fans, the mounting system is everything.
Leave a Reply