When your ceiling fan starts wobbling or making unusual noises, mismatched blade arm sizes could be the culprit. Proper ceiling fan blade arm sizes ensure smooth, quiet operation while maximizing airflow efficiency in your home. These critical components—also called blade mounts or blade brackets—connect fan blades to the central hub assembly, and even slight dimensional errors cause imbalance, noise, and premature wear. Whether you’re replacing damaged arms, updating worn hardware, or matching new blades to an existing fan, this guide delivers precise measurement techniques, standard dimension specifications, and selection criteria to guarantee perfect compatibility. You’ll learn exactly how to measure your existing arms, identify the right replacement style, and avoid costly mistakes that compromise your fan’s performance.
Critical Blade Arm Measurements You Must Know
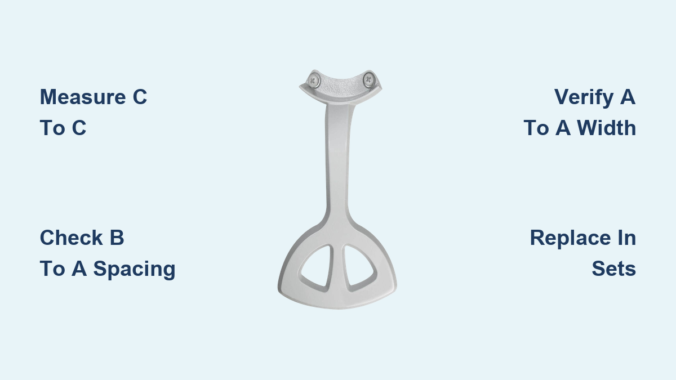
Before purchasing replacement blade arms, capture three essential dimensions that determine compatibility with your specific ceiling fan model. These measurements—C to C, B to A, and A to A—define the mounting pattern and geometry of the arm, and even minor discrepancies cause imbalance or improper blade alignment.
Measuring C to C Dimensions for Hub Compatibility
The C to C (Center to Center) measurement represents the distance between the two mounting holes that attach the blade arm to your fan’s central hub. This dimension dictates how the arm positions relative to the fan’s rotational axis and must match your fan’s mounting pattern exactly. Measure this dimension carefully in both millimeters and inches, as variations cause arms to sit at incorrect angles, leading to uneven blade pitch and unbalanced rotation that stresses motor bearings over time.
Pro Tip: Use digital calipers for precise measurements rather than standard tape measures, which can introduce errors as small as 1/16 inch that still cause significant wobble during operation.
Determining B to A Spacing for Blade Alignment
The B to A (Blade Mounting Hole Spacing) indicates the distance between holes where individual fan blades attach to the arm. This spacing affects how blades align relative to each other and directly impacts your fan’s air circulation pattern. Incorrect B to A dimensions result in blades that sit too close together or too far apart, disrupting the aerodynamic efficiency of the entire blade system.
Verifying A to A Width for Structural Support
The A to A measurement describes the total width of the blade arm at the blade attachment point, encompassing both mounting hole positions and the structural material between them. This dimension ensures the arm provides adequate support surface for secure blade mounting. When measuring A to A, include the entire structural width—not just the distance between holes—to guarantee proper blade stability during high-speed operation.
Standard Blade Arm Dimensions for Common Fan Sizes
Most residential ceiling fans follow established dimensional standards that simplify replacement part selection. Understanding these common specifications helps you quickly identify whether your fan uses standard-sized components or requires specialty ordering.
Standard Replacement Arm Specifications
Standard replacement blade arms typically measure 5 ¼ inches in length by 4 3⁄16 inches in width at the blade mounting surface, with structural thickness of 1/16 inch. These proportions provide the rigidity needed for decades of reliable operation while maintaining appropriate weight characteristics. The half-moon style blade arm represents the most prevalent configuration for 52-inch ceiling fans—the most common residential size—featuring a curved profile that follows the rotational arc of the blades.
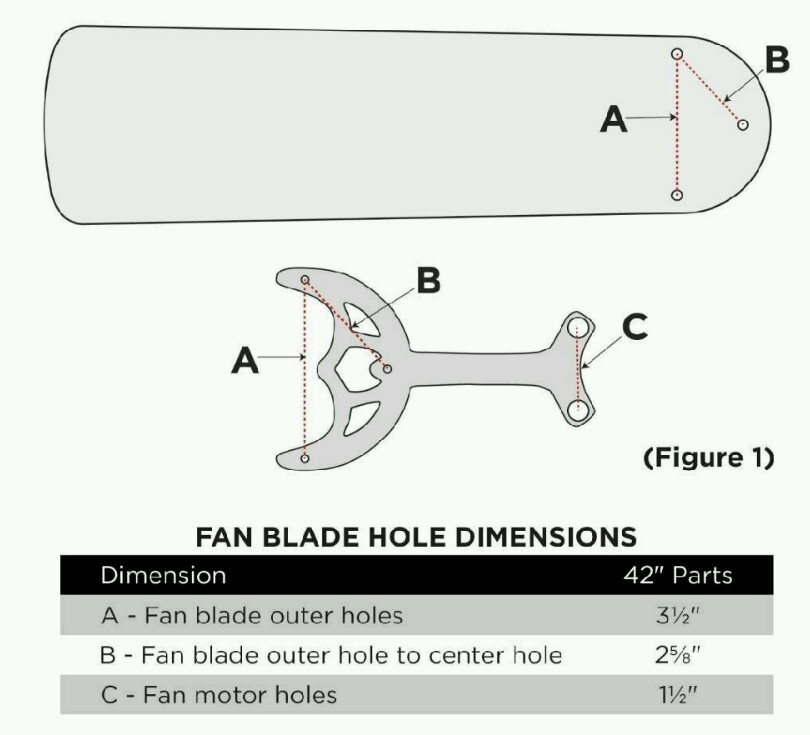
| Blade Design | C to C (IN) | B to A (IN) | A to A (IN) |
|---|---|---|---|
| Standard – Antique Brass | 2-1/16 | 2-3/4 | 3-15/16 |
| Standard – Polished Brass | 2-1/16 | 3 | 4-1/4 |
| Butterfly Style Hugger | 2-1/8 | 3-1/16 | 4-5/16 |
| Compact Design | 1-1/4 | 2-1/2 | 3-1/2 |
Catalog Number Reference System
Manufacturers use catalog numbers to simplify blade arm identification:
– B1S: Standard profile, Antique Brass finish, 2-1/16″ C to C
– B1: Standard profile, Polished Brass finish, 2-1/16″ C to C
– B9: Butterfly hugger style, multiple finishes, 2-1/8″ C to C
– B14: Compact profile, 1-1/4″ C to C spacing
How to Identify Your Blade Arm Style Type
Blade arm styles divide into three primary categories—standard, hugger, and specialty configurations—each designed for specific installation scenarios and clearance requirements. Selecting the correct style ensures proper fan operation and prevents interference with ceiling surfaces.
Standard Blade Arms for Conventional Installations
Standard blade arms serve conventional ceiling fan installations where the motor assembly hangs down from the mounting bracket with adequate clearance between the ceiling and fan body. These arms extend outward from the central hub to position blades at optimal distances for efficient air circulation. Standard arms work with most 52-inch residential fans and provide the familiar appearance that characterizes traditional ceiling fan installations.
Hugger Style Arms for Low-Ceiling Applications
Hugger style blade arms address low-profile or flush-mount installations where minimal clearance exists between the fan housing and the ceiling. These arms feature modified geometry that reduces the overall profile while maintaining proper blade spacing. The B9 butterfly style and B11 hugger-only design offer distinctive styling while maintaining full functional compatibility with low-clearance installations.
Compact Designs for Space-Constrained Areas
Specialty blade arms like the B14 and B15 configurations serve installations with space constraints, using C to C measurements as small as 1-1/4 inches to accommodate unique mounting patterns. These specialty options ensure even unique or older fan models can receive proper replacement parts rather than requiring complete fan replacement.
Steel Construction Benefits for Long-Lasting Performance
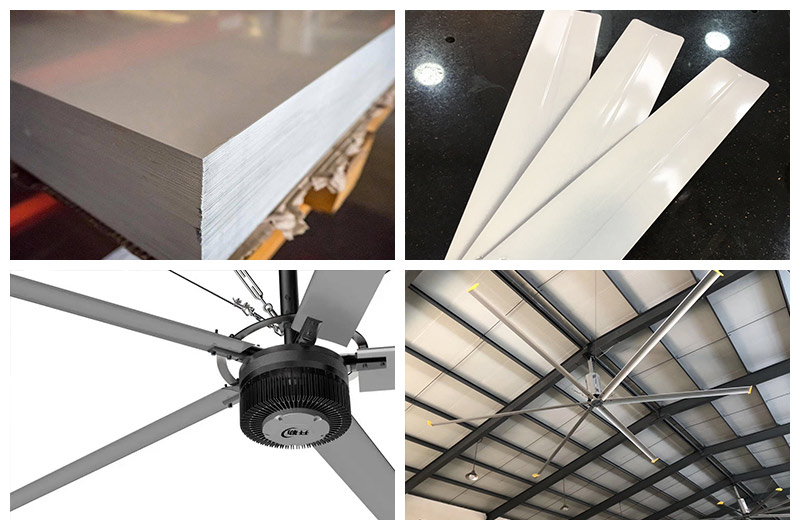
Premium replacement blade arms are constructed from solid steel material with 1/16 inch thickness, providing exceptional durability and resistance to bending, warping, or fatigue over extended service periods. This steel construction ensures arms maintain dimensional accuracy throughout temperature and humidity fluctuations typical in residential environments.
Key advantages of steel construction:
– Resists corrosion in humid environments like bathrooms and kitchens
– Withstands accidental impacts during cleaning or maintenance
– Maintains structural integrity under centrifugal forces at high speeds
– Prevents the gradual misalignment that causes imbalance and noise
Unlike aluminum or plastic alternatives, steel blade arms won’t degrade when exposed to salt air in coastal installations, making them ideal for beach homes or pool areas where moisture accelerates material deterioration.
Proper Installation Steps for Perfect Balance
Correct installation of replacement blade arms ensures balanced operation and prevents premature wear on fan components. Following these steps guarantees smooth, wobble-free performance.
Gathering Required Hardware Before Starting
Replacement blade arms typically do not include mounting screws, which must be obtained separately based on your fan’s specific requirements. Use the correct screw length and diameter to avoid stripped threads or insecure mounting that causes vibration during operation. Before disassembly, photograph your existing installation to ensure proper reassembly sequence.
Complete Set Replacement for Balanced Operation
Always replace blade arms as complete sets—never mix arms from different production batches. Even arms from the same manufacturer may exhibit small dimensional variations between production lots that introduce weight imbalances. If one arm becomes damaged, replace the entire set to maintain proper rotational balance and prevent wobble.
Cost Comparison: Replacement vs. New Fan
Evaluating blade arm replacement costs against alternatives helps you make informed decisions about maintaining versus replacing your ceiling fan.
Current market pricing:
– Sets of four arms (standard for five-blade fans with one spare): $20.00 to $22.95
– Sets of five arms for five-blade configurations: $25.00 to $30.00
– Sets of six arms for six-blade fans: $30.00
The cost of replacement blade arms represents a small fraction of complete fan replacement, making arm replacement a cost-effective option for restoring aging or damaged fans. A quality fan replacement costs $150 to $500 or more, while complete blade arm restoration typically costs under $50 in parts—providing significant savings while extending your fan’s service life.
Maintenance Tips for Maximum Blade Arm Lifespan
Regular maintenance of blade arms extends their service life and ensures continued quiet, balanced fan operation. Establish these inspection and cleaning routines to prevent problems before they develop.
Annual Inspection Checklist
Visual inspection of blade arms should occur annually as part of routine ceiling fan maintenance. Check for:
– Visible corrosion or oxidation on metal surfaces
– Bending or deformation of arm geometry
– Loose mounting points where arms connect to the hub
– Separation of finish coatings from underlying material
Early identification of potential problems allows for planned replacement before catastrophic failure occurs during operation, which could damage fan blades or create safety hazards.
Cleaning Techniques That Preserve Finish
Clean blade arms during regular fan blade maintenance using mild detergent solutions and soft cloths to avoid damaging finish surfaces. Avoid harsh chemicals and abrasive materials that accelerate corrosion of underlying steel. Pay particular attention to mounting hole areas where dust accumulation affects secure attachment.
How to Select the Right Replacement Arms
Following a systematic selection process ensures you obtain blade arms that match your fan’s specifications and installation requirements.
Step-by-Step Selection Process
- Identify your fan’s specifications including size, manufacturer, and model number
- Measure existing arms carefully using accurate tools
- Determine whether standard or hugger-style arms are needed based on clearance measurements
- Select your preferred finish from available options
- Order complete sets matching the number of blades on your fan
Blade arms are available through hardware retailers, online marketplaces, and specialty ceiling fan parts suppliers. Consider price competitiveness, shipping costs, return policy flexibility, and technical support availability when selecting a supplier. Specialty suppliers often provide better guidance for unusual applications, while major retailers may offer competitive pricing for standard replacements.
Understanding ceiling fan blade arm sizes, measurement specifications, and selection criteria empowers you to maintain your fan’s performance and appearance without requiring expensive complete replacements. Proper measurement, careful selection, and correct installation of blade arms ensures years of reliable, balanced operation while maintaining the aesthetic qualities of your installation. The relatively modest cost of replacement blade arms compared to complete fan replacement makes this maintenance activity both practical and economically sensible for extending the service life of your existing ceiling fan investment.
Leave a Reply