That lingering fog on your bathroom mirror after a shower isn’t just annoying—it’s a warning sign. When your bathroom ceiling fan can’t keep up with moisture removal, you’re inviting mold growth, damaged drywall, and compromised indoor air quality. Replacing a bathroom ceiling fan ranks among the most valuable home maintenance projects you can tackle, protecting your home from costly moisture damage while improving air quality. With basic DIY skills and the right guidance, you can complete this essential upgrade in a single afternoon, restoring proper ventilation to your bathroom and safeguarding your home’s structural integrity.
The process might seem intimidating if you’ve never worked with electrical components before, but modern replacement fans are designed with homeowners in mind. This guide provides everything you need to successfully replace your bathroom ceiling fan, from recognizing when replacement is necessary through final testing procedures. By the end, you’ll have the confidence to handle this project safely and effectively.
Why Your Bathroom Fan Fails to Ventilate Properly
Your bathroom fan’s declining performance manifests through unmistakable warning signs that demand attention before moisture damage becomes severe. Persistent mirror fogging lasting more than 60 seconds after showering indicates inadequate airflow—your fan simply can’t move enough air to prevent humidity buildup. This sustained moisture creates ideal conditions for mold growth behind walls and in ceiling cavities, potentially requiring thousands in remediation costs.
Visible water damage around the housing—peeling paint, brown stains, or crumbling drywall—signals years of moisture infiltration that standard cleaning can’t fix. These stains reveal humidity escaping into spaces where it accumulates rather than venting outdoors. Musty odors that linger despite regular cleaning suggest mold growth within the fan housing or ductwork, circulating spores throughout your home with every use.
Excessive noise during operation—rattling, grinding, or unusually loud humming—indicates failing motor bearings or loose components. Modern fans operate at whisper-quiet levels (below 1.0 sones), making older noisy units obvious candidates for replacement. If your fan has surpassed ten years of service, replacement becomes essential regardless of current performance—newer models offer significantly better energy efficiency, quieter operation, and advanced features like humidity sensors.
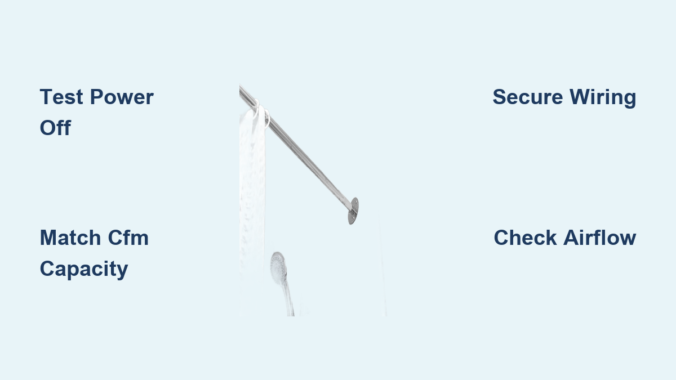
Select the Perfect Replacement Fan Capacity

Choosing the right fan size ensures effective moisture removal without unnecessary noise or energy waste. Calculate your bathroom’s CFM requirement by multiplying length × width × ceiling height, then multiplying by 0.13. For example, an 8×9-foot bathroom with 8-foot ceilings needs approximately 75 CFM (8 × 9 × 8 × 0.13 = 74.88). This calculation guarantees complete air exchange within 7-8 minutes of operation—critical for preventing moisture damage.
Adjust for special bathroom features if your space includes:
– A jetted tub or large shower (add 50% to calculated CFM)
– Vaulted or high ceilings (increase by 25-30%)
– Double sinks or multiple fixtures (add 20-30 CFM)
Avoid oversized fans that create negative pressure in your bathroom, pulling cold air from HVAC vents during winter and making the space uncomfortable. An oversized unit also consumes more electricity and generates unnecessary noise. Prioritize noise ratings when selecting your replacement—ultra-quiet models (0.3-0.5 sones) operate nearly silently while providing strong airflow, making them ideal for bathrooms adjacent to bedrooms.
Essential Tools for Safe Fan Replacement

Gather these critical items before starting your bathroom ceiling fan replacement project to avoid mid-work interruptions:
- Voltage tester (non-negotiable for electrical safety)
- Drill/driver with Phillips and flathead bits
- Jab saw or jigsaw for ceiling modifications
- Wire stripping pliers and assorted screwdrivers
- Safety goggles, work gloves, and respirator mask
Electrical supplies you’ll need:
– Wire nuts in multiple sizes
– Foil HVAC tape (not standard duct tape)
– Cable clamp for securing wiring
Ventilation components:
– 4-6 inch flexible or rigid ducting
– 90-degree duct elbow for routing
– Exterior vent cap matching duct diameter
Safety tip: Never skip the voltage tester—always verify power is off at the circuit breaker before touching any wires. Test your tester on a known live circuit first to confirm it’s functioning properly.
Critical Safety Steps Before Electrical Work
Power shutdown is non-negotiable—locate the correct circuit breaker and turn it completely off. Wall switches control only fan operation, not electrical supply. After turning off the breaker, use your voltage tester on both the fan wires and any connected receptacles to confirm no electricity is present. If the tester indicates power, you’ve turned off the wrong breaker—start over.
Attic safety considerations matter if you’re accessing from above:
– Distribute weight carefully across ceiling joists
– Never step between joists—this risks falling through
– Wear long sleeves and a cap to protect from insulation
Ladder safety is equally important for roomside installations:
– Position on level ground with three points of contact
– Never stand on the top two rungs
– Have a spotter hold the base steady when possible
Verify GFCI protection exists for your bathroom circuit—modern building codes require ground fault circuit interrupter protection for all bathroom fixtures. If your home lacks this protection, consult an electrician before proceeding.
Remove Your Old Fan Without Damage
Begin with grille removal—most models use spring clips along opposite sides or mounting screws. Gently pry or unscrew the grille, preparing for accumulated dust to fall. Photograph wire connections before disconnecting anything—this visual reference prevents wiring mistakes during reinstallation.
Disconnect the motor assembly following your specific fan type:
– For plug-in designs: Unplug the motor from its housing receptacle
– For hardwired units: Turn wire nuts counterclockwise to separate connections
Detach the housing by locating mounting screws securing it to ceiling joists. If no fasteners are visible from below, you’ll need attic access. Carefully disconnect ductwork using utility knives to cut foil tape, and secure house wires with electrical tape to prevent them from slipping into wall cavities.
Warning: Never pull on wires to retrieve them—they can become permanently stuck. Instead, leave them accessible and gently guide them during new installation.
Install Your New Fan Housing Correctly
Test-fit the housing before securing it, ensuring the exhaust port aligns with your existing duct run. Proper positioning prevents unnecessary duct bending that restricts airflow. Secure mounting is critical—use 1-inch drywall screws to fasten the housing directly to ceiling joists, ensuring no gaps exist between the housing edge and ceiling.
Connect ductwork properly by sliding the duct over the housing’s collar and securing it with foil tape or a hose clamp. Pull firmly on the connection to verify it won’t come loose during operation. Route house wiring through the cable clamp, stripping approximately 4 inches of outer insulation and 1/2 inch from individual wires—avoid nicking copper conductors.
Pro tip: Apply spray foam insulation around the housing perimeter to reduce noise transmission into living spaces below, especially valuable for bathrooms above bedrooms.
Complete Electrical Connections Safely
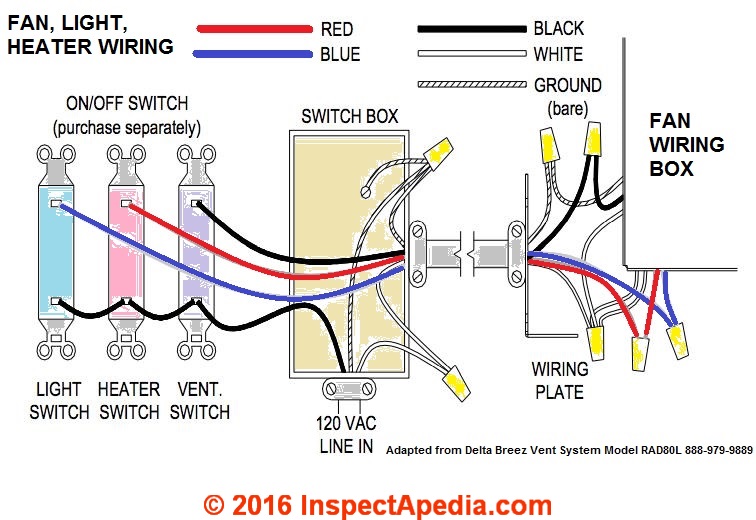
Identify wire functions before connecting:
– Black = hot (energized) wire
– White = neutral return path
– Bare copper/green = ground connection
Make connections in this sequence:
1. Twist ground wires together with a wire nut
2. Connect neutral wires (white to white)
3. Join hot wires (black to black)
Verify all connections by gently tugging on each wire—properly secured wires shouldn’t pull free. Tuck wires neatly into the housing, ensuring no contact with moving fan components. Double-check wire nuts for tightness and coverage—exposed copper creates shock and fire hazards.
Test Your New Fan Before Final Assembly
Restore power at the circuit breaker and listen for the fan motor to start. If the breaker trips immediately, turn it off and recheck wiring connections for crossed wires or loose connections. Perform these critical tests:
- Airflow verification: Hold a tissue against the grille—it should stick firmly
- Exterior vent check: Confirm air exits the roof or wall cap within seconds
- Noise assessment: Listen for unusual rattling or grinding sounds
- Functionality test: Verify all features (light, heater) operate correctly
Address any issues immediately before completing final assembly—fixing problems now prevents disassembly later. Weak airflow suggests duct blockages or improper sizing, while excessive noise indicates mounting or assembly issues.
Maintain Your New Fan for Longevity
Schedule these maintenance tasks to keep your replacement fan operating efficiently:
– Clean blades and housing every six months with a damp cloth
– Vacuum dust from housing interior and motor surfaces
– Inspect ductwork annually for damage or disconnection
– Clean exterior vent cap screens twice yearly
Avoid these common maintenance mistakes:
– Using excessive water near electrical components
– Ignoring persistent weak airflow (indicates developing problems)
– Forgetting to check exterior vent flapper operation
– Neglecting to replace damaged vent caps promptly
Warning: Never operate the fan with the grille removed—debris can damage the motor or create safety hazards.
Replacing your bathroom ceiling fan protects your home from moisture damage while improving air quality and comfort. By following these steps carefully, you’ve ensured proper ventilation that will prevent mold growth and structural damage for years to come. A well-maintained replacement fan typically lasts 10-15 years, making this DIY project one of the best investments you can make in your home’s health and longevity. When you hear that quiet hum after your next shower and watch the mirror clear within seconds, you’ll know your effort was well worth it.
Leave a Reply