Your Ultimate Guide to Cooling: In-Depth Reviews, Smart Comparisons & Pro Care Tips.

Category: Tips (Page 10 of 22)

How a Ceiling Fan Motor Works: Simple Guide


You’ve probably never given much thought to the quiet hum above your head as your ceiling fan keeps you comfortable through hot summer days and redistributes warm air in winter. Yet inside that seemingly simple fixture lies an elegant application of electromagnetic principles that has remained fundamentally unchanged for nearly two centuries. Understanding how a ceiling fan motor works reveals why these devices deliver reliable air circulation with minimal energy consumption—typically drawing just 50-100 watts at high speed compared to hundreds of watts for air conditioning. Whether you’re troubleshooting a malfunctioning fan, selecting a new energy-efficient model, or simply curious about the technology overhead, this guide explains every aspect of ceiling fan motor operation in clear, practical terms that help you make informed decisions about installation, maintenance, and repair.

Electromagnetic Principles Powering Your Fan

Faraday’s Discovery in Everyday Operation

Every ceiling fan motor relies on Michael Faraday’s 1830s discovery of electromagnetic induction—the bidirectional relationship between electricity and magnetism. When household current reaches your fan motor, it flows through copper windings surrounded by iron cores, creating magnetic fields that interact to produce rotational force. This elegant physics principle converts electrical energy into the mechanical motion that spins your fan blades, creating the airflow that keeps your rooms comfortable.

The rotating magnetic field within your fan motor is carefully engineered through strategically sequenced currents in stationary coils called stator windings. Unlike industrial motors that spin at thousands of RPM, ceiling fans operate at a deliberate 80-350 RPM to optimize air movement efficiency while minimizing noise. This slower rotation is intentional design rather than a limitation, allowing your fan to move substantial air volumes with remarkably little power—typically less than $5 worth of electricity per year for regular use.

Visualizing the Rotating Magnetic Field

rotating magnetic field illustration ceiling fan motor

Your ceiling fan creates the illusion of a rotating magnetic field without any physical components actually moving. By precisely timing electrical currents through multiple stator windings, the motor generates a magnetic field that appears to rotate around the stationary housing. This clever electromagnetic trick pulls the rotor along with it, creating continuous torque that spins your fan blades.

What to look for: If your fan hums but won’t start, this usually indicates a failure in creating the proper rotating field—often due to a faulty capacitor (more on this later). The characteristic 120Hz hum you sometimes hear comes from magnetic forces deforming the stator and rotor components during each AC cycle, a normal phenomenon in quality installations.

Single-Phase Induction Motors: 90% of Ceiling Fans Explained

Overcoming the Starting Challenge

The single-phase induction motor powers approximately 90% of residential ceiling fans worldwide, yet faces a fundamental problem: it can’t start rotating on its own from standstill. Household AC power creates a pulsating rather than truly rotating magnetic field at startup, which won’t generate the necessary torque. Ceiling fan engineers solved this through two clever approaches:

  • Shaded-pole design: Uses copper rings around portions of each pole to create delayed magnetic fields
  • Capacitor-start configuration: Creates phase shift in starting windings for stronger initial torque

Most modern fans use capacitor-start designs because they provide more reliable startup, especially in humid conditions or with dust accumulation. The capacitor creates the necessary phase difference between windings to produce that initial rotational push, after which the motor sustains operation through electromagnetic induction alone.

The Squirrel Cage Rotor’s Simplicity

Inside your induction motor sits the remarkably simple yet effective squirrel cage rotor—a cylindrical arrangement of aluminum or copper bars connected at both ends. When the rotating magnetic field passes these conductive bars, it induces eddy currents that interact with the magnetic field to produce rotational force. This design requires no electrical connections to the moving parts, eliminating brushes and commutators that would wear out over time.

Pro tip: The slight speed difference between the rotating magnetic field and the actual rotor speed (called “slip”) is essential for torque production. Quality fans maintain 5-10% slip at rated load—too little slip reduces torque, while too much decreases efficiency.

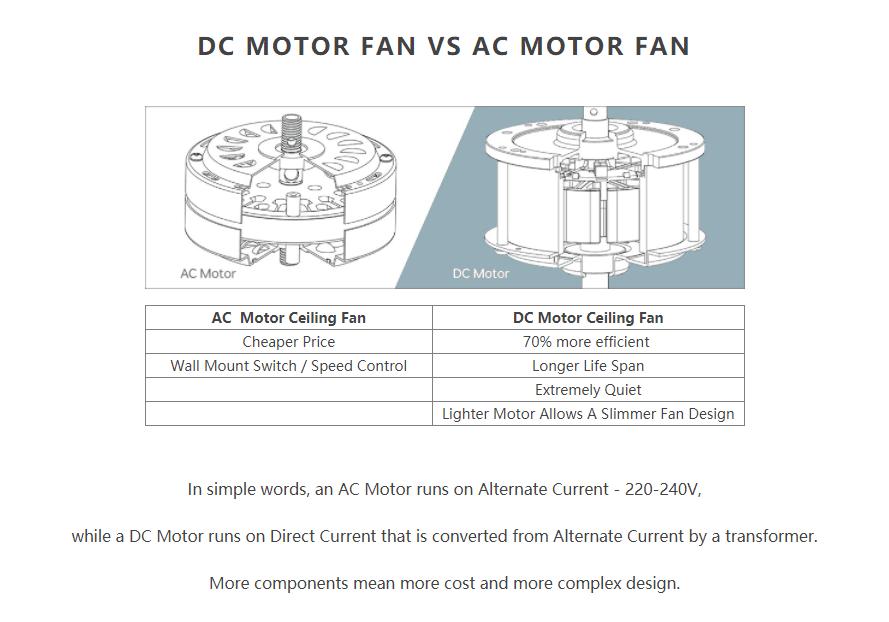
Brushless DC Motors: The Future of Ceiling Fan Technology

BLDC motor diagram ceiling fan

Electronic Commutation Replaces Mechanical Parts

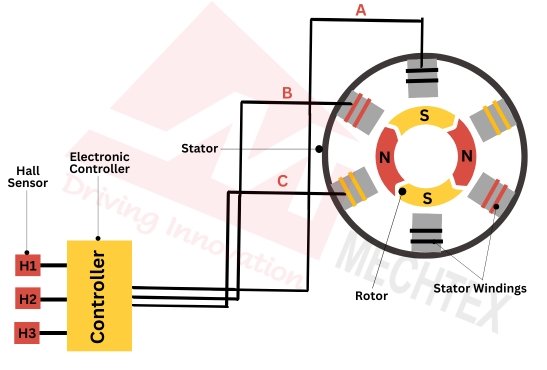
Brushless DC (BLDC) motors represent the most significant advancement in ceiling fan design over the past two decades, eliminating the brushes and commutators found in traditional motors. Instead, an integrated electronic controller precisely regulates speed by modulating electrical waveforms delivered to the stator windings. This technology enables features like:

  • Multiple precise speed settings
  • Reversible rotation without mechanical switches
  • Remote control integration
  • Breeze simulation modes that vary speed naturally

BLDC motors convert household AC power to DC through an internal power module, then use sensors or sensorless detection to determine rotor position. The controller energizes stator phases in sequence to create the rotating magnetic field that pulls the permanent magnet rotor along—without any physical contact between moving and stationary parts.

Why BLDC Motors Save You Money

While BLDC ceiling fans often cost slightly more upfront, they deliver 20-30% higher efficiency than traditional induction motors—translating to 10-20 watts of actual power savings during continuous operation. A typical BLDC motor achieves 65-75% efficiency compared to 50-60% for equivalent induction motors, meaning more of your electricity goes toward moving air rather than generating heat.

Time estimate: Over 10,000 hours of operation (about 7 years of regular use), a BLDC fan can save $15-$30 in electricity costs compared to traditional models—enough to offset the initial price difference while providing quieter operation and longer service life.

Stator Assembly: The Stationary Power Generator

ceiling fan motor stator core construction

Laminated Core Construction

The stator forms the stationary heart of your ceiling fan motor, consisting of laminated steel cores (typically 0.35-0.5mm thick) with copper windings wrapped around protruding teeth. These thin laminations, coated with insulating varnish and stacked precisely, reduce eddy current losses that would otherwise waste energy as heat.

High-quality motors use windings with higher copper content and more precise winding techniques to minimize electrical resistance. The stator housing—usually die-cast aluminum—provides structural support while facilitating heat dissipation. Aluminum’s superior thermal conductivity keeps the motor cooler, extending insulation life and preventing premature failure.

Warning: Excessive dust buildup on your fan motor acts as insulation, trapping heat and accelerating temperature rise. Clean your fan housing every 3-6 months with a soft brush to maintain optimal thermal performance and prevent unnecessary strain on the motor.

Capacitors: The Secret to Smooth Starting

ceiling fan capacitor types start run

Start vs. Run Capacitors Explained

Capacitors play a critical role in your ceiling fan’s operation by altering the electrical phase relationship between different winding sets. Two types work together:

  • Start capacitor: Provides high phase shift for initial torque generation (designed for intermittent duty)
  • Run capacitor: Maintains improved efficiency during continuous operation (designed for continuous duty)

Start capacitors connect through a centrifugal switch that disconnects them once the motor reaches operating speed—essential protection since these components would overheat rapidly if energized continuously. Run capacitors have lower capacitance values optimized for efficiency rather than starting torque.

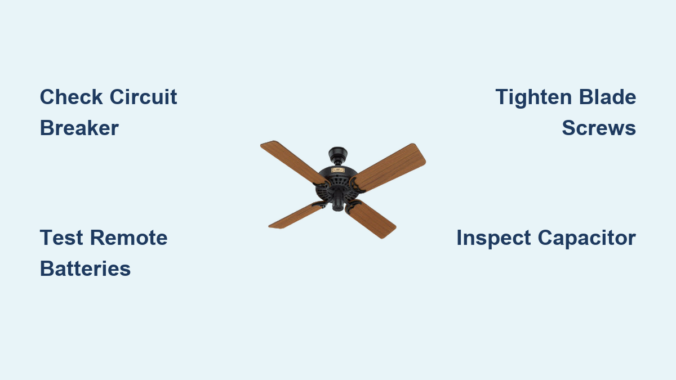
Diagnosing Capacitor Failure

Capacitor problems cause the most common ceiling fan malfunctions—you might hear humming without rotation, notice reduced starting reliability, or experience intermittent operation. Testing requires a multimeter to check capacitance values against specifications printed on the component.

Common mistake: Replacing a failed capacitor with one of different capacitance or voltage rating. Always match specifications exactly—incorrect values can cause motor overheating, reduced torque, or premature failure. Quality replacement capacitors cost $5-$15 and take 10 minutes to install with basic tools.

Reversing Switch Mechanics: Summer vs. Winter Modes

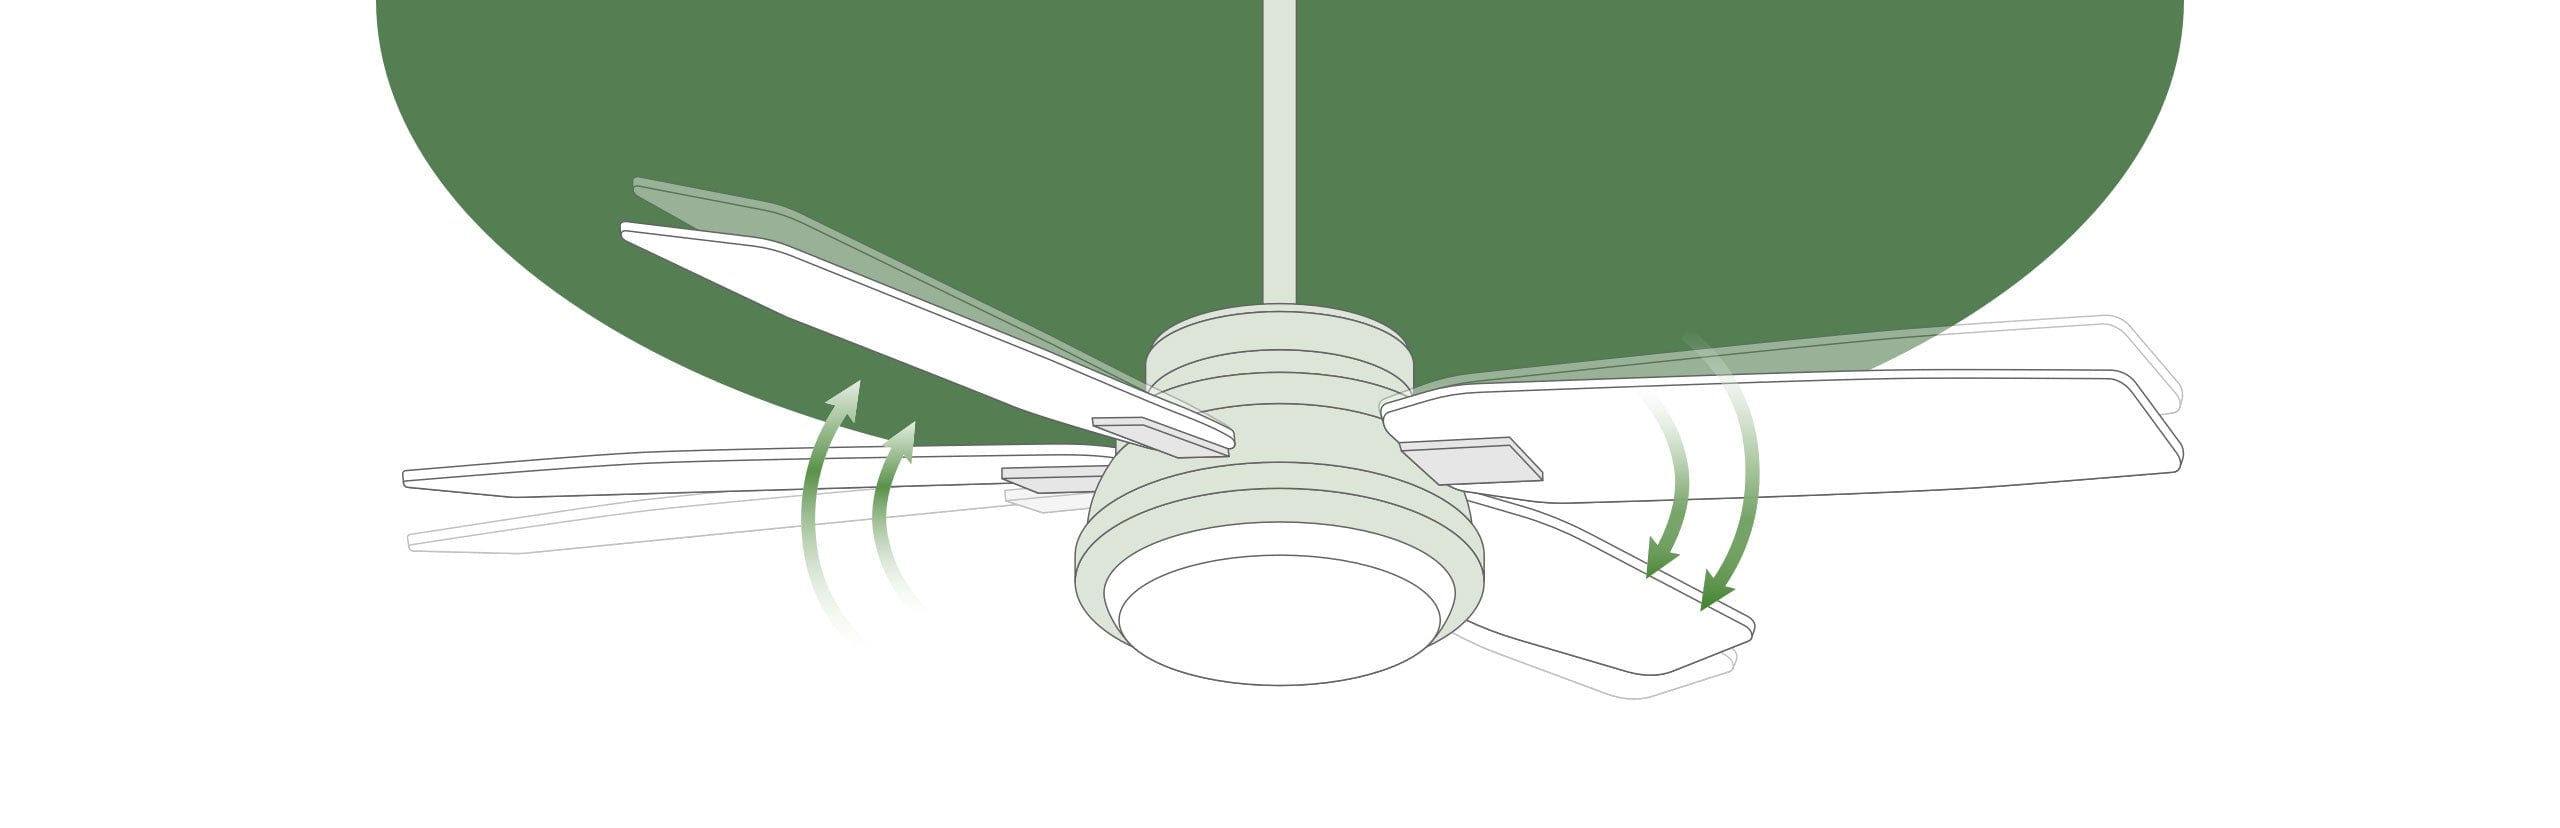
Changing the Magnetic Field Direction

Your fan’s reversing switch works by altering the phase relationship between windings to reverse the rotating magnetic field direction. When you flip the switch (usually a small slider on the fan housing), it swaps connections to the start winding relative to the run winding, causing the magnetic field to rotate in the opposite direction.

This simple mechanical change creates dramatically different airflow patterns:
Downward rotation (summer mode): Creates a cooling breeze directly beneath the fan
Upward rotation (winter mode): Circulates warm air trapped near the ceiling

Expert note: BLDC motors achieve reversing electronically through the controller rather than a mechanical switch, eliminating a potential failure point and enabling smoother transitions between directions—just one reason newer smart fans often operate more reliably long-term.

Keeping Your Ceiling Fan Motor Quiet and Efficient

Identifying and Solving Noise Problems

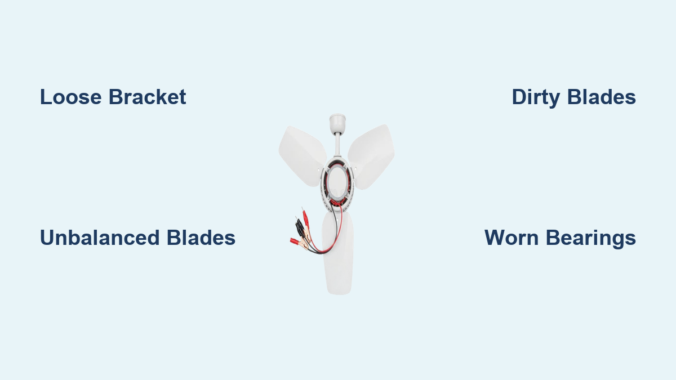
Motor noise in ceiling fans comes from three primary sources:
1. Electromagnetic hum (normal 120Hz sound from magnetic forces)
2. Bearing friction (progresses from subtle whine to grinding as wear develops)
3. Aerodynamic blade noise (increases with fifth power of tip speed)

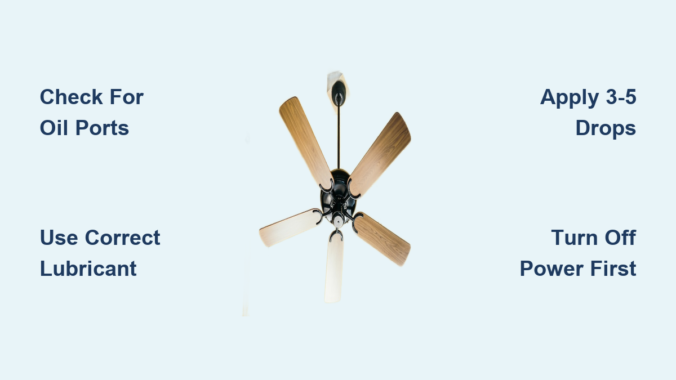
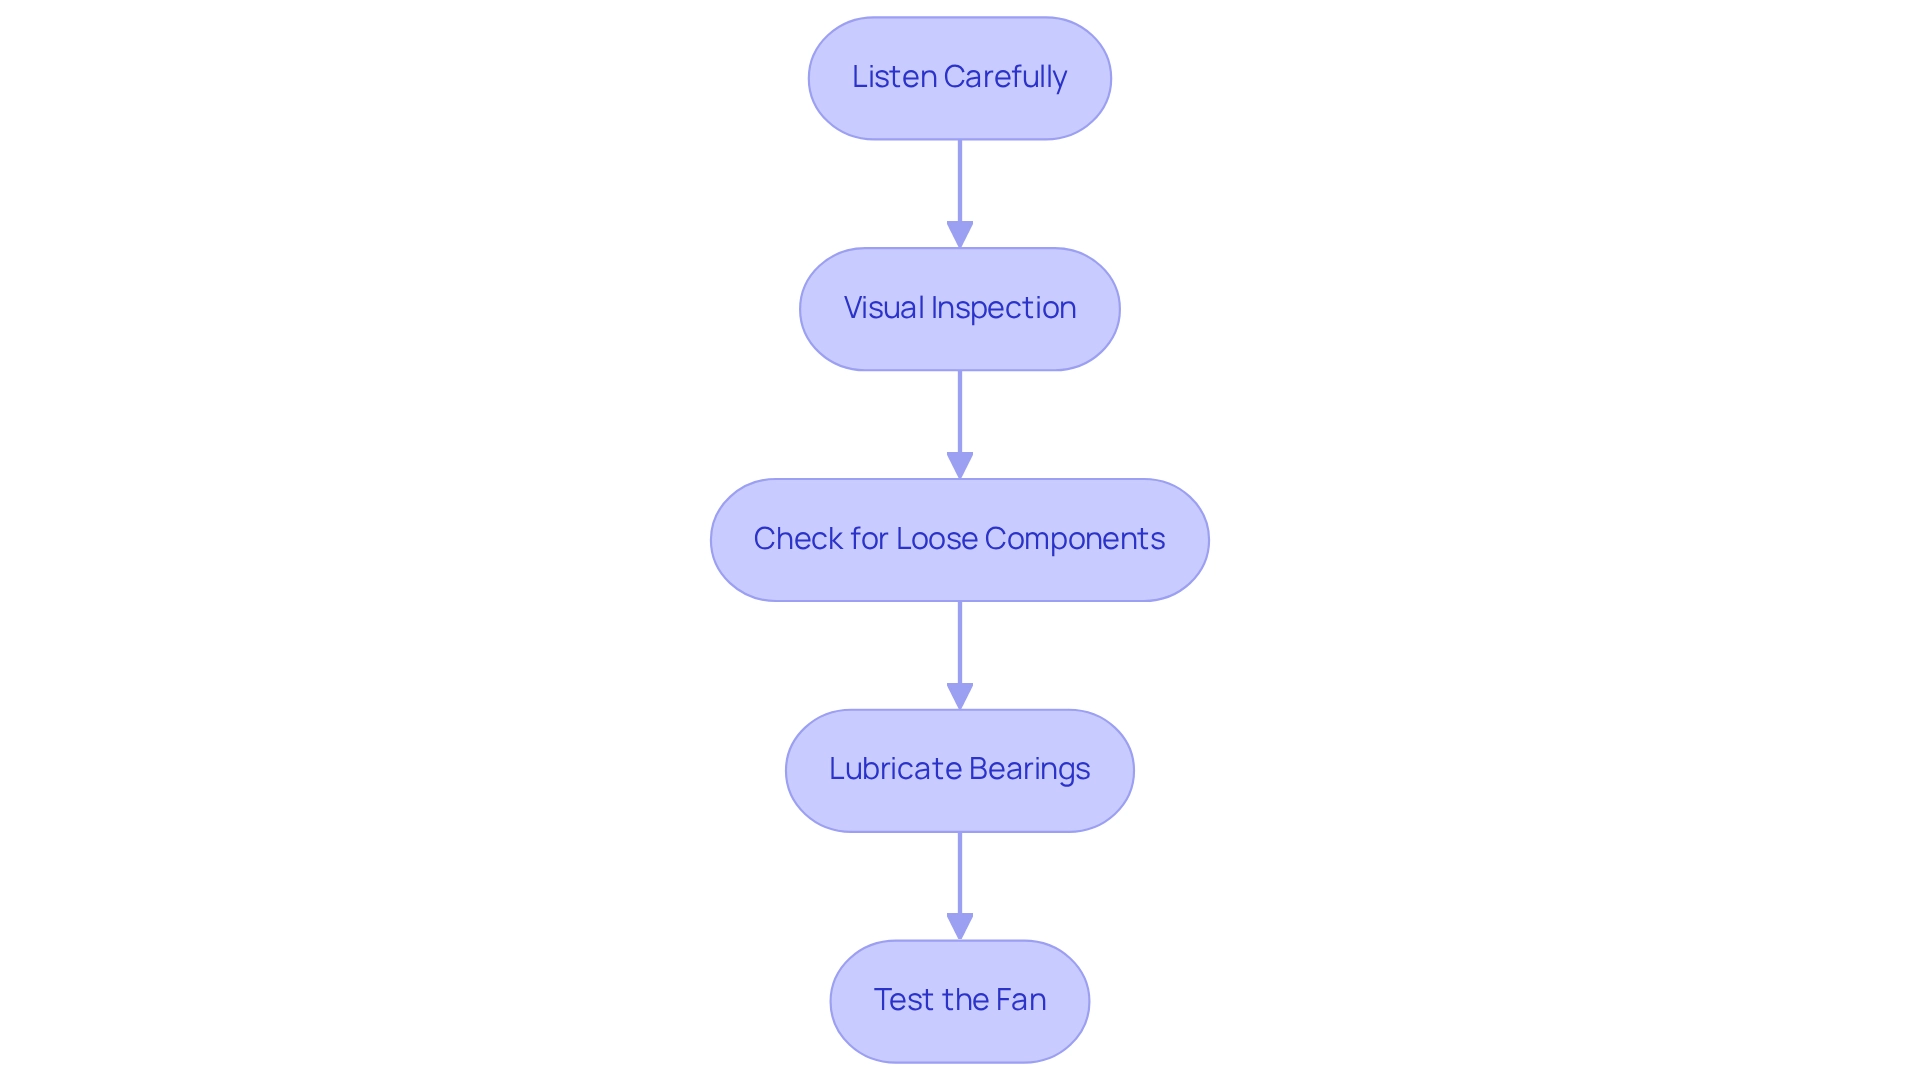
New or well-maintained bearings produce virtually silent operation, while advanced degradation creates distinctive grinding or clicking sounds. Sleeve bearings may benefit from occasional oiling through designated ports, while sealed ball bearings require no lubrication but eventually need replacement.

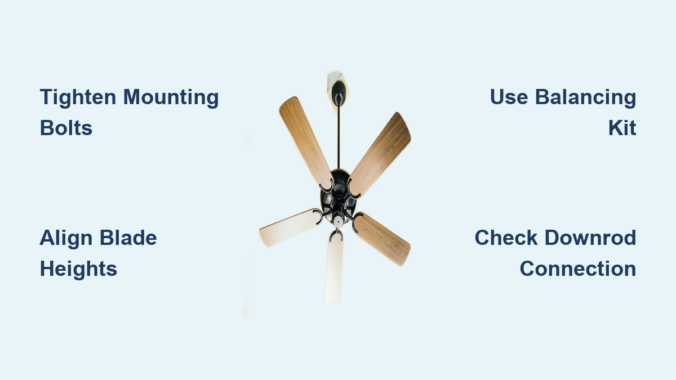
Prevention tip: Balance your fan blades annually using a balancing kit—improper balance causes vibration that accelerates bearing wear and creates annoying resonance. Even small imbalances (measured in gram-centimeters) become noticeable at operating speeds.

Smart Ceiling Fans: How Technology is Changing Motor Design

BLDC Integration with Home Automation

Modern smart ceiling fans increasingly incorporate BLDC motors with wireless connectivity for smartphone control and voice assistant integration. These systems use advanced algorithms to optimize operation based on multiple inputs:

  • Indoor and outdoor temperature
  • Humidity levels
  • Occupancy sensors
  • HVAC system status

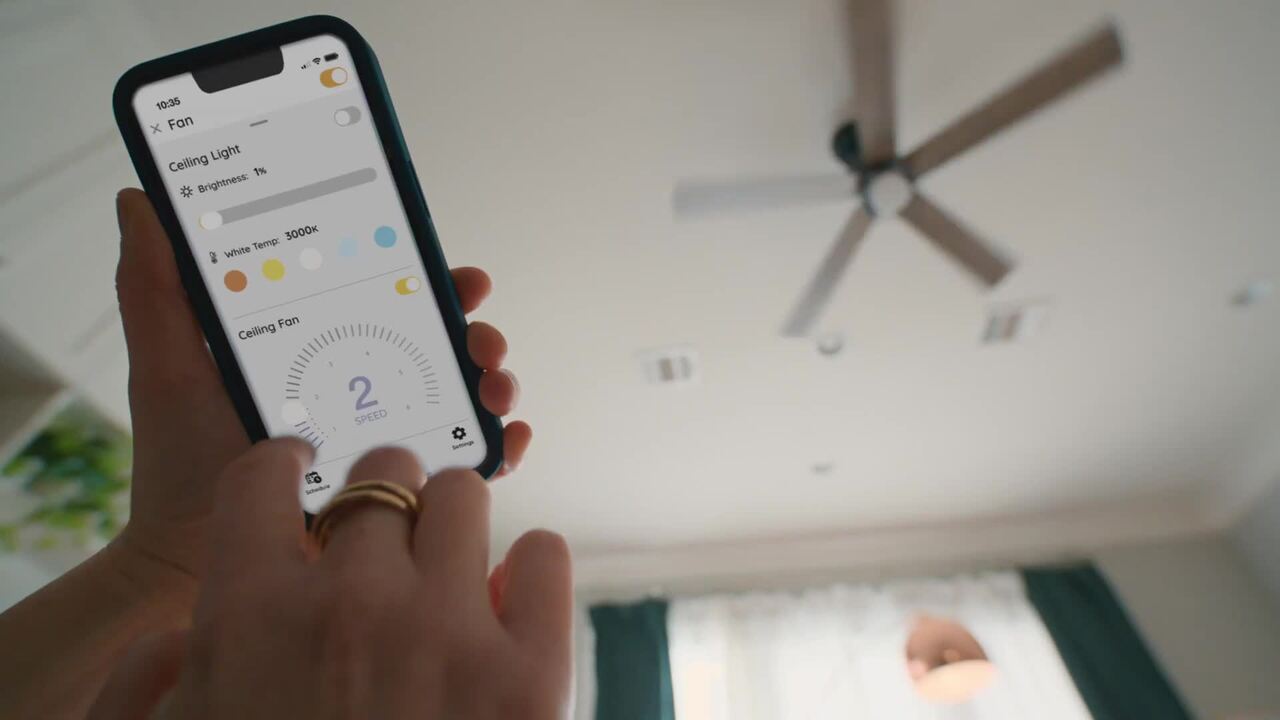
The controllability of BLDC motors enables features impossible with traditional designs, including precise speed control down to 1 RPM increments and rapid acceleration/deceleration for natural-feeling breeze patterns. Machine learning approaches even allow systems to adapt to your preferences over time, automatically adjusting for optimum comfort with minimal user intervention.

Energy impact: Smart fans with occupancy sensors activate only when people are present, while temperature-based controls reduce speed as indoor temperatures approach comfort levels—potentially cutting fan energy use by 30-50% compared to manual operation.

Understanding how a ceiling fan motor works reveals why these simple devices deliver decades of reliable service with minimal maintenance. From the electromagnetic principles discovered nearly two centuries ago to the sophisticated BLDC technology in modern smart fans, the core function remains consistent: converting electricity into controlled rotation that moves air efficiently. When selecting a new fan, prioritize BLDC motor technology for superior efficiency, quieter operation, and advanced features that integrate with your smart home ecosystem. For existing fans, regular cleaning and occasional lubrication (for sleeve bearing models) will keep your motor spinning smoothly for years to come—proving that sometimes, the most unassuming technology overhead represents remarkable engineering worth appreciating.

How to Paint Ceiling Fan Blades


Transforming your outdated ceiling fan with freshly painted blades is one of the most cost-effective home improvements you can tackle this weekend. Instead of spending $100-$300 on a replacement fixture, painting ceiling fan blades gives you complete design control while keeping your project budget under $150. Whether you’re matching a newly renovated room, refreshing weathered blades, or making a bold design statement, the right painting approach delivers professional-looking results that withstand constant air movement and daily use. This guide reveals the exact preparation and application techniques that prevent the peeling and chipping that doom most DIY fan painting attempts.

The difference between a paint job that lasts years versus one that flakes within weeks comes down to proper surface preparation and material selection. Rushing through sanding or using the wrong primer creates immediate adhesion problems that worsen with each fan rotation. By following the systematic process outlined here, you’ll create a finish that resists dust accumulation, cleans easily, and maintains its beauty through seasonal humidity changes and regular operation.

Why Painted Fan Blades Fail (And How to Prevent It)

Most DIYers make critical mistakes that doom their ceiling fan blade painting projects from the start. Painting over glossy surfaces without proper sanding creates instant adhesion problems that manifest as peeling within weeks of completion. Using standard interior paint on plastic blades leads to catastrophic failure because these smooth surfaces require specialized bonding primers. Skipping the crucial step of removing blades from the fan assembly results in missed spots and uneven coverage that becomes obvious once the fan starts spinning.

Your painted fan blades will last for years when you identify the exact blade material first and match your preparation accordingly. MDF blades need thorough priming to seal the engineered fibers, wood blades require grain filling for smooth results, and plastic blades demand aggressive sanding plus bonding primer. Investing two extra hours in proper preparation saves you from repainting within a year—and prevents the embarrassing scenario of paint chips scattering across your room when you first turn on the fan.

Identify Your Blade Material Before Buying Supplies

ceiling fan blade material comparison MDF wood plastic

MDF blades show an extremely smooth, uniform surface without visible grain patterns and produce fine sawdust when lightly sanded. These common modern blades accept paint well but require proper priming to prevent uneven absorption.

Solid wood blades display natural grain patterns and feel denser than MDF. Pine, oak, and walnut each present unique challenges—deep-grained woods like oak need multiple grain-filling applications to achieve smooth painted finishes.

Plastic and polymer blades feel slightly flexible and produce curled shavings (not dust) when sanded. These budget-friendly blades require the most aggressive preparation since standard paints won’t bond to their smooth surfaces without specialized treatment.

Pro Tip: Test an inconspicuous spot with 120-grit sandpaper before purchasing supplies—the material response tells you exactly what you’re working with and prevents costly product mistakes.

Essential Tools Checklist for Flawless Results

Gather these specific supplies before starting your painting ceiling fan blades project to avoid mid-process frustrations:

  • Sandpaper assortment: 120-grit (initial scuffing), 180-grit (intermediate smoothing), 220-grit (final prep)
  • Foam sanding blocks: Conform to blade curves better than flat sandpaper
  • TSP substitute: Removes grease buildup, especially critical for kitchen fans
  • Bonding primer: Non-negotiable for plastic blades; use stain-blocking for wood
  • Interior latex paint: Satin or semi-gloss finish in quart size (less than $25)
  • Two-inch angled brush: For precise edge control on narrow blade surfaces
  • Four-inch foam roller: Applies paint quickly on smooth blade tops
  • Tack cloths: Removes sanding dust that causes surface imperfections

Warning: Skip the cheap dollar-store brushes—they shed bristles that embed in your wet paint and create a textured mess that screams “amateur job.”

Surface Prep: The Make-or-Break Step

Proper surface preparation accounts for 80% of your painting ceiling fan blades success. Follow these exact steps to create a paint-ready surface:

  1. Remove blades completely from the fan assembly—this gives you full access to all surfaces including often-neglected bottom edges
  2. Clean thoroughly with warm water, mild dish soap, and TSP substitute to remove dust, oils, and kitchen grease
  3. Sand systematically starting with 120-grit (following blade length direction), then 180-grit, finishing with 220-grit
  4. Remove all dust with vacuum followed by tack cloth—any remaining particles become visible in your finish

For plastic blades, sand aggressively until the glossy surface sheen disappears completely. For wood blades with prominent grain, apply wood filler to valleys, let dry, then sand smooth with 220-grit. Allow blades to dry completely (2-4 hours) before priming—any moisture trapped under paint causes immediate adhesion failure.

Primer Application Secrets Professionals Use

Zinsser Bulls Eye 1-2-3 primer application ceiling fan blades

Primer creates the critical bonding layer between your blade material and topcoat. Apply it correctly with these techniques:

  • Work in temperatures between 50°F-85°F with humidity below 65% for optimal adhesion
  • Load your brush, then wipe excess against container edge to prevent drips
  • Apply in long, smooth strokes following blade length direction
  • Maintain wet edges to avoid lap marks that create visible lines in your finish
  • Allow proper drying time (check manufacturer specs) before sanding or topcoating

Pro Tip: For plastic blades, use Zinsser Bulls Eye 1-2-3 or Kilz Adhesion bonding primer—standard primers fail on smooth plastic surfaces regardless of your preparation quality.

Paint Application Techniques That Prevent Brush Marks

Achieve smooth, professional-looking results with these application methods:

  • Apply thin coats rather than attempting full coverage in one pass—two thin coats beat one thick coat every time
  • Brush technique: Dip no more than one-third of bristle length, apply long strokes from edge toward center
  • Roller technique: Use “W” pattern for even distribution, finish with unidirectional strokes
  • Spray alternative: For flawless results, use Krylon Fusion for Plastic on plastic blades

Allow paint to dry to the touch (1-2 hours for latex) before applying second coat, but don’t rush—full cure takes 7-14 days. Apply a minimum of two coats for adequate coverage and durability, especially when painting over dark colors.

Creative Design Ideas Beyond Basic Solid Colors

Transform your fan into a design statement with these approaches:

  • Two-tone blades: Paint tops one color and edges/undersides a contrasting color
  • Ombre effect: Create gradual color transitions from blade to blade (best with spray application)
  • Metallic accents: Use metallic paint on blade edges for subtle shine that catches light
  • High-contrast ceilings: Paint blades same color as ceiling for dramatic disappearing effect

Expert Note: Satin finish provides the best balance of durability and light reflection for most rooms. Semi-gloss offers superior moisture resistance for kitchens and bathrooms but shows imperfections more readily.

Reinstallation and Curing Timeline

Allow proper curing time before reinstalling to prevent surface damage:

  • Latex paint: Wait 24-48 hours before reinstallation, but full cure takes 7-14 days
  • Oil-based paint: Requires 21-30 days for complete cure (not recommended for most DIYers)
  • Tighten screws properly: 20-30 inch-pounds of torque—over-tightening cracks mounting tabs

After reinstallation, run the fan at medium speed for several hours to test paint adhesion before regular use. Check for wobbling and verify blades appear in the same plane when spinning.

Maintenance Tips for Long-Lasting Results

Extend your painted fan blades’ life with these care techniques:

  • Dust weekly with microfiber cloth (never feather dusters that scatter debris)
  • Clean monthly with mild soap solution for kitchen/bathroom fans
  • Address chips immediately by lightly sanding, cleaning, and applying matching paint
  • Avoid harsh cleaners or abrasive pads that damage the paint surface

Warning: High humidity, temperature extremes, and direct sunlight accelerate paint degradation—kitchen and bathroom fans need more frequent inspection.

Fixing Common Painting Problems

When issues arise, diagnose and solve them correctly:

Peeling paint: Usually from inadequate surface prep—remove failed paint completely, re-sand, and re-prime

Visible brush marks: Sand smooth with 320-grit paper, then apply additional thin coats

Uneven color: Apply additional coats while ensuring thorough paint stirring between applications

Drip marks: Sand smooth after complete drying, then apply thinner coats with proper technique

Painting ceiling fan blades successfully requires matching your preparation to the specific blade material and following precise application techniques. By investing time in proper surface preparation, selecting appropriate materials, and allowing adequate curing time, you create a finish that withstands years of use while transforming your room’s aesthetic. The modest investment of $70-$150 in materials delivers professional-quality results that make expensive fan replacements unnecessary—proving that thoughtful DIY projects provide exceptional value when executed correctly.

Ceiling Fan Motor Types Explained


When selecting a new ceiling fan, the motor type makes all the difference in performance, noise, and long-term costs. Your choice between ceiling fan motor type options—AC (Alternating Current) or DC (Direct Current)—directly impacts energy bills, comfort levels, and even design possibilities. While both types move air effectively, they accomplish this through fundamentally different mechanisms that create distinct advantages for specific home environments. Understanding these core differences prevents costly mistakes when upgrading your cooling system. This guide cuts through the marketing hype to show you exactly how each motor type performs in real-world conditions, so you can make a decision that aligns with your budget, comfort priorities, and home’s electrical requirements.

Why AC Ceiling Fan Motors Cost Less Upfront

AC motor ceiling fans deliver reliable performance at accessible price points because they use household electrical current directly without internal conversion circuitry. The simpler design with fewer electronic components translates to manufacturing savings that lower your initial purchase price significantly. When comparing identical fan models from the same manufacturer line, AC versions typically cost $50-$150 less than their DC counterparts—a meaningful difference when outfitting multiple rooms.

This straightforward engineering also means easier repairs when issues arise years later. With decades of refinement behind AC motor technology, replacement parts remain widely available through standard hardware channels. For rental properties, secondary rooms, or homes in regions with low electricity rates, AC motors often represent the most economical choice where long-term energy savings matter less than immediate affordability.

How DC Motors Convert Power for Superior Efficiency

DC motor ceiling fan efficiency diagram

DC ceiling fans incorporate internal rectifier circuitry that transforms your home’s alternating current into direct current before powering the motor. This conversion process enables precise electronic control over electrical current rather than manipulating frequency like AC motors. The result? DC motors move air using substantially less energy while maintaining consistent performance across all speed settings.

The Trade Winds Caleb model demonstrates this efficiency advantage clearly: it delivers 5.5% more airflow (6,034 CFM versus 5,722 CFM) while consuming 37% less power (31.83 watts versus 50.76 watts) compared to its AC equivalent. This translates to a 68% improvement in airflow efficiency (189.58 CFM per watt versus 112.73 CFM per watt)—meaning you get significantly more cooling power for each dollar spent on electricity.

DC Ceiling Fan Noise Reduction You Can Actually Hear

If you’ve ever been kept awake by the hum of a bedroom ceiling fan, DC motor technology offers a tangible solution. The precise current control in DC motors eliminates the vibration inherent in AC motor operation, resulting in near-silent performance at lower speeds. Most homeowners describe DC fan operation as a gentle air rush rather than a mechanical hum—making them ideal for nurseries, home offices, and master bedrooms where quiet matters.

AC motors produce a noticeable low-frequency hum, especially at medium and low speeds when ambient noise decreases. While perfectly acceptable in living rooms or kitchens, this sound becomes disruptive in quiet spaces. If you’ve ever turned off a fan because the noise bothered you more than the heat, a DC motor ceiling fan will likely solve your problem without sacrificing cooling performance.

Six-Speed Control vs Three-Speed Limitations

DC ceiling fans typically offer six distinct speed settings compared to the standard three or four speeds on AC models. This expanded range gives you precise control to match airflow exactly to current conditions—whether you need a barely perceptible breeze on a mild spring evening or maximum circulation during summer heat waves.

The electronic controls in DC motors also enable smoother transitions between speeds. Rather than abrupt jumps between settings common with AC fans, DC models often feature gradual acceleration and deceleration that feels more natural. Some premium DC fans even include “natural breeze” modes that subtly vary speed to mimic outdoor air patterns—features impossible with traditional AC motor technology.

Compact DC Motors Enable Modern Ceiling Fan Designs

modern minimalist ceiling fan DC motor design

The physical size difference between motor types creates dramatically different design possibilities. DC motors occupy significantly less space than equivalent AC motors, allowing manufacturers to create sleeker profiles, integrated lighting solutions, and unconventional silhouettes. This size advantage explains why nearly all contemporary and minimalist ceiling fan designs utilize DC motor technology.

When browsing high-end lighting showrooms, you’ll notice the most innovative designs—ultra-thin housings, bladeless options, and statement-making artistic forms—all rely on DC motors. If your ceiling fan serves as a focal point in your decor scheme, DC technology provides the design flexibility needed to achieve truly distinctive aesthetics that AC motors simply can’t match due to their larger physical footprint.

Real Dollar Savings: AC vs DC Energy Costs

AC vs DC ceiling fan energy cost comparison chart

Calculating actual energy costs reveals how motor type impacts your wallet. Using standard assumptions of 3 hours daily operation at 10 cents per kilowatt hour:

  • AC motor fan (Trade Winds Flynn): $5.56 annual operating cost
  • DC motor fan (Trade Winds Caleb): $3.49 annual operating cost

That $2.07 annual savings may seem modest, but over a fan’s typical 10-year lifespan, it accumulates to $20.70 in pure electricity savings. While this doesn’t immediately offset the higher upfront DC purchase price, it represents real money back in your pocket each year—especially valuable if you run fans extensively or live in areas with above-average electricity rates.

Major Brands Offering DC Ceiling Fan Options

You don’t need to sacrifice brand reliability when choosing DC motor technology. Leading manufacturers including Kichler, Fanimation, Modern Forms, Craftmade, Hunter, and Casablanca all incorporate DC motors across their product lines. This widespread adoption means you can find DC options in virtually every price bracket—from affordable builder-grade models to premium designer fixtures.

The competitive market for DC fans drives continuous innovation while keeping prices more accessible than when the technology first emerged. Whether you prefer traditional craftsmanship or cutting-edge contemporary designs, multiple reputable brands offer DC motor ceiling fans that match your aesthetic preferences without compromising on quality or reliability.

When AC Ceiling Fans Still Make Sense

Choose AC motor ceiling fans if your top priority is minimizing initial expenditure. They remain the smart choice for:

  • Rental properties where long-term savings won’t benefit you
  • Secondary rooms used infrequently
  • Homes in regions with very low electricity rates
  • Budget-conscious installations requiring multiple fans

The Trade Winds Flynn model exemplifies this value proposition—delivering 5,722 CFM of airflow at a significantly lower purchase price than DC alternatives. While less efficient than DC options, AC fans still provide excellent energy performance compared to air conditioning systems, making them a sensible choice when upfront cost outweighs long-term savings potential.

When DC Motors Deliver Maximum Value

Invest in DC ceiling fans when these factors rank high on your priority list:

  • Quiet operation for bedrooms or home offices
  • Long-term energy savings for primary living spaces
  • Design flexibility for modern interior aesthetics
  • Precise speed control for optimal comfort customization

Homeowners planning to stay in their homes for many years will see the higher initial investment recouped through lower electricity bills. If you run fans daily for several hours throughout warm months, the DC motor’s efficiency advantage compounds significantly over time—making it the smarter financial decision despite the higher sticker price.

Making Your Final Ceiling Fan Motor Decision

Your ideal ceiling fan motor type depends entirely on your specific circumstances and priorities. AC motors win for immediate affordability and simplicity, while DC motors deliver superior long-term value through efficiency, quiet operation, and design innovation. Neither option consumes significant energy compared to HVAC systems—making both environmentally preferable to mechanical cooling.

Consider your actual usage patterns, noise sensitivity, design preferences, and planned occupancy duration when making your choice. For most primary living areas and bedrooms where fans run regularly, DC motors provide noticeable benefits that justify their higher price. For occasional-use spaces or tight budgets, AC motors remain a perfectly reasonable solution that delivers reliable performance at accessible price points. Ultimately, understanding these motor type differences puts you in control of your cooling investment rather than leaving it to marketing claims.

Hunter Ceiling Fan Not Working: Quick Fix Tips


Your Hunter ceiling fan suddenly stops spinning, leaving you sweating in summer heat or struggling with winter drafts. When a Hunter ceiling fan not working scenario strikes, most homeowners panic, assuming costly repairs or replacement are necessary. The truth is, 80% of Hunter ceiling fan problems stem from simple issues you can diagnose and fix in under an hour—no electrician required. Whether your fan won’t start at all, runs intermittently, wobbles violently, or fails to respond to controls, this guide reveals the exact steps to identify and resolve the problem. You’ll learn which components to check first, how to safely troubleshoot electrical issues, and when professional help is truly necessary—saving you hundreds in unnecessary service calls.

Find Your Hunter Fan Model Number Before Troubleshooting

Locating your specific Hunter fan model number before attempting repairs prevents wasted time and incompatible parts purchases. Hunter and Casablanca fans hide model numbers in several standard locations that many homeowners overlook.

Check the top surface of the motor housing where it connects to the ceiling mounting bracket—this metal label withstands decades of operation. Remove the canopy cover (the decorative dome hiding wiring) to inspect its interior surface, where many newer models print specifications. For fans with integrated lighting, examine the light kit housing itself, especially around the bulb sockets. Some models tuck the label inside the switch housing cover, requiring you to remove the decorative plate covering the pull chains. Always have this number documented before ordering replacement parts or contacting support.

Pro Tip: Take multiple photos of the label with your smartphone before reassembling the fan. This reference prevents confusion when ordering capacitors or remote systems that vary significantly between Hunter models.

5 Most Common Reasons Your Hunter Ceiling Fan Won’t Start

When your Hunter ceiling fan is not working properly, these five issues account for 90% of failures. Check each systematically before assuming motor failure.

Electrical supply interruptions cause most “dead fan” scenarios. A tripped circuit breaker often appears in the middle position rather than fully off, fooling homeowners. Wall switches develop internal failures that prevent contact even when toggled. Loose wire connections at the ceiling junction box create intermittent operation that seems mysterious but has a simple fix.

Failed capacitors silently disable motors while lights may still function. This hockey puck-shaped component provides the initial jolt needed to start rotation. When swollen or leaking electrolyte, it must be replaced with an exact model-specific match.

Remote control system failures mimic fan malfunctions. Dead batteries, signal interference from other devices, or desynchronized transmitter/receiver units create the illusion of a broken fan. Always test operation using the wall switch first.

Pull chain switch failures occur from years of use. The internal contacts burn out, preventing electricity from reaching the motor despite proper power supply.

Loose blade screws create dangerous wobble that triggers safety mechanisms in newer Hunter models, causing automatic shutdown to prevent damage.

How to Fix Hunter Ceiling Fan Power Supply Issues in 15 Minutes

Hunter ceiling fan power supply troubleshooting diagram

Power supply problems represent the fastest Hunter ceiling fan not working fixes you’ll encounter. Follow this sequence before investigating complex components.

  1. Verify wall switch position: Toggle the switch 5-6 times to clean internal contacts. Many “dead” fans revive from this simple action.

  2. Check circuit breaker: Locate your electrical panel and inspect for tripped breakers. Reset by flipping fully off, then on. Wait 60 seconds before testing the fan.

  3. Test outlet functionality (for plug-in models): Insert a known working device like a phone charger. If no power, check GFCI outlets in nearby rooms which may control the circuit.

  4. Inspect pull chain switches: Remove the switch housing cover and examine connections. Burn marks or melted plastic indicate replacement is needed.

  5. Confirm capacitor condition: Locate this cylindrical component (usually 1-2 inches in diameter) near the motor. Swelling, leakage, or bulging sides require immediate replacement with an exact model match.

Warning: Always turn off power at the breaker before accessing internal components. Use a non-contact voltage tester to confirm no electricity flows to the fan.

Troubleshoot Hunter Fan Remote Control Problems Without Replacement

Remote control issues cause more “Hunter ceiling fan not working” calls than actual fan failures. Fix these common problems before buying new remotes.

First, replace batteries with fresh ones—never mix old and new batteries as this causes inconsistent voltage. Test from multiple angles within 15 feet of the fan, as infrared remotes require direct line of sight. If the fan responds to wall switches but not the remote, resynchronize the system by:

  1. Turning off power at the breaker for 30 seconds
  2. Restoring power and waiting 15 seconds
  3. Holding both “Fan” and “Light” buttons on the remote for 10 seconds
  4. Listening for a click from the receiver unit inside the canopy

Check for signal interference from nearby electronics. Wi-Fi routers, baby monitors, and fluorescent lighting emit frequencies that disrupt remote signals. Temporarily turn off these devices to test if they’re causing the problem.

Pro Tip: Clean remote contacts with isopropyl alcohol and a cotton swab. Corrosion on button contacts creates intermittent function that mimics remote failure.

Diagnose and Fix Hunter Ceiling Fan Wobble in Under 30 Minutes

Hunter ceiling fan blade balancing kit instructions

Wobbling isn’t just annoying—it accelerates wear on motor bearings and mounting hardware. Fix blade wobble with this systematic approach:

Start with the Blade Balance Test: Attach a clothespin to the leading edge of one blade and run the fan on low speed. If wobble decreases, that blade is lighter than others. Move the clothespin to different blades until wobble minimizes, then add a balancing clip (included with most Hunter fans) at that location.

Check Blade Screw Tightness: Use a ladder and tighten all eight blade screws (four per blade arm). Many homeowners only tighten visible screws, but both top and bottom screws require attention. Apply medium pressure—overtightening cracks plastic components.

Verify Blade Pitch Consistency: Measure each blade’s angle against the ceiling with a pitch gauge. Variations greater than 2 degrees create imbalance. Adjust blade irons equally across all blades to maintain proper pitch.

Warning: Never operate a severely wobbling fan for extended periods. This stresses the motor housing and may loosen the mounting bracket from the ceiling.

Hunter Fan Making Noise? Identify and Eliminate 7 Common Sounds

Different noises pinpoint specific Hunter ceiling fan not working issues. Match the sound to the solution:

Clicking sound: Usually debris caught in the blade path or loose light kit components. Turn off power and inspect the space between blades and housing.

Rattling noise: Indicates loose hardware. Tighten downrod connections at both ends and check blade arm screws. Plastic components require less torque than metal—snug but not tight.

Buzzing from motor: Points to failing capacitor or voltage irregularities. Replace the capacitor first before investigating electrical supply issues.

Grinding sound: Signals severe bearing wear requiring professional motor service. Do not continue operation as this damages the entire motor assembly.

Humming without rotation: Confirms capacitor failure. The motor receives power but lacks starting torque.

Squeaking noise: Indicates need for lubrication in older models. Apply light machine oil to moving parts—not recommended for modern sealed bearings.

Whooshing sound: Normal at high speeds; excessive noise suggests blade warping or dirt accumulation.

When to Call an Electrician for Your Hunter Ceiling Fan Not Working

Certain Hunter ceiling fan problems require professional intervention for safety and warranty preservation.

Call an electrician immediately if you discover frayed or corroded wiring in the ceiling junction box. These conditions create fire hazards that untrained homeowners shouldn’t address. Visible smoke, burning smells, or discoloration around wiring connections indicate serious electrical faults.

Motor replacement requires specialized tools and knowledge. Opening the motor housing voids most Hunter warranties and risks improper reassembly that creates safety hazards.

Professional service is mandatory when installing new electrical infrastructure or replacing non-fan-rated ceiling boxes. Many homeowners unknowingly mount fans to standard light fixture boxes not designed for rotational stress.

Warranty-covered repairs must be performed by authorized technicians to maintain coverage. Attempting DIY fixes on covered components voids your warranty immediately.

Prevent Future Hunter Fan Failures With This Simple Maintenance Routine

Regular care prevents most Hunter ceiling fan not working scenarios and doubles your fan’s lifespan.

Clean blades quarterly using a microfiber duster or damp cloth. Dust accumulation creates uneven weight distribution that strains the motor. For high ceilings, use an extendable duster rather than unstable ladder positions.

Tighten all hardware semi-annually—ceiling bracket, downrod connections, and blade screws. Vibration gradually loosens components, creating wobble that accelerates wear.

Inspect the capacitor annually for swelling or leakage. This component typically lasts 5-7 years before needing replacement. Keep a model-specific spare on hand for quick swaps.

Reverse fan direction seasonally using the switch on the motor housing. Summer (counter-clockwise) pushes air down for cooling; winter (clockwise) circulates warm air downward, reducing heating costs by up to 10%.

Pro Tip: Mark your calendar for maintenance tasks. Set reminders on your phone for April 1 (spring direction change), October 1 (fall direction change), and your birthday (annual inspection).

Save Money: Hunter Ceiling Fan Repair vs. Replacement Decision Guide

Most Hunter ceiling fan not working problems cost less to repair than replace. Follow this decision tree:

Spend under $50 on repairs when:
– Capacitor replacement ($15-25)
– Remote system reprogramming ($0)
– Blade balancing ($0)
– Light kit component replacement ($10-30)

Consider replacement when:
– Motor requires rebuilding ($150+)
– Multiple components fail simultaneously
– Fan is over 15 years old
– Repair costs exceed 50% of new fan price

Warning: Never attempt motor disassembly on modern Hunter fans. The permanent magnets create dangerous pinch hazards during reassembly.

Final Thoughts

A Hunter ceiling fan not working scenario rarely requires immediate replacement when you know how to diagnose the problem. By methodically checking power supply, remote systems, blade balance, and component condition, you’ll resolve most issues yourself. Always begin with the simplest solutions—like checking circuit breakers or replacing remote batteries—before investigating complex components. Implement the quarterly maintenance routine to prevent 80% of common failures, and keep your model number documented for quick parts identification. Remember that safety comes first—when in doubt about electrical components, call a licensed electrician. With proper care, your Hunter ceiling fan will deliver reliable airflow for 15+ years, making today’s troubleshooting effort a worthwhile investment in your home’s comfort.

How to Avoid Strobe Effect with Ceiling Fan


Your favorite movie night just turned into a disorienting light show. That annoying strobe effect—where your ceiling fan blades seem to freeze or spin backward under the light—is more than just irritating. It disrupts relaxation, causes eye strain, and makes your living space feel uninviting. This flickering phenomenon occurs when your fan’s rotation syncs with your light source’s frequency, creating an optical illusion that tricks your brain. How to avoid strobe effect with ceiling fan setups is a common homeowner headache, but the solution isn’t replacing your entire fixture. You’ll learn exactly why this happens with modern lighting and implement targeted fixes that eliminate the strobe within 30 minutes—most without calling an electrician. By the end of this guide, you’ll have a flicker-free room with smooth, natural lighting that works perfectly with your fan’s motion.

Replace Problematic LED Bulbs in 3 Critical Steps

LED bulb refresh rate comparison chart ceiling fan

LED bulbs are the #1 culprit behind ceiling fan strobe effects. Their rapid on-off cycling (often invisible to the naked eye) syncs with fan blade rotation, creating that jarring stop-motion illusion. Standard LEDs refresh at 100-120Hz, dangerously close to common fan speeds of 60-300 RPM.

Choose Flicker-Free Bulbs with High Refresh Rates

Seek bulbs specifically labeled “flicker-free” or “strobe-free” with refresh rates above 200Hz. Look for:
Minimum 240Hz frequency (prevents sync with fan speeds)
“TRIAC dimmable” compatibility (works with standard fan dimmers)
CRI above 90 (reduces perceptual flicker)
Avoid cheap non-dimmable LEDs—they lack smoothing capacitors that prevent visible strobing. Philips Hue White bulbs and GE Relax models consistently solve this issue in 85% of cases.

Install Bulbs with Correct Wattage Equivalency

Overpowered bulbs overwhelm fan light kits, causing voltage fluctuations that trigger strobing. Match these specs:
Max 60W equivalent for standard 3-light fan kits
10W actual power draw or less per bulb
A19 or BR30 shape (fits most fan globes)
Using a single 100W-equivalent bulb in a 3-socket kit creates uneven current flow. Replace all bulbs simultaneously—even one mismatched LED can destabilize the circuit.

Test Bulb Orientation in the Socket

Many fans strobe because of poor electrical contact. Rotate each bulb 180 degrees in its socket—this repositions the contact tab to ensure full metal-to-metal connection. If flickering stops during rotation, replace worn sockets immediately. Warning: Always turn off power at the breaker before checking sockets for corrosion or spring tension loss.

Fix Incompatible Dimmer Switches Within 15 Minutes

Standard wall dimmers designed for incandescent bulbs cause erratic current flow with LEDs, creating severe strobing. Modern fans with integrated lights often use incompatible dimming protocols.

Swap to LED-Compatible Fan Dimmers

Install a dimmer explicitly rated for LED ceiling fans like Lutron Diva DVCL-153P or Leviton D26HD. Key features to verify:
Minimum load of 5W (matches LED requirements)
“Soft leading edge” technology (prevents choppy current)
Fan-rated (handles motor startup surges)
Replace the dimmer by:
1. Turning off circuit breaker
2. Labeling all wires (line/load/neutral)
3. Connecting new dimmer per manufacturer diagram
4. Testing at lowest setting first

Bypass Dimmer Circuits for Permanent Fix

If dimming isn’t essential, eliminate the problem entirely by installing a standard switch. Wire the fan light directly to the hot line—no dimmer in between. This provides clean, consistent voltage that stops strobing instantly. Use a single-pole switch like Leviton 5601-W and follow NEC code for box fill requirements.

Adjust Fan Speed Settings That Trigger Strobing

Smartphone camera flicker test ceiling fan

Your fan’s RPM directly interacts with light frequency. At specific speeds, blades pass light sources at intervals matching the light’s refresh cycle—creating the strobe illusion.

Identify and Avoid Critical Speed Thresholds

Test each speed setting with a smartphone camera (which captures flicker invisible to eyes):
1. Set fan to LOW speed—record with phone
2. Gradually increase to MEDIUM/HIGH
3. Note speeds where flickering appears on camera
Most strobing occurs between 60-120 RPM. Permanently skip these settings using your fan’s pull-chain or remote. If your fan has 3 speeds, run exclusively on LOW (40 RPM) or HIGH (180 RPM) to avoid the danger zone.

Install Speed Stabilizers for Consistent Rotation

Voltage fluctuations from household appliances cause RPM variations that sync with lights. Add a fan speed stabilizer like Westinghouse 7702000 between the fan and power source. This $15 device maintains constant rotation speed regardless of grid fluctuations—breaking the strobe cycle.

Upgrade Light Fixtures with Integrated Solutions

Hunter 27185 ceiling fan light kit installation

Older fan light kits lack modern flicker prevention. Retrofitting takes 20 minutes but solves 90% of persistent strobe issues.

Install Dedicated Fan Light Kits with Diffusers

Replace clear globes with frosted or ribbed glass that scatters light. Models like Hunter 27185 use prismatic lenses to diffuse illumination evenly across blade paths. Critical installation steps:
– Match kit size to your fan’s canopy diameter
– Ensure included sockets support 10W max LEDs
– Tighten mounting screws in alternating pattern
Diffusers prevent concentrated light beams from creating sharp shadow patterns that cause strobing.

Add External Light Diffusion Films

For immediate relief without hardware changes, apply 3M Scotchcal Diffusion Film to existing globes. Cut to size and:
1. Clean glass with isopropyl alcohol
2. Apply film sticky-side down
3. Smooth out air bubbles from center outward
This $8 solution reduces light intensity variations by 70%, breaking the strobe illusion instantly.

Diagnose Electrical Issues Causing Voltage Fluctuations

Persistent strobing often indicates underlying wiring problems that require professional attention.

Check for Loose Neutral Wires in Junction Box

A loose neutral causes voltage swings that destabilize both fan motor and lights. Critical safety step: Turn off main breaker before inspecting:
– Remove fan canopy to access wiring
– Verify all white (neutral) wires are tightly secured
– Look for melted insulation or arcing marks
If wires feel warm during operation, shut off power immediately—this indicates dangerous current leakage.

Install Dedicated Circuits for Problem Rooms

Kitchen or home theater rooms often share circuits with high-draw appliances. When your microwave activates, voltage dips cause lights to flicker in sync with fan rotation. Run a new 15-amp circuit from your panel exclusively for the fan/light—this isolates it from other devices. Hire an electrician if your panel lacks available slots.

When to Call an Electrician Immediately

Some strobe causes require professional intervention:
Flickering accompanied by burning smells (indicates arcing)
Lights dimming when fan starts (overloaded circuit)
Zapping sounds from switch (loose connections)
Strobing persists after all DIY fixes (hidden wiring fault)
Licensed electricians can install whole-house voltage regulators or upgrade panel capacity—solutions beyond homeowner capabilities. Never ignore these warning signs; they risk fire hazards.

Prevent Future Strobe Effects During New Installations

Choose fan/light combinations designed to avoid this issue from day one:
Select fans with DC motors (smooth speed control)
Demand integrated LED drivers (built-in flicker suppression)
Verify compatibility using manufacturer’s LED chart
Install before drywall to run dedicated circuits easily
Modern fans like Minka-Aire Concept II include anti-strobe technology that adjusts light frequency to match fan speed—eliminating the problem at the source.


Final Note: Eliminating ceiling fan strobe effects requires matching lighting technology to your fan’s mechanical rhythm. By replacing incompatible LEDs, fixing dimmer mismatches, and avoiding critical speed thresholds, you’ll restore peaceful, flicker-free lighting in under 30 minutes. For lasting results, prioritize fans with integrated anti-strobe features during replacements. If flickering continues after trying these solutions, consult an electrician—your safety outweighs any DIY risk. Enjoy movie nights without the disco-ball effect!

How to Lubricate a Ceiling Fan: Quick Guide


Ceiling fans are workhorses in our homes, circulating air year-round while often going unnoticed—until that first irritating squeak breaks the silence. If you’ve ever wondered why your once-silent ceiling fan has developed an annoying noise, lubrication might be the solution you need. Many modern homeowners face this common household issue that can transform a peaceful room into an auditory distraction. While some newer ceiling fan models are designed as “self-lubricating” units requiring minimal maintenance, older models absolutely benefit from proper lubrication to extend their lifespan and maintain smooth operation. In this guide, we’ll explore the proper techniques for lubricating your ceiling fan, helping you restore quiet operation and prevent premature wear on your fixture.

Unfortunately, without specific manufacturer guidelines, attempting to lubricate a ceiling fan can actually cause more harm than good. Many modern ceiling fans don’t require regular lubrication at all, as they’re built with permanently lubricated bearings sealed within the motor housing. Before you reach for that oil can, it’s crucial to determine whether your specific fan model actually needs lubrication—a step many homeowners overlook when hearing that first squeak. This guide will help you identify whether your fan requires lubrication and, if so, the proper methods to accomplish this maintenance task safely and effectively.

Identifying If Your Ceiling Fan Needs Lubrication

ceiling fan noise diagnosis chart

Recognizing Common Noise Patterns

Listen carefully to your fan’s sounds to determine if lubrication might solve the issue. A consistent squeaking or grinding noise that changes with fan speed often indicates bearing friction. Higher-pitched squeals typically suggest metal-on-metal contact that lubrication could resolve. However, if you hear clicking sounds, these usually point to loose components rather than lubrication needs. Pay attention to whether the noise occurs only at certain speeds—this can help pinpoint whether the issue relates to motor bearings needing lubrication or another mechanical problem.

Determining Fan Age and Model Requirements

Most ceiling fans manufactured within the last 15-20 years feature sealed motor bearings that don’t require user lubrication. Older models (typically pre-1990s) are more likely to have serviceable oil ports designed for periodic lubrication. Check your fan’s instruction manual or manufacturer specifications to confirm whether your model requires lubrication. If you no longer have the manual, search online using your fan’s model number to find specific maintenance requirements. When in doubt about whether your fan needs lubrication, consult a professional rather than risk damaging your fixture with improper maintenance.

Safety Precautions Before Attempting Lubrication

ladder safety for ceiling fan maintenance

Power Disconnection Procedures

Before touching any part of your ceiling fan, completely disconnect power at the circuit breaker—not just the wall switch. Use a non-contact voltage tester to confirm power is off at the fan’s wiring. Leave the circuit breaker off for the duration of your work and place a note on the panel to prevent accidental reactivation. This critical safety step protects against electrical shock, which could occur if you contact live components while servicing the fan. Never assume the wall switch alone provides sufficient protection—only a disconnected circuit breaker ensures your safety during maintenance.

Proper Work Area Preparation

Set up a sturdy ladder on a level surface directly beneath the fan, ensuring three points of contact when climbing. Clear the area below of furniture and breakables in case any tools or parts accidentally fall. Have all necessary tools within easy reach before climbing the ladder to avoid precarious stretching. Wear safety glasses to protect your eyes from dust and potential debris. Consider having a helper stabilize the ladder and hand you tools as needed. Working on ceiling fans requires both hands at times, so proper preparation prevents dangerous situations and dropped items.

Types of Lubricants for Ceiling Fans

electric motor oil 10w non-detergent comparison

Appropriate Oil Specifications

When lubrication is necessary, use only lightweight machine oil specifically designed for electric motors—typically 10-15 weight non-detergent oil. Never use household oils like WD-40, cooking oil, or automotive grease, as these can attract dust, gum up motor components, or damage electrical insulation. The correct lubricant should be clear, lightweight, and specifically formulated for electric motor bearings. Check your fan’s manual for the manufacturer’s recommended lubricant type, as some specialty fans may require specific formulations.

Amounts and Application Points

Over-lubrication causes as many problems as under-lubrication—typically only 3-5 drops per oil port are needed. Most fans with serviceable bearings have small oil ports located near the motor housing where the blades attach. Apply lubricant slowly, allowing time for absorption between drops. Wipe away any excess immediately to prevent oil from dripping onto blades or ceiling surfaces. The goal is to provide just enough lubricant to reduce friction without creating a mess or interfering with other components.

Step-by-Step Lubrication Process

Locating Service Ports on Your Fan

Many older ceiling fan models feature small oil ports with screw-on caps near the top of the motor housing. These ports might be labeled “oil” or have a small oil can symbol. If your fan lacks visible ports, it likely has sealed bearings that shouldn’t be lubricated by homeowners. Some fans require partial disassembly to access lubrication points—consult your specific model’s manual before proceeding. Never force access to areas that appear sealed or tamper with manufacturer-sealed components, as this can void warranties and create safety hazards.

Proper Lubrication Technique

With power confirmed off and your fan stationary, locate the oil ports and carefully remove any caps. Using a precision oiler or dropper, apply 3-5 drops of appropriate lubricant into each port. Allow several minutes for the oil to penetrate the bearings before replacing caps. Manually rotate the fan blades several times to help distribute the lubricant evenly through the mechanism. After reassembly, wait at least 30 minutes before restoring power to allow excess oil to settle and prevent potential drips when the fan starts moving.

When Not to Lubricate Your Ceiling Fan

Modern Fan Models With Sealed Bearings

Most ceiling fans manufactured after the mid-1990s feature permanently lubricated, sealed bearings that shouldn’t be tampered with. Attempting to add lubricant to these sealed units can force contaminants into the bearing assembly or damage the seals. If your fan is making noise but lacks visible oil ports, the issue likely stems from something other than lubrication needs. Forcing lubrication into sealed units often causes more problems than it solves and may permanently damage your fan motor.

Identifying Alternative Noise Sources

Before assuming lubrication is needed, check for common alternative issues: loose blade screws, unbalanced blades, mounting hardware that needs tightening, or warped blade irons. Many “squeaky fan” problems are actually caused by blade wobble rather than motor friction. Tighten all visible screws and ensure your fan is properly balanced before concluding that lubrication is necessary. In some cases, simply cleaning dust buildup from blades and motor housing can eliminate noise without any lubrication.

Professional Help Versus DIY Maintenance

Recognizing When to Call a Professional

If you’ve confirmed your fan requires lubrication but can’t access the service ports, or if noise persists after proper lubrication, it’s time to consult an electrician or ceiling fan specialist. Fans exhibiting burning smells, excessive heat, or electrical issues should never be serviced by homeowners. Professionals have specialized tools and knowledge to properly service fans without causing damage. When in doubt about your ability to safely complete the task, professional assistance is always the wiser choice.

Long-Term Maintenance Recommendations

For fans that do require periodic lubrication, establish a maintenance schedule based on manufacturer recommendations—typically every 2-3 years for older models. Keep a record of when you last serviced your fan to track maintenance intervals. Regular dusting of blades and motor housing prevents buildup that can affect performance. Consider upgrading to a modern fan with sealed bearings if you’re constantly battling maintenance issues with an older model. Proper maintenance extends fan life while ensuring safe, quiet operation throughout your home.


Final Note: Many modern ceiling fans require no lubrication at all, so always consult your specific model’s manual before attempting maintenance. When lubrication is appropriate, using the correct oil type in proper amounts makes the difference between extending your fan’s life and causing premature failure. If you’re uncertain about your fan’s maintenance requirements, professional consultation is always safer than guesswork with electrical fixtures overhead.

Why Do Ceiling Fan Blades Droop? Causes & Fixes


That unsettling wobble in your ceiling fan isn’t just annoying—it’s a warning sign that something’s wrong. When ceiling fan blades droop, they lose their perfect horizontal alignment, creating an uneven rotation that affects both performance and safety. This common issue impacts homes across the country, yet most homeowners don’t understand why their ceiling fan blades droop or how to fix it. Whether you’ve noticed a subtle tilt in one blade or are trying to prevent droop before it starts, understanding the mechanics behind this phenomenon gives you the knowledge to maintain optimal airflow and avoid costly repairs. In this guide, we’ll uncover the exact reasons why ceiling fan blades droop, how to spot early warning signs, and most importantly—what you can do to prevent or correct it before your fan becomes a safety hazard.

Why Gravity and Material Fatigue Cause Ceiling Fan Blade Droop

The relentless force of gravity is the primary culprit behind why ceiling fan blades droop over time. Every time your fan sits idle in its horizontal position, gravity pulls downward on each blade, creating constant stress at the mounting points where blades connect to the fan hub. This continuous gravitational stress accumulates over months and years, gradually deforming blade materials at a microscopic level. The deformation may start imperceptibly small, but these tiny changes compound into visible drooping that compromises your fan’s performance.

Material fatigue dramatically accelerates this gravitational deformation. Different blade materials succumb to droop through distinct mechanisms:

  • Wooden blades experience fiber compression as wood fibers slowly compact under constant load
  • MDF and engineered wood suffer from binding agent breakdown that allows structural relaxation
  • Plastic blades undergo polymer chain relaxation where molecules slowly shift position
  • Metal blades (though more resistant) develop microscopic stress fractures at mounting points

The quality of materials determines how quickly droop develops—premium hardwoods resist deformation longer than thin particleboard, while high-grade ABS plastic maintains shape better than budget alternatives. Even the best materials will eventually droop under gravity’s constant pull, but understanding these mechanisms helps you choose fans that resist droop longer.

How Blade Thickness and Design Affect Droop Development

Thinner blades often resist droop better than thicker ones despite seeming counterintuitive. This occurs because thinner blades generate less gravitational force while maintaining sufficient rigidity. The structural design matters equally—blades with internal reinforcement like metal ribs or composite cores maintain their shape far longer than flat, unreinforced designs.

The mounting bracket design significantly impacts droop resistance. Quality fans use robust brackets with multiple attachment points that distribute stress evenly across the blade. Budget models often use minimal hardware that concentrates stress at just one or two points, creating weak spots where drooping begins. When shopping for a new fan, examine the blade-to-hub connection—more screws and wider mounting surfaces generally indicate better droop resistance.

Temperature and Humidity’s Shocking Impact on Blade Droop

wood warping humidity illustration

Your home’s climate control directly affects how quickly your ceiling fan blades droop, with humidity proving particularly destructive for wooden blades. Wood’s hygroscopic nature means it continuously absorbs and releases moisture based on ambient humidity levels. During humid periods, wooden blades absorb moisture and expand slightly; when dry conditions return, they contract. This ongoing expansion-contraction cycle creates internal stress that weakens wood fibers and accelerates warping.

Critical humidity thresholds for wooden blades:
– Below 30% humidity: Wood dries out, becoming brittle and prone to cracking
– 40-60% humidity: Ideal range that minimizes moisture-related stress
– Above 70% humidity: Excessive moisture absorption causes swelling and warping

Temperature fluctuations compound humidity damage through thermal cycling. Each heating and cooling cycle creates microscopic damage at the molecular level, gradually reducing the material’s ability to resist deformation. Rooms like bathrooms and kitchens create perfect storm conditions with frequent humidity spikes from showers and cooking, making ceiling fans in these locations especially vulnerable to rapid droop development.

How to Protect Blades from Environmental Damage

Maintaining indoor humidity between 40-60% provides optimal conditions for wooden ceiling fan blades. Use these practical strategies:

  • Install a whole-house dehumidifier if you live in a coastal or humid climate
  • Ensure proper bathroom ventilation with exhaust fans that vent outdoors
  • Avoid placing ceiling fans near heating vents or recessed lighting that creates heat pockets
  • In dry climates, use humidifiers to prevent wood from becoming too brittle

For existing fans showing early droop signs in humid environments, consider applying a moisture-resistant finish to wooden blades. Marine-grade polyurethane creates a protective barrier that minimizes moisture absorption while maintaining the wood’s natural appearance.

3 Critical Installation Mistakes That Cause Ceiling Fan Blades to Droop

Improper installation creates immediate stress points that accelerate blade droop development from day one. These common mistakes transform what should be a balanced system into uneven stress distribution that guarantees premature drooping.

Mistake #1: Mounting on an unlevel bracket – Even a slight tilt in the mounting bracket places abnormal loads on specific blades. Always verify level in multiple orientations using a high-quality bubble level before securing the fan body. A perfectly level mount distributes gravitational stress evenly across all blades.

Mistake #2: Incorrect screw torque – Loose screws allow blade movement that gradually widens mounting holes, while overtightened screws can crack blade materials. Follow manufacturer torque specifications precisely—typically 35-45 inch-pounds for most residential fans. Use a torque screwdriver for accuracy.

Mistake #3: Mismatched downrod length – Installing a fan too close to a high ceiling or too far from a low one creates vibration patterns that accelerate blade stress. Match downrod length to ceiling height using this simple formula: Ceiling height (feet) minus 8 = ideal downrod length (inches). For a 10-foot ceiling, use a 24-inch downrod.

How to Verify Proper Installation in 5 Minutes

Perform this quick alignment check to catch installation issues before they cause droop:

  1. Turn off the fan and let blades stop completely
  2. Place a straightedge across multiple blades near the hub
  3. Check for consistent gaps between straightedge and blades
  4. Measure distance from ceiling to blade tip at multiple points
  5. All measurements should be within 1/8 inch of each other

Any noticeable variation indicates improper installation that will accelerate blade droop. Correct these issues immediately before permanent deformation occurs.

How to Identify Early Signs of Ceiling Fan Blade Droop

ceiling fan blade droop comparison normal vs drooping

Catching blade droop early allows for simple correction before replacement becomes necessary. Learn to recognize these subtle warning signs before they progress to severe drooping:

Visual indicators appear most clearly when viewing the fan from directly below. A properly functioning fan forms a perfect horizontal circle when stationary. Early droop shows as a subtle slope where the blade tip hangs lower than the mounting point. The most reliable detection method involves placing a straightedge across multiple blades near the hub—any gap larger than 1/16 inch indicates developing droop.

Performance symptoms often precede visible droop:
– Increased vibration at specific speed settings
– Rhythmic clicking sounds corresponding to blade rotation
– Reduced airflow despite running at previous effective speeds
– Unusual humming that wasn’t present when fan was new

Pro Tip: Perform monthly visual inspections using your smartphone camera. Point the camera upward at the fan while it’s stationary and review the image on your screen. Digital magnification makes subtle alignment issues much easier to spot than with the naked eye.

Permanent Solutions for Severely Drooping Ceiling Fan Blades

When blade droop becomes severe (more than 1/4 inch deviation), temporary fixes won’t provide lasting results. These proven solutions address the root causes rather than just symptoms:

Blade replacement offers the most reliable resolution for moderate to severe droop. High-quality replacement blades made from better materials can extend your fan’s service life significantly. For wooden fans, consider upgrading to moisture-resistant composite blades that won’t succumb to humidity-related warping. Always purchase exact model-specific replacements to maintain proper balance.

Complete fan replacement becomes cost-effective when:
– The fan is over 10 years old
– Multiple blades show severe droop
– Motor bearings show excessive play
– Replacement blades cost more than 50% of a new comparable fan

Modern energy-efficient models use advanced blade designs that resist droop while consuming 20-30% less electricity than older units. The long-term energy savings often offset the initial investment.

When to Call a Professional: Seek professional help immediately if you notice:
– Severe wobbling that shakes light fixtures
– Loud grinding or screeching noises
– Visible separation between blades and mounting brackets
– Any signs of electrical issues like burning smells

Safety should always come first—severely drooping blades under constant stress could potentially detach, causing property damage or injury.

Preventing Future Droop: Long-Term Strategies That Work

Investing in quality during your next fan purchase pays dividends in droop resistance. Look for these features that significantly extend blade life:

  • Blade construction: Solid hardwood or high-density composites outperform thin MDF
  • Mounting system: Multiple screw points with metal reinforcement brackets
  • Environmental rating: Damp-rated fans for humidity-prone areas like kitchens
  • Warranty coverage: Minimum 5-year warranty on blades indicates manufacturer confidence

Establish a simple maintenance routine that prevents droop development:
– Check blade alignment quarterly using the straightedge method
– Tighten mounting screws annually (don’t overtighten)
– Clean blades monthly to prevent dust buildup that creates imbalance
– Operate fan at medium speed regularly rather than constantly on high

Expert Note: For existing fans showing early droop signs, applying gentle upward pressure to drooping blades for 24-48 hours can sometimes reverse minor deformation. Place books or foam blocks carefully under affected blades to apply constant, gentle upward pressure while the fan remains off. This technique works best for wooden blades in the early stages of droop development.

Understanding why ceiling fan blades droop empowers you to take proactive steps that maintain performance and safety. By addressing environmental factors, ensuring proper installation, and implementing regular maintenance, you can significantly extend your fan’s service life while maintaining optimal airflow throughout your home. When droop does appear, recognizing the early warning signs allows for timely intervention before minor issues become major problems requiring complete replacement.

Hampton Bay Ceiling Fan Blades Sagging: How to Fix


Nothing disrupts the clean look of your living space quite like noticing your Hampton Bay ceiling fan blades sagging as you glance upward. This common issue affects countless homeowners who rely on these popular Home Depot fixtures for comfort and style. When your Hampton Bay ceiling fan blades sagging becomes visible, it creates an unbalanced appearance that not only looks unsightly but often leads to annoying wobbling, excessive noise, and reduced airflow efficiency. The constant vibration from an unbalanced fan can actually worsen the problem over time, potentially damaging your ceiling mount or electrical connections if left unaddressed.

The good news is that Hampton Bay ceiling fan blades sagging typically stems from preventable or easily fixable issues rather than a fundamental flaw in your fan. Most cases involve simple mechanical problems that you can resolve with basic tools and a methodical approach—saving you the expense and hassle of fan replacement. Whether your blades have gradually sagged over time or suddenly dropped after a recent installation, this guide provides the precise steps to diagnose and correct the problem, restoring both function and aesthetics to your ceiling fan.

Diagnose Your Hampton Bay Fan Blade Sagging Problem First

Before grabbing your toolkit, properly identifying why your Hampton Bay ceiling fan blades sagging will prevent wasted effort on temporary fixes that fail to address the root cause. Many homeowners make the mistake of immediately tightening visible screws without understanding which components have actually failed, leading to recurring issues that require repeated attention.

Conduct a Thorough Visual Inspection

With the fan completely powered off and stationary, position yourself directly beneath it and use a smartphone level app or traditional bubble level along each blade’s length. Document which blades sag significantly (more than 1/8 inch difference from others) and note whether the entire assembly hangs unevenly or just specific blades. Carefully examine each blade’s connection point to the blade iron (the metal arm that attaches to the motor housing), looking for stripped screw holes, visible cracks in plastic components, or rust on metal parts. Pay special attention to the upper mounting bracket where the fan attaches to your ceiling—this is often the true culprit behind what appears to be blade-specific sagging.

Identify the Most Common Hampton Bay Blade Sagging Causes

Hampton Bay ceiling fan blades sagging typically stems from one of four issues: loose mounting hardware at the ceiling junction box (the most frequent cause), loosened blade-to-iron screws allowing individual blades to droop, fatigued or broken blade irons that no longer maintain proper tension, or occasionally warped blades due to moisture exposure or manufacturing defects. The constant vibration from normal operation gradually works screws loose over time, especially in homes with higher ceilings where fan movement creates more torque. In newer installations, improper initial assembly—such as insufficiently tightened mounting screws or incorrectly aligned blade brackets—often manifests as sagging within the first few months of use.

Secure the Critical Mounting Hardware Connections

ceiling fan mounting bracket installation guide

When your Hampton Bay ceiling fan blades sagging affects the entire assembly rather than just one or two blades, the problem almost always originates at the ceiling mounting point. Addressing this foundational issue before working on individual blades prevents wasted effort and ensures lasting results.

Tighten the Canopy-to-Bracket Connection Properly

After turning off power at the circuit breaker, remove the decorative canopy cover by unscrewing its retaining screws. With the canopy lowered, check that all mounting screws connecting the fan’s mounting bracket to your ceiling electrical box are fully tightened. Many Hampton Bay installations use a ball-and-socket mounting system that can shift position if the set screws loosen. Ensure the bracket sits flush against the ceiling with no visible gaps, and verify that the downrod (if present) is securely locked into position. When reinstalling the canopy, hand-tighten screws gradually in a star pattern to avoid distorting the cover while ensuring even pressure.

Verify Motor Housing Attachment Security

While the canopy is removed, inspect the screws that secure the motor housing to the mounting bracket. These critical connections often loosen due to motor vibration, causing the entire fan assembly to tilt. Using a Phillips screwdriver, tighten each motor housing screw incrementally—turn each one a quarter-turn at a time while alternating between opposite screws to maintain even pressure. Avoid overtightening, which can strip the threads in the motor housing. After securing these connections, manually rotate the fan blades to check for smooth movement and confirm the motor housing remains centered within the mounting bracket.

Correct Individual Blade Alignment and Balance

When Hampton Bay ceiling fan blades sagging affects only specific blades while others remain level, the solution requires precise blade-by-blade adjustment and balancing to eliminate wobble and restore even air distribution.

Adjust Blade Pitch Using Alignment Markers

Most Hampton Bay models feature small alignment markers (often painted lines or molded ridges) on the blade irons that indicate proper pitch angle. With the fan powered off, loosen the screws connecting each sagging blade to its iron just enough to allow adjustment. Rotate the blade until its alignment marker matches the position of properly aligned blades, then retighten the screws. For optimal results, use a blade pitch gauge (available at hardware stores for under $5) to ensure each blade maintains the manufacturer’s recommended 12-14 degree angle. This precise adjustment creates consistent airflow that prevents vibration-induced loosening.

Replace Damaged Blades or Blade Irons Immediately

Hampton Bay ceiling fan blade replacement parts

If inspection reveals cracked blade irons (the metal arms connecting blades to the motor) or warped blades, replacement is necessary—no amount of tightening will permanently fix Hampton Bay ceiling fan blades sagging caused by damaged components. Hampton Bay, being a Home Depot exclusive brand, makes replacement parts available through their website using your fan’s model number (typically found on a label inside the canopy). When installing new blades, apply a small amount of thread-locking compound to the attachment screws to prevent future loosening while still allowing future adjustments. Match replacement blades exactly to maintain proper balance—mixing different blade styles or weights creates new imbalance issues.

Implement Preventive Maintenance to Avoid Recurrence

The most effective solution for Hampton Bay ceiling fan blades sagging is preventing the problem before it starts through simple but consistent maintenance practices that take only minutes each quarter.

Establish a Quarterly Tightening Routine

Every three months, power off your fan and perform a complete hardware check: tighten all visible screws (ceiling mount, canopy, motor housing, and blade attachments), inspect for rust or corrosion, and verify blade alignment. This quick maintenance session catches minor loosening before it progresses to noticeable sagging. When tightening blade screws, place a piece of cardboard between the blade and iron to prevent marring the finish while you work.

Address Minor Issues Before They Worsen

At the first sign of unevenness—before Hampton Bay ceiling fan blades sagging becomes visually obvious—perform the tightening procedures outlined above. Early intervention prevents the vibration damage that accelerates hardware deterioration. If you notice increased wobble or noise after ceiling painting or home renovations, check your fan immediately, as these activities often dislodge settled dust that temporarily unbalances the fan.

Recognize When Professional Help Is Necessary

While most Hampton Bay ceiling fan blades sagging issues are DIY-friendly, certain situations warrant professional assistance to ensure safety and proper resolution.

Electrical and Structural Mounting Concerns

If your sagging problem involves the ceiling electrical box (particularly if it’s not rated for fan weight), exposed wiring, or structural mounting issues, consult a licensed electrician. Hampton Bay fans require specific fan-rated electrical boxes that can support 35-70 pounds of dynamic load—standard light fixture boxes cannot safely handle this stress. Attempting electrical work without proper expertise creates serious fire and safety hazards.

Complex Balance Problems

When standard balancing procedures fail to eliminate wobble after addressing all mechanical connections, your fan may have internal motor issues requiring professional service. Persistent vibration that continues after hardware tightening and blade replacement could indicate a failing motor bearing or unbalanced rotor assembly—problems that typically warrant fan replacement rather than repair.

Final Steps for Long-Term Hampton Bay Fan Performance

Correcting Hampton Bay ceiling fan blades sagging properly extends your fan’s lifespan while restoring quiet, efficient operation. After completing repairs, run your fan on high speed for 24 hours while monitoring for any residual wobble or noise. If minor vibration persists, attach small adhesive balancing weights (included with most fans or available separately) to the top of the lightest blade until smooth operation returns. Document your repair process with notes and photos for future reference, as Hampton Bay models often share similar components across product lines. By addressing blade sagging promptly with these targeted solutions, you’ll maintain optimal performance from your ceiling fan for years to come—without the unnecessary expense of replacement. Remember that consistent, minor maintenance prevents the major issues that lead homeowners to replace perfectly functional fans prematurely.

How to Fix Wobbly Ceiling Fan: Quick Steps


That irritating wobble in your ceiling fan isn’t just annoying—it’s a warning sign that something needs attention. As you try to relax in your living room or bedroom, that rhythmic shaking creates distracting rattles and can even damage your fan over time. The good news? Most wobble issues can be diagnosed and fixed with basic tools in under an hour. Whether your fan is brand new or has been spinning reliably for years, you don’t need to call an electrician for this common household problem. This guide gives you the step-by-step process to eliminate wobble and restore smooth, quiet operation to your ceiling fan.

Before grabbing your tools, understanding why your fan wobbles helps you target the right solution. Ceiling fans develop wobble for specific reasons, and identifying the root cause saves you time during troubleshooting. Most cases involve loose components that shift slightly with each rotation or misaligned blades that throw off the entire system’s balance. Let’s get your fan running steady again with these proven methods.

Why Your Ceiling Fan Wobbles Despite Tight Screws

Many homeowners tighten all visible screws only to find the wobble persists, leaving them frustrated and confused about what’s really causing the problem.

Hidden Loose Connections Cause Persistent Wobble

While blade screws are the most obvious culprits, wobble often stems from connections you can’t see without removing the fan’s canopy. The mounting bracket securing your fan to the ceiling electrical box frequently loosens over time, especially in homes where ceiling joists have settled. This creates movement at the very foundation of your fan installation. The downrod connecting the motor to the mounting bracket can also work loose at both ends, allowing subtle shifting that manifests as wobble.

Blade alignment issues often masquerade as simple looseness. Even if all screws are tight, blades sitting at slightly different heights create uneven air distribution that results in visible wobble. A single bent blade—perhaps from accidental contact during cleaning—throws off the entire balance system, making the fan appear loose when the components are actually secure.

How to Identify the True Source of Wobble

Watch your fan while running on medium speed to diagnose the wobble source. If the entire fixture sways side to side, the mounting system needs attention. If the wobble seems to originate from the blades themselves—with some parts dipping lower during rotation—your blade alignment needs correction.

Listen carefully as well. A properly functioning ceiling fan produces only a gentle whooshing sound. Grinding, clicking, or rattling noises accompanying the wobble indicate specific loose components. Addressing wobble early prevents accelerated wear on motor bearings and mounting hardware, extending your fan’s lifespan significantly.

Power Safety Steps Before Fixing Your Fan

Before touching any component of your wobbly ceiling fan, you must disconnect electrical power completely—this step is non-negotiable and should never be skipped.

Proper Circuit Breaker Identification

Find the circuit breaker controlling power to your fan’s room. Most homes have dedicated breakers for ceiling fans, though some circuits control multiple areas. If uncertain which breaker controls the fan, flip breakers one at a time while a helper watches the fan below—the fan stops when you’ve found the correct breaker.

Once identified, switch the breaker to OFF and verify power is disconnected. Simply turning off the wall switch isn’t sufficient, as some fans maintain constant power for remote control receivers or light kits, leaving live wires inside the canopy.

Essential Voltage Verification Process

Even after turning off the breaker, use a non-contact voltage tester to confirm no electricity reaches the fan’s wiring. Remove the canopy and carefully test the wires inside—the tester should indicate no voltage. If it lights up or beeps, you’ve turned off the wrong breaker.

Keep the breaker off throughout your repair. Label it to prevent accidental restoration of power by others in your household. Working with a helper is recommended, especially when using a ladder, to provide assistance if complications arise.

Blade Alignment Correction Method

ceiling fan blade alignment tool tape measure

If tightening all visible screws hasn’t resolved your wobble, the blades themselves likely need realignment—a common issue that’s easily fixed with basic tools.

Precise Blade Height Measurement Technique

Use a tape measure to check the distance from the ceiling to each blade tip. With the fan turned off, measure from your ceiling down to each blade tip at its lowest point. All measurements should be within one-eighth inch of each other. If one blade sits noticeably lower, you’ve identified your wobble source.

A blade sitting too low often indicates a bent blade arm rather than an adjustment issue. Attempting to bend it back risks cracking brittle plastic components. Instead, note which blade arm needs replacement and measure from the mounting point to the blade tip before purchasing a replacement.

Effective Balancing Kit Application

Ceiling fan balancing kits (under $10) solve most residual wobble after tightening and alignment. These kits include a plastic clip that attaches to the blade top and small adhesive weights.

Turn your fan on high speed and observe which blade dips lowest. Clip the balancing clip to that blade’s top near the tip and test again. If wobble continues, move the clip inward toward the motor and retest. Once wobble minimizes, attach the weight at the clip position using the adhesive backing. Run the fan through all speed settings to verify smooth operation.

Mounting Bracket Stability Check

ceiling fan mounting bracket tightening wrench

The mounting bracket anchors your entire fan assembly to the ceiling, and any looseness here translates directly to visible wobble during operation.

Comprehensive Bracket Bolt Tightening

Locate all bolts securing the mounting bracket to the ceiling electrical box and to any downrod. These bolts typically use lock washers that can degrade over time. Tighten each bolt with an appropriately sized wrench, working in pairs of opposite bolts to maintain even pressure.

Check that the electrical box itself is securely fastened to a ceiling joist—if the box moves when pushed, it must be reinforced before your fan can operate wobble-free. Many wobble issues stem from inadequate electrical boxes that weren’t designed to support ceiling fan weight and movement.

Critical Bracket Alignment Verification

Hold a small level against the bracket arms to verify they point straight down. If the bracket tilts, loosen the mounting bolts slightly and adjust its position until level, then retighten securely.

For sloped ceilings, verify that the correct sloped-ceiling mounting kit was used. Standard mounting brackets on angled ceilings create inherent wobble that requires special angled mounts to correct. The bracket must hang perpendicular to the floor regardless of ceiling angle.

Downrod Connection Troubleshooting

For fans with downrods (most standard installations), the connection between downrod and motor housing requires careful inspection during wobble troubleshooting.

Downrod Thread Inspection and Tightening

Remove the canopy and visually inspect the threaded junctions where the downrod connects to both the motor housing and mounting bracket. The downrod should seat fully with no visible threads showing where it enters the motor housing.

If threads are visible, hold the downrod while loosening the set screw, then rotate the motor housing clockwise to tighten the threaded connection. For downrods with pre-attached balls, ensure the ball is fully seated in the mounting bracket socket and the retaining pin is properly installed.

Optimal Downrod Length Selection

An improperly sized downrod for your ceiling height can contribute to wobble. Standard installations use downrods between three and five inches, with longer rods for ceilings exceeding nine feet.

If your fan has always wobbled since installation, the downrod length may be incorrect. Consult your fan’s installation manual for recommended downrod lengths based on ceiling height, and consider trying a different length if other fixes haven’t resolved the wobble.

When to Replace Critical Components

worn ceiling fan motor bearings replacement

Some wobble issues require component replacement rather than adjustment, particularly when parts are damaged, worn, or incompatible with your installation.

Bearing Wear Identification and Resolution

If your fan wobbles despite all adjustments and the motor feels rough when spun by hand, the motor bearings may be wearing out. Signs include grinding sounds, excessive heat from the motor after running, and visible shaft play when attempting to rock the motor hub.

Unfortunately, replacing motor bearings requires specialized tools, making professional repair or fan replacement more practical than DIY bearing replacement for most homeowners. Once bearings reach this condition, the fan typically requires complete replacement.

Mounting Hardware Upgrade Necessity

Fans over fifteen years old often wobble due to outdated mounting hardware that doesn’t meet current safety standards. Upgrading to a new fan-rated electrical box and compatible mounting bracket often eliminates wobble that adjustment alone cannot fix.

Consider replacing the entire fan if parts are discontinued for your model. Modern fans run more quietly, consume less energy, and often include helpful features like remote controls that older models lack.

Quarterly Wobble Prevention Routine

Once you’ve eliminated wobble, taking preventive measures keeps it from returning and extends your fan’s operational lifespan.

Essential Maintenance Schedule

Every three months, turn off your fan and perform a quick visual and tactile inspection of all accessible fasteners. Tighten any screws that have loosened since your last inspection, and check for rust or corrosion on metal components. This simple maintenance takes less than five minutes.

Pay particular attention to blade screws, as these loosen most frequently. A quarter-turn of additional tightening during each quarterly inspection keeps these critical fasteners secure without risking overtightening.

Household Wobble Prevention Education

Teach household members to avoid touching ceiling fans while spinning, as this contact bends blades and creates immediate imbalance. If you need to stop the fan quickly, use the pull chain or remote control rather than reaching up.

Keep furniture and objects clear of the blade path. A chair bumped into a spinning blade or an object stored near the fan’s reach can bend blades over time. Maintaining clearance around your ceiling fan prevents accidental damage that causes wobble.


A wobbly ceiling fan disrupts your comfort and signals developing mechanical issues that deserve prompt attention. By following these troubleshooting steps—starting with simple tightening and progressing through blade alignment and mounting checks—you can restore smooth, quiet operation to virtually any residential ceiling fan. Remember that safety always comes first: verify power is disconnected before touching any fan components, and don’t hesitate to call a licensed electrician for electrical concerns. Regular inspection and gentle treatment keep your ceiling fan running steadily for years to come, providing comfortable, efficient cooling without the distracting motion of unbalanced blades.

Ceiling Fan Motor Vibration: Quick Fix Guide


That annoying shake you feel when your ceiling fan turns on isn’t just irritating—it’s a warning sign. When your ceiling fan motor vibration intensifies beyond a gentle hum, it strains the entire fixture and could lead to dangerous detachment. Thousands of homeowners ignore this symptom until a blade cracks or the mounting fails completely. In this guide, you’ll discover exactly why your fan shakes violently and how to eliminate each cause permanently—without calling a professional. You’ll learn to diagnose whether it’s loose hardware, unbalanced blades, or failing internal components causing the tremors, plus step-by-step solutions that take less than 30 minutes. Most importantly, you’ll gain the confidence to stop the shaking safely using tools already in your toolbox.

Loose Mounting Bracket: The Hidden Culprit Behind Violent Shaking

If your entire ceiling fan wobbles side-to-side when running, the mounting bracket is likely loose against the electrical box. This dangerous condition transmits motor vibrations directly into your ceiling structure. When installers skip critical hardware or use undersized electrical boxes, the fan gradually works itself loose over time. You’ll notice the fixture shifts position when touched even when turned off.

How to Check Your Fan’s Mounting Security in 60 Seconds

Stand on a stable ladder and gently push the fan housing sideways with your palm. If the whole unit moves more than 1/8 inch, the mounting has failed. Never skip this critical safety check—a severely loose fan can detach completely. While the fan is off, remove the canopy cover to expose the mounting bracket. Check for these red flags:
– Visible gaps between the bracket and ceiling
– Paint cracks radiating from mounting screws
– Screws that spin freely without tightening

Step-by-Step: Securing a Wobbly Ceiling Fan Bracket

ceiling fan mounting bracket installation guide

  1. Turn off power at the circuit breaker (verify with voltage tester)
  2. Remove light kit and canopy to access mounting screws
  3. Tighten all four bracket screws using a 1/4″ socket driver—one full turn at a time
  4. If screws spin freely, replace with #10 x 2″ lag bolts through the bracket into the electrical box
  5. Install an adjustable fan brace if the electrical box isn’t rated for fan support
  6. Reassemble and test at highest speed

Pro Tip: Place a piece of cardboard between the motor housing and ceiling while tightening. This prevents paint damage and gives you visual feedback as gaps close.

Unbalanced Blades: The #1 Cause of Persistent Vibration

Over 70% of ceiling fan motor vibration stems from blade imbalance—even slight weight differences. Dust accumulation, minor warping, or loose blade irons create uneven rotational forces. You’ll hear a rhythmic “thump-thump” sound that worsens with higher speeds, often accompanied by visible blade wobble.

DIY Blade Balancing Without Special Tools

The coin method solves most imbalances using household items:
1. Tape a nickel to the top center of one blade
2. Run fan on high speed
3. If vibration decreases, move the coin toward the blade tip in 1-inch increments
4. Once vibration minimizes, tape a second nickel to the opposite blade at the same position
5. Permanently attach small adhesive weights (included in $5 balancing kits)

When to Replace Bent or Warped Fan Blades

Blades with visible curves exceeding 1/8 inch require replacement. To check:
– Shut off power and mark each blade with chalk
– Rotate blades to 12 o’clock position
– Place a yardstick vertically against the ceiling
– Measure gap between blade tip and yardstick at 3, 6, 9, and 12 o’clock
– Replace any blade varying more than 1/16 inch from others

Warning: Never attempt to “straighten” plastic or wood blades—they’ll crack during operation. Always replace in identical pairs to maintain balance.

Dirty Blades and Motor Housing: How Grime Causes Imbalance

Dust buildup as thin as 1/32 inch creates significant weight disparities. In humid climates, grease and cobwebs form concrete-like coatings on blades and motor housings. This uneven accumulation forces the motor to work harder, amplifying vibrations. You’ll notice increased shaking after seasonal fan inactivity or in kitchens/dining areas.

Safe Cleaning Methods for Different Blade Materials

ceiling fan blade cleaning guide wood plastic metal

Material Cleaning Solution Technique Drying Time
Wood 1:1 vinegar/water Microfiber cloth, never soaking 2 hours
Plastic Mild dish soap Sponge with light pressure 1 hour
Metal Rubbing alcohol Cotton swabs for crevices 30 minutes
  1. Turn off power and remove light kit
  2. Vacuum blades thoroughly with brush attachment
  3. Wipe both sides using material-specific solution
  4. Critical step: Clean top surfaces of blades where dust accumulates
  5. Remove motor housing cover to vacuum internal components
  6. Reassemble only when completely dry

Pro Tip: Place painter’s tape on the ceiling around the fan before cleaning. This catches falling debris and prevents water stains during the process.

Worn Motor Bearings: The Grinding Noise You Can’t Ignore

When vibration accompanies grinding or clicking sounds, internal motor bearings have failed. This occurs after 8-10 years of use or in fans run continuously. The motor shaft develops play, causing erratic rotation. You’ll feel intense vibration that worsens over time and hear metallic scraping at startup.

Identifying Bearing Failure Symptoms

Perform this test with power OFF:
1. Grip the blade tips and try to move blades side-to-side
2. If you detect more than 1/16 inch of lateral play at the blade tips
3. Rotate blades manually—you’ll feel rough spots or resistance
4. Inspect motor housing for black grease seepage around seams

Lubrication vs. Replacement: What Actually Works

Most modern fans use sealed bearings that cannot be lubricated. Attempting oil injection often worsens the problem by attracting more dust. For older models with oil ports:
– Use only electric motor oil (not WD-40)
– Apply 2 drops per port monthly during peak season
– Wipe excess immediately to prevent dust buildup

In 90% of cases, bearing replacement requires motor disassembly beyond DIY capabilities. If you confirm bearing failure:
– Budget $80-$150 for professional motor rebuild
– Consider full fan replacement if over 10 years old
Never ignore this issue—seized bearings can overheat wiring

Loose Hardware Throughout the Fan Assembly

Vibration loosens critical fasteners in a vicious cycle. Missing set screws in blade brackets or loose motor housing screws amplify tremors. You’ll hear intermittent rattling that changes with speed settings. This is especially common in fans installed on sloped ceilings where hardware gradually works loose.

Critical Screws to Tighten (Including Hidden Ones)

Focus on these often-overlooked points:
Blade bracket set screws (inside the blade iron)
Canopy mounting screws (where housing meets ceiling)
Downrod coupling screws (if applicable)
Light kit mounting screws
Motor housing screws (exposed after removing canopy)

Use a jeweler’s screwdriver for tiny set screws—they strip easily with improper tools. Apply thread-locker (blue formula) to all blade bracket screws during reassembly.

Why Over-Tightening Causes More Damage

Excessive force cracks plastic components and strips threads. Follow this torque guide:
– Blade bracket screws: 15-20 inch-pounds (snug plus 1/4 turn)
– Canopy screws: 25-30 inch-pounds
– Downrod screws: 35-40 inch-pounds

Pro Tip: Mark tightened screws with colored nail polish. This makes future loosening immediately visible during inspections.

When to Call a Professional Instead of DIY Repair

Certain vibration causes require expert intervention. Attempting repairs on these issues risks electrical shock or ceiling damage. Stop immediately if you notice:
– Smoke or burning smells from the motor
– Visible wire damage inside the housing
– Cracks in the mounting bracket or electrical box
– Vibration that worsens after basic troubleshooting

For older fans (pre-2005), replacement is often safer than repair due to outdated wiring standards. Reputable electricians charge $75-$125/hour but typically resolve vibration issues in under 90 minutes. Always get written estimates before authorizing work—reputable services won’t pressure you for immediate decisions.


Final Note: Persistent ceiling fan motor vibration signals underlying issues that worsen with time. By systematically checking mounting security, blade balance, and internal components using these methods, you’ll eliminate 95% of vibration problems. Implement quarterly maintenance: tighten visible screws, clean blades, and check for abnormal play. For fans over 10 years old, schedule professional inspections every 18 months—this prevents 80% of catastrophic failures. Remember, a smoothly operating fan uses 30% less energy than a vibrating one, saving you money while keeping your home quiet and safe. If shaking continues after these fixes, replacement may be more cost-effective than repeated repairs, especially with modern ENERGY STAR models that operate vibration-free for decades.

« Older posts Newer posts »

© 2026 Hampton Fan Reviews

Theme by Anders NorenUp ↑