That frustrating pull chain you can’t reach from bed, the wall switch across the room you must walk to in the dark, or the fan speed you can never quite adjust without getting up—these everyday annoyances vanish when you convert your ceiling fan to remote control operation. This practical electrical upgrade transforms how you interact with one of the most-used fixtures in your home, bringing modern convenience to traditional ceiling fans without replacing the entire unit. Whether your fan was installed last year or two decades ago, universal remote conversion kits work with most major brands including Hampton Bay, Hunter, and virtually any fan following standard wiring conventions. In just an afternoon, you can add remote functionality that puts complete control at your fingertips.
Why Convert Your Ceiling Fan to Remote Control
Bedroom installations see the most dramatic practical improvement—remote control means adjusting fan speed or turning lights on and off without leaving your bed, a genuine quality-of-life enhancement that becomes more appreciated with each use. High-ceiling installations present even stronger cases for conversion, since pull-chain access often requires pole tools or ladder climbing that introduces its own hazards. Vaulted ceilings, two-story rooms, and stairwell-adjacent fans become far more manageable with handheld control.
Energy management improves when fan adjustment requires minimal effort. When reaching pull chains demands physical exertion, many occupants tolerate uncomfortable conditions rather than making adjustments. Remote operation encourages active management of comfort settings—turning fans off when leaving rooms, adjusting speeds for changing conditions, and responding immediately to comfort needs rather than accepting suboptimal settings.
Accessibility considerations make remote conversion particularly valuable for elderly or mobility-impaired residents. The physical action of reaching pull chains or walking to wall switches presents increasing difficulty with age or physical limitation. Handheld remotes positioned within easy reach from seating areas or beds maintain independent fan control without requiring assistance.
Essential Safety Steps Before Conversion
Electrical safety must dominate your thinking throughout any ceiling fan conversion project. Before touching any wiring or accessing the fan’s internal components, you must identify the specific circuit breaker feeding power to the fan circuit and switch it completely off. This step cannot be emphasized strongly enough—working on live electrical circuits poses serious risks of shock, arc flash, and potential electrocution.
Once you’ve switched the breaker to the off position, implement additional safety measures to prevent accidental re-energization while you work. If your electrical panel supports locking mechanisms, engage the lock to secure the breaker in the off position. When panel locks are unavailable, wrap electrical tape around the breaker handle as a basic physical barrier, though this offers less security than a proper lock. Regardless of which method you employ, post a visible warning note on the panel instructing others in the household to leave the breaker alone until the project concludes.
Verifying power removal constitutes an essential step before proceeding with any physical work. While the breaker position provides primary confirmation, using a non-contact voltage tester on the fan’s wiring connections offers definitive assurance that no live current exists. Test the tester on a known live source first to confirm proper function, then verify the absence of voltage at each wire you intend to touch—including black (hot), red (often switched hot), and white (neutral) wires. Only after receiving negative readings across all connections should you consider the circuit safe for work.
Required Tools for Ceiling Fan Remote Conversion
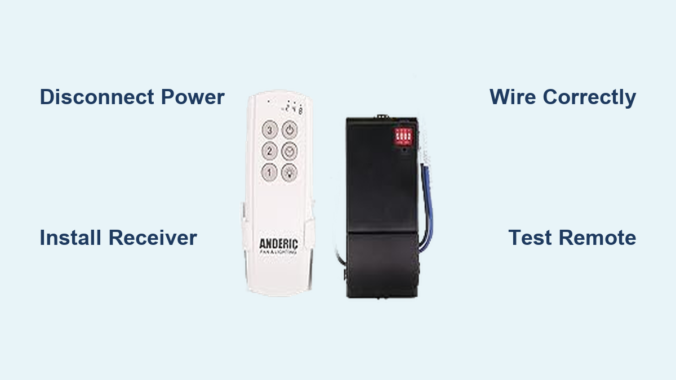
Gathering the right materials before beginning saves frustration and prevents mid-project trips to the hardware store. The primary component is a universal remote control conversion kit, which includes a receiver unit (installed inside the fan canopy) and a handheld transmitter (the remote).
Quality universal kits accommodate wide voltage ranges—premium receivers function across 90V to 265V, making them suitable for virtually any residential setting worldwide. The Cloudpower Universal-Frequency Conversion Kit, available online for approximately $19, represents one popular option offering six speed settings and transmission ranges exceeding 30 meters. The Hampton Bay Universal Remote Control Kit, Model #27157, provides another widely-used option with reliable performance and comprehensive documentation.
Beyond the conversion kit, gather these essential tools:
– Voltage tester to confirm power disconnection
– Wire strippers rated for the gauge of wire in your circuit
– Appropriately sized screwdrivers
– Insulated tools to reduce accident risk
– Wire nuts and electrical tape for secure connections
– Smartphone camera to photograph original wiring configurations
The remote transmitter requires AAA batteries (typically not included with the kit)—purchase these in advance to avoid delays. Consider keeping spare batteries on hand for future replacement.
Single Switch Wiring Conversion Process

The conversion process for a ceiling fan controlled by a single wall switch follows a systematic sequence beginning with accessing the fan’s internal wiring compartment. Most ceiling fans feature a canopy—a dome-shaped cover concealing the mounting bracket and wire connections where the fan assembly meets the ceiling electrical box. This canopy typically attaches through a trim ring design where turning the ring a quarter turn releases mounting screws from keyhole slots, allowing the cover to drop away and expose the wiring compartment.
With the canopy removed, you gain access to the existing wiring configuration. In a standard single-switch setup, you will observe a three-wire cable entering from the ceiling electrical box: a black (hot) conductor providing power, a white (neutral) conductor completing the circuit, and sometimes a red wire indicating a switched connection. The fan itself connects to these ceiling wires through its internal wiring harness—black for fan motor, blue for light kit (if applicable), and white for neutral.
Before disconnecting anything, photograph the original configuration for reference. The original setup likely connected the ceiling black wire directly to the fan’s black wire, the ceiling white wire to the fan’s white wire, and if a light kit exists, a switched hot source connected to the blue light wire. This documentation provides a safety net if you need to reverse the installation.
The remote receiver installation transforms this wiring configuration by inserting the receiver between the ceiling supply and the fan’s internal wires. Connect the ceiling white (neutral) wire to the receiver’s neutral terminal. Connect the ceiling black (hot) wire to the line-in or power-in terminal on the receiver. Connect the fan’s black wire to the receiver terminal labeled for fan control (sometimes marked “fan” or colored red). If your fan includes a light kit, connect the fan’s blue wire to the receiver’s light control terminal (often labeled “light”).
After completing all wire connections, tuck all wires neatly into the junction box without compression or pinching. The receiver unit should seat securely within the available space in the mounting bracket area. Reattach the canopy and trim ring to complete the physical installation.
Dual Switch Ceiling Fan Remote Conversion
Homes with ceiling fans controlled by two separate wall switches—one governing fan operation and another controlling the light kit—require a slightly different approach. This dual-switch configuration presents additional wiring complexity demanding careful planning before beginning conversion work.
Two options exist for converting this configuration:
1. Installing a remote-controlled switch module that replaces one or both existing wall switches
2. Installing a wireless remote control kit with a receiver mounted inside the fan canopy (generally recommended)
For the wireless kit approach in dual-switch configurations:
– Identify the two switched hot wires (typically black and red) entering from the ceiling
– Select one of these wires as the primary power source for the receiver, connecting it to the receiver’s line-in terminal
– Cap off the other switched hot wire with a wire nut and electrical tape
– Connect the fan’s black wire to the receiver’s fan terminal
– Connect the fan’s blue wire to the receiver’s light terminal
– Connect neutral and ground wires as in single-switch configuration
Critical point: Both wall switches must remain in the “on” position after conversion. Since the receiver now controls all switching functions, any wall switch in the “off” position would interrupt power to the receiver and prevent remote operation.
Troubleshooting Common Remote Control Issues
Even with careful installation, operational issues sometimes arise requiring systematic troubleshooting. Understanding common problems and their solutions ensures your remote conversion provides reliable long-term service.
Complete non-operation despite remote button presses suggests:
– Wall switch status—the master switch must remain on
– Breaker position—if tripped, reset it
– Remote batteries—replace depleted batteries
– Receiver indicator lights—confirm power receipt
Intermittent operation or limited range often indicates:
– Signal interference from metallic objects or dense construction materials
– Electronic devices operating on similar frequencies (wireless phones, baby monitors)
– Weak remote batteries—replace with fresh ones
Fan operates but light does not typically indicates:
– Wiring connection issues at the receiver or fan
– Light kit pull-chain switch not in the on position
– Bulb failure—test bulbs in another fixture
Multiple speed settings not functioning suggests:
– The receiver’s speed control circuit may need attention
– Fan’s internal pull-chain speed selector set to fixed low speed—set to maximum
Maintaining Your Remote-Controlled Ceiling Fan
Maintaining your remote-converted ceiling fan involves minimal ongoing effort but several important considerations ensure continued reliable operation.
Remote battery replacement represents the most common maintenance task. Depending on frequency of use and battery quality, remote batteries typically require replacement annually or whenever operation becomes inconsistent. Keep spare AAA batteries available for immediate replacement when needed.
Receiver unit longevity generally matches or exceeds the operational life of the ceiling fan itself, though environmental factors affect this. Heat accumulation within the canopy space, particularly in poorly ventilated attic installations or high-ceiling applications, can accelerate electronic component aging. If receiver failure occurs, replacement receivers are available from kit manufacturers and electrical suppliers—matching the original kit’s frequency and compatibility specifications ensures continued operation with your existing remote.
Remote loss or damage doesn’t mean complete system replacement. Replacement transmitter units can often be purchased separately. Universal remote systems from major manufacturers support replacement remotes that pair with existing receivers.
Wall switch configuration deserves consideration. While the switch becomes unnecessary for daily operation, keeping it functional provides a fallback control method if remote batteries die or the receiver fails. The switch also serves as a dedicated power disconnect for maintenance. Leaving the switch in the on position and covering it with a blank plate maintains the electrical configuration while preventing accidental switching.
Converting your ceiling fan to remote control delivers immediate practical benefits that enhance daily living. The project requires modest investment of time and materials, follows standardized wiring conventions, and produces reliable results when proper safety procedures and installation techniques are followed. Your once-inconvenient pull-chain fan becomes a modern fixture responding to your command from anywhere in the room—comfort and control that makes every day a little easier. Whether you’re upgrading a bedroom fan for nighttime convenience or converting a high-ceiling installation for practical access, ceiling fan remote conversion represents one of the most valuable and immediately noticeable home improvements you can undertake.
Leave a Reply