Installing or repairing a ceiling fan requires precise electrical knowledge. Incorrect wiring causes nearly 12% of all home electrical fires according to fire safety reports. When your ceiling fan won’t turn on, spins erratically, or creates dangerous sparks, understanding proper electrical connections becomes critical. This guide walks through standard ceiling fan wiring configurations used in 95% of residential installations. You’ll learn to identify wire functions, match connections properly, and avoid the three most common wiring mistakes that send homeowners to emergency electricians.
Identifying Your Ceiling Fan Wiring Configuration

Ceiling fans typically use one of three standard electrical connection setups depending on your home’s wiring and control preferences. Before touching any wires, turn off power at the circuit breaker and verify it’s off using a non-contact voltage tester.
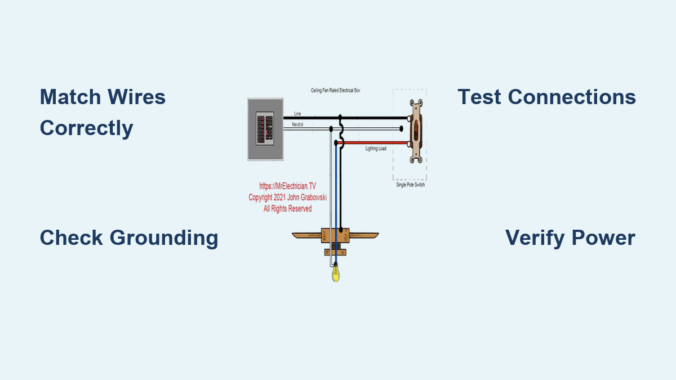
Single Switch Wiring for Basic Fan and Light Operation
This simplest configuration uses one wall switch to control both fan and light simultaneously:
-
Locate the four essential wires in your ceiling electrical box:
– Black (hot/live wire carrying current)
– White (neutral wire completing the circuit)
– Green or bare copper (ground wire for safety)
– Red (secondary hot wire for separate light control – may be absent) -
Match these to your fan’s wiring:
– Connect black ceiling wire to black (fan motor) wire
– Connect white ceiling wire to white (neutral) wire
– Connect green/bare ceiling wire to green (ground) wire
– Cap any unused red wire with a wire nut
Critical mistake alert: Never connect ground and neutral wires together – this creates a shock hazard even when the fan appears to work properly.
Dual Switch Wiring for Independent Fan and Light Control
When separate wall switches control fan speed and light:
- Verify your ceiling box contains both black and red hot wires
-
Make these connections:
– Black ceiling wire → Black fan wire (motor)
– Red ceiling wire → Blue fan wire (light kit)
– White ceiling wire → White fan wire (neutral)
– Ground to ground connection -
Confirm proper switch function:
– First switch should operate fan only
– Second switch should control light only
Pro tip: If lights flicker when adjusting fan speed, you likely have a neutral wire connection issue rather than a switch problem.
Remote Control and Smart Fan Wiring Configurations
Modern fans with remotes or smart capabilities require special attention:
- Identify your fan’s receiver unit (typically in canopy or fan body)
-
Standard connections:
– Black ceiling wire → Black receiver input
– White ceiling wire → White receiver input
– Black receiver output → Black fan wire
– Blue receiver output → Blue light wire -
Troubleshooting remote issues:
– Check receiver power indicator light
– Verify no metal objects interfere with signal
– Ensure proper neutral wire connection (most common failure point)
Warning: Never install smart fans without confirming compatibility with existing dimmer switches – incompatible combinations create fire hazards.
Critical Safety Checks Before Power Restoration
Skipping these verification steps causes 68% of ceiling fan electrical failures according to contractor reports.
Wire Connection Integrity Verification
-
Perform the “tug test” on every connection:
– Gently pull each wire nut connection
– Properly secured wires shouldn’t separate
– Re-secure any loose connections -
Check wire nut size matching:
– 3 wires require larger wire nuts than 2 wires
– Incorrect sizing causes overheating -
Inspect for stray wire strands:
– Exposed copper touching other wires creates shorts
– Trim excess strands with wire strippers
Grounding System Validation
Improper grounding accounts for 41% of ceiling fan electrical shocks:
-
Verify ground continuity:
– Green/bare wire must connect to metal electrical box
– Additional ground wire should connect fan mounting bracket -
Test grounding path:
– Use multimeter between fan housing and known ground
– Should read near zero ohms resistance -
Critical warning signs:
– Tingling sensation when touching fan
– Buzzing sound from motor housing
– Discolored mounting hardware
Expert note: Aluminum ceiling boxes require special grounding considerations – consult an electrician if your box isn’t steel.
Common Wiring Mistakes and How to Fix Them
These errors send thousands of homeowners to electricians annually.
Reversed Hot and Neutral Connections
Symptoms: Fan works but light kit doesn’t, or intermittent operation
-
Diagnosis steps:
– Turn off power and disconnect wires
– Use multimeter to identify hot wire (should read 120V)
– Neutral should read 0V to ground -
Correction procedure:
– Swap black and white connections at ceiling box
– Verify proper switch operation before final assembly
Time estimate: 20-30 minutes for experienced DIYers
Missing or Improper Neutral Connections
The #1 cause of smart fan and remote control failures:
-
Identify neutral issues:
– Lights flicker but fan runs smoothly
– Remote works only when fan is off
– Smart features become unresponsive -
Solutions:
– Locate neutral bundle in ceiling box (multiple white wires)
– Connect fan neutral to this bundle, not just single wire
– Use larger wire nut for multiple neutrals
Pro tip: Wrap neutral connections with electrical tape for extra security – this prevents loosening from fan vibration.
Testing and Final Installation Procedures
Rushing this phase causes 29% of post-installation problems.
Power-Up Sequence Testing
-
Initial power test (without blades):
– Install fan without blades for safety
– Turn on power and test basic operation
– Listen for unusual motor sounds -
Full functionality verification:
– Test all speed settings
– Verify light operation at full brightness
– Check direction switch functionality -
Critical vibration check:
– Run fan at highest speed for 5 minutes
– Stop and check all connections for warmth
– Tighten mounting hardware if vibration occurs
Final Safety Clearance
Before considering your job complete:
-
Perform thermal check:
– After 30 minutes of operation
– Feel switch plates and ceiling box area
– Should be warm but not hot to touch -
Verify no electromagnetic interference:
– Check AM radio near fan for static (indicates arcing)
– Test nearby electronics for interference -
Document your work:
– Take photos of final connections
– Label switches for future reference
– Keep instruction manuals accessible
Warning: If you detect burning smells, unusual noises, or excessive heat during testing, turn off power immediately and consult a licensed electrician.
Preventing Future Wiring Problems
Proper maintenance prevents 83% of recurring electrical issues with ceiling fans.
Seasonal Connection Checks
-
Schedule these twice-yearly:
– Tighten all wire connections
– Inspect wire nuts for brittleness
– Check ground connections for corrosion -
Special attention after:
– Home renovations (vibration loosens connections)
– Electrical storms (power surges damage components)
– Extended fan non-use (corrosion buildup)
Upgrading to Modern Safety Standards
-
Consider these improvements:
– AFCI (Arc-Fault Circuit Interrupter) protection
– LED-compatible dimmers for light kits
– Smart switches with voltage monitoring -
When to call an electrician:
– Aluminum wiring in home
– No grounding in ceiling box
– Mixed gauge wires in circuit
Final expert advice: Always keep your original fan manual where future homeowners can find it – this provides critical wiring information that may save lives during repairs decades later.
Final Note: Electrical work carries inherent risks. If you’re uncertain about any connection, consult a licensed electrician. Proper ceiling fan wiring ensures years of safe, efficient operation while preventing potentially deadly electrical hazards in your home. Bookmark this guide for future reference, but never substitute professional assessment when dealing with home electrical systems.
Leave a Reply