Ceiling fans can slash your energy bills by up to 40% when positioned correctly, yet most homeowners install them without understanding the critical relationship between fan placement and performance. A poorly positioned ceiling fan creates uncomfortable drafts, wastes energy, and fails to circulate air effectively—turning what should be a cost-saving comfort device into a noisy, inefficient eyesore. The difference between a fan that barely moves air and one that creates perfect comfort lies entirely in strategic ceiling fan position. Whether you’re installing a new fan or optimizing an existing one, understanding the precise height, clearance, and orientation requirements will transform your home’s comfort while reducing both heating and cooling costs.
Most homeowners don’t realize that ceiling fan position affects more than just airflow—it directly impacts safety, noise levels, and even the longevity of the fan itself. When installed just 6 inches too high or too low, a fan’s efficiency can drop by nearly a third, forcing you to run air conditioning longer or crank up the heat unnecessarily. This guide reveals the exact measurements, positioning techniques, and seasonal adjustments that turn your ceiling fan into an invisible comfort machine that works silently while saving you money every month.
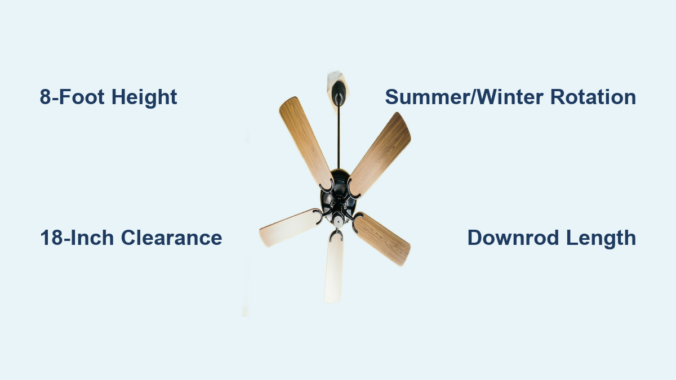
8-Foot Rule for Optimal Mounting Height
Your ceiling fan blades must sit precisely 8 feet above the floor for maximum comfort and safety in standard residential spaces. This measurement isn’t arbitrary—it’s the sweet spot where airflow reaches seated and standing occupants without creating disruptive drafts or safety hazards. Fans mounted lower than 7 feet create uncomfortable wind tunnels that disturb papers and cause annoyance, while those above 9 feet fail to deliver sufficient airflow at occupant level, negating the fan’s primary purpose.
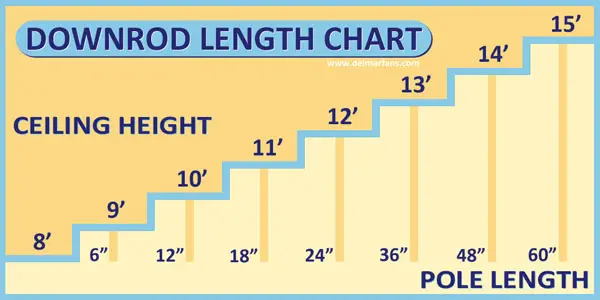
For rooms with standard 8-9 foot ceilings, use a 3-6 inch downrod to achieve perfect positioning. High-ceiling rooms require careful calculation: add 4 inches of downrod length for each additional foot of ceiling height beyond 9 feet. A 12-foot ceiling needs approximately 18 inches of downrod to position the blades at the ideal 8-foot height. Skip the guesswork by using the “elbow test”—stand directly beneath your planned installation point; when you raise your arm to shoulder height, your elbow should clear the fan blades with room to spare.
Hugger or low-profile fans become essential when working with ceilings under 8 feet. These flush-mount designs eliminate the downrod entirely, positioning blades just 10-12 inches from the ceiling while maintaining the critical 7-foot minimum clearance from the floor. Don’t compromise safety by installing standard fans in low-ceiling spaces—they’ll create dangerous clearance issues and operate inefficiently.
18-Inch Wall Clearance Minimum for Unobstructed Airflow
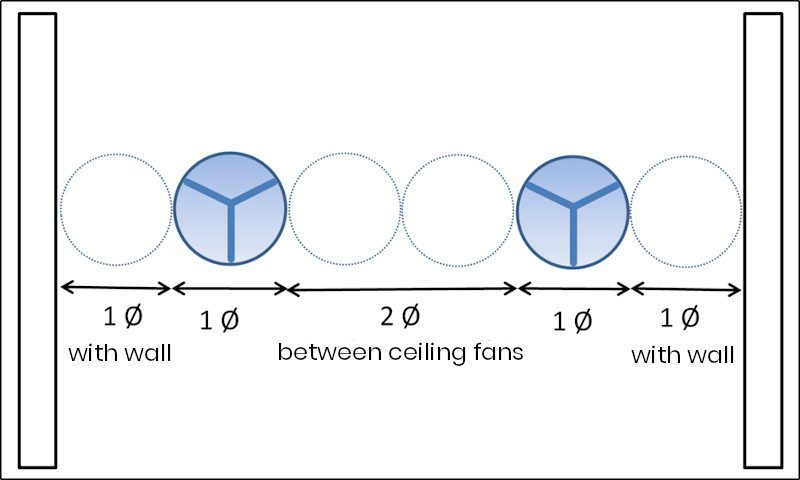
Your ceiling fan must maintain at least 18 inches of clearance from all walls to prevent air turbulence and maintain efficient circulation patterns. This distance ensures the fan can draw air freely from all directions without creating pressure differentials that reduce performance by up to 25%. In practice, this means positioning the fan at least 24 inches from walls whenever possible—the extra space creates symmetrical airflow that reaches corners effectively.
Measure twice before drilling by creating a paper template the size of your fan’s blade span. Tape this circle to the ceiling at your planned installation point and step back to verify adequate clearance from walls, light fixtures, and architectural features. Pay special attention to sloped ceilings where blade tips might approach walls at certain angles during rotation.
Furniture placement dramatically impacts effective ceiling fan position. Avoid installing fans directly over the center of seating areas—offset the position slightly toward the room’s center point to create balanced airflow across all seating zones. In rectangular rooms, position the fan along the long axis rather than the center point to maximize coverage across the entire space. Test your positioning by sitting in each primary seating area before final installation to confirm comfortable airflow reaches all occupants.
Summer vs. Winter Rotation Settings That Save Energy
Flip your fan’s direction switch every season to unlock maximum energy savings—counterclockwise at high speed during summer, clockwise at low speed during winter. This simple adjustment changes how air circulates, creating completely different comfort effects with the same hardware. In summer mode, the downward airflow creates a wind-chill effect that makes you feel up to 8°F cooler, allowing you to raise your thermostat setting without sacrificing comfort.
Winter positioning works differently—you want the fan to pull cool air upward gently while pushing warm air down from the ceiling. Set your fan to clockwise rotation at the lowest speed setting; you shouldn’t feel a direct breeze at floor level. This subtle circulation prevents heat stratification where warm air pools uselessly near the ceiling, reducing heating costs by up to 10% according to Department of Energy studies.
Verify your settings are correct with the paper test: hold a single sheet of paper near the fan blades while running. In summer mode, the paper should be pushed downward; in winter mode, it should lift gently upward. Many homeowners leave their fans in summer mode year-round, missing out on significant heating cost reductions and creating uncomfortable drafts during colder months.
Room-Specific Positioning Strategies That Work

Bedrooms require different ceiling fan position considerations than living spaces—offset the fan 12-18 inches from the bed’s center point to avoid direct airflow while sleeping. Direct breeze over your body disrupts sleep cycles and creates discomfort, yet complete lack of airflow reduces summer comfort. The ideal compromise positions the fan to circulate air across the room without targeting the bed directly, creating gentle movement that cools without disturbance.
Kitchens demand strategic placement over primary cooking zones but with critical safety clearances. Position fans at least 36 inches from stove surfaces to prevent grease accumulation on blades while still capturing cooking heat and odors. In open-concept kitchens, center the fan between cooking and dining areas to optimize both air quality and comfort during meals.
Bathrooms need moisture-specific positioning—install directly over shower/tub areas with at least 24 inches clearance from fixtures. This placement captures steam at its source before it can condense on surfaces, reducing mold risk and improving air quality. Ensure your bathroom fan has appropriate moisture resistance ratings; standard fans deteriorate quickly in humid environments.
Home offices benefit from rear-positioned fans that circulate air across workspaces without disturbing papers or computer monitors. Place the fan toward the back of the room relative to your desk, creating airflow that moves from behind you toward the front of the workspace. This positioning provides cooling benefits without creating screen glare or document displacement.
Downrod Length Mistakes That Destroy Fan Performance
Using the wrong downrod length ranks among the most common ceiling fan position errors that homeowners make. Too short a downrod traps the fan too close to the ceiling, restricting its ability to draw air upward and reducing efficiency by 20-30%. Too long a downrod creates clearance issues and disrupts airflow patterns, causing turbulence that increases noise while decreasing effectiveness.
Calculate your ideal downrod length using this formula: subtract 8 feet from your ceiling height, then multiply the result by 4. For a 10-foot ceiling: (10-8) × 4 = 8 inches of downrod. Round up to the nearest standard size (most fans offer 3″, 6″, 12″, 18″, and 24″ options). Always measure from finished floor to ceiling surface—not from baseboards or crown molding—to ensure accuracy.
Avoid the temptation to use multiple downrod connectors to achieve extreme lengths. Each connection point introduces potential vibration and instability. For ceilings over 14 feet, consider specialty high-ceiling fan systems designed specifically for those applications rather than jury-rigged solutions that compromise safety and performance.
Three-Month Maintenance Routine for Peak Performance
Clean your fan blades thoroughly every three months using a microfiber cloth and mild detergent solution to maintain optimal ceiling fan position effectiveness. Dust accumulation creates blade imbalance that reduces airflow by up to 15% while increasing noise and vibration. Focus on both upper and lower blade surfaces—the top collects more dust but the bottom affects aerodynamics more significantly.
Check blade tightness monthly by gently wiggling each blade at its mounting point. Loose blades create dangerous wobble that stresses motor components and reduces efficiency. Tighten any loose blade screws using a screwdriver—don’t overtighten, as this can strip mounting holes. Balance the fan annually using the included balancing kit to correct minor weight variations that develop over time.
Test seasonal direction settings each spring and fall before extreme temperatures hit. Verify the direction switch operates smoothly and the fan achieves proper speeds in both directions. Listen for unusual noises during operation that might indicate bearing wear or motor issues requiring professional attention.
Professional Installation Indicators You Shouldn’t Ignore
Call a licensed electrician immediately if your ceiling has plaster construction or lacks visible joists—these installations require specialized mounting hardware that DIYers often mishandle. Homes built before 1980 frequently lack proper electrical boxes rated for fan support, creating serious safety hazards when standard light fixture boxes bear the weight and vibration of a rotating fan.
High-ceiling installations above 12 feet demand professional expertise and equipment. Attempting these installations with standard ladders creates fall risks while compromising positioning accuracy. Professionals use specialized lifts and laser measurement tools to ensure perfect ceiling fan position even on soaring ceilings.
Smart fan installations with app control or home automation integration often require technical knowledge beyond basic electrical skills. Incorrect wiring can damage control systems or create compatibility issues with your home network. Professionals ensure proper integration while maintaining optimal positioning for both performance and aesthetic considerations.
Proper ceiling fan position transforms an ordinary fixture into a silent comfort machine that saves energy year-round. By maintaining the critical 8-foot blade height, ensuring adequate wall clearance, adjusting seasonal rotation, and following room-specific placement strategies, you’ll maximize both comfort and efficiency. Remember that a well-positioned fan works so effectively you’ll barely notice it’s running—delivering perfect comfort while quietly reducing your energy bills with every rotation.
Leave a Reply