
Your ceiling fan starts humming but the blades barely move, or perhaps it struggles to spin at all despite working perfectly just days ago. This frustrating issue often points to one specific component: the ceiling fan capacitor. Replacing this small but critical electrical part is a manageable DIY project that takes most homeowners less than an hour with basic tools. Unlike calling an electrician, which could cost $100-$150 for such a simple repair, you can restore your fan’s operation for just the price of a new capacitor (typically $8-$20). This guide provides the exact steps to safely diagnose, remove, and install a new capacitor so you can enjoy proper airflow without breaking the bank.
Recognizing When Your Ceiling Fan Capacitor Has Failed
Identifying capacitor failure correctly prevents unnecessary repairs and wasted time. These specific symptoms indicate your capacitor needs replacement rather than other potential issues.
Blades spin slowly on all speed settings is the most common indicator of capacitor trouble. If your fan labors to reach speed or never achieves its normal rotation rate regardless of which setting you select, the capacitor can’t provide the necessary electrical boost. Unlike motor issues that might affect only one speed, capacitor failure impacts all speed settings uniformly because it affects the motor’s starting torque.
Humming noise without blade movement signals a classic capacitor failure scenario. When you turn on the fan and hear the motor humming but see no rotation, the capacitor has lost its ability to deliver the initial power surge required to start the motor. Continuing to operate your fan in this condition creates excessive heat that can permanently damage the motor windings, so address this issue immediately.
Fan rotates in the wrong direction despite correct switch settings often stems from capacitor degradation. The capacitor controls the electrical phase relationship between motor windings, and when it weakens, this relationship shifts enough to reverse the fan’s rotation direction. If your fan spins clockwise when it should be blowing air downward (counterclockwise), capacitor replacement will likely resolve this.
Essential Safety Measures Before Starting
Electrical repairs demand strict safety protocols to prevent injury or damage. Skipping these precautions could result in electrical shock, fire hazard, or motor damage.
Turn off power at the circuit breaker, not just the wall switch. Many homeowners make the dangerous mistake of assuming the wall switch cuts all power, but some wiring configurations maintain voltage even when switches are off. After flipping the breaker, test the fan operation to confirm it won’t start, then use a non-contact voltage tester on the wiring connections inside the fan housing. Only proceed when the tester confirms no electrical current is present.
Work from a stable platform with someone nearby if possible. A sturdy step ladder with rubber feet provides safer access than chairs or unstable surfaces. Have an assistant hold the ladder and hand you tools to keep both hands free for delicate electrical work. Ensure the area below has enough clearance in case of accidental drops.
Allow the fan to cool completely before starting. Even after turning off power, motor components retain significant heat that can cause burns during disassembly. Wait at least 15 minutes after powering down before touching internal components.
Tools and Replacement Parts You’ll Need

Gathering everything before starting prevents mid-project interruptions and ensures a smooth repair process.
Basic hand tools include a set of screwdrivers (both Phillips and flathead), wire strippers, and needle-nose pliers. A magnetic-tipped screwdriver prevents dropped screws in tight spaces, while quality wire strippers ensure clean insulation removal without nicking conductors. Needle-nose pliers help form perfect wire loops for secure terminal connections.
Electrical testing equipment must include a non-contact voltage tester—this inexpensive tool could save your life by confirming power is off. Though not essential for this repair, a multimeter allows more thorough testing of the old capacitor’s condition before replacement.
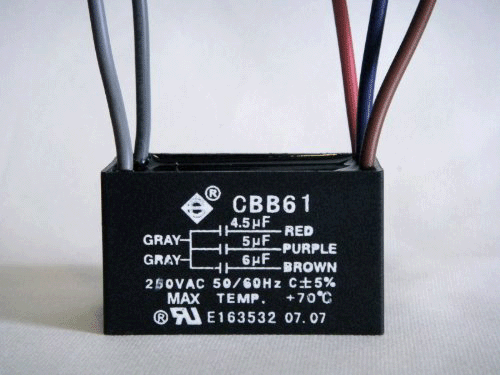
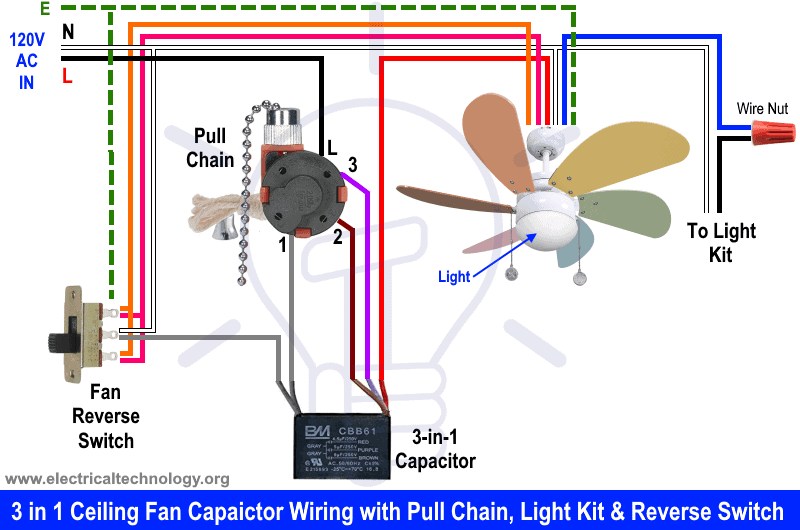
The correct replacement capacitor is critical. Check the old capacitor’s specifications: voltage rating (usually 250V or 370V) and capacitance value in microfarads (µF). Most ceiling fans use dual-run capacitors with values like 4.5µF + 6µF, meaning two separate capacitance ratings within one unit. Bring the old capacitor to the hardware store for exact matching—using incorrect specifications can damage your motor or cause improper operation.
Locating and Accessing the Faulty Capacitor
Finding the capacitor requires minimal disassembly on most fan models, though locations vary slightly by manufacturer.
Remove the fan canopy to access the wiring compartment. Typically secured by 2-4 screws hidden under decorative caps, the canopy covers the electrical box where the capacitor resides. Carefully pop off the caps with a flathead screwdriver, unscrew the mounting hardware, and gently lower the canopy. Support the canopy with one hand while disconnecting any wire bundles to prevent strain on connections.
Locate the capacitor within the housing—it usually appears as a small cylindrical or rectangular component with 2-4 wires attached. Most manufacturers mount it near the pull-chain switch mechanism or directly on the motor housing. Take multiple photos of the wiring configuration before disconnecting anything, as this visual reference prevents connection errors during reinstallation.
Removing the Old Capacitor Safely
Proper removal technique prevents damage to surrounding components and ensures a clean replacement.
Disconnect wiring connections methodically. Most fans use either spade terminals that slide onto capacitor prongs or wire nuts connecting directly to capacitor leads. For spade terminals, grip the plastic connector (not the wire) and pull straight off—never twist or rock the connection, which can damage terminals. For wire nuts, unscrew counterclockwise while holding both wire bundles to prevent twisting.
Remove mounting hardware securing the capacitor. Most units attach with a single screw, zip tie, or adhesive foam tape. Note the mounting orientation for proper reinstallation of the new unit. If wires are soldered (less common in modern fans), cut them close to the capacitor body while preserving maximum wire length for reconnection.
Set the old capacitor aside for reference. Compare its specifications with your replacement to ensure an exact match before proceeding—this final verification prevents installation errors.
Installing Your New Ceiling Fan Capacitor
Correct installation guarantees reliable operation and prevents premature failure of the new component.
Mount the replacement capacitor in the same position as the original. Secure it with the original hardware, tightening just enough to prevent movement without cracking the plastic casing. If using adhesive mounting, apply a small dab of silicone adhesive or double-sided foam tape for secure positioning.
Connect wiring according to your reference photos. For spade terminals, slide connectors firmly onto corresponding prongs until they click into place. For wire connections, strip ¼ inch of insulation, align bare ends, and twist on wire nuts clockwise until snug. Give each connection a gentle tug to verify security—loose connections cause arcing and overheating.
Double-check all connections against your reference photos. Verify that wire colors match original configuration (typically black for common, brown/red for main winding, blue/yellow for auxiliary), but prioritize matching the physical connections over color assumptions since manufacturers vary.
Testing Your Fan After Capacitor Replacement
Verification testing before final reassembly saves time and prevents repeated disassembly if issues arise.
Restore power at the circuit breaker and test operation. The fan should start promptly on the lowest speed setting without humming or hesitation. Test all speed settings to ensure smooth transitions and consistent operation at each level. Listen for unusual noises that might indicate incorrect wiring.
Check rotation direction by standing directly beneath the fan. In summer mode, blades should spin counterclockwise (as viewed from below), creating a downward breeze. If rotation is reversed, swap the connections to the auxiliary winding terminals—this simple fix corrects direction without additional parts.
Run the fan for 10-15 minutes at medium speed while monitoring for overheating. A properly installed capacitor should remain cool to the touch. Any burning smell, discoloration, or excessive heat indicates incorrect installation or a defective replacement part requiring immediate attention.
Troubleshooting Common Post-Replacement Issues
Even with careful installation, occasional problems may arise that require simple solutions.
Fan still hums but won’t start usually means incorrect capacitor specifications or loose wiring connections. Double-check that your replacement matches the original microfarad ratings exactly, and verify all wire connections are tight and secure. An undersized capacitor won’t provide enough starting torque.
Excessive vibration after repair often stems from blade imbalance rather than the capacitor. Tighten all blade screws and ensure no blades are bent or damaged. If vibration persists, check that the capacitor value matches specifications exactly—slight deviations can cause harmonic imbalances.
Capacitor overheating during operation indicates either a defective replacement unit or underlying motor problems. Immediately power down and check connections. If wiring is correct, the motor may be drawing excessive current due to failing windings, which requires professional assessment.
When Professional Help Becomes Necessary
While capacitor replacement is generally DIY-friendly, certain situations warrant expert assistance.
Seek professional help if wiring differs significantly from standard configurations. Some modern fans with remote controls, smart features, or integrated lighting circuits have complex electrical systems that require specialized knowledge.
Call an electrician if the fan was improperly mounted to begin with. Fans require specific electrical boxes rated for ceiling fan weight—using standard light fixture boxes creates a dangerous falling hazard that needs professional correction.
Consult a professional if multiple repairs fail to resolve the issue. Persistent problems after correct capacitor replacement may indicate motor winding damage or other complex electrical faults beyond typical DIY scope.
Replacing a faulty ceiling fan capacitor restores proper airflow and comfort to your living space with minimal investment. By recognizing failure symptoms, following safety protocols, and executing the replacement correctly, you’ve not only fixed your immediate problem but gained valuable electrical repair knowledge for future projects. The $10-$20 investment in a new capacitor saves you the $100+ cost of professional service while extending your fan’s lifespan for years to come. When your blades spin smoothly and silently once again, you’ll appreciate the satisfaction of completing this practical home repair yourself.
Leave a Reply