When your ceiling fan light kit won’t respond to its own switch while the fan operates correctly, that red wire is likely the culprit. Understanding how to properly connect the red wire in a ceiling fan installation separates a smoothly functioning fixture from frustrating electrical issues that leave you constantly adjusting both light and fan from the same control. This critical wire enables independent operation of your fan’s light kit and motor—two features homeowners increasingly expect in modern ceiling fixtures. By the end of this guide, you’ll know exactly when and how to connect that red wire correctly, avoid common installation mistakes that cause short circuits, and ensure your ceiling fan operates safely with separate light and fan controls.
Why Your Ceiling Fan’s Red Wire Matters for Independent Operation
The red wire serves as the secondary hot conductor that allows separate control of your ceiling fan’s light kit from the main motor. Without properly connecting this wire, you’ll find yourself unable to operate the light independently from the fan—a common frustration that sends many homeowners searching for solutions online. Most modern electrical systems use a three-wire configuration (black, red, and white) in the ceiling box specifically to enable this dual functionality through either a dual-switch wall control or a universal remote system.
What Happens When the Red Wire Isn’t Connected Properly
When the red wire remains disconnected or is incorrectly joined with other conductors, your light kit typically won’t function at all while the fan continues to operate normally. Some homeowners mistakenly connect the red wire to the black wire, causing both light and fan to operate from the same switch—a temporary fix that defeats the purpose of having separate controls. Others connect it to the white neutral wire, creating an immediate short circuit that trips the breaker as soon as power is restored.
How Dual-Switch Systems Utilize the Red Wire
In standard installations with two wall switches (one controlling the fan, one controlling the light), the red wire connects directly to the light kit’s wiring while the black wire powers the fan motor. The white neutral wire connects to both components, and the grounding wires complete the circuit safely. This configuration allows you to turn your fan on during summer months while keeping the light off, or operate just the light as a nightlight without the fan running unnecessarily.
Essential Safety Preparations Before Handling Electrical Wires

Before you even consider connecting that red wire, you must implement critical safety protocols that prevent electrocution and fire hazards. Electrical work represents one of the most dangerous DIY home projects, with ceiling fan installations accounting for numerous preventable accidents each year when proper precautions aren’t followed.
Mandatory Power Shutdown Procedures
- Locate your home’s main electrical panel and identify the correct circuit breaker controlling the ceiling fixture
- Flip the breaker to the OFF position and secure it with tape to prevent accidental reactivation
- Test the wires in the ceiling box with a non-contact voltage tester to confirm all power is disconnected
- Place a warning sign on the electrical panel indicating work is being performed
Critical warning: Never assume the power is off based solely on the wall switch position—always verify with a reliable voltage tester at the actual wiring location.
Required Safety Equipment and Tools
- Non-contact voltage tester (tested on a known live circuit first)
- Rubber-soled shoes and dry work gloves
- Safety glasses to protect against falling debris
- Wire strippers capable of handling 14-12 gauge wiring
- UL-listed wire connectors rated for the wire gauge you’re using
- Ladder with stabilizer and someone to spot you if working at height
Step-by-Step Red Wire Connection Process for Ceiling Fans
With safety precautions in place, you can proceed to connect the red wire correctly. This process assumes you’re working with a standard residential 120-volt circuit and a conventional ceiling fan with separate light kit controls.
Identifying Your Wiring Configuration
First, examine both your ceiling wiring and fan wiring to confirm you have the necessary components:
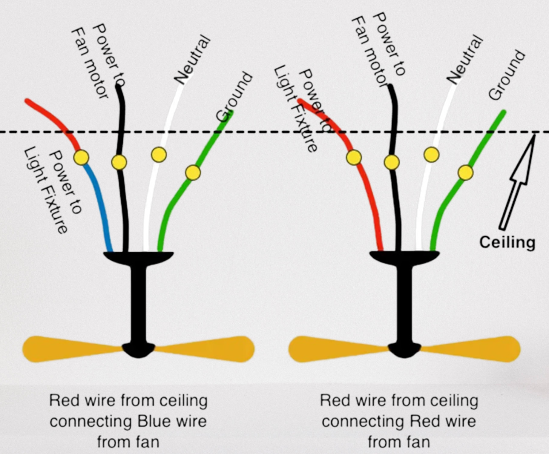
– Ceiling box should contain: black (hot), red (secondary hot), white (neutral), and bare copper (ground)
– Fan assembly should have: black (fan motor), blue or red (light kit), white (neutral), and green (ground)
Visual cue: The red wire from your ceiling should connect ONLY to the blue or red wire from your fan’s light kit—not to the black fan motor wire.
Making the Critical Red Wire Connection
- Strip approximately 3/4 inch of insulation from the end of both the ceiling red wire and fan light kit wire
- Twist the exposed copper strands together clockwise using needle-nose pliers
- Secure the connection with an appropriately sized wire nut, ensuring no bare copper remains exposed
- Gently tug on both wires to confirm the connection won’t pull apart
- Fold the connected wires neatly into the ceiling box, keeping them away from moving fan components
Pro tip: Before securing everything in place, wrap electrical tape around the base of the wire nut for added security against vibration loosening the connection over time.
Common Red Wire Connection Mistakes to Avoid
- Connecting red to black (causes both fan and light to operate from same switch)
- Failing to secure connections properly (vibration from fan operation can loosen wires)
- Using undersized wire nuts (creates fire hazard from overheating connections)
- Not verifying switch configuration matches wiring (results in non-functional controls)
- Ignoring local electrical codes regarding box fill capacity (overcrowded boxes create fire risk)
Troubleshooting Red Wire Connection Problems After Installation
Even with proper installation technique, issues can arise when connecting the red wire in your ceiling fan. These diagnostic steps will help you identify and resolve common post-installation problems.
When the Light Kit Doesn’t Work but Fan Operates Normally
This classic symptom indicates a problem specifically with your red wire circuit:
– Verify the wall switch controlling the light is actually sending power (test with voltage tester)
– Check the wire connection between ceiling red and fan light kit wires for tightness
– Confirm the light kit itself has power by testing the socket with a known-working bulb
– Examine the fan’s pull chain switches if your model uses them for light control
Expert note: Some ceiling fans require both the wall switch AND pull chain to be in the ON position for the light to function—check your specific model’s requirements.
When Both Light and Fan Operate from the Same Switch
This indicates your red wire is likely connected incorrectly:
– Turn off power at the breaker and verify with voltage tester
– Check if red and black wires are joined together either in the ceiling box or fan housing
– Verify your wall switch configuration has two separate switches controlling the fixture
– Confirm you haven’t accidentally connected the fan’s light kit wire to the black motor wire
Maintaining Your Ceiling Fan Wiring for Long-Term Safety
Proper connection of the red wire is just the beginning—ongoing maintenance ensures continued safe operation and prevents future electrical issues that could compromise your home’s safety.
Annual Inspection Checklist for Ceiling Fan Wiring
- Turn off power and verify with voltage tester before inspection
- Check all wire connections for tightness (vibration can loosen connections over time)
- Look for signs of overheating (discoloration, melting, or brittle insulation)
- Ensure no wires are pinched by mounting hardware or making contact with moving parts
- Verify wire nuts haven’t worked loose from the constant vibration of fan operation
Prevention tip: Apply a small amount of dielectric grease to wire connections during installation to prevent corrosion and maintain conductivity in humid environments.
When to Call a Licensed Electrician Instead of DIY
While connecting the red wire might seem straightforward, certain situations require professional intervention:
– Aluminum wiring in your home (requires special connectors and techniques)
– No red wire present in ceiling box when your fan requires separate light control
– Frequent breaker trips after installation (indicates potential short circuit)
– Signs of burning or melting at connection points
– Uncertainty about your home’s electrical system configuration
Final Safety Considerations for Ceiling Fan Electrical Work
The red wire enables the convenient separate control of your ceiling fan’s light and motor functions, but improper handling creates significant safety risks that shouldn’t be taken lightly. Always verify your specific fan model’s wiring requirements before making connections, as variations exist between manufacturers. Remember that local electrical codes may have specific requirements regarding ceiling fan installations that override general guidelines. Never work on live circuits, and when in doubt about any aspect of the installation process, consult a qualified electrician—your safety is worth far more than the cost of professional assistance. With the red wire properly connected, you’ll enjoy the full functionality of your ceiling fan with independent control of both light and fan speed, enhancing both comfort and energy efficiency in your living space.
Leave a Reply