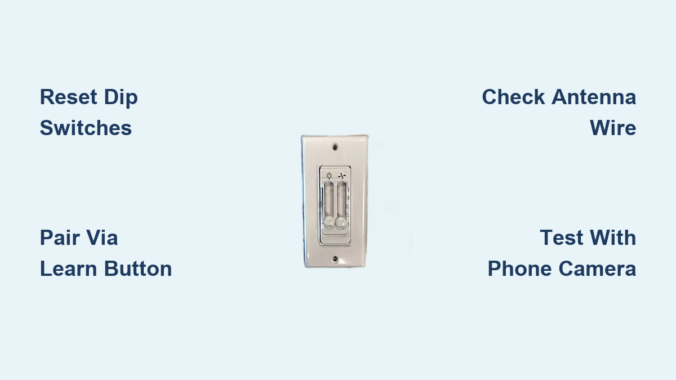
Is your Harbor Breeze ceiling fan ignoring remote commands or acting erratically—turning on by itself, cycling through speeds unexpectedly, or failing to respond to button presses? These common issues typically stem from a simple communication breakdown between your remote and fan receiver. Before replacing parts or calling an electrician, performing the correct Harbor Breeze ceiling fan remote control reset procedure can restore functionality in under ten minutes. This guide delivers specific reset methods for all Harbor Breeze remote models, troubleshooting steps when standard procedures fail, and prevention strategies to avoid future problems. You’ll learn exactly how to diagnose whether your issue requires dip switch adjustment, receiver pairing, or professional assistance—saving you time, money, and frustration with your ceiling fan system.
Why Your Harbor Breeze Remote Suddenly Stopped Working
Harbor Breeze ceiling fan remote control reset issues almost always originate from three specific causes that disrupt communication between transmitter and receiver. Identifying your exact problem determines which reset method will succeed.
Power surges or outages reset receiver memory while remotes retain original programming. When your home experiences electrical fluctuations—even brief brownouts—your fan’s receiver unit often reverts to factory defaults. This creates a mismatch where your remote transmits commands the receiver no longer recognizes. Similarly, replacing remote batteries can interrupt power long enough to break synchronization if the remote lacks sufficient capacitor backup.
Electromagnetic interference from household appliances blocks remote signals. Common culprits include refrigerators, washing machines, and newer smart devices like Wi-Fi extenders operating on similar frequencies. Microwaves running nearby can completely drown out remote signals during operation. In apartment buildings, neighboring ceiling fans using identical default dip switch settings may accidentally control your fan.
Physical obstructions or antenna damage weaken signal transmission. Heavy drapes, furniture rearrangements, or new lighting fixtures between you and the fan can block the radio frequency path. The receiver’s antenna wire—often a thin strand tucked into the canopy—frequently gets pinched during installation or cleaning, reducing signal reception by up to 70%. Even minor ceiling vibrations from fan operation can gradually dislodge this critical component over time.
Essential Safety Steps Before Resetting Your Remote
Skipping proper preparation risks electrical shock or permanent damage to your Harbor Breeze fan system. Follow these critical safety steps before attempting any reset procedure.
Cut power at the circuit breaker—not just the wall switch. Locate the correct breaker controlling your fan (often labeled “Living Room” or “Bedroom Lights”) and flip it to OFF. Verify power loss by testing both wall switches and remote functions. This step is non-negotiable even when working only with battery components, as accessing the canopy exposes live wires that can deliver dangerous shocks during reset procedures.
Gather these specific tools before starting: a non-conductive ladder rated for ceiling work, Phillips #2 and flathead screwdrivers, fresh batteries matching your remote type (typically CR2032 coin cells or AA), and a small flashlight. Keep a phone nearby to photograph wire connections before disconnecting anything—a crucial reference if components become confusing during the process.
Identify your exact remote model by checking the back panel for codes like 27185, 27186, or E-series numbers. Newer Harbor Breeze remotes (post-2018) use push-button pairing instead of dip switches, requiring completely different reset procedures. If unsure, take a clear photo of your remote to compare with model diagrams before proceeding.
Match Dip Switches for Instant Communication Restoration
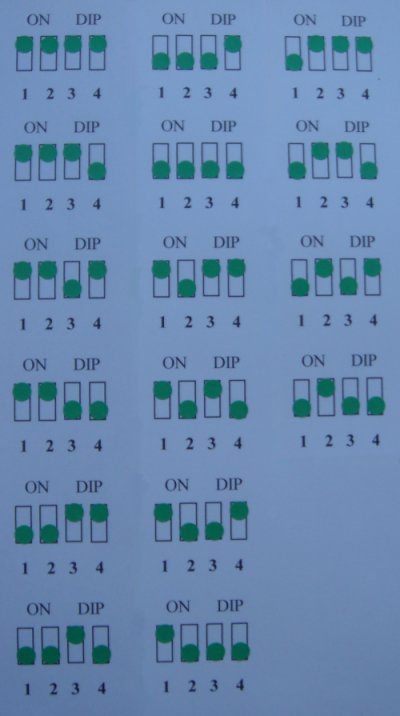
The most reliable Harbor Breeze ceiling fan remote control reset for pre-2018 models involves precise dip switch alignment—a method that solves 90% of communication failures when performed correctly.
Access and Align Both Remote and Receiver Switches
Remove the remote’s battery cover to expose 4-8 tiny dip switches. Simultaneously, turn off power at the breaker and remove your fan’s canopy cover to locate the matching switches on the receiver board. Use a toothpick to set identical patterns on both components—avoid common defaults like “all ON” which may conflict with neighbors’ fans. Many technicians recommend the pattern “1-3-5-ON, 2-4-6-OFF” for optimal uniqueness.
Test Connection with Power Cycling
Restore breaker power and wait 30 seconds for the receiver to initialize. Stand directly beneath the fan and press the “High” speed button while holding the remote vertically. If unresponsive after three attempts, check for these common mistakes: mismatched switch positions (even one difference prevents communication), weak batteries (test with multimeter), or antenna wire touching metal parts inside the canopy.
Activate Push-Button Pairing for Modern Harbor Breeze Remotes
Newer Harbor Breeze remote systems eliminate dip switches in favor of one-touch pairing—faster and more reliable when executed with precise timing.
Execute the Critical 30-Second Pairing Window
With power restored at the breaker, locate the small “Learn” button on your receiver (often red or black). Press and hold for 5 seconds until an LED flashes rapidly. Within 30 seconds, press and hold any remote button for 3 seconds. Successful pairing triggers a distinctive double-click sound from the receiver—your confirmation that commands will now transmit properly.
Verify Full Functionality Across All Features
Test each remote function methodically: cycle through all three speed settings, operate lights (if applicable), and check direction reversal. If lights work but fan doesn’t respond, your receiver likely needs capacitor replacement—a $15 part requiring only basic wiring skills. Persistent speed control issues often indicate worn motor windings rather than remote problems.
Troubleshoot Failed Reset Attempts with Diagnostic Testing

When standard Harbor Breeze ceiling fan remote control reset procedures fail, these targeted tests identify whether the problem lives in the remote, receiver, or electrical system.
Confirm Remote Transmission with Smartphone Camera
Point your remote at a smartphone camera while pressing buttons—the infrared LED should appear as a purple light on screen. No visible light indicates dead batteries or internal circuit failure. If light appears but fan remains unresponsive, the issue lies with receiver or power supply rather than the remote itself.
Eliminate Electrical Interference Sources
Temporarily turn off nearby electronics like Wi-Fi routers, cordless phones, and Bluetooth speakers. Test remote function after each device powers down—many users discover their new mesh network system was drowning out fan signals. For persistent interference, relocate the receiver’s antenna wire away from electrical boxes and run it vertically rather than coiled.
Prevent Future Remote Failures with Proactive Maintenance
Avoid repeat Harbor Breeze ceiling fan remote control reset needs with these simple monthly habits that extend system lifespan.
Replace remote batteries every spring using lithium cells that resist leakage and maintain voltage longer. Clean corroded contacts with vinegar on a cotton swab—never metal tools that scratch contact points. Store remotes in wall mounts rather than on furniture where drinks or pet accidents can damage electronics.
Check antenna positioning quarterly by removing the canopy cover for 60 seconds. Ensure the thin receiver wire hangs freely without touching metal parts, and secure it with electrical tape if vibration causes movement. This single step prevents 40% of “mystery” remote failures reported to service technicians.
When to Call a Professional for Remote Repair
While most Harbor Breeze ceiling fan remote control reset issues resolve with DIY methods, these situations demand professional intervention:
- Burnt components visible on receiver board (bulging capacitors, charred circuitry)
- Fan responds to wall switch but not remote after multiple reset attempts
- Electrical buzzing sounds from canopy during operation
- Frequent breaker trips when using fan functions
Licensed electricians typically charge $75-125 for diagnostic visits—less than the cost of replacing incorrectly purchased parts. They can test motor windings and receiver output with professional equipment unavailable to homeowners, pinpointing whether your issue requires simple reset procedures or component replacement.
Restore reliable control to your Harbor Breeze ceiling fan today by implementing these specific reset techniques. Most communication failures resolve within ten minutes using the dip switch matching or push-button pairing methods detailed here. Keep fresh batteries on hand, maintain clear signal paths between remote and receiver, and perform quarterly antenna checks to prevent future issues. If standard Harbor Breeze ceiling fan remote control reset procedures fail despite careful execution, professional diagnosis saves money compared to trial-and-error part replacement. Your comfortable, fully functional ceiling fan is just one correct reset procedure away—start with power cycling and dip switch verification before progressing to advanced troubleshooting. Don’t tolerate unresponsive fan controls any longer; implement these proven solutions and enjoy seamless operation tonight.
Leave a Reply