Installing a ceiling fan typically takes between 1 to 3 hours, though the actual duration varies significantly based on your experience level, existing electrical infrastructure, and project complexity. Whether you’re replacing an old fixture or adding a fan where none existed before, understanding these timelines helps you plan effectively and decide whether to tackle the project yourself or call a licensed electrician. The good news is that most straightforward ceiling fan installations fall within a manageable timeframe that even weekend DIYers can accommodate.
This guide breaks down exactly what affects installation time, provides detailed time estimates for each project type, and offers tips to streamline your experience. By the end, you’ll have a realistic expectation of how long your specific installation will take and whether you’re better suited as a DIY project or professional work.
Standard Installation Time Estimates
Installation time depends heavily on your experience and the existing setup. Understanding these baseline estimates helps you plan your weekend project and set realistic expectations for completion.
Time by Experience Level
First-time installers should budget 2 to 3 hours for a standard ceiling fan installation. Those unfamiliar with electrical wiring need additional time for learning curves, cautious work practices, and careful verification of each connection. You’ll likely find yourself reading instructions mid-project and double-checking wire connections, which is perfectly normal and recommended for safety.
Homeowners with basic electrical knowledge can typically complete the job in 1.5 to 2 hours. If you’ve replaced light fixtures, installed outlets, or handled similar DIY electrical work, your experience eliminates the research phase and reduces hesitation at each step. You understand fundamental concepts like matching wire colors and securing connections, allowing you to work efficiently without constant verification.
Licensed electricians complete standard installations in 45 minutes to 1 hour under optimal conditions. Their expertise means they’ve encountered virtually every scenario and can troubleshoot issues immediately rather than experimenting with solutions. However, even professionals face delays when dealing with older homes or unexpected complications.
Time by Project Type
Replacing an existing ceiling light fixture with a fan takes 1 to 1.5 hours when the electrical box is already fan-rated and wiring connections are in good condition. This represents the simplest scenario since no new wiring or structural modifications are required—you’re essentially upgrading the existing setup rather than creating something new.
Upgrading from an older fan to a new model requires approximately 1 to 1.5 hours if the existing electrical box is fan-ready. The process involves removing the old fixture, assembling the new fan, and connecting it to infrastructure you already have. This scenario often goes faster than converting from a light fixture since you’re working with familiar components.
Installing where no fixture exists extends the timeline to 3 to 4 hours or longer. Running new wiring through walls or ceilings, potentially installing a fan-rated electrical box from scratch, and ensuring code compliance all add substantial time. This scenario frequently requires professional intervention or at minimum, significant DIY experience.
Step-by-Step Installation Timeline

Understanding exactly where your time goes helps you prepare mentally and gather tools before beginning. Each phase has a typical duration that assumes standard conditions and no complications.
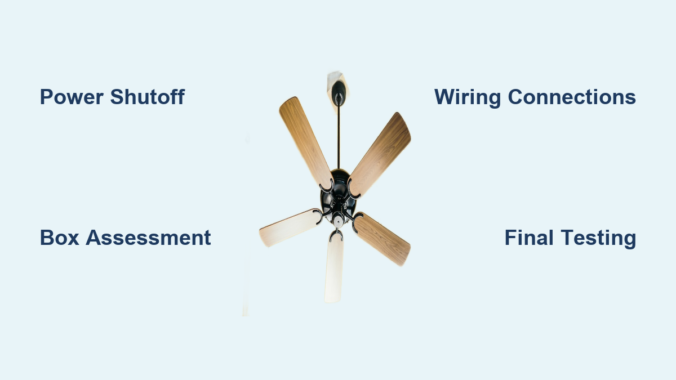
Safety Preparation and Power Shutoff
Allow 5 to 10 minutes for this critical first step. Locating the correct circuit breaker takes longer for those unfamiliar with their electrical panel. Never skip the voltage tester verification—even after turning off what you believe is the correct breaker. Mislabeled panels and wiring anomalies mean you might encounter live wires if you skip this step. Testing the wires with a voltage tester is essential for your safety, period.
Pro Tip: Test your voltage tester on a known live circuit first to ensure it’s working properly before relying on it for safety.
Electrical Box Assessment
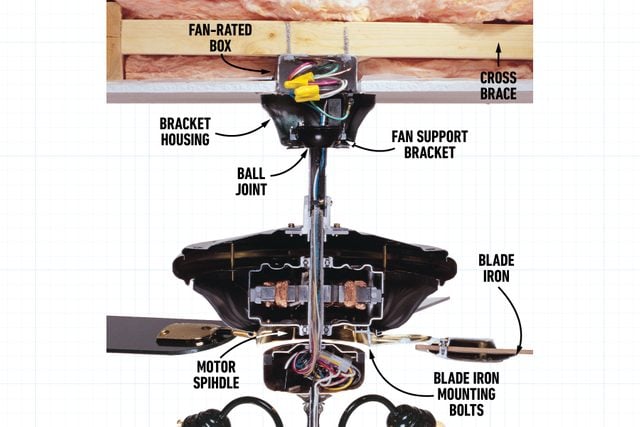
This step consumes 10 to 40 minutes depending on box condition. If the existing box is already fan-rated and securely mounted, assessment takes 10 to 15 minutes. However, if replacement is needed—which is common when converting from a light fixture—the process extends to 20 to 40 minutes. Standard electrical boxes designed for light fixtures lack the structural strength to support ceiling fans, which generate vibration during operation and weigh significantly more. Installing a new fan-rated box involves removing the old one, securing the new box to ceiling joists, and ensuring code compliance.
Fan Assembly
Modern fans arrive in multiple boxes requiring assembly before installation. Budget 15 to 30 minutes for this phase. Basic models with simple blade designs assemble in 15 to 20 minutes. Fans with light kits, multiple blade configurations, decorative elements, or smart home integration require 25 to 30 minutes or longer. Reading instructions before assembly and organizing all components prevents frustration and wasted time.
Mounting Bracket and Motor Installation
The mounting bracket installation takes 10 to 15 minutes, with sloped ceilings requiring special brackets that add complexity and time. Hoisting the fan motor and securing it to the bracket requires either a second person or a support strap to hold the motor’s weight. This step takes approximately 15 to 20 minutes under normal conditions, with high ceilings extending the timeframe.
Warning: Never attempt to hold the fan motor with one hand while making connections with the other—this is a common cause of dropped fans and injury.
Wiring Connections
Matching wire colors and functions correctly requires 10 to 20 minutes when existing wiring is in good condition. Complications arise with older homes featuring non-standard wire colors, missing neutral wires, or damaged insulation requiring repair. If you need to modify a wall switch for separate fan and light control, add extra time for configuration.
Final Assembly and Testing
Attaching fan blades and light kit components takes 10 to 15 minutes. Testing and troubleshooting afterward requires 10 to 20 minutes to verify correct operation across all speed settings, check for unusual noises or vibrations, and confirm remote control functionality. Most issues resolve quickly with minor adjustments, though persistent problems may indicate deeper installation errors.
Factors That Affect Installation Time
Several variables dramatically impact how long your specific installation will take. Understanding these factors helps you anticipate challenges and plan accordingly.
Existing Infrastructure Condition
The condition and suitability of existing electrical infrastructure significantly affects duration. Modern, code-compliant wiring with properly installed fan-rated boxes enables fast installations. Older homes present unexpected complications including outdated wiring materials, incorrectly sized junction boxes, or non-standard installation practices from previous decades. If your existing electrical box isn’t fan-rated—and many light fixture boxes aren’t—you must replace it before installation, adding 20 to 40 minutes to your project.
Ceiling Type and Height
Standard ceilings with easy access enable straightforward installations, but ceiling variations change everything. High ceilings require ladder work and longer downrod assemblies, adding 15 to 45 minutes. Sloped or vaulted ceilings need specialized mounting brackets designed to keep fans level despite angled surfaces, increasing both cost and installation time. Tight or constrained spaces—such as upper floors without attic access—make component handling and wiring difficult, potentially requiring drywall cutting or work around structural elements.
Wiring Complexity
The electrical wiring situation dramatically affects duration. Existing wiring in good condition means the electrical portion takes only 10 to 20 minutes for connections. Running new wiring adds substantial time—potentially several hours—depending on access and routing complexity. Outdated or damaged wiring requires repair before installation, adding unpredictable time and potentially requiring professional intervention.
Fan Complexity and Features
Basic ceiling fans with pull-chain operation install most quickly. However, modern features add time: light kits require additional wiring and assembly (10-15 minutes); remote control systems need receiver installation and pairing (10-15 minutes); smart home integration requires WiFi connection and app configuration (15-30 minutes). Fans with more than standard four blades or unusual designs may need additional assembly time and careful alignment.
Electrical Requirements and Considerations

Understanding the electrical fundamentals ensures safe installation and helps you anticipate potential complications before they arise.
The Electrical Box Foundation
The electrical box is the foundation of any ceiling fan installation and must meet specific requirements. Standard boxes designed for lightweight light fixtures cannot support ceiling fans. Fan-rated boxes feature reinforced construction with metal brackets or support bars anchoring to ceiling joists. When purchasing a new box, look for labeling indicating “fan-rated” or “approved for ceiling fan support”—if the box lacks this designation, it’s unsuitable for fan installation.
Even boxes that appear sturdy may lack necessary support characteristics. When uncertainty exists, replacing the box with a proper fan-rated unit is the safest approach. The additional 20 to 40 minutes is worth eliminating the risk of fan failure.
Wiring Connections Explained
Ceiling fan wiring follows standard color conventions, though variations exist in older homes. Ground connections (green or bare copper) provide essential grounding protection and must never be omitted. Hot wire connections (black or red) carry electrical current—multiple hot wires may be present when controlling fan and lights separately. Neutral wire connections (white) complete the circuit and are essential for both fan motor and light kit functions. All connections must be secure with proper insulation using wire nuts or approved connectors.
Control Configuration Options
How you control your fan affects installation complexity. Pull-chain operation is simplest with minimal additional wiring. Wall switches add convenience but require proper wiring configuration. Remote control systems include receiver units wiring between fan and house wiring, adding installation steps. Smart controls require WiFi connection and app configuration beyond standard electrical installation.
DIY vs Professional Installation
Deciding between DIY and professional installation involves weighing time, cost, safety, and your personal skill level.
When DIY Makes Sense
DIY ceiling fan installation saves $100-$300 compared to professional work, but plan for 2 to 4 hours of your time rather than the 1 to 3 hours professionals need. DIY installation is appropriate when existing electrical infrastructure is in good condition, you possess basic electrical knowledge and comfort working with systems, and the installation location presents no unusual challenges. Honestly assess your skills and comfort level—electrical work carries real safety risks when performed incorrectly.
When to Hire a Professional
Professional installation is strongly recommended for several situations: no existing fixture or wiring requires running new electrical work; non-fan-rated electrical boxes need replacement by someone experienced; uncertain electrical knowledge means the risks outweigh potential savings; complex installations with high or sloped ceilings benefit from professional equipment and experience; some jurisdictions require licensed electricians for code compliance.
Cost Comparison
Professional installation typically costs $100-$300 depending on location, job complexity, and electrician pricing. Simple replacements with existing fan-rated boxes fall at the lower end. Complex installations involving new wiring or challenging locations approach the upper range. DIY costs are limited to tools (if not already owned) and the fan itself—though tool purchases for a single installation may not be cost-effective.
Speed Up Your Installation Process
While safety should never be compromised for speed, proper preparation streamlines the entire process and prevents frustrating delays.
Gather Tools Before Starting
Having all necessary tools prepared before beginning eliminates mid-project delays for tool acquisition. You’ll need screwdrivers (Phillips and flathead), an adjustable wrench, a voltage tester, wire strippers, a ladder appropriate for ceiling height, a drill with bits, a pencil, a level, and a flashlight. Having these items laid out and accessible before starting keeps momentum going.
Prepare the Work Area
Clear furniture from beneath the installation location and lay protective coverings to catch debris. Ensure adequate lighting for all work areas and have a trash bag ready for packaging materials. A well-prepared workspace enables faster, safer work.
Read Instructions Completely First
This step surprises many DIYers, but reading all manufacturer instructions before beginning prevents costly mistakes. Understanding the assembly sequence and requirements ahead of time means you won’t discover mid-project that you assembled components in the wrong order or missed a critical step.
Verify Components Before Beginning
Unpack all boxes and verify all components are present and undamaged before starting assembly. Identifying missing or defective parts before beginning allows time for replacement without partial disassembly later. There’s nothing more frustrating than partially installing a fan only to discover a missing part.
Troubleshooting Common Installation Issues
Even careful installations sometimes encounter problems. Understanding common issues helps you diagnose and resolve them quickly.
Wobbling After Installation
Fan wobbling indicates improper blade alignment, loose mounting hardware, or an unlevel mounting bracket. Check that all blades attach at the same angle and distance from the motor hub—slight variations cause imbalance. Verify all mounting screws are tight, particularly the bracket-to-ceiling connection and fan-to-bracket connection. If wobbling persists, many fans include balancing weights that attach to blades to correct imbalance.
Light Kit Problems
Light issues commonly involve flickering, failure to operate, or buzzing. Verify bulbs are properly installed and compatible with the fixture—loose bulbs cause flickering. Check wiring connections within the light kit assembly, ensuring they’re secure and properly made. If lights operate inconsistently, the control switch or remote receiver may require attention.
Remote Control Malfunctions
Most remote issues stem from depleted batteries—replace batteries before pursuing complex solutions. Remote control receivers must be positioned where the remote’s signal can reach; some placements within the fan canopy block signal reception. If pairing is lost due to power interruption or electronic interference, consult manufacturer instructions for reprogramming procedures.
Summary of Time Expectations
Ceiling fan installation time ranges from approximately 1 hour for professional work under ideal conditions to 4+ hours for complex DIY projects in challenging situations. Most straightforward installations fall within the 1.5 to 3 hour range regardless of who performs the installation, with professionals completing work more quickly due to expertise and familiarity.
The most significant time variables are existing electrical infrastructure condition, ceiling type and height, fan complexity, and installer experience. Projects requiring new wiring, box replacement, or work in difficult locations extend well beyond the standard timeframe regardless of who handles the installation.
Proper preparation—gathering tools, reading instructions, verifying components—before beginning installation optimizes the process. Rushing through preparation to begin work immediately often results in delays when missing components, incorrect assumptions, or overlooked requirements create complications mid-project. Safety should never be compromised for time savings. The time required to properly shut off power, verify with a voltage tester, and work carefully through each step is always worthwhile.
Leave a Reply