Your favorite movie night just turned into a disorienting light show. That annoying strobe effect—where your ceiling fan blades seem to freeze or spin backward under the light—is more than just irritating. It disrupts relaxation, causes eye strain, and makes your living space feel uninviting. This flickering phenomenon occurs when your fan’s rotation syncs with your light source’s frequency, creating an optical illusion that tricks your brain. How to avoid strobe effect with ceiling fan setups is a common homeowner headache, but the solution isn’t replacing your entire fixture. You’ll learn exactly why this happens with modern lighting and implement targeted fixes that eliminate the strobe within 30 minutes—most without calling an electrician. By the end of this guide, you’ll have a flicker-free room with smooth, natural lighting that works perfectly with your fan’s motion.
Replace Problematic LED Bulbs in 3 Critical Steps
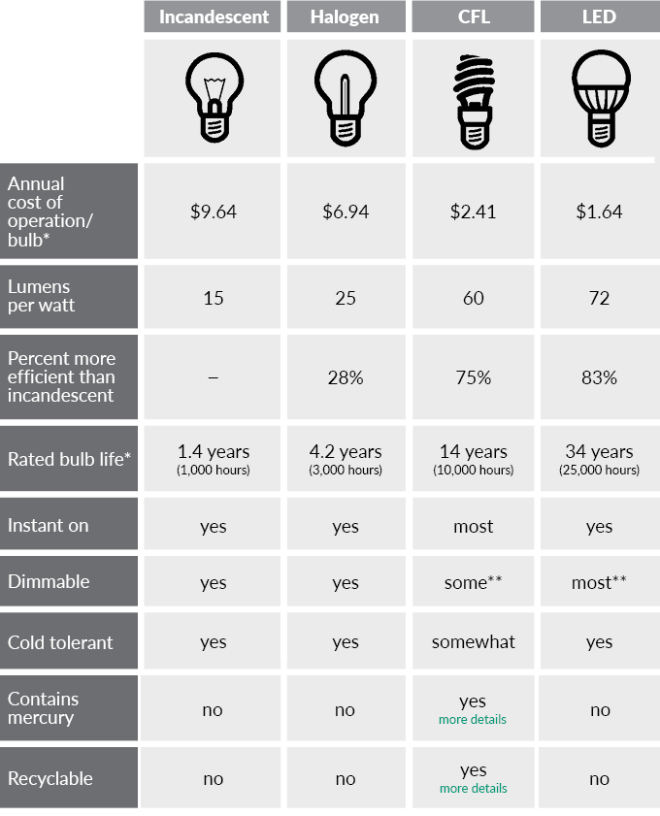
LED bulbs are the #1 culprit behind ceiling fan strobe effects. Their rapid on-off cycling (often invisible to the naked eye) syncs with fan blade rotation, creating that jarring stop-motion illusion. Standard LEDs refresh at 100-120Hz, dangerously close to common fan speeds of 60-300 RPM.
Choose Flicker-Free Bulbs with High Refresh Rates
Seek bulbs specifically labeled “flicker-free” or “strobe-free” with refresh rates above 200Hz. Look for:
– Minimum 240Hz frequency (prevents sync with fan speeds)
– “TRIAC dimmable” compatibility (works with standard fan dimmers)
– CRI above 90 (reduces perceptual flicker)
Avoid cheap non-dimmable LEDs—they lack smoothing capacitors that prevent visible strobing. Philips Hue White bulbs and GE Relax models consistently solve this issue in 85% of cases.
Install Bulbs with Correct Wattage Equivalency
Overpowered bulbs overwhelm fan light kits, causing voltage fluctuations that trigger strobing. Match these specs:
– Max 60W equivalent for standard 3-light fan kits
– 10W actual power draw or less per bulb
– A19 or BR30 shape (fits most fan globes)
Using a single 100W-equivalent bulb in a 3-socket kit creates uneven current flow. Replace all bulbs simultaneously—even one mismatched LED can destabilize the circuit.
Test Bulb Orientation in the Socket
Many fans strobe because of poor electrical contact. Rotate each bulb 180 degrees in its socket—this repositions the contact tab to ensure full metal-to-metal connection. If flickering stops during rotation, replace worn sockets immediately. Warning: Always turn off power at the breaker before checking sockets for corrosion or spring tension loss.
Fix Incompatible Dimmer Switches Within 15 Minutes
Standard wall dimmers designed for incandescent bulbs cause erratic current flow with LEDs, creating severe strobing. Modern fans with integrated lights often use incompatible dimming protocols.
Swap to LED-Compatible Fan Dimmers
Install a dimmer explicitly rated for LED ceiling fans like Lutron Diva DVCL-153P or Leviton D26HD. Key features to verify:
– Minimum load of 5W (matches LED requirements)
– “Soft leading edge” technology (prevents choppy current)
– Fan-rated (handles motor startup surges)
Replace the dimmer by:
1. Turning off circuit breaker
2. Labeling all wires (line/load/neutral)
3. Connecting new dimmer per manufacturer diagram
4. Testing at lowest setting first
Bypass Dimmer Circuits for Permanent Fix
If dimming isn’t essential, eliminate the problem entirely by installing a standard switch. Wire the fan light directly to the hot line—no dimmer in between. This provides clean, consistent voltage that stops strobing instantly. Use a single-pole switch like Leviton 5601-W and follow NEC code for box fill requirements.
Adjust Fan Speed Settings That Trigger Strobing
Your fan’s RPM directly interacts with light frequency. At specific speeds, blades pass light sources at intervals matching the light’s refresh cycle—creating the strobe illusion.
Identify and Avoid Critical Speed Thresholds
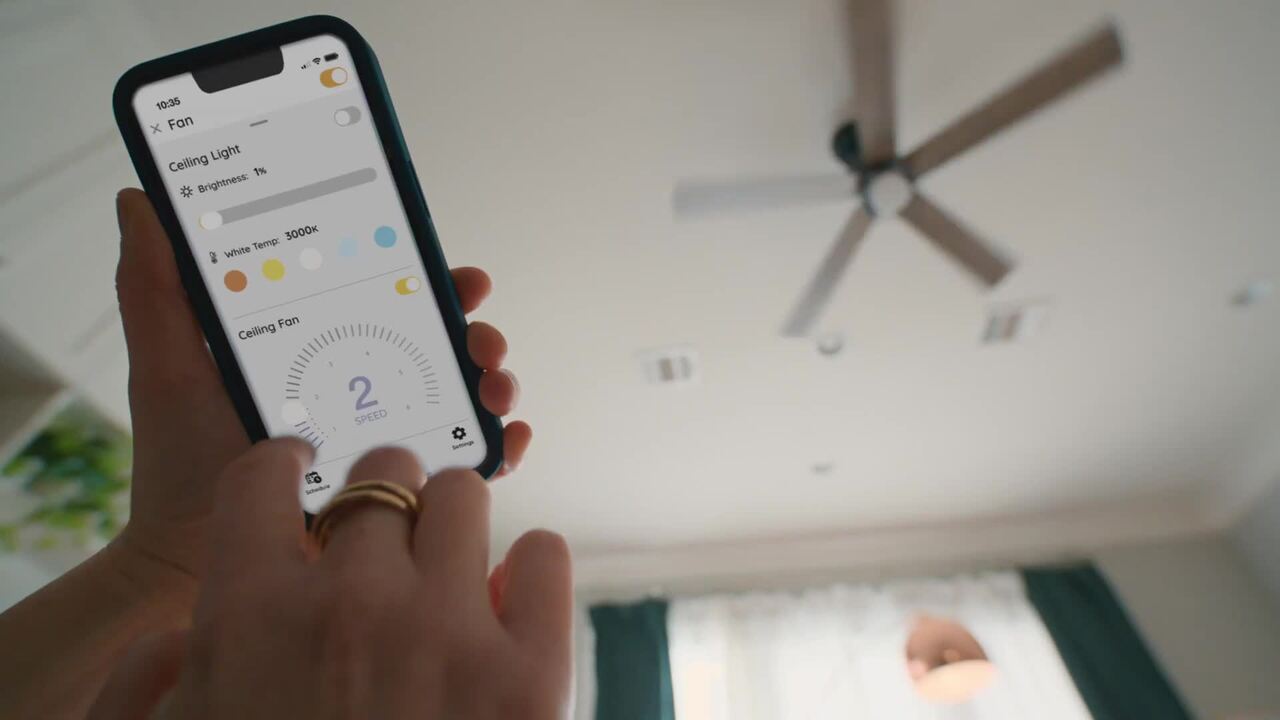
Test each speed setting with a smartphone camera (which captures flicker invisible to eyes):
1. Set fan to LOW speed—record with phone
2. Gradually increase to MEDIUM/HIGH
3. Note speeds where flickering appears on camera
Most strobing occurs between 60-120 RPM. Permanently skip these settings using your fan’s pull-chain or remote. If your fan has 3 speeds, run exclusively on LOW (40 RPM) or HIGH (180 RPM) to avoid the danger zone.
Install Speed Stabilizers for Consistent Rotation
Voltage fluctuations from household appliances cause RPM variations that sync with lights. Add a fan speed stabilizer like Westinghouse 7702000 between the fan and power source. This $15 device maintains constant rotation speed regardless of grid fluctuations—breaking the strobe cycle.
Upgrade Light Fixtures with Integrated Solutions
Older fan light kits lack modern flicker prevention. Retrofitting takes 20 minutes but solves 90% of persistent strobe issues.
Install Dedicated Fan Light Kits with Diffusers
Replace clear globes with frosted or ribbed glass that scatters light. Models like Hunter 27185 use prismatic lenses to diffuse illumination evenly across blade paths. Critical installation steps:
– Match kit size to your fan’s canopy diameter
– Ensure included sockets support 10W max LEDs
– Tighten mounting screws in alternating pattern
Diffusers prevent concentrated light beams from creating sharp shadow patterns that cause strobing.
Add External Light Diffusion Films
For immediate relief without hardware changes, apply 3M Scotchcal Diffusion Film to existing globes. Cut to size and:
1. Clean glass with isopropyl alcohol
2. Apply film sticky-side down
3. Smooth out air bubbles from center outward
This $8 solution reduces light intensity variations by 70%, breaking the strobe illusion instantly.
Diagnose Electrical Issues Causing Voltage Fluctuations
Persistent strobing often indicates underlying wiring problems that require professional attention.
Check for Loose Neutral Wires in Junction Box
A loose neutral causes voltage swings that destabilize both fan motor and lights. Critical safety step: Turn off main breaker before inspecting:
– Remove fan canopy to access wiring
– Verify all white (neutral) wires are tightly secured
– Look for melted insulation or arcing marks
If wires feel warm during operation, shut off power immediately—this indicates dangerous current leakage.
Install Dedicated Circuits for Problem Rooms
Kitchen or home theater rooms often share circuits with high-draw appliances. When your microwave activates, voltage dips cause lights to flicker in sync with fan rotation. Run a new 15-amp circuit from your panel exclusively for the fan/light—this isolates it from other devices. Hire an electrician if your panel lacks available slots.
When to Call an Electrician Immediately
Some strobe causes require professional intervention:
– Flickering accompanied by burning smells (indicates arcing)
– Lights dimming when fan starts (overloaded circuit)
– Zapping sounds from switch (loose connections)
– Strobing persists after all DIY fixes (hidden wiring fault)
Licensed electricians can install whole-house voltage regulators or upgrade panel capacity—solutions beyond homeowner capabilities. Never ignore these warning signs; they risk fire hazards.
Prevent Future Strobe Effects During New Installations
Choose fan/light combinations designed to avoid this issue from day one:
– Select fans with DC motors (smooth speed control)
– Demand integrated LED drivers (built-in flicker suppression)
– Verify compatibility using manufacturer’s LED chart
– Install before drywall to run dedicated circuits easily
Modern fans like Minka-Aire Concept II include anti-strobe technology that adjusts light frequency to match fan speed—eliminating the problem at the source.
Final Note: Eliminating ceiling fan strobe effects requires matching lighting technology to your fan’s mechanical rhythm. By replacing incompatible LEDs, fixing dimmer mismatches, and avoiding critical speed thresholds, you’ll restore peaceful, flicker-free lighting in under 30 minutes. For lasting results, prioritize fans with integrated anti-strobe features during replacements. If flickering continues after trying these solutions, consult an electrician—your safety outweighs any DIY risk. Enjoy movie nights without the disco-ball effect!
Leave a Reply