Most homeowners only think of ceiling fans as summer cooling devices, but knowing how to change ceiling fan direction in winter can save you hundreds on heating bills while making your home significantly more comfortable. When set correctly, your ceiling fan can reduce heating costs by 5-15% by redistributing warm air that naturally rises to the ceiling back down to where you actually live and work. This simple five-minute adjustment requires no tools and works on nearly all modern ceiling fans—yet the vast majority of homeowners miss out on these benefits every winter.
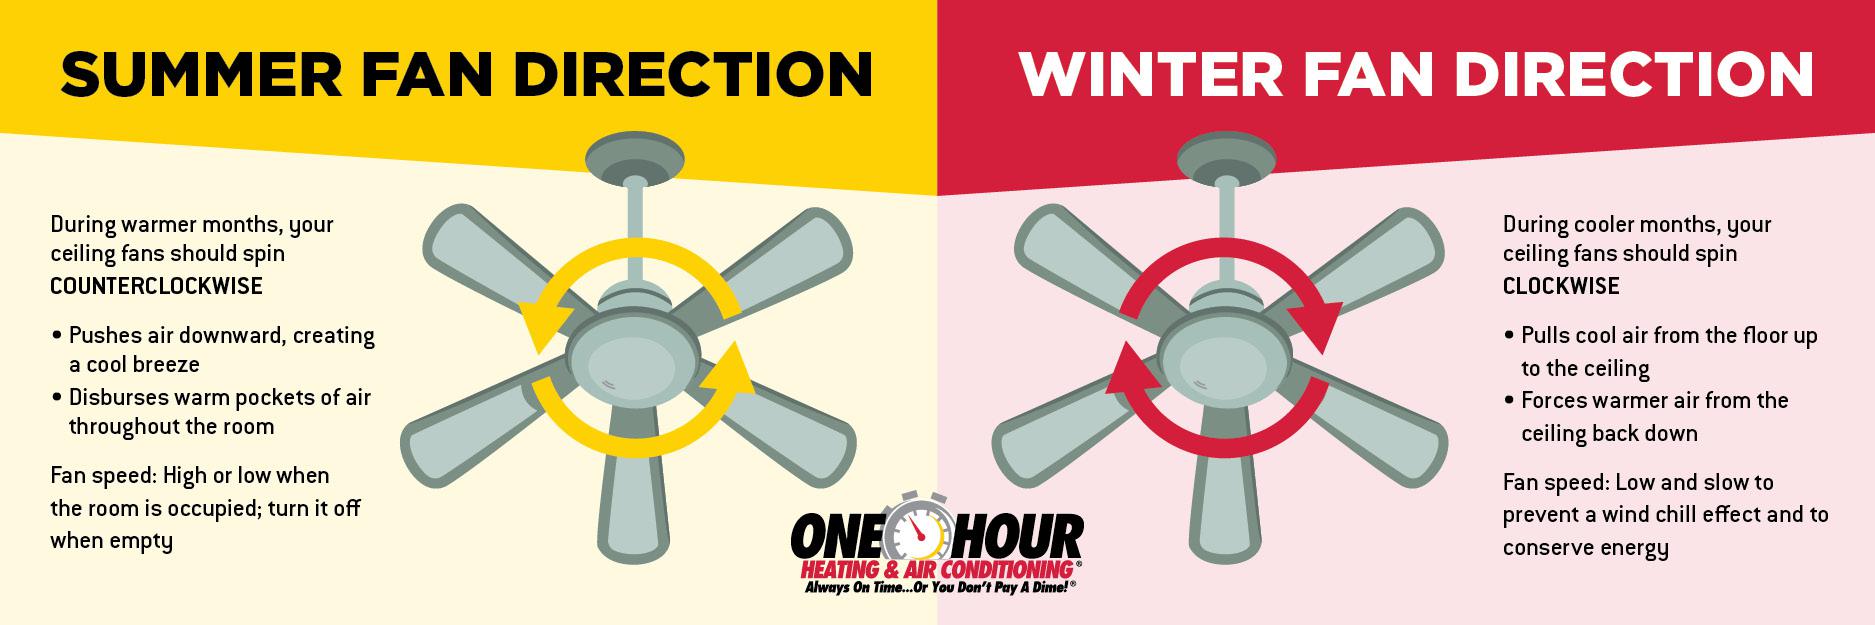
The science behind seasonal fan adjustment is straightforward thermodynamics: warm air rises while cool air sinks, creating uncomfortable temperature stratification where your head feels warm but your feet feel cold. By reversing your fan to rotate clockwise during winter, you create a gentle updraft that pulls cool air upward and pushes warm air down along the walls, eliminating cold spots and allowing you to lower your thermostat while maintaining comfort. This guide walks you through every step of changing your ceiling fan direction for winter, including how to identify your current setting, locate the direction switch, execute the change safely, and optimize your fan for peak winter performance.
Why Winter Direction Matters
Energy Savings Potential
Changing your ceiling fan direction during winter months can yield substantial financial benefits through reduced heating costs. When warm air accumulates near the ceiling while cold air settles at floor level, your heating system must run more frequently to maintain comfortable temperatures at thermostat level—typically positioned at eye height in main living areas. By reversing your fan to rotate clockwise, you create continuous air circulation that redistributes the warm air your heating system has worked hard to produce, ensuring it remains where you need it rather than being trapped uselessly near the ceiling.
The U.S. Department of Energy and numerous utility companies estimate that proper ceiling fan use during winter can reduce heating costs by 5-15% over the course of a typical heating season. For a household with average heating expenses of $1,500 annually, that represents savings of $75 to $225 per year—money that adds up significantly over the lifetime of your fan. Unlike many home improvements that require substantial investment, this seasonal adjustment costs absolutely nothing yet delivers measurable returns every winter.
Eliminate Temperature Stratification
Beyond the financial benefits, proper ceiling fan direction dramatically improves indoor comfort by eliminating the frustrating phenomenon where your feet feel cold even though the thermostat indicates the home is at the desired temperature. Temperature stratification—the variation in temperature from floor to ceiling—creates discomfort even when overall heating is adequate. A clockwise-rotating fan continuously mixes warm and cool air layers, creating more uniform temperatures throughout the vertical plane of each room.
This improved circulation also helps eliminate cold spots near exterior walls, windows, and corners that often develop during winter months. The gentle air movement created by a properly set ceiling fan makes your entire room feel more uniformly warm, allowing you to lower your thermostat setting while maintaining the same comfort level—a practice that compounds your energy savings over time. Many homeowners report feeling more comfortable at temperatures they previously found too cool, simply because the temperature is consistent throughout the room.
Identify Current Fan Direction
Quick Visual Observation
Before making any adjustments, determine your ceiling fan’s current rotation direction. Stand directly beneath the fan while it operates on its lowest speed setting. If the blades appear to be moving from the ceiling toward the floor in a slicing motion, your fan is rotating counterclockwise—the summer setting. Conversely, if the blades appear to be moving in an upward direction or if you feel a gentle updraft of air being pulled upward toward the ceiling, the fan is rotating clockwise—the winter setting you want for cold weather operation.
Another reliable visual test involves observing lightweight items hanging beneath the fan, such as light fixtures, paper streamers, or ribbons. When a fan rotates counterclockwise, it creates a noticeable downdraft that causes lightweight items to flutter downward. A clockwise rotation produces the opposite effect, with any hanging items being gently pushed upward or remaining relatively still due to the updraft nature of the airflow.
Smoke or Tissue Paper Test
For definitive confirmation of your fan’s direction, perform a simple smoke test. Light a match, blow it out immediately, and hold the smoking match beneath the fan while it operates on low speed. Watch the direction of the smoke carefully—smoke will be pushed downward by a counterclockwise-rotating fan and pulled upward by a clockwise-rotating fan. Alternatively, hold a small piece of tissue paper beneath the operating fan. The paper will be pushed down (counterclockwise) or pulled up (clockwise) depending on the current direction setting.
This test works because the airflow pattern at the center of a rotating ceiling fan differs based on rotation direction. The downdraft of counterclockwise rotation creates positive pressure that pushes items downward, while the updraft of clockwise rotation creates negative pressure that pulls items upward. Either test takes only seconds to perform and eliminates any ambiguity about your fan’s current configuration.
Locate the Direction Switch
Motor Housing Switch
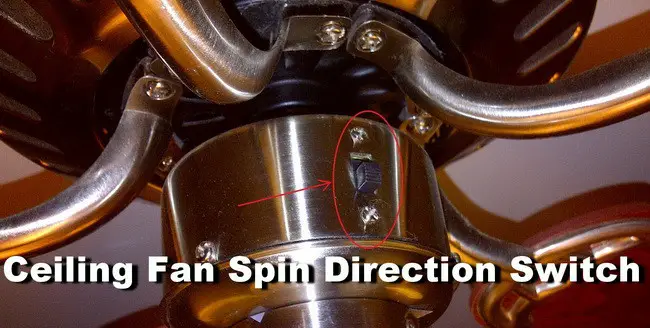
The direction reversal mechanism on most ceiling fans consists of a small toggle switch or rocker switch located on the fan’s motor housing, typically on the side visible from below when looking up at the fan. This switch is usually positioned near where the fan blades connect to the motor and may be recessed into a small groove. On most fans, you’ll find the direction switch about midway up the motor housing.
The switch is typically a small lever that flips up or down or a rocker switch that presses on one side or the other. Most manufacturers label these switches clearly with “CW” for clockwise and “CCW” for counterclockwise, or with icons showing fan blades and arrows indicating the two possible rotation directions. Some older or budget models use “Summer” and “Winter” labels, making the seasonal purpose explicit.
Remote Control and Smart Controls
For fans equipped with remote controls, the direction reversal function is typically accessed through a dedicated button on the remote, often labeled “Reverse,” “Rev,” or featuring a circular arrow icon. Some remotes use a combination of buttons—pressing both the power button and a specific function button simultaneously may activate the reverse function. After activating the reverse function via remote, you should hear a click from the fan’s motor housing indicating the internal switch has engaged.
Fans integrated with smart home systems like Google Home, Amazon Alexa, or Apple HomeKit can typically have their direction changed through voice commands or mobile app interfaces. The specific commands vary by platform but often include phrases like “Set living room fan to reverse” or “Change bedroom fan direction.” The smart home hub communicates with the fan’s receiver to engage the reverse function electronically.
Change Fan Direction Step-by-Step
Safety First
Before performing any adjustment, always turn off the power at the circuit breaker that supplies the fan. This precaution prevents accidental activation while you’re adjusting the direction switch. Verify the power is off by attempting to operate the fan through all control methods—wall switch and remote control—before touching the fan. Use a non-contact voltage tester if available to confirm no electrical current is present before proceeding.
Never attempt to change the direction switch while the fan is rotating—this can damage the motor or create a safety hazard. Ensure the fan has come to a complete stop before touching any components.
Execute the Direction Change
Once you’ve confirmed the power is off and the fan has stopped, locate the direction switch on the motor housing. For fans with a toggle switch, flip the lever to the opposite position from its current setting. If your fan has a rocker switch, press the side labeled “Winter,” “CW,” or showing a clockwise arrow. For fans with a sliding switch, slide it to the position indicating clockwise rotation.
After changing the switch position, wait several seconds for the electrical contacts to settle before restoring power. Turn the fan back on at its lowest speed setting and observe the rotation direction to verify the change was successful. You should notice the blades moving in an upward motion rather than a downward cutting motion, and you may feel a gentle updraft of air when standing beneath the fan.
Verify New Direction
After completing the direction change, take a moment to verify that the fan is operating correctly in its new configuration. Stand beneath the fan and confirm that you feel a gentle updraft rather than a downdraft. Observe any hanging items like light fixtures—they should be pushed slightly upward or remain still rather than fluttering downward. The fan should operate quietly without new clicking, grinding, or humming sounds.
If the fan appears to be rotating in the correct direction but makes unusual noises, turn it off immediately and inspect the fan blades for damage, warping, or accumulated dirt that could cause imbalance. Clean the blades if necessary and ensure all mounting hardware is tight. If unusual noises persist, consult a qualified electrician.
Optimal Winter Settings
Speed Recommendations
Winter ceiling fan operation differs significantly from summer operation in terms of optimal speed settings. During summer, fans run at high speeds to maximize air circulation. In winter, however, the goal is gentle air circulation that redistributes warm air without creating perceptible drafts. For this reason, ceiling fans should be operated at low speeds during winter months.
Running the fan at the lowest speed setting produces a gentle updraft that effectively mixes the air layers without creating uncomfortable air movement at occupied levels. Most fans have three speed settings, and the lowest setting typically provides sufficient air movement for winter benefits. Some modern fans have a dedicated “winter” mode preset that automatically sets the appropriate speed along with the correct rotation direction.
Duration and Timing
Unlike summer use where fans may run continuously while occupants are present, winter fan operation can be more selective. The ideal approach involves running the fan during the hours when your heating system is actively operating. Many homeowners find that running the fan for 15-30 minutes after the heating system cycles off is sufficient to thoroughly mix the air layers and maintain temperature consistency throughout the room.
Continuous winter operation at low speed is also acceptable and can provide ongoing benefits, particularly in homes with high ceilings or open floor plans where temperature stratification is more pronounced. The minimal energy consumption of a ceiling fan operating at low speed—typically 15-25 watts compared to 60-100 watts at high speed—makes continuous operation economically viable.
Troubleshooting Common Issues

Fan Fails to Change Direction
If your ceiling fan fails to respond to direction change attempts, first verify that the direction switch is actually being activated—if the switch is a small toggle lever, ensure it has fully engaged in the new position by feeling or hearing a distinct click. For remote-controlled fans, replace the battery in the remote and try the direction change command again, ensuring you are within range.
If the physical switch appears to be functioning but the fan continues rotating in the original direction, the issue may be with the capacitor—a small electrical component that provides the starting torque for the motor in each direction. Capacitors can fail over time, and a failed capacitor may only allow rotation in one direction. This repair should be performed by a qualified electrician.
Excessive Noise or Vibration
A properly maintained ceiling fan should operate quietly in both directions. If you notice new noises—clicking, grinding, or humming—that appear after changing the fan direction, the fan may have an imbalance issue. Turn the fan off and inspect the fan blades for damage, warping, or accumulated dirt that could cause imbalance.
Clean the fan blades thoroughly with a damp cloth, checking that all blades are equally clean and undamaged. Tighten any loose blade mounting screws, ensuring all blades are mounted at the same angle relative to the motor housing. If balancing issues persist, most fan manufacturers offer balancing kits that can be attached to the blades to correct minor imbalances.
Seasonal Maintenance Tips
Pre-Winter Inspection
Before transitioning your ceiling fan to winter operation, perform a comprehensive inspection. Turn off the power at the circuit breaker and visually inspect the fan assembly from below, looking for any signs of damage, loose components, or accumulated debris. Check that all blade attachment screws are tight and that the blades are not warped or cracked.
Examine the fan’s mounting bracket and downrod connection to verify that all screws and bolts are properly tightened. The fan should hang level with no visible wobble when rotating. Inspect the canopies and covers that hide the electrical connections at the ceiling mount, ensuring they are properly secured.
Post-Winter Transition
When winter ends, remember to change your ceiling fan direction back to counterclockwise for summer cooling benefits. Many homeowners mark their calendar or set a reminder to check and reverse their fans when daylight saving time changes occur, creating a reliable seasonal routine.
During the spring transition, perform another inspection of the fan assembly to address any issues that may have developed during the winter heating season. Check that the direction switch operates freely and that the fan responds correctly to remote control commands.
Common Winter Fan Myths
Fans Only Cool Rooms
A widespread misconception holds that ceiling fans are exclusively cooling devices with no heating season utility. This belief leads many homeowners to ignore their fans entirely during winter months, missing significant opportunities for energy savings and comfort improvement. The reality is that ceiling fans are year-round comfort tools that simply need direction adjustment to serve different purposes in different seasons.
Fans Make Rooms Feel Colder
Some homeowners worry that operating ceiling fans during winter will make their homes feel colder. This concern stems from summer operation experience. However, when operated at low speeds in clockwise rotation, ceiling fans create gentle air movement that is typically imperceptible to occupants while effectively redistributing warm air. The result is improved comfort, not reduced comfort.
Changing your ceiling fan direction for winter operation is a simple adjustment that delivers substantial benefits in comfort and energy efficiency throughout the cold months. By following the steps outlined in this guide—identifying your current direction, locating the direction switch, executing the change safely, and optimizing your settings for winter—you can reduce heating costs by 5-15% while eliminating cold floors and warm ceilings. Remember to operate your fan at low speeds during winter months, running it during active heating periods to maximize the distribution of warm air. This five-minute seasonal adjustment requires minimal effort yet provides measurable returns every winter, making it one of the simplest and most cost-effective home improvement tasks you can perform.
Leave a Reply