Nothing beats the refreshing breeze of a well-installed ceiling fan on a hot summer day, but many homeowners hesitate to tackle the wiring process themselves. Knowing exactly how to connect ceiling fan wires properly separates a safe, functional installation from a potentially dangerous electrical hazard. With the right approach and careful attention to detail, connecting your ceiling fan wires becomes a manageable DIY project that can save you hundreds compared to professional installation. This guide provides the step-by-step wiring knowledge you need to complete your ceiling fan installation safely and correctly—no electrician required for most standard setups.
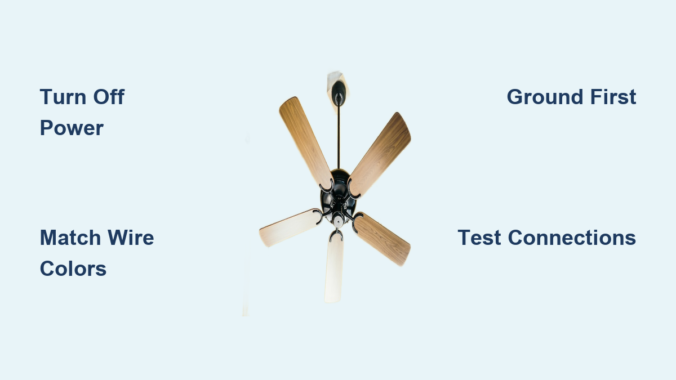
Electrical work demands respect and proper preparation. Before you touch a single wire, understand that mistakes in ceiling fan wiring can lead to electrical shock, fire hazards, or damage to your new appliance. Always begin by turning off power at the circuit breaker and verifying it’s off with a reliable voltage tester. If you encounter confusing wiring configurations or feel uncertain at any point, stop and consult a licensed electrician—your safety is worth far more than the cost of professional assistance.
Verify Your Electrical Box Can Support a Ceiling Fan
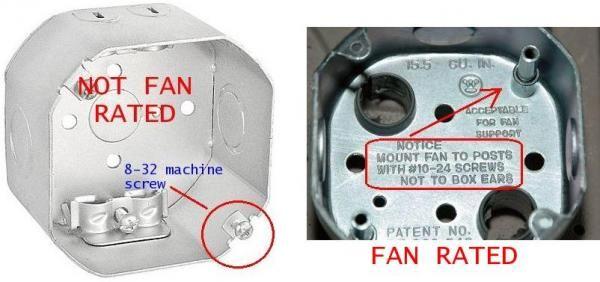
Standard light fixture boxes cannot handle the vibration and weight of ceiling fans, creating serious safety risks. Before connecting any wires, confirm you have a fan-rated electrical box properly secured to your ceiling joist.
Identifying an Unsafe Electrical Box
Look for signs your current box isn’t rated for fan installation: lightweight plastic construction, mounting only to drywall without joist attachment, or visible movement when you gently tug on the existing fixture. Fan-rated boxes will typically have “Acceptable for Fan Support” stamped on them and feature robust metal construction with multiple mounting points.
Upgrading to a Fan-Suitable Electrical Box
Replacing an inadequate box requires cutting power, removing the old fixture, then installing a fan-rated retrofit box. Position the new box between ceiling joists, expand the support arms until they grip the wood firmly, and secure with the provided screws. Proper installation creates a solid foundation that prevents your fan from wobbling or, worse, falling.
Decoding Wire Colors and Connections
Understanding what each wire does prevents dangerous mistakes when connecting ceiling fan wires. Residential electrical systems follow standardized color coding, but variations exist in older homes that require special attention.
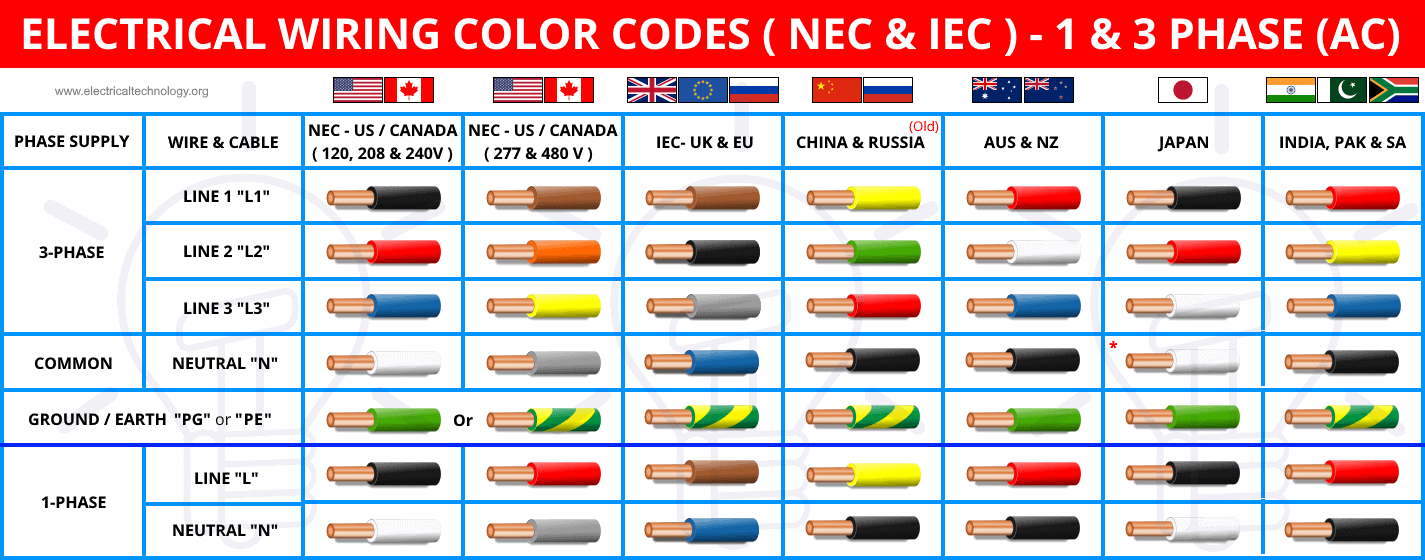
Standard Wire Color Functions
The black wire carries live current and connects to your fan’s black motor wire. White wires serve as neutrals that complete the circuit—connect your fan’s white wire to the house white neutral. Green or bare copper wires provide grounding for safety. Blue wires, when present on your fan, control the light kit separately from the fan motor. Never connect black to white—that creates a short circuit.
Handling Special Wiring Scenarios
Homes with dual wall switches require connecting your fan’s black wire to one hot wire (typically black) and the blue light wire to a second hot wire (often red). If your ceiling has only two wires (black and white), you’ll control both fan and light with a single switch. Aluminum wiring requires special connectors and techniques—consult an electrician rather than attempting this connection yourself.
Step-by-Step Wire Connection Process
With power confirmed off and your electrical box ready, you can safely make the critical connections that bring your ceiling fan to life. Follow this sequence for reliable, code-compliant results every time.
Prepare Wires for Connection
Strip approximately 1/2 inch of insulation from each wire end using wire strippers—enough to make solid contact without exposing excess copper. Twist any stranded wires tightly with needle-nose pliers to prevent fraying. Match house wires to fan wires by color before making connections to avoid mistakes.
Make Ground Connections First
Connect all ground wires together first: the house ground (bare copper), the electrical box ground (if metal), and the fan’s green wire. Twist clockwise with pliers, cap with a wire nut, and tug gently to verify security. This creates a safety path before energizing any circuit.
Connect Neutral Wires Next
Join the house white neutral wire with your fan’s white neutral wire. Twist clockwise, ensuring full copper contact, then secure with a wire nut. Push this connection upward into the electrical box to keep it clear of other connections. Proper neutral connections prevent electrical noise and ensure smooth operation.
Complete Hot Wire Connections
Connect the house black hot wire to your fan’s black motor wire. If you have separate light control, connect the house’s second hot wire (often red) to your fan’s blue light wire. Cap each connection individually with appropriately sized wire nuts. For fans without light kits, cap the blue wire separately with a wire nut.
Testing Your Wiring Before Final Assembly

Never skip testing before fully assembling your fan—discovering problems now saves you from climbing back up the ladder later. Proper verification ensures safety and functionality before you commit to the final installation.
Safety Checks Before Power Restoration
Double-check that no bare copper shows beyond wire nuts, all connections feel tight when gently tugged, and wires aren’t pinched by mounting hardware. Ensure the fan assembly can rotate freely without contacting wires. Verify that ground connections are solid—this critical safety feature prevents electrical shock.
Initial Power Test Procedure
Restore power at the breaker and test fan operation at all speed settings. Listen for unusual buzzing or grinding sounds that indicate wiring problems. Test light functions separately if your fan includes lighting. If anything operates incorrectly, turn off power immediately and recheck connections—never ignore warning signs.
Troubleshooting Common Wiring Problems
Even careful installations sometimes encounter issues that require diagnosis and correction. Knowing how to identify and fix common wiring problems saves time and prevents frustration.
Why Your Fan Won’t Turn On
Check that power is actually reaching the box with your voltage tester. Verify all wire connections are tight—loose neutrals often cause complete failure. Ensure wall switch connections are correct, especially if you installed a new switch. Some fans have pull chains that must be in the “on” position before wall controls work.
Fixing Wobbling and Noise Issues
Wobbling typically stems from improper mounting rather than wiring, but electrical issues can cause unusual noises. Check that all mounting screws are tight and the downrod is properly secured. If you hear buzzing at certain speeds, verify that wire connections aren’t touching metal parts inside the canopy. Balance kits included with most fans solve minor wobble problems.
When to Call a Professional Electrician
While many ceiling fan installations are DIY-friendly, certain situations demand professional expertise that shouldn’t be ignored for the sake of saving money.
Critical Warning Signs
Call an electrician immediately if you notice burning smells, discoloration on wires or connections, sparks during testing, or if circuit breakers trip repeatedly when operating the fan. Aluminum wiring, knob-and-tube systems, or any signs of previous electrical damage require professional assessment before proceeding.
Complex Installation Scenarios
Homes without existing ceiling wiring, installations requiring new circuit runs, or configurations with smart home integration often exceed reasonable DIY scope. If local building codes require permits for electrical work in your area, professional installation ensures code compliance and proper documentation.
Properly connecting ceiling fan wires transforms what seems intimidating into a satisfying DIY victory. By following this guide’s step-by-step approach—from verifying your electrical box can support the fan through making secure wire connections and thorough testing—you’ll enjoy reliable operation and improved home comfort for years. Remember that electrical safety always comes first: never rush connections, always verify power is off, and don’t hesitate to call a professional when facing situations beyond your comfort level. With your new ceiling fan safely installed, you’ll cool your home more efficiently while adding style and value to your living space. Take pride in your accomplishment, but maintain your installation with regular checks to catch potential issues before they become problems.
Leave a Reply