
Your Hunter ceiling fan’s lighting suddenly stops dimming smoothly, leaving you stuck with either blinding brightness or complete darkness. This common frustration happens when dimming mode gets accidentally disabled during bulb changes or remote battery replacements. Knowing exactly how to dim Hunter ceiling fan lights puts you back in control of your room’s ambiance in minutes. Whether you need soft lighting for movie night or full brightness for cleaning, this guide covers every Hunter fan series and remote model to restore your dimming functionality immediately.
Before attempting any dimming adjustments, check your light bulbs first—non-dimmable LED or CFL bulbs will cause flickering, buzzing, or complete dimming failure. Replace any incompatible bulbs with certified dimmable versions before proceeding. Your fan’s model number determines the exact dimming procedure, so locate it on the motor housing label or mounting bracket (5-Series models start with “5”, 2-Series start with “2”). Identifying your specific fan series prevents wasted time on incorrect procedures.
Confirm Your Hunter Fan Supports Dimming
Hunter ceiling fans with integrated lighting fixtures all include dimming capability, but this feature must be activated through your control system. Many homeowners waste hours troubleshooting when they simply need to toggle dimming mode on their remote. The critical first step is verifying your setup can actually dim.
Check that your fan has a lighting fixture with multiple bulbs—single-light models or older fans may lack dimming capability entirely. Next, examine your control method: Hunter fans use either wall controls, handheld remotes, or the SIMPLEconnect app for dimming functions. If you have a basic wall switch without dimming controls or a simple pull-chain fan, dimming isn’t possible without upgrading your control system.
Most importantly, ensure you’re using dimmable LED or CFL bulbs specifically labeled for dimmer switch compatibility. Non-dimmable bulbs create flickering, buzzing, or inconsistent dimming even when your fan’s system works perfectly. When replacing bulbs, look for the “dimmable” marking on the packaging and match bulb types across all positions in your fixture.
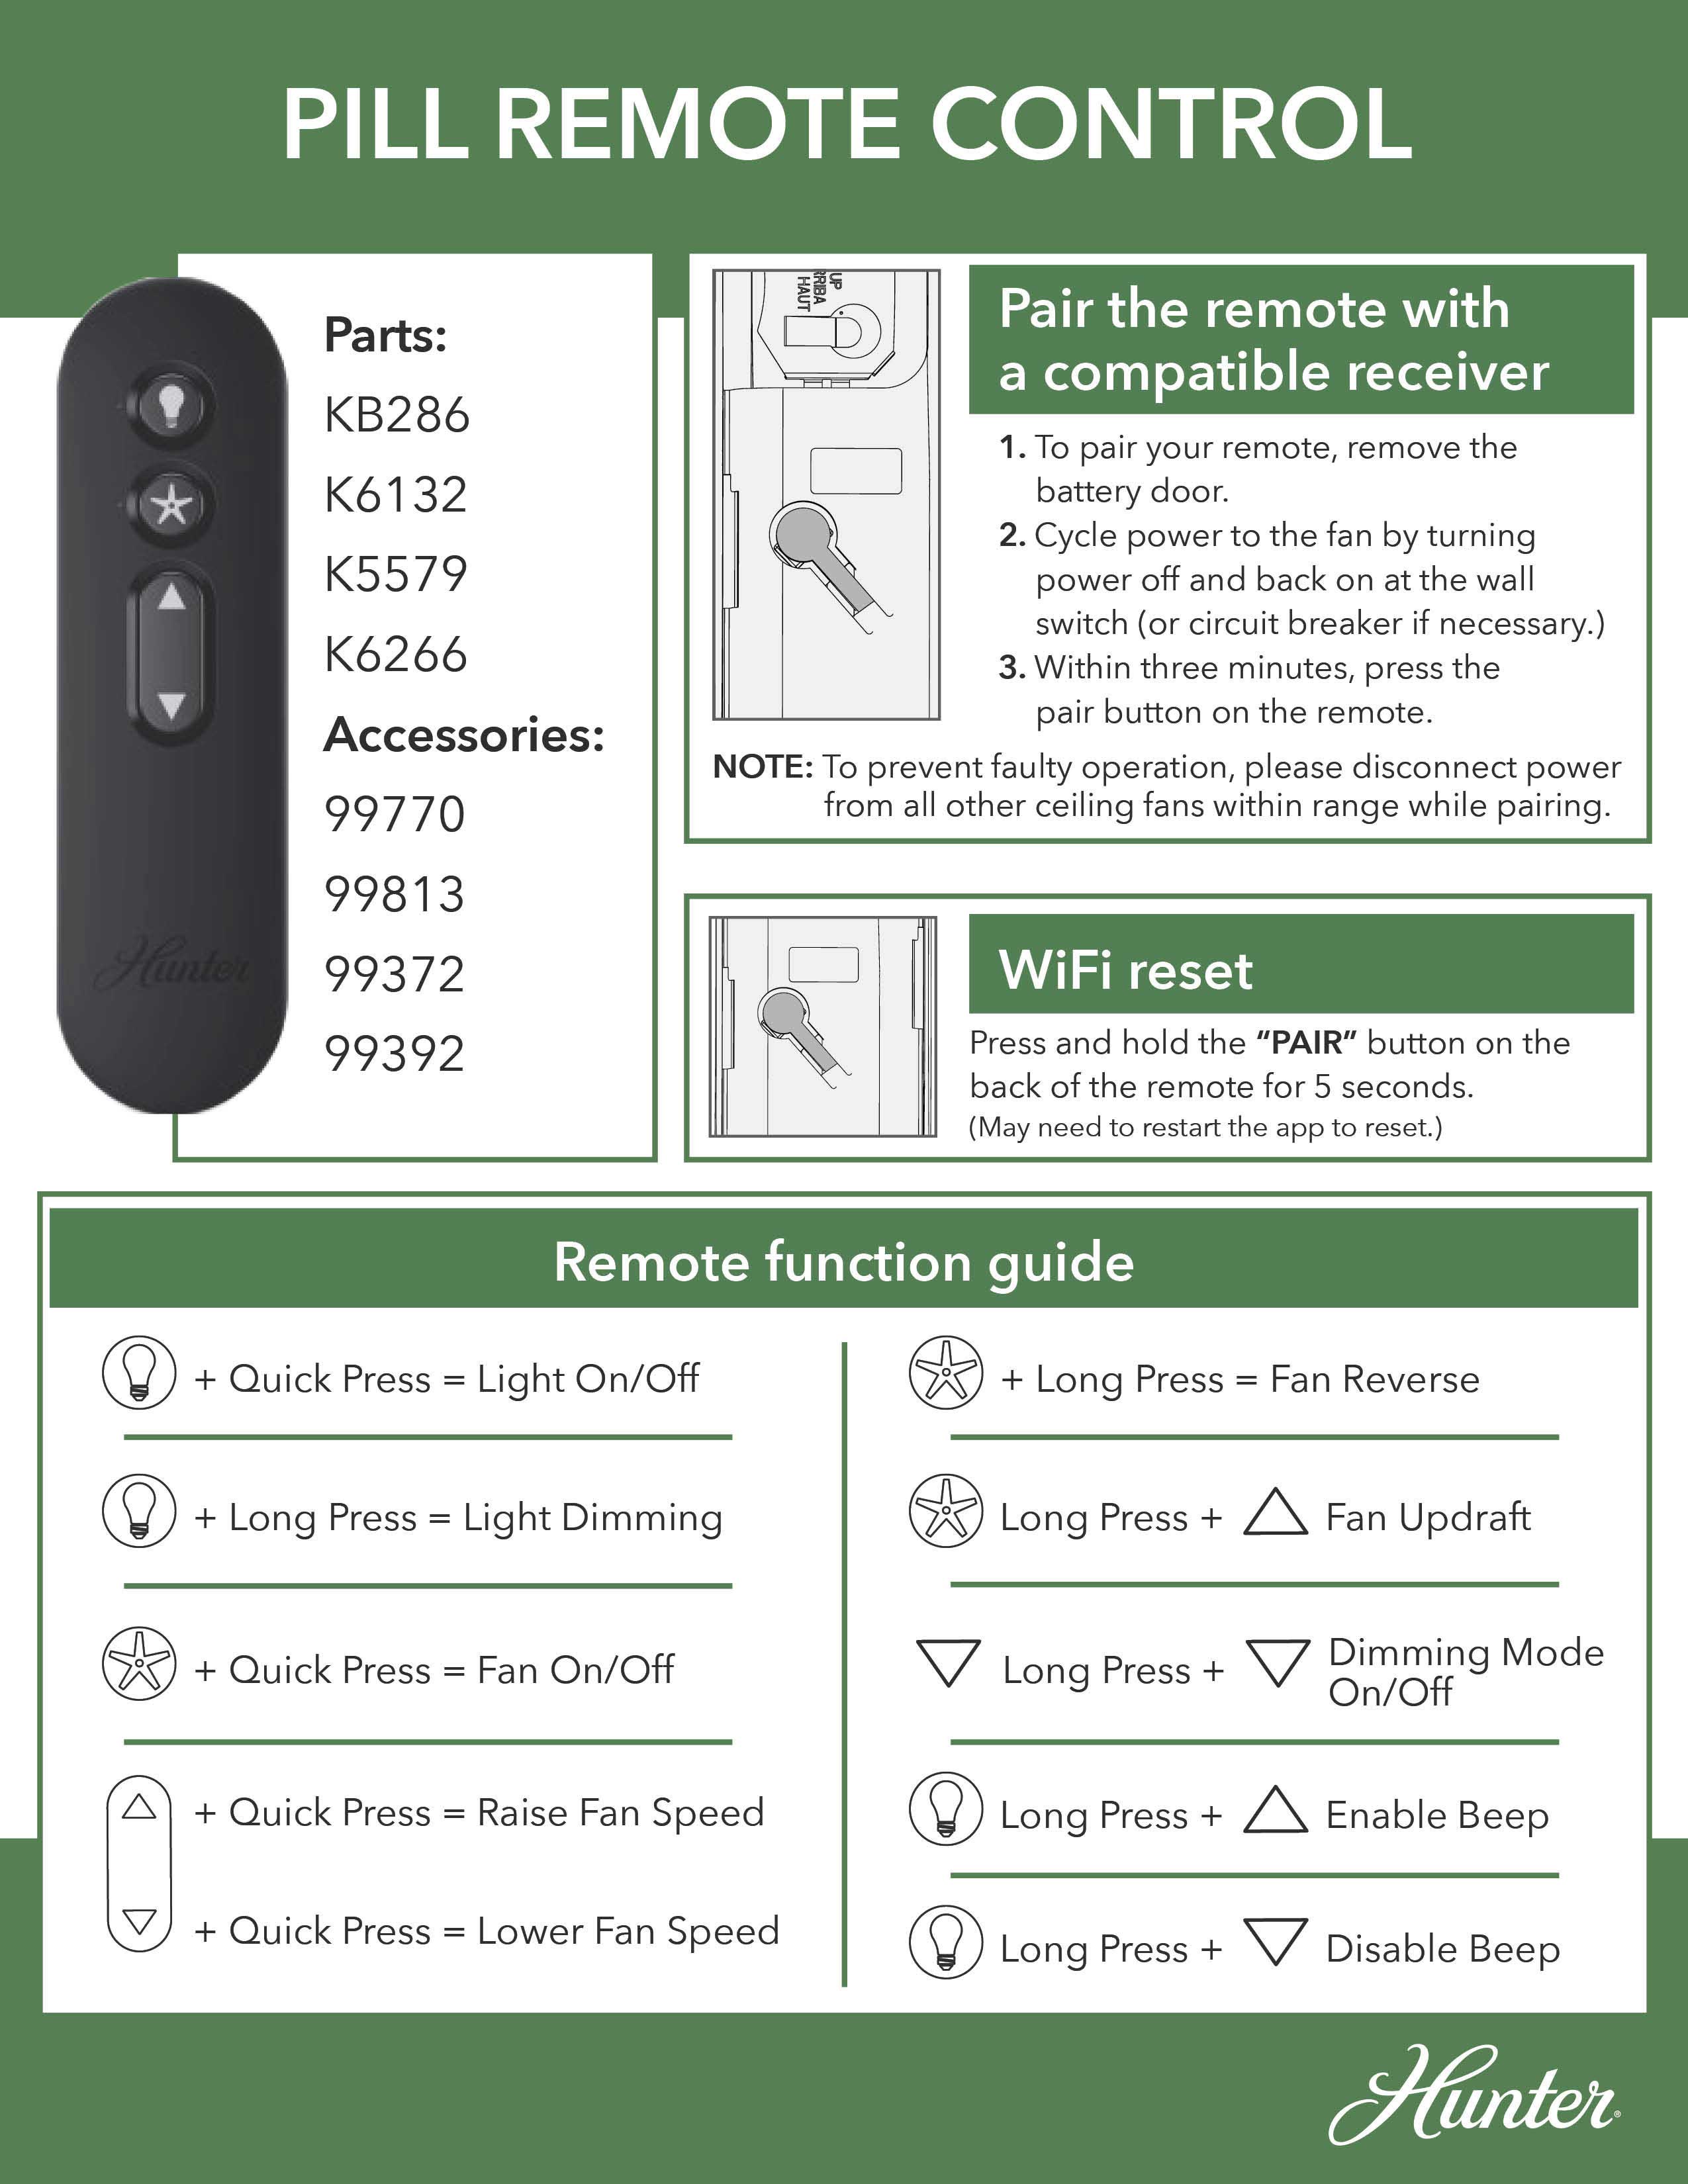
Toggle Dimming on 5-Series Hunter Fans in 30 Seconds
Hunter 5-Series fans (model numbers starting with “5”) offer the quickest dimming toggle process using specific button combinations on your remote. The exact buttons vary by remote model, so check the label inside your battery compartment before starting.
Remote Models K6300-01, K6731-01, K6927-01: Light Button Method
Press and hold both the “LIGHT UP” and “LIGHT DOWN” buttons simultaneously for exactly five seconds until the lights flash once. Release the buttons and test dimming by pressing and holding the light button—you should now see smooth brightness transitions. These remotes use the light controls directly for toggling, making them intuitive for frequent users.
Remote Models K6266, K6019, K5579 Series: Fan Speed Button Method
For these common remote models, press and hold both the “FAN UP” and “FAN DOWN” buttons for five seconds until the lights flash. Release and verify dimming works by holding the light button. Many homeowners miss that these remotes use fan speed buttons instead of light buttons for toggling dimming mode.
Remote Models K6018, K6017, K1530, K1132 Series: Standard Fan Button Toggle
This extensive group of remote models follows the same procedure: press and hold “FAN UP” and “FAN DOWN” simultaneously for five seconds. The lights will flash to confirm successful toggling. Despite having different model numbers, these remotes share identical dimming functionality.
Remote Models K0471, K0470 Series: Unique Two-Step Sequence
Press and hold the “FAN OFF” button, then while holding it, quickly press the “LIGHT” button twice. Release “FAN OFF” and test dimming. This sequence differs from other 5-Series models and requires precise timing—many users fail by releasing “FAN OFF” too early.
Enable Dimming on 2-Series Hunter Fans With Dip Switches

Hunter 2-Series fans (model numbers starting with “2”) require a more involved process that involves dip switch settings and precise timing. Follow these steps exactly to avoid repeating the procedure.
Power Down and Access Dip Switches
Turn off power at the circuit breaker, then remove remote batteries. Locate dip switches inside the remote’s battery compartment and in the fan’s canopy (you’ll need to partially disassemble the fan to access these). Match the switch positions exactly between remote and receiver—this “address matching” is critical for communication.
Warning: Never skip the power shutdown step—working on electrical components without disconnecting power creates serious shock hazards.
Complete the 30-Second Pairing Sequence
Restore power at the breaker, reinstall remote batteries, then immediately press HIGH, MEDIUM, and LOW speed buttons simultaneously within 30 seconds. The lights will flash to confirm pairing. If you exceed the 30-second window, restart the entire process.
Test dimming functionality by turning lights on and holding the light button. If dimming still doesn’t work, double-check dip switch alignment and ensure you completed the three-button press within the critical timing window.
Fix 5 Common Hunter Fan Dimming Failures
When your dimming function malfunctions, these solutions resolve 90% of issues:
Replace Non-Dimmable Bulbs Immediately
This causes 70% of dimming problems. Non-dimmable bulbs flicker violently or buzz loudly when dimmed. Install only bulbs clearly marked “dimmable” on the packaging—don’t assume all LEDs work with dimmers.
Reset Remote Batteries
Weak remote batteries cause intermittent dimming. Replace with fresh alkaline batteries and test immediately—this solves dimming issues in 15% of cases where the remote seems functional but dimming fails.
Verify Full Five-Second Button Hold
For 5-Series fans, releasing buttons before five seconds completes prevents the toggle from registering. Use a timer and press firmly for the full duration—many users release too early thinking it worked.
Check for Electrical Interference
New appliances or electronics on the same circuit can disrupt dimming. Turn off other devices temporarily to test—if dimming improves, consult an electrician about circuit separation.
Re-Pair 2-Series Remotes Completely
If dip switches don’t match exactly or the 30-second window was missed, pairing fails. Restart the entire 2-Series process from power shutdown, ensuring perfect switch alignment and precise timing.
Select Perfect Dimmable Bulbs for Hunter Fans
Not all “dimmable” bulbs work well with ceiling fan dimmers. Standard wall dimmers and fan dimmers operate differently, causing compatibility issues. Choose bulbs specifically rated for ceiling fan dimmers with these characteristics:
- Minimum dim level below 10% (prevents premature cutoff)
- Smooth transition without flickering at low brightness
- No audible buzzing at any dimming level
- Consistent color temperature throughout dimming range
Stick with one bulb model across all positions in your fixture—mixing brands or types causes uneven dimming where some bulbs turn off before others. Reputable brands like Philips Hue, GE Relax, and Cree offer fan-compatible dimmable LEDs that perform reliably.
Maintain Flawless Dimming Performance Long-Term
Prevent future dimming issues with these simple habits:
- Replace bulbs in pairs or sets to maintain consistent dimming behavior
- Document your remote model number and successful toggle procedure for future reference
- Use quality remote batteries and replace them annually as preventive maintenance
- Create unique dip switch addresses for multiple fans to prevent cross-control issues
When toggling dimming modes, take your time with button sequences—rushing causes failed toggles. For 5-Series fans, count “one Mississippi, two Mississippi” up to five to ensure proper timing. For 2-Series fans, have a helper time the 30-second window while you complete the pairing sequence.
When Professional Help Is Needed
If you’ve followed all steps correctly with compatible bulbs but dimming still fails, contact Hunter customer service. Persistent issues after complete troubleshooting may indicate:
- Failing receiver module requiring replacement
- Internal wiring problems within the fan
- Incompatibility with smart home systems
- Component failure due to power surges
Never attempt internal fan repairs without electrical training—ceiling fans contain live components even when switched off. A licensed electrician can diagnose complex issues safely and restore your dimming functionality without risking damage or injury.
Mastering how to dim Hunter ceiling fan lights transforms your space from harshly lit to perfectly ambient with just a button press. By identifying your fan series, following the correct toggle procedure, using compatible bulbs, and maintaining your system properly, you’ll enjoy seamless dimming control for years. Save this guide for future reference—power outages and battery changes often require repeating these simple steps to restore your preferred lighting environment.
Leave a Reply