Many homeowners face a frustrating dilemma when installing a new ceiling fan: discovering their electrical box lacks a grounding wire. This common issue plagues older homes built before modern electrical codes mandated grounding conductors in every circuit. Without proper grounding, you risk electrical shock hazards and potential fire dangers whenever the fan develops wiring faults or insulation failures. This guide provides actionable solutions that maintain safety while working within your existing electrical infrastructure. You’ll learn how to verify your current setup, implement code-compliant alternatives, and ensure your ceiling fan operates safely—even without that crucial bare copper wire.
Why Proper Grounding Is Non-Negotiable for Ceiling Fans
Electrical grounding creates an essential safety pathway that diverts stray current away from you and your home during faults. When a ceiling fan’s internal wiring fails—whether from aging insulation, accidental damage during installation, or moisture exposure—the grounding system channels dangerous electricity safely into the earth rather than through anyone touching the fan’s metal components. Without this critical path, hazardous voltage can linger on accessible parts like the mounting bracket, canopy, or even the blades themselves, creating shock risks that won’t necessarily trip standard circuit breakers.
The National Electrical Code mandates proper grounding for ceiling fans due to their unique combination of electrical components and physical movement. These fixtures operate under constant vibration that can gradually loosen connections over time, increasing potential fault risks. Beyond personal safety concerns, ungrounded installations can void homeowner insurance policies and trigger red flags during property inspections. Real estate transactions often stall when inspectors document ungrounded fixtures, making proper grounding not just a safety issue but also a financial consideration for homeowners.
Identifying Your Electrical Box Configuration

Before attempting any grounding solution, you must accurately assess your ceiling electrical box’s wiring setup. Begin by switching off the circuit breaker controlling the fan location and verifying power is completely disconnected using a reliable voltage tester. Remove any existing fixture to expose the wiring compartment and examine what wires emerge from your ceiling. Modern installations feature three conductors: black (hot), white (neutral), and bare copper or green (ground). If you see only black and white wires without any grounding conductor, you’re dealing with an ungrounded situation requiring special handling.
Test for hidden grounding paths by checking if your electrical box itself provides grounding. With power confirmed off, use your voltage tester to check between the black wire and the metal box—if you detect voltage, the box may already be grounded through metallic conduit or armored cable. In this scenario, connecting your fan’s green ground wire directly to the metal box creates a legitimate grounding path. However, if no voltage appears between box metal and either circuit wire, and no visible ground conductor exists, you’ll need to implement one of the alternative solutions outlined below to ensure safe operation.
Running a New Ground Wire From Your Electrical Panel
The most code-compliant solution involves installing a proper grounding conductor from your ceiling box back to your home’s electrical panel. This approach works when you have reasonable access to routing paths between the fan location and a verified ground source. The new wire must match your circuit’s conductor gauge—typically 14 AWG for standard 15-amp lighting circuits or 12 AWG for 20-amp circuits—and connect securely at both ends using appropriate wire connectors.
Fishing a new ground wire through finished walls and ceilings presents the main challenge, often requiring strategic access points or temporary drywall patches. Professionals typically use fish tapes or flexible drilling rods to navigate between floors, taking care not to damage existing wiring or structural elements. While ambitious DIYers can tackle this project with proper tools and knowledge, significant obstacles like inaccessible attics, finished basements, or multi-story routing often warrant hiring a licensed electrician to ensure proper installation and code compliance. The advantage of this method is that it creates a permanent, verifiable ground path that satisfies all electrical inspection requirements.
How to Verify Your New Ground Connection
After installation, confirm your new ground wire functions correctly using a multimeter. With the circuit energized, place one probe on the fan’s metal housing and the other on a known ground point like a properly grounded outlet screw. A reading below 1 volt indicates successful grounding, while higher measurements suggest connection issues requiring further troubleshooting. Additionally, perform a visual inspection to ensure all wire connections remain tight and properly secured within approved junction boxes.
Installing GFCI Protection as a Code-Compliant Alternative
When running a new ground wire proves impractical, the National Electrical Code permits Ground Fault Circuit Interrupter (GFCI) protection as an acceptable safety alternative for ungrounded ceiling fan circuits. GFCI devices constantly monitor current flow between hot and neutral wires, cutting power within 1/40th of a second if they detect even minor current imbalances—fast enough to prevent serious shock injuries despite the absence of a traditional ground path.
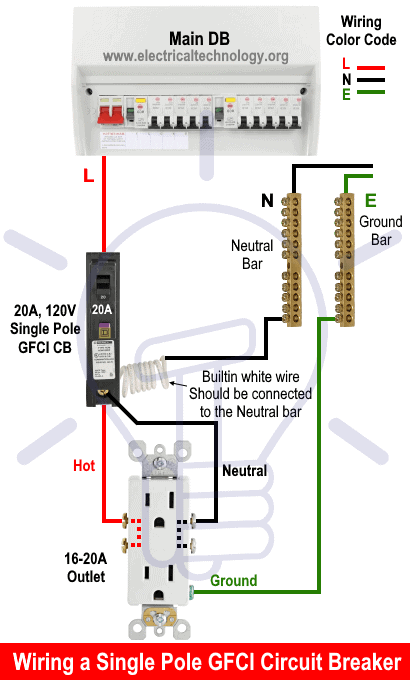
You can implement this solution in two primary ways: by installing a GFCI breaker at your electrical panel to protect the entire circuit, or by replacing the fan’s wall switch with a GFCI-protected switch. In either case, connect the fan’s ground wire to the metal electrical box (if metal) or leave it safely capped off if no grounding path exists. Crucially, you must affix a “No Equipment Ground” warning label near any GFCI-protected outlets on the circuit—a frequently overlooked code requirement that informs future users about the installation’s limitations.
Understanding GFCI Limitations for Ceiling Fans
While GFCI protection significantly enhances safety, it doesn’t provide the same level of fault current handling as proper grounding. Some modern ceiling fans with advanced features like Bluetooth connectivity, integrated lighting systems, or smart home compatibility may malfunction or operate unreliably without a true ground connection. If your fan exhibits unusual behavior after GFCI installation—such as flickering lights, erratic speed control, or intermittent operation—you may need to pursue alternative grounding solutions despite the added complexity.
Testing Your Grounding Solution for Safety Verification
Never assume your grounding solution works correctly without proper verification. Conduct multiple tests using different methods to confirm safety before relying on your installation. Start with a basic multimeter test: with the circuit powered, measure voltage between the fan’s metal housing and a known ground source like a properly grounded outlet screw. A reading near zero volts confirms effective grounding, while measurements above 1 volt indicate problems requiring immediate attention.
For GFCI-protected installations, use a dedicated circuit tester with a GFCI test button to verify proper operation. Plug the tester into an outlet on the same circuit and press the test button—the GFCI should trip instantly, cutting power to the circuit. Reset the GFCI afterward and repeat the test to ensure consistent performance. Monthly testing remains essential for ongoing safety, as GFCI devices can degrade internally while appearing functional. Additionally, perform visual inspections of all connections to confirm wire nuts are secure, no copper strands are exposed, and the grounding path remains continuous without breaks or splices.
When Professional Electrical Help Becomes Essential
Certain situations demand professional intervention rather than DIY solutions. If your home contains aluminum wiring—common in structures built between 1965 and 1973—special connectors and handling procedures are required to prevent dangerous oxidation and fire hazards. Similarly, homes with obsolete knob-and-tube wiring or severely outdated electrical panels typically need comprehensive evaluation by a licensed electrician before any fan installation proceeds.
Consult a professional if you’re uncertain about local code requirements, if your electrical box shows signs of overheating or damage, or if you encounter unexpected wiring configurations during installation. The relatively modest cost of professional assistance pales in comparison to potential consequences of improper grounding—electrical fires can cause hundreds of thousands in damage, while shock injuries may result in permanent disability or worse. Electricians can also secure necessary permits and schedule inspections to ensure your installation meets all regulatory requirements, providing documentation that protects you during future home sales.
Maintaining Safety With Ungrounded Ceiling Fan Installations
When operating a ceiling fan without a complete ground path, implement additional safety measures to minimize risks. Always ensure the fan remains properly balanced—excessive wobble creates vibration that can gradually loosen electrical connections over time, increasing shock and fire hazards. Regularly inspect the canopy housing for signs of overheating like discoloration, melting, or burning odors, which indicate serious problems requiring immediate attention.
For fans protected only by GFCI devices, establish a strict monthly testing schedule. Press the “Test” button on your GFCI outlets or breakers to verify they trip properly, then reset them afterward. Many homeowners neglect this simple step, leaving themselves vulnerable to undetected GFCI failures. Consider upgrading to a modern fan with double-insulated motor construction if your current unit shows signs of wear—these models incorporate additional internal insulation layers that reduce shock risk even without proper grounding.
Long-Term Electrical System Upgrades for Permanent Safety
The definitive solution for ungrounded ceiling fan installations involves upgrading your home’s electrical infrastructure to meet current code standards. This may mean replacing entire ungrounded circuits with modern three-wire NM-B cable, installing dedicated ground paths throughout your home, or updating your electrical panel to accommodate modern grounding requirements. While these projects represent significant investments, they provide permanent safety improvements that enhance both daily living and future property value.
Contact your local building department before starting major electrical work to understand specific permit requirements and code interpretations in your area. Electrical regulations vary considerably between jurisdictions, and what satisfies requirements in one municipality may not meet standards elsewhere. Many areas require inspections for all fan installations—skipping these steps risks failed inspections during home sales and potential insurance complications if issues arise later. A phased approach often works best for older homes: prioritize high-risk areas like kitchens and bathrooms first, then gradually extend grounded circuits throughout your home as budget allows.
Leave a Reply