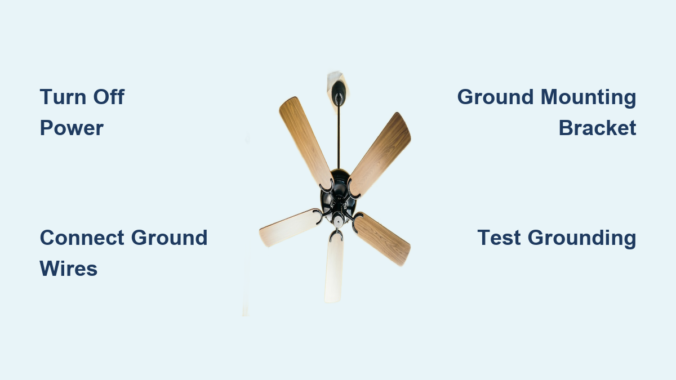
Grounding a ceiling fan is a critical safety step that protects your home from electrical faults and prevents potential shock hazards. Without proper grounding, electrical surges can travel through the fan’s metal components, creating dangerous situations for anyone in the room. Whether you’re installing a new ceiling fan or troubleshooting an existing one that lacks proper grounding, understanding the correct procedures ensures your installation meets electrical code requirements and keeps your household safe. This comprehensive guide walks you through everything you need to know about ceiling fan grounding, from identifying ground wires to testing your completed installation.
Why Proper Ceiling Fan Grounding Prevents Electrical Hazards
Electrical grounding creates a safe pathway for stray current to flow into the earth if a fault develops in your ceiling fan’s wiring or metal components. When a live wire inside the fan accidentally touches any metal part—the canopy, motor housing, or fan blades—the grounding wire redirects that dangerous current away from anyone who might touch the fan and into your home’s grounding system instead. This protection becomes especially important in bedrooms and living spaces where people spend extended periods and where ceiling fans often operate for hours at a time.
Beyond safety concerns, many jurisdictions require compliant grounding as part of their building and electrical codes. The National Electrical Code mandates grounding for all ceiling fans, and local code officials may flag ungrounded installations during home inspections or when selling your property. Proper grounding also protects the fan’s electrical components from power surges and lightning strikes, potentially extending the fan’s operational lifespan by preventing damage to sensitive electronics inside the motor housing. An ungrounded fan might operate normally for years, but when a fault occurs, the lack of proper grounding could turn your ceiling fan into a serious shock hazard.
Locate Your Ceiling Fan Ground Wires Before Starting Work
Finding the ground wires in your ceiling fan installation requires understanding wire color coding and typical placement. The ground wire in your ceiling electrical box is almost always green, bare copper, or green-and-yellow striped, running alongside the black (hot) and white (neutral) wires. This wire connects somewhere in your home’s electrical system to a ground rod, water pipe, or the neutral bus bar in your main electrical panel, creating that essential pathway to earth ground.
Your ceiling fan itself includes a ground wire, typically green or green with a yellow stripe, attached to the fan’s mounting bracket or internal wiring. This wire may be connected to the fan canopy’s green grounding screw, or it may be a loose wire waiting to be joined with the house ground wire using a wire connector. Some fans feature a separate ground wire for the light kit if your fan includes lighting components. Taking photos before disconnecting any wires helps you remember correct placement and prevents confusion during reassembly—this simple step saves significant troubleshooting time later.
Verify Power Is Off Before Handling Any Wires
Never skip testing for live voltage before touching any wires during your ceiling fan grounding project. Turn off power at the circuit breaker serving the fan’s circuit and use a reliable voltage tester to confirm no electricity is flowing. Test both at the fan location and at the wall switch controlling the fan. Remember that wall switches often control only one of the two “hot” wires in a circuit, meaning other wires may still be energized even when the switch is off. Testing at multiple points ensures your safety throughout the installation process.
Connect Ground Wires Using Proper Electrical Techniques

Making proper ground wire connections ensures electrical continuity from your fan through your home’s grounding system. Begin by stripping approximately ¾ inch of insulation from the end of each ground wire if they’re not already prepared, using your wire strippers to avoid nicking the copper conductor. Hold the bare copper ends of the fan’s ground wire and the house ground wire together side by side, ensuring they’re parallel and the stripped portions align completely.
Twist these wires together clockwise using your needle-nose pliers or a wire connector tool, creating a tight, secure connection that no wire can pull free from. Finish by screwing a green wire nut over the twisted connection, turning it clockwise until it feels snug and no bare copper is visible. Some electricians prefer to create a hook shape in each wire end before connecting them—bend the bare copper into a hook using your pliers, interlock the hooks, and then tighten the connection. This hook method creates an especially secure connection that won’t separate even under stress.
Ground Your Ceiling Fan Mounting Bracket Properly
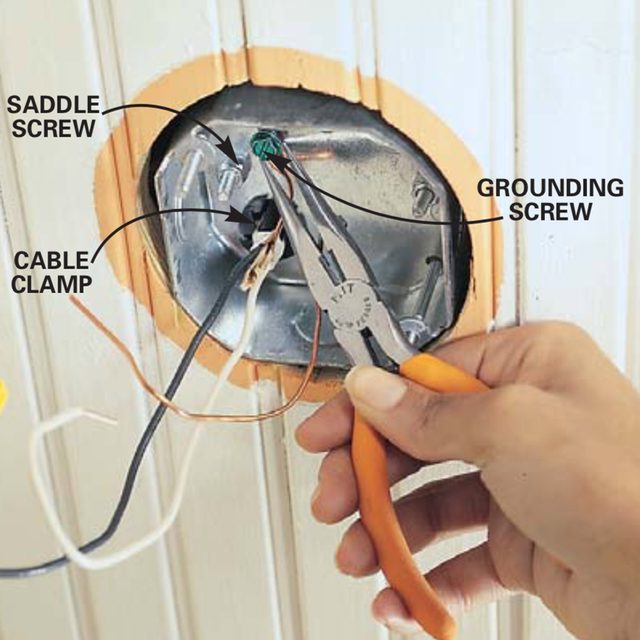
The mounting bracket that secures your ceiling fan to the electrical box must also be properly grounded, as this metal component provides a direct path to the fan’s motor housing. Most brackets include a green grounding screw, usually located where the bracket attaches to the electrical box or near the canopy attachment point. This screw may have a pre-drilled hole with a green-painted head, or it may simply be a standard brass or green screw designated for grounding purposes.
Connect the house ground wire to the mounting bracket by loosening the grounding screw, placing the stripped end of the ground wire under the screw head in a clockwise direction (so the wire wraps around the screw as you tighten), and then tightening the screw firmly. Some brackets feature a ground wire pigtail already attached—simply connect this pre-installed wire to your house ground wire using a green wire nut. If your bracket lacks a dedicated grounding point, the bracket should still make contact with a grounded electrical box, but adding a ground pigtail screw to the box provides extra assurance against loose connections.
Test Your Grounding Installation Before Final Assembly
Verifying that your grounding installation actually works prevents dangerous surprises after you button everything up. Once the fan is fully assembled and mounted, restore power at the circuit breaker and use a multimeter or plug-in circuit tester to confirm proper grounding. Set your multimeter to the AC voltage setting, touch one probe to a known hot wire (black) and the other to a ground connection—the reading should show approximately 120 volts, confirming that current can flow through the ground path when needed.
Alternatively, use a three-prong circuit tester with GFCI functionality, plugging it into a nearby outlet to check that the outlet itself is properly grounded, then test the fan by turning it on and checking for any unusual humming, tingling sensations when touching metal parts, or intermittent operation that might indicate loose connections. For thorough verification, a plug-in receptacle tester with GFCI and ground fault indicators provides clear readouts showing whether ground, neutral, and hot connections are correct. If your tests reveal any issues, turn the power back off and re-examine all connections for security and proper wire placement before proceeding.
Avoid These Common Ceiling Fan Grounding Mistakes

Even experienced DIYers sometimes make errors during ceiling fan grounding that compromise safety or code compliance. Stripping too much insulation from ground wires creates fire hazards when excess bare copper contacts other wires or metal components inside the electrical box—only ¾ inch of bare copper should be visible beyond any wire nut. Connecting ground wires to the wrong terminals, such as attaching a ground wire to a neutral screw or wrapping it around hot wire screws, creates dangerous fault conditions that can energize metal parts unexpectedly.
Failing to connect all ground wires—including any separate light kit ground wire—leaves portions of your installation ungrounded and potentially hazardous. Using regular (non-green) wire nuts for ground connections makes future maintenance confusing and doesn’t provide the visual identification that green connectors offer. Some installers skip connecting the mounting bracket to ground entirely, assuming the bracket makes sufficient contact with the grounded electrical box, but loose connections at either point can interrupt the grounding path. Taking your time and double-checking each connection prevents these common pitfalls.
When Professional Electrical Help Is Necessary for Ceiling Fan Grounding
While many homeowners can successfully ground a ceiling fan themselves, certain situations require professional expertise to ensure safety and code compliance. If your ceiling electrical box lacks a ground wire entirely, you’ll need an electrician to run a proper ground conductor from your fan’s location to the grounding system—this typically involves fishing wire through walls and may require opening ceilings or running conduit. Homes with aluminum wiring instead of copper require special connectors and techniques that most electricians are trained to handle but which pose fire risks if installed incorrectly.
If you encounter confusing wire configurations, such as multiple ground wires of different gauges, cables running in unexpected directions, or junction boxes with more wires than expected, professional assessment prevents dangerous mistakes. Any signs of previous amateur work—such as reversed wires, improper connectors, or damaged insulation—suggest calling an electrician to evaluate and correct potential hazards. Similarly, if local codes require permits or inspections for ceiling fan installation, a licensed electrician can handle the paperwork and ensure your installation passes official review.
Properly grounding your ceiling fan protects your family from electrical hazards, prevents damage to the fan itself, and ensures your installation meets electrical code requirements. By following these steps—identifying ground wires, making secure connections, testing your work, and maintaining the installation over time—you create a safe, reliable ceiling fan that operates without risk for years to come. When in doubt, always consult a licensed electrician to verify that your grounding installation provides the complete protection that proper electrical safety requires. Regular maintenance checks during seasonal cleaning ensure your grounding connection remains secure, preventing potential hazards before they become dangerous situations in your home.
Leave a Reply