Installing a ceiling fan on a suspended ceiling requires specialized mounting techniques that many homeowners overlook—often with disastrous consequences. Unlike standard ceiling installations where you mount directly to solid joists, suspended ceilings (also called false ceilings) consist of gypsum drywall boards that cannot safely support a rotating fan’s dynamic weight. The spinning motion effectively doubles the stress on mounting points, meaning a 15-pound fan creates approximately 30 pounds of force during operation. This comprehensive guide reveals the exact mounting methods professionals use to hang ceiling fans safely on suspended ceilings, including step-by-step instructions for three proven bracket systems that prevent dangerous wobbling, noise issues, and potential ceiling collapse.
Before you drill a single hole, understand that improper installation voids your warranty and creates serious safety hazards. Suspended ceilings made from wood or gypsum board lack the structural integrity to carry ceiling fans without reinforcement, yet many DIYers make the critical error of using standard hollow-wall anchors. This guide walks you through assessing your ceiling’s capacity, selecting the correct mounting hardware, and executing a safe installation that will keep your fan operating smoothly for years—without putting anyone at risk from falling hardware.
Measure Your Ceiling Gap Before Buying Mounting Hardware
The hollow space between your concrete ceiling and suspended ceiling determines which mounting bracket size you need, and guessing wrong leads to failed installations. Most suspended ceilings create gaps ranging from 12cm to 120cm, with bracket systems designed for specific ranges:
- 12cm to 20cm gaps: Compact mounting plates requiring minimal clearance
- 20cm to 35cm gaps: Standard intermediate brackets for typical installations
- 35cm to 65cm gaps: Extended support systems needing wiring extensions
- 65cm to 120cm gaps: Specialized deep-ceiling mounting solutions
To measure accurately, remove a ceiling tile at your intended fan location and use a tape measure to determine the distance between the concrete ceiling above and your suspended ceiling surface. This measurement must be precise—brackets that are too short won’t reach the structural ceiling, while oversized brackets create unnecessary complexity. If you’re installing near existing lighting fixtures, check for obstructions in the cavity that might interfere with bracket placement.
Verify Structural Support with the Drill Test
Before committing to any mounting location, confirm you’ve identified solid structural support with this simple verification method:
- Mark your intended mounting point on the suspended ceiling
- Drill a small pilot hole (1/8 inch diameter) through the ceiling material
- Insert a stiff wire or inspection mirror to check what’s behind
- If you hit solid concrete or a wooden beam, you’ve found viable support
- If you encounter only hollow space, relocate your mounting point
Warning: Never mount directly to suspended ceiling material alone—this creates immediate safety hazards as the gypsum board will crack under operational stress.
Install Intermediate Steel Brackets for Hidden Support
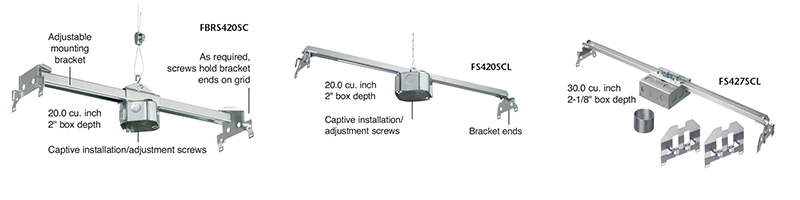
When direct beam mounting isn’t possible, intermediate steel brackets provide the most reliable solution for suspended ceiling installations. These adjustable-height brackets mount between your concrete ceiling and false ceiling, creating invisible support that prevents vibration noise while handling dynamic loads.
Proper Bracket Installation Sequence
- Position the bracket assembly in the ceiling cavity with mounting plate against concrete ceiling
- Adjust vertical supports to bring mounting point within 2-3 inches of suspended ceiling surface
- Secure bracket to concrete ceiling using appropriate anchor bolts (typically 1/4 inch diameter)
- Drill access hole through suspended ceiling for electrical wiring
- Connect fan mounting bracket to the intermediate system’s lower plate
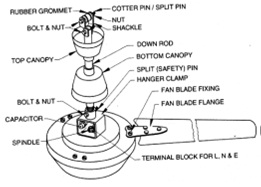
Pro Tip: Most ceiling fans come with only 46cm of wiring, which may be insufficient for deep ceiling installations. Purchase 61cm or 120cm extension cable sets from specialty suppliers to maintain proper electrical connections without straining wires.
Build a Spread Plate System for Maximum Weight Distribution
When mounting brackets aren’t feasible, a custom spread plate distributes the fan’s weight across multiple connection points, converting two mounting screws into six or more anchor points. This configuration is essential for older buildings with thin wooden ceiling structures.
Construct Your Spread Plate in 4 Steps
- Cut a 12″x12″ plywood or metal plate to serve as your base
- Drill a central opening matching your fan’s mounting bracket
- Position six anchor points around the perimeter (spaced evenly)
- Secure the plate to structural elements above using appropriate fasteners
Critical Safety Check: Before mounting your fan, test the spread plate by applying your full body weight to the center mounting point. If the construction holds your weight without cracking or shifting, it will safely support your ceiling fan. Never skip this verification step.
Mount Fans on Sloped Ceilings Using Ball Bearing Models
Attic rooms and vaulted ceilings require special considerations for ceiling fan installation. The slope angle determines whether you need specialized hardware or can use standard mounting techniques.
Calculate Your Ceiling Pitch Accurately
- Measure the horizontal run (length along the ceiling surface)
- Measure the vertical rise (height difference across that length)
- Divide rise by run (e.g., 2m rise ÷ 3m run = 0.6667)
- Convert to degrees using arctan(0.6667) = approximately 33.7°
Warning: Standard ceiling fans become unstable on slopes greater than 25°. For steeper angles, you must use ball bearing models specifically designed for inclined installations—these maintain balance even at high speeds. Check product specifications for “sloped ceiling compatible” labeling before purchasing.
Avoid These 3 Critical Installation Mistakes

Mistake #1: Using Hollow Wall Anchors on Suspended Ceilings
Why it fails: Hollow anchors rely on the surrounding material for grip, but gypsum board lacks the density to resist rotational forces from a spinning fan. Within weeks, the anchors pull through, causing the fan to detach.
Solution: Always mount to structural elements above the suspended ceiling using intermediate brackets or spread plates.
Mistake #2: Ignoring Clearance Requirements
Minimum safe distances:
– 20cm between blades and walls/furniture
– 2m between floor and lowest fan point
– Additional clearance for light fixtures (typically 15cm extra depth)
Consequence: Blades striking walls cause catastrophic failure and create dangerous projectile hazards.
Mistake #3: Skipping Post-Installation Tightening
Critical step: Check all mounting hardware tightness after 24 hours, then monthly during the first year. Vibration from operation gradually loosens connections.
Pro Tip: Apply a small drop of thread-locking compound to critical screws (not electrical connections) to prevent gradual loosening.
Extend Your Fan’s Lifespan with Proper Maintenance
Even perfectly installed ceiling fans require periodic maintenance to ensure continued safe operation. Check these elements quarterly:
- Mounting hardware tightness: All connection points between fan and bracket
- Blade alignment: Misaligned blades cause excessive wobble
- Electrical connections: Look for signs of arcing or overheating
- Wobble testing: Run fan at highest speed while observing movement
Warning: If you notice unusual noises, excessive wobble, or electrical issues, turn off the fan immediately and consult a professional. Continuing to operate a problematic fan risks structural failure.
When Ceiling Mounting Isn’t Possible: Safe Alternatives
For historic buildings or extremely fragile ceiling constructions where no mounting solution is viable, consider these alternatives that provide similar air circulation benefits:
- High-velocity oscillating floor fans: Positioned in room corners for maximum coverage
- Wall-mounted ventilation systems: Installed through exterior walls for cross-breezes
- Compact Keiki-style fans: Designed for wall mounting while maintaining ceiling fan aesthetics
These solutions eliminate installation risks while still improving air circulation—particularly valuable in rental properties where structural modifications aren’t permitted.
Final Safety Verification Before First Use
Complete these checks before powering on your newly installed fan:
- Confirm all electrical connections are secure and properly insulated
- Verify fan wobble is minimal (less than 1/8 inch movement at highest speed)
- Ensure no wires are pinched or stressed in the mounting assembly
- Test all control functions (speed settings, light operation, reverse mode)
- Observe operation for 15 minutes to detect unusual noises or vibrations
Professional Recommendation: If you’re uncertain about any aspect of the installation, hire a licensed electrician with ceiling fan experience. The modest cost of professional installation pales in comparison to potential medical bills or property damage from a falling fan. Remember—your ceiling fan should enhance comfort, not create safety hazards. By following these precise mounting techniques, you’ll enjoy years of reliable operation with proper air circulation and energy savings.
Leave a Reply