When your vaulted or cathedral ceiling creates a beautiful architectural feature but leaves you wondering how to keep the room comfortable, installing a ceiling fan becomes essential—but presents unique challenges. Standard fan installations won’t work properly on angled surfaces, leading to wobbling, inefficient airflow, and potential safety hazards. The good news is that modern ball joint mounting systems make this installation possible for most homeowners with basic DIY skills. This guide provides the specific steps you need to successfully mount your ceiling fan on a sloped surface, ensuring it operates safely and efficiently while maintaining that clean, professional look you expect.
Unlike flat ceilings where fans mount directly to electrical boxes, sloped ceilings require specialized hardware that allows the fan to hang perfectly level regardless of the ceiling angle. Without this critical adaptation, your fan would tilt at the same angle as your ceiling, causing dangerous vibrations and poor air circulation. Understanding the ball joint mechanism before you begin is crucial—it’s the engineering solution that makes sloped ceiling installations work reliably. With proper preparation and attention to detail, you can complete this project safely and enjoy effective cooling in your uniquely shaped space.
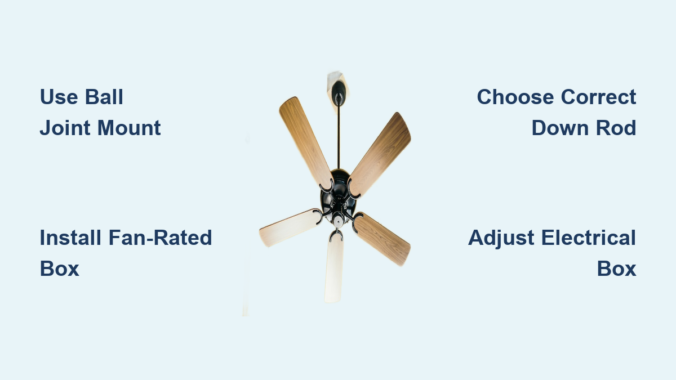
Essential Safety Steps Before Starting
Before you even think about mounting your fan, you must address electrical safety—this isn’t optional. Immediately switch off the circuit breaker controlling your installation location at the main electrical panel. Simply turning off the wall switch won’t protect you from potentially fatal electrical shock during installation. After flipping the breaker, verify power is truly off using a voltage tester on the existing fixture wires, testing the tester itself on a known live outlet first to confirm it’s working properly.
The weight factor makes sloped ceiling installations particularly hazardous if done incorrectly. Ceiling fans typically weigh 17-20 pounds or more, and when operating, they generate significant vibration forces that standard light fixture boxes cannot safely support. You must use a fan-rated electrical box specifically designed to handle this dynamic load. Never reuse an existing light fixture bracket—discard it and install the mounting bracket that comes with your ceiling fan. This component provides the secure foundation needed for safe operation and accommodates the ball joint mechanism essential for sloped ceilings.
If your existing wiring includes a dimmer switch, you’ll need to replace it with a standard on/off switch before proceeding. Ceiling fans with remote controls cannot function properly with dimmer switches—the remote system handles all speed and light functions. This critical detail applies to both sloped and flat ceiling installations but becomes especially important when working with the additional complexities of an angled surface.
How the Ball Joint Mount System Works
The ball joint mounting system is the engineering breakthrough that makes sloped ceiling fan installation practical. This mechanism consists of two key components: a ball-shaped hanger at the top of your fan’s down rod and a specially designed hanging bracket attached to your ceiling electrical box. The bracket features a precisely engineered slot that accepts the ball, allowing the assembly to pivot freely while gravity pulls the fan into a perfectly vertical position.
When examining the ball joint mechanism closely, notice that the ball contains a vertical slot in one specific location, while the hanging bracket includes a corresponding tab. This design ensures the ball can only engage with the bracket in the correct orientation. During installation, you must align these components precisely—lower the fan until the tab slides into the slot, and the weight of the fan will hold everything securely in place. This elegant solution creates a stable mounting point that accommodates your ceiling angle while keeping the fan level.
Misalignment causes the most frequent problems with sloped ceiling fans. If your electrical box orientation doesn’t match the slope direction, the ball won’t engage properly, leaving your fan unstable or unable to hang level. The ball mount only swivels in one direction, meaning your electrical box must be rotated correctly before installation begins. This is why checking and potentially adjusting your box orientation is a critical pre-installation step for successful results.
Choose the Correct Down Rod Length

Selecting the right down rod length is crucial for proper sloped ceiling installation. Standard down rods included with ceiling fans measure just 2-3 inches—designed for flat 8-foot ceilings but completely inadequate for sloped surfaces. These short rods cause the fan canopy to contact the sloping ceiling, preventing proper installation and creating clearance issues that affect performance.
Calculate your required rod length based on three factors:
– Your ceiling height at the installation point
– The angle of your ceiling slope
– Your fan’s position relative to the ceiling peak
As a general guideline, ceilings with slopes up to 30 degrees may work with standard or slightly extended rods, while steeper slopes or installations near the peak typically require rods of 12 inches or longer. One documented successful configuration used an 18-inch rod for an 11-foot ceiling with moderate slope—demonstrating that significantly longer rods are often necessary.
Pro Tip: Before purchasing your fan, contact the manufacturer with your specific ceiling angle, height, and intended placement to get precise down rod recommendations. When in doubt, choose a longer rod—you can always cut it down, but you can’t extend a rod that’s too short.
Install the Fan Mounting Bracket
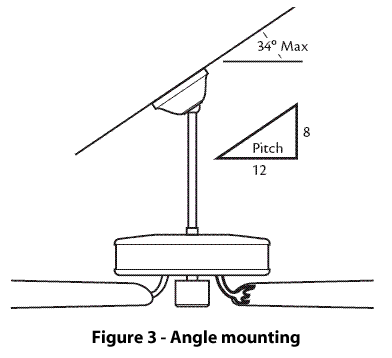
Begin by removing any existing hanger bracket from your old light fixture—discard it completely and replace it with the fan-specific bracket included in your ceiling fan package. This new bracket screws directly into your fan-rated electrical box, providing the secure foundation required for safe operation. Proper bracket orientation is critical: position it with the slot facing toward the upward rising section of your ceiling within approximately 90 degrees to ensure proper clearance for the ball joint mechanism.
Secure the bracket using the specialized screws included with your fan—never substitute standard screws from other applications. Tighten them firmly into the electrical box until the bracket sits flush against your ceiling with no gaps. If the bracket doesn’t sit flush, check that your electrical box is mounted correctly and that no debris or old mounting hardware interferes with proper contact. A misaligned bracket will cause installation problems that become increasingly difficult to fix once your fan is hanging.
Handle Electrical Box Orientation Issues
Electrical box orientation presents one of the most common challenges in sloped ceiling installations. When the box is rotated approximately 45 degrees off from the correct orientation relative to your ceiling slope, the ball joint won’t align properly, causing clearance issues or preventing proper engagement. If you discover this problem, several solutions exist depending on your box attachment method.
For boxes secured with screws into structural members above, you may be able to remove the screws, rotate the box to the correct orientation, and reattach it. In many cases, the drywall compound around the box will break free sufficiently to allow rotation without major damage. After rotation, resecure the box using existing screw holes or drill new holes for additional screws. Critical warning: Boxes attached with drywall screws must be replaced—they’re brittle and unsafe for fan support. Proper fan-rated boxes require four wood lag screws driven deep into structural joists.
When rotation isn’t feasible, specialized adapters can solve orientation problems. These allow the ball mount to rotate and align with your ceiling slope, though they add cost and complexity. Check your fan’s accessories section or contact the manufacturer to identify appropriate adapter options for your specific situation.
Wire Your Ceiling Fan Properly
Begin by assembling as much of the fan as possible on the floor—attach all blades according to manufacturer instructions while the fan remains at a comfortable working height. This strategy significantly reduces overhead work and makes the installation process more manageable. With the fan assembled, lift it carefully and slide the ball hanger into the hanging bracket, ensuring the vertical slot aligns with the tab.
Make your electrical connections following this pattern:
– Black to black (hot)
– White to white (neutral)
– Green or bare to ground
Connect wiring according to the manufacturer’s diagram, installing the remote control receiver as specified—often mounting it directly on the hanger bracket. Crucial step: Pair your remote control with the receiver before final mounting. This allows easier adjustment of wire positions if needed and prevents frustration later when you’re working overhead.
Use Slope Adapters for Steeper Angles
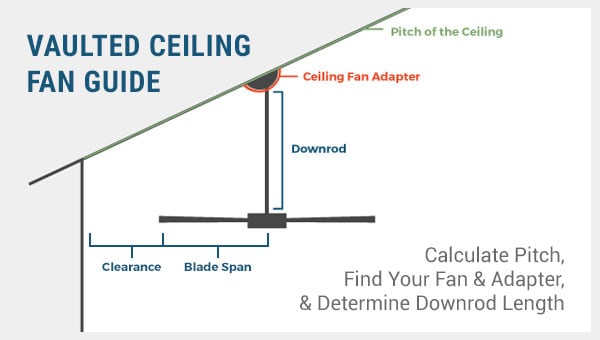
Standard ceiling fans accommodate slopes up to approximately 30 degrees. Installing a fan rated for lower angles on a steeper slope causes the down rod to contact the canopy, preventing proper installation and creating safety hazards. Before purchasing your fan, verify its maximum slope rating matches or exceeds your ceiling’s angle.
For ceilings exceeding standard ratings, specialized slope adapters become essential. These allow installation on angles up to 45 degrees or more by providing additional clearance or alternative mounting geometry. Manufacturers like Westinghouse and SeaGull offer these adapters in various finishes to match fan aesthetics.
One documented case involved a 34-degree slope where the standard fan mounting (rated for only 30 degrees) failed—the down rod physically contacted the canopy during installation. The solution required obtaining a slope adapter specifically rated for the steeper angle. This experience underscores why verifying slope compatibility before purchase is critical.
Troubleshoot Installation Problems
If the ball doesn’t fit into the bracket slot during installation, verify your electrical box orientation and check for debris obstructing the mechanism. The slot on the cup bracket must face toward the upward rising ceiling within approximately 90 degrees to provide proper clearance. If the fan wobbles after installation, check that all blade screws are tightened evenly and that blades aren’t damaged or warped—the ball joint should allow the fan to hang level regardless of minor ceiling imperfections.
Remote control pairing issues often resolve by ensuring the receiver is installed correctly and using fresh batteries. Complete pairing before final mounting for easier access and adjustment. For fans that won’t start, double-check all wire connections for security and proper matching—the ground connection is particularly important for safe operation.
Maintain Your Ceiling Fan Long-Term
Once properly installed, your sloped ceiling fan requires similar maintenance to standard installations. Clean blades regularly with a damp cloth to prevent dust accumulation that causes imbalance and wobbling. Remote controls need periodic battery replacement—keeping spares on hand prevents inconvenience. Most remotes use standard coin-cell batteries readily available at hardware stores.
Warranty coverage varies by manufacturer and may be affected by installation method. Following manufacturer instructions precisely maintains coverage—some warranties specifically require professional installation for sloped ceilings exceeding standard ratings. Over time, vibration can occasionally loosen electrical connections; if your fan develops intermittent operation, checking these connections should be part of your troubleshooting process.
Installing a ceiling fan on a sloped ceiling demands careful attention to specialized mounting requirements, electrical safety, and proper hardware selection. By following these preparation steps, installation sequence, and troubleshooting guidance, most homeowners can successfully complete this project and enjoy reliable, efficient cooling from their sloped ceiling fan for years to come. The ball joint system makes these installations practical while slope adapters extend compatibility to steeper angles—giving you the comfort you deserve in your uniquely shaped living space.
Leave a Reply