
Installing a ceiling fan can transform your room’s comfort and style, but standard installations often require a downrod—the metal pipe that suspends the fan from the ceiling. However, many situations call for a downrod-free setup. Whether you’re working with a low ceiling, a sloped roof, or simply want a sleek, modern look, flush-mount ceiling fans (also called “hugger” fans) offer the perfect solution. These fans mount directly against the ceiling canopy, eliminating the need for an extended downrod while still delivering powerful air circulation and aesthetic appeal.
This comprehensive guide walks you through everything you need to know about installing a ceiling fan without a rod—from determining if your space is suitable, to gathering the right tools, to safely completing the electrical connections. We’ll cover the key differences between downrod and flush-mount installations, provide step-by-step instructions, and help you avoid common pitfalls that can turn a straightforward project into a frustrating ordeal. By the end, you’ll have the knowledge and confidence to tackle this project and enjoy the benefits of your new low-profile ceiling fan.
Finding the Right Flush-Mount Ceiling Fan for Your Space
Choosing Between Standard and Low-Profile Models
When shopping for a downrod-free ceiling fan, you’ll notice two distinct categories: true flush-mount fans and low-profile fans. True flush-mount fans sit completely against the ceiling with no gap between the motor housing and ceiling surface, typically measuring less than 12 inches from ceiling to blade tip. Low-profile fans create a minimal gap—usually 3-6 inches—which still qualifies as “downrod-free” but provides slightly better airflow than true flush-mount models.
Measure your ceiling height before purchasing. For standard 8-foot ceilings, both types work well, but true flush-mount fans become essential for ceilings under 8 feet. Check the product specifications for “blade drop” measurement—the distance from ceiling to the lowest point of the blades when installed. This number should leave at least 7 feet of clearance from floor to blade tips for safety. Many manufacturers now offer “low ceiling” specific models that optimize airflow while maintaining minimal profile.
Matching Fan Size to Room Dimensions
Selecting the right fan size ensures effective air circulation without overwhelming your space. For flush-mount installations, smaller blade spans typically perform better due to the restricted airflow pattern near the ceiling. In rooms up to 75 square feet (like bathrooms or small bedrooms), choose a fan with a 29-36 inch blade span. Medium-sized rooms (75-144 square feet) work well with 36-42 inch fans, while larger spaces may require 44-50 inch models—though these larger fans rarely offer true flush-mount capabilities.
Consider blade pitch as well—this refers to the angle of the blades relative to horizontal. A pitch between 12-15 degrees generally provides optimal airflow for flush-mount installations. Higher pitches (18+ degrees) create more turbulence near the ceiling, reducing efficiency in low-clearance situations. When possible, select fans with reversible rotation to maximize seasonal comfort: clockwise in winter to gently circulate warm air downward, counterclockwise in summer for cooling breeze.
Critical Pre-Installation Electrical Checks
Verifying Your Ceiling Box Can Support a Fan
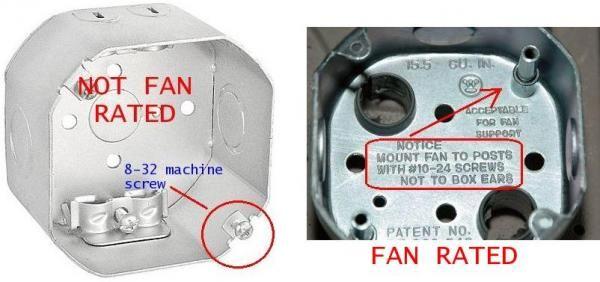
Before you purchase any fan, confirm your existing electrical box can safely support it. Standard light fixture boxes cannot handle the weight and vibration of a ceiling fan—they’re designed for fixtures weighing 6-10 pounds maximum. Ceiling fans typically weigh 15-50 pounds, requiring a fan-rated electrical box specifically designed to handle dynamic loads.
Remove your existing light fixture and inspect the electrical box. Fan-rated boxes will have “CAFU” stamped on them or indicate “Suitable for Fan Support” with a weight rating of at least 35 pounds. If your box lacks these markings, you must replace it before proceeding. This requires either accessing from above (in attics) or installing a retrofit fan brace that spans between ceiling joists. Never mount a fan to a standard plastic box—it will eventually pull loose from the drywall, causing the fan to fall.
Testing Your Home’s Electrical System
With your ladder positioned safely, turn off power at the circuit breaker and verify it’s off using a non-contact voltage tester. Remove the existing fixture and check wire connections. Most homes have standard wiring: black (hot), white (neutral), and green/bare copper (ground). Some older homes may have different configurations that require special attention.
Check wire condition—frayed or brittle wires need replacement before installing your new fan. Ensure you have sufficient wire length (at least 6 inches extending from the box) to make proper connections. If wires are too short, you’ll need to extend them with wire nuts and additional lengths of matching gauge wire. Your flush-mount fan installation requires secure electrical connections to prevent arcing, which is especially dangerous when the fan housing sits flush against the ceiling with limited heat dissipation.
Simplified Flush-Mount Installation Process
Step-by-Step Mounting Without a Downrod
Unlike standard fans, flush-mount installations skip the downrod attachment entirely. Begin by assembling the fan blades to their arms according to manufacturer instructions—typically using the included screws tightened securely but not excessively. Then attach the blade arms to the motor hub, taking care not to strip the screw holes in the plastic or metal components.
Your flush-mount fan will include a mounting bracket that attaches directly to the electrical box. Secure this bracket using the provided screws, ensuring it’s level—this prevents wobble during operation. True flush-mount fans use a canopy that sits directly against the ceiling with no gap, while low-profile models may include a short mounting plate that creates minimal clearance. Position the motor assembly onto the mounting bracket following the specific locking mechanism for your model (twist-lock, screw-in, or clip system).
Making Electrical Connections for Optimal Safety
With your mounting bracket secure, connect the wires using this simple color-matching system: black to black (hot), white to white (neutral), and green/bare copper to green/bare copper (ground). Some fans include a separate blue wire for light kits—connect this to the black ceiling wire if you want the light controlled by the same switch as the fan, or to a separate switched wire if you have dual controls.
Use wire nuts sized appropriately for your wire gauge (typically 12-14 AWG for household circuits), twisting each connection until hand-tight plus a quarter-turn. Gently tug each wire to confirm it won’t pull loose. Wrap connections with electrical tape for added security, especially important in flush-mount installations where vibration has less space to dissipate. Carefully tuck all wires into the electrical box, ensuring no pinched or stressed connections before attaching the canopy.
Troubleshooting Common Flush-Mount Issues

Eliminating Wobble Without Downrod Adjustment
Wobble presents differently in flush-mount fans since you can’t adjust downrod length to balance the unit. Start by checking that all blade screws are equally tight—loose screws cause immediate vibration. If wobble persists, use the balancing kit included with most fans: attach the clip to the top center of each blade while running the fan on medium speed to identify which blade causes the most vibration.
Once identified, move the clip toward the blade tip and test again. When you find the position that minimizes vibration, secure the included balancing weight at that location. For stubborn wobble, check that your mounting bracket is perfectly level—this requires removing the canopy to access the bracket. A torpedo level placed across the bracket helps identify minor leveling issues that create significant vibration at high speeds.
Fixing Low Airflow in Flush-Mount Installations
The most common complaint with downrod-free fans is reduced airflow compared to standard installations. This occurs because the blades operate closer to the ceiling, disrupting the ideal airflow pattern. First, verify your fan is rotating in the correct direction for the season—counterclockwise for summer cooling, clockwise for winter circulation.
If airflow remains weak, check for blade pitch issues—some flush-mount fans allow minor pitch adjustments through slot mounting holes. Increase pitch slightly (no more than 2 degrees) to improve pull. For permanent solutions, consider replacing your fan with a model specifically designed for high-velocity airflow in low-clearance situations. These feature aerodynamically optimized blades and more powerful motors that compensate for the restricted mounting position.
Maximizing Long-Term Performance

Seasonal Maintenance for Flush-Mount Fans
Dust accumulation affects flush-mount fans more severely than downrod models because the motor housing sits closer to the ceiling where dust settles. Clean blades monthly using a microfiber duster or slightly damp cloth—never spray cleaner directly on the fan. Pay special attention to the top surfaces of blades, which collect dust most heavily in flush-mount configurations.
Twice yearly, perform a more thorough inspection: check all mounting screws for tightness (vibration gradually loosens them), verify wire connections haven’t worked loose, and listen for unusual motor sounds. Apply a drop of lightweight machine oil to the motor housing oil ports if your model includes them—most modern fans are sealed units requiring no lubrication, but older models benefit from this maintenance.
Recognizing When to Replace Your Flush-Mount Fan
Flush-mount fans typically last 10-15 years with proper maintenance, but certain warning signs indicate replacement is needed. Persistent overheating—where the motor housing becomes uncomfortably hot during normal operation—suggests internal component failure. Since flush-mount designs have less space for heat dissipation, this problem worsens quickly once it begins.
Excessive noise that balancing can’t resolve, especially grinding or screeching sounds, indicates bearing failure. Unlike standard fans, you generally cannot service the motor in flush-mount models due to their compact design. Flickering lights (if your fan includes a light kit) that persist after checking connections usually signal internal wiring problems requiring replacement rather than repair. When these issues appear, invest in a new fan—attempting repairs on sealed flush-mount units often causes more damage than replacement would cost.
By following these specific guidelines for downrod-free installations, you’ll enjoy the cooling benefits of a ceiling fan even in spaces with low ceilings or modern design constraints. Remember that proper electrical support and secure mounting make the difference between years of reliable service and a dangerous installation. With your new flush-mount fan operating smoothly, you’ll benefit from improved comfort, energy efficiency, and a clean, contemporary look that enhances any room.
Leave a Reply