
Nothing beats the frustration of sitting under a spinning ceiling fan during a heatwave only to realize it’s barely making a dent in your comfort level. You’re not imagining things—many homeowners discover their ceiling fans simply circulate air without delivering that refreshing coolness they expect. The good news is that transforming your fan from a basic air mover to an effective cooling solution often requires just a few simple adjustments you can implement immediately.
Understanding how to make a ceiling fan cooler hinges on leveraging airflow dynamics, optimizing fan settings, and implementing strategic cooling techniques that work with your existing equipment. Most people overlook simple modifications that can dramatically improve performance, leaving them unnecessarily cranking up the air conditioning and watching their energy bills soar. This guide reveals practical, proven methods to maximize your ceiling fan’s cooling potential without costly replacements or complex installations—helping you stay comfortable while reducing energy consumption throughout the hottest months.
Set Fan Direction for Summer Cooling
Your ceiling fan’s rotation direction determines whether it cools or merely redistributes warm air—a detail many homeowners never check. During summer, your fan must rotate counterclockwise when viewed from below to create the downward airflow that produces the wind-chill effect essential for cooling.
When set correctly, the counterclockwise rotation forces air straight down toward the floor while simultaneously pulling warmer air upward along the walls. This creates a continuous circulation pattern that makes your skin feel significantly cooler through evaporative cooling—your body’s natural process where moving air accelerates sweat evaporation, lowering your perceived temperature by up to 8 degrees. The U.S. Department of Energy confirms this simple adjustment allows most homeowners to raise their thermostat setting by 4 degrees without sacrificing comfort, translating to approximately 10% savings on cooling costs.
To verify your fan’s direction, stand directly beneath it and observe the blade movement. If rotating clockwise (which creates upward airflow ideal for winter), locate the small switch on the fan’s motor housing—usually accessible by removing the light kit cover. Flip this switch while the fan is off to change direction. Many newer models feature remote controls or smart home integration that simplifies direction changes with the press of a button. After confirming counterclockwise summer rotation, run your fan at medium speed for immediate improvement in cooling sensation.
Optimize Fan Speed and Placement

Running your fan at maximum speed doesn’t necessarily create better cooling—often it produces uncomfortable turbulence that disrupts gentle airflow patterns. The optimal speed depends on your room size, ceiling height, and blade design, with medium speed typically delivering the most effective cooling for standard 8-9 foot ceilings.
Blade pitch (the angle at which blades are mounted) significantly impacts cooling efficiency. Fans with steeper pitches (12-15 degrees) move more air at lower speeds, creating stronger cooling effects without the noise and energy waste of high-speed operation. If your fan feels ineffective even at high speed, it may have shallow blade pitch unsuitable for cooling—consider replacement if other optimizations fail. For immediate improvement, match speed to your environment: use low speed for mild days, medium for typical summer heat, and high only in exceptionally large rooms or during extreme temperatures.
Proper placement ensures your fan’s airflow reaches where you need it most. The blades should maintain a minimum 7-foot clearance from floor to ceiling and at least 18 inches from walls to prevent air disruption. In rooms with vaulted or cathedral ceilings exceeding 9 feet, install a downrod extension to lower the fan to the optimal height—typically 8-9 feet above the floor. For bedrooms, position the fan directly over your bed’s center point to maximize cooling where you sleep. Remember that ceiling fans cool people, not rooms, so always turn them off when leaving the space to avoid wasting energy.
Enhance Cooling with Strategic Airflow Techniques

Creating effective cooling requires understanding how air moves through your home and positioning your fan to maximize natural convection currents. Simple adjustments to window placement and room layout can dramatically amplify your fan’s cooling power without additional equipment.
Open windows on opposite sides of your home to establish cross-ventilation that works with your ceiling fan rather than against it. When your fan pushes air downward in one room, that displaced air needs an escape route—properly positioned windows allow warm indoor air to exit while drawing cooler outdoor air inside. On days when outdoor temperatures dip below 80°F, this natural convection current can reduce indoor temperatures by 5-10 degrees without air conditioning. Start with windows on the cooler side of your home (typically north or east-facing) and open corresponding windows on the warmer side to create a continuous airflow path.
Clear at least a 3-foot radius around your fan to prevent furniture, curtains, or other objects from disrupting airflow patterns. Large bookcases, ceiling-hung plants, or tall lamps positioned too close to the fan create turbulence that reduces cooling effectiveness by up to 30%. In open floor plans, consider running multiple fans in adjacent rooms to create a coordinated airflow system that moves cool air throughout your living space rather than trapping it in isolated pockets.
Install a Cooling Attachment or Accessory
When basic adjustments aren’t enough, several affordable accessories can transform your standard ceiling fan into a powerful cooling machine. These additions leverage evaporative cooling principles to lower air temperature rather than just moving existing air.
Misting attachments provide the most dramatic cooling enhancement, capable of lowering perceived temperatures by 10-15 degrees in dry climates. These systems connect to your fan’s center hub or blade brackets and release a fine water mist that evaporates instantly when hit by moving air. The evaporation process absorbs heat energy from the surrounding air, creating genuinely cooler airflow. Basic DIY misting kits cost $15-$40 and attach to standard garden hoses, while integrated misting fans offer more reliable operation and quieter performance for $100-$200. Note that misting systems work best in dry climates (below 50% humidity) as high humidity reduces evaporation efficiency.
Cooling pads or evaporative cooler attachments offer a less messy alternative that still delivers significant temperature reduction. These pads mount behind the fan blades and wick water upward from a reservoir, with the fan drawing air through the damp material to distribute cooled air throughout the room. While less effective than misting systems in extremely hot conditions, they work well in moderate climates and avoid the potential moisture issues of direct misting. Look for models with automatic shut-off features to prevent over-saturation when the reservoir runs dry.
Maintain Your Fan for Peak Cooling Performance
Even perfectly configured fans lose cooling effectiveness when neglected—dust accumulation alone can reduce airflow by up to 25%. Regular maintenance ensures your fan delivers maximum cooling power throughout the season.
Clean fan blades thoroughly every 2-4 weeks during peak usage periods using a microfiber duster or damp cloth. Focus on both top and bottom surfaces, as dust buildup on the upper side creates aerodynamic drag while lower-side dust disrupts airflow patterns. For stubborn buildup, use a mild soap solution but ensure blades are completely dry before operating the fan to prevent moisture-related issues. Don’t forget to wipe down the motor housing and light fixtures, as accumulated dust there can reduce efficiency and create fire hazards in extreme cases.
Check blade balance monthly by running the fan at high speed and observing for wobble. Even slight imbalances force the motor to work harder while creating turbulent airflow that reduces cooling effectiveness. Most fans include balancing kits with small weights that attach to the blade brackets—follow the manufacturer’s instructions to correct any wobble. Lubricate the motor annually if your model requires it (check your manual), as dried lubricants increase friction and reduce rotational speed. Replace worn bearings or unbalanced blades immediately rather than letting problems worsen.
Know When to Supplement or Replace Your Fan
Recognize when your cooling needs exceed what a fan alone can provide—this prevents frustration while ensuring you stay comfortable during extreme heat. Ceiling fans have fundamental limitations based on physics that no amount of tweaking can overcome.
When outdoor temperatures consistently exceed 90°F with humidity above 60%, the wind-chill effect diminishes significantly as your skin struggles to evaporate sweat in saturated air. In these conditions, ceiling fans work best as air conditioning supplements rather than replacements—set your thermostat 4 degrees higher than usual while running fans in occupied rooms. This strategy reduces AC runtime by 20-30% while maintaining comfort, with studies showing fans operating alongside AC can cut total cooling costs by up to 40% compared to AC alone.
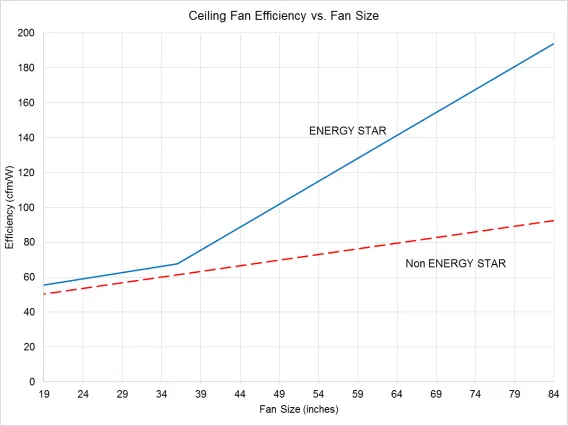
Consider replacing fans manufactured before 2009’s federal efficiency standards, as they typically consume 50-70% more energy than modern models while delivering inferior airflow. Newer Energy Star-certified fans move 20% more air per watt of electricity, with DC motor models offering the quietest operation and most precise speed control. While replacement costs $50-$200, the energy savings often pay back the investment within 1-2 cooling seasons while providing noticeably better cooling performance. Look for models with steeper blade pitches (14-15 degrees) and larger blade spans for maximum air movement in your room size.
By implementing these techniques systematically, you’ll transform your ceiling fan from a basic air circulator into an effective cooling solution that keeps you comfortable all summer. Start with proper direction and speed settings, optimize placement and airflow patterns, then consider targeted accessories if needed—always maintaining your fan to ensure peak performance. The combination of these strategies reduces reliance on energy-intensive air conditioning while delivering genuine cooling relief exactly where you need it most.
Leave a Reply