Your outdated ceiling fan might be functional, but that brass finish and dated blades scream 1990s. If your fan clashes with your freshly painted walls or new furniture, you’re not alone—nearly 68% of homeowners report ceiling fans as the hardest fixture to match with modern decor. The good news? You don’t need to rip out wiring or spend thousands. This guide reveals exactly how to modernize a ceiling fan through strategic upgrades that deliver contemporary style while preserving your existing motor. You’ll discover cost-effective transformations that take under two hours, avoid electrical complications, and make your fan look custom-installed. Whether you’re dealing with yellowed plastic blades or clunky pull chains, these actionable steps will seamlessly integrate your fan into today’s design trends.
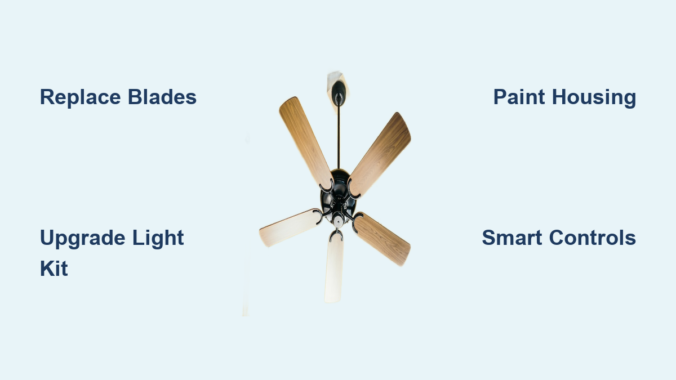
Replace Outdated Blades with Contemporary Styles
Ceiling fan blades dictate 70% of your fixture’s visual impact. Swapping them transforms your entire room aesthetic without touching wiring. Modern blade designs now include matte black oak, white-washed teak, and even metal options that complement current farmhouse and industrial trends. For optimal results, measure your existing blade bracket spacing before purchasing replacements—most modern fans use universal 4-inch mounting holes.
How to Remove and Install New Blades Safely
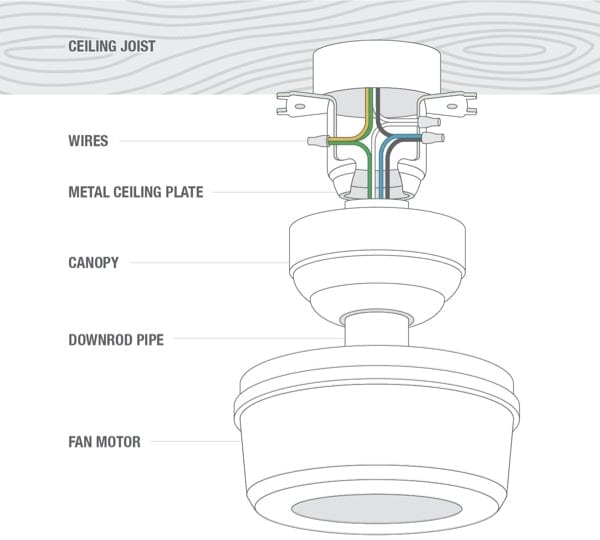
Begin by turning off power at the circuit breaker, not just the wall switch. Place a non-slip ladder directly under the fan and secure it. Remove each blade by loosening the mounting screws with a Phillips head screwdriver—never force them if rusted; apply penetrating oil and wait 10 minutes. When installing new blades, hand-tighten all screws first before final tightening to ensure even pressure. Critical warning: Always balance new blades using the included weights; unbalanced fans cause wobble and motor damage within weeks.
Choosing Blade Materials for Your Design Style
Match blade materials to your room’s dominant textures. For coastal or Scandinavian spaces, select bleached basswood blades under 42 inches. Industrial lofts benefit from matte black steel blades with visible rivets. If you have high ceilings (over 9 feet), opt for longer blades (52-54 inches) to maintain visual proportion. Avoid glossy finishes—they highlight dust and show wear faster than matte options. Pro tip: Install reversible blades with wood on one side and painted finish on the other to seasonally update your room.
Upgrade Your Light Kit to Contemporary Fixtures
An outdated dome light kit instantly ages your ceiling fan. Modern integrated LED kits offer dimmable, color-temperature adjustable lighting that replaces dated bulb housings. The key is selecting kits matching your fan’s mounting pattern—most post-2010 fans use standard 3-screw bases, but older models require adapter plates.
Step-by-Step Light Kit Replacement Process

After cutting power, remove the old dome by twisting it counterclockwise. Disconnect wires by pressing the quick-connect tabs (don’t cut them). For the new kit, connect black-to-black and white-to-white wires using wire nuts, then tuck connections into the canopy. Secure the mounting bracket with all screws—loose brackets cause dangerous swaying. Test before installing the diffuser: turn power on briefly to verify operation. Common mistake: Forgetting to remove plastic protective film from new LED panels, which causes yellowed lighting.
Smart Lighting Integration Options
Transform basic fans into smart systems with Wi-Fi enabled kits like Hunter Fan’s Bond Bridge. These kits maintain your fan’s pull-chain operation while adding voice control compatibility. For renters, choose magnetic-mount LED rings that attach to existing housings without wiring. When selecting color temperatures, 2700K creates warm ambient light for living rooms, while 3000K provides task lighting for kitchens. Budget tip: Install smart bulbs in existing kits instead of full replacements—just ensure your fan’s housing allows proper heat dissipation.
Transform the Fan Housing with Strategic Paint
Yellowed white housings or brass finishes date your entire fixture. A professional paint job costs under $20 and takes 90 minutes. The secret is using high-adhesion spray paint designed for plastics and metals—Rust-Oleum Painter’s Touch 2X works best for fan components.
Surface Preparation for Flawless Results

Disassemble all removable parts: blades, light kits, and pull chains. Clean surfaces with isopropyl alcohol to remove grease—never use household cleaners that leave residue. Sand glossy areas lightly with 220-grit sandpaper. Mask off motor housings and electrical components completely with painter’s tape. Critical step: Remove all pull chains before painting; trapped paint causes binding when reassembled.
Modern Color Application Techniques
For contemporary appeal, choose matte black, brushed nickel, or matte white finishes—avoid shiny metallics. Apply paint in 6-inch passes with light, even coats from 10 inches away. Wait 15 minutes between coats for optimal adhesion. For two-tone effects, paint only the top canopy in metallic while keeping blades neutral. Pro tip: Add metallic wax to dried paint for subtle shimmer without reflectivity. Allow 24 hours curing time before reassembly—rushing causes smudging.
Replace Pull Chains with Designer Accessories
Those dangling plastic chains scream outdated. Modern alternatives include leather straps, braided cord, or metal bead chains that complement your decor. Universal replacement kits like Modern Fan Company’s upgrade packs include all necessary hardware and take 10 minutes per chain.
Installing Non-Traditional Chain Alternatives
After cutting power, remove the old chain by unscrewing the base cap. Thread your new accessory through the hole—leather straps require knotting the end while metal beads need crimping. Test tension before final installation: chains should retract smoothly without slack. For cord options, apply fray-preventative liquid to cut ends. Warning: Never use conductive materials like bare metal chains near electrical components.
Coordinating Chain Styles with Room Themes
Match chain materials to other room metals. In kitchens with stainless appliances, choose brushed nickel bead chains. For bohemian spaces, use macramé pull cords with wooden toggles. Leather straps work best in studies or libraries—opt for cognac tones in traditional spaces and black in modern lofts. Budget hack: Replace only the visible portion by attaching new chains to existing mechanisms with shrink tubing.
Integrate Smart Controls Without Rewiring
Old wall switches limit your fan functionality. Modern smart controls retrofit into existing switch boxes without new wiring. The Bond Bridge system is ideal—it attaches directly to your fan’s receiver and works with Alexa/Google Home while maintaining pull-chain operation.
Setting Up Wireless Control Systems
Turn off power and remove your existing switch plate. Attach the Bond module to your fan’s control wires using the included connectors—no electrician needed. Download the app and follow the pairing sequence (typically involves 3 rapid pull-chain pulls). For dual-switch setups (separate light/fan controls), install two modules. Troubleshooting tip: If the fan doesn’t respond, check for aluminum wiring—older homes may need copper pigtails.
Creating Custom Automation Routines
Program “Good Morning” scenes that gradually increase fan speed and light brightness. Set vacation mode to randomize operation times for security. Use geofencing to activate your fan when you’re 10 minutes from home. For allergy sufferers, schedule 15-minute post-shower runs to reduce humidity. Pro feature: Voice commands like “Alexa, set fan to ocean breeze” for preset speeds.
When Full Replacement Becomes Necessary
Some fans can’t be modernized due to worn motors or obsolete parts. If your fan wobbles severely after blade replacement or makes grinding noises, replacement is safer than repairs. Modern direct-wire fans like the Hunter Dempsey deliver contemporary design with universal mounting.
Selecting Future-Proof Modern Fans
Prioritize DC motor fans—they use 70% less energy than AC models and offer whisper-quiet operation. Choose fans with integrated LED lighting (non-replaceable bulbs indicate lower quality). Verify “damp-rated” for bathrooms or covered patios. Measure your room size: 42-inch fans suit bedrooms, while 54-inch models work best in living areas. Critical check: Ensure your ceiling box supports fan weight—older installations often need reinforcement.
Cost-Effective Installation Strategies
Hire an electrician only if your wiring lacks a ground wire—most upgrades are DIY-friendly. Save $150 by installing during bulb changes when you’re already on the ladder. For vaulted ceilings, choose fans with extended downrods (included free with many models). Pro tip: Buy display models from lighting showrooms for 30-50% off—cosmetic blemishes won’t show when installed.
Modernizing your ceiling fan isn’t about chasing trends—it’s solving real problems like clashing aesthetics and inefficient operation. By implementing just two upgrades from this guide, you’ll transform that eyesore into a design feature that complements your space. Remember to prioritize blade and light kit replacements first, as these deliver maximum visual impact with minimal effort. For ongoing freshness, dust blades weekly with microfiber cloths to prevent buildup that makes modern finishes look dated. If you tackle one project this month, swap those yellowed pull chains—this 10-minute fix delivers instant contemporary appeal. Ready to see results? Start with your bedroom fan tonight; you’ll sleep under a stylish new focal point before the week ends. For more lighting transformation ideas, explore our guide to matching ceiling fans with modern chandeliers.
Leave a Reply