Discovering your bathroom ceiling fan is malfunctioning or simply needing replacement can trigger anxiety, but removing it doesn’t require professional expertise. Each year, thousands of homeowners successfully complete this project themselves, saving hundreds in service fees while gaining valuable home maintenance skills. Whether you’re dealing with a noisy motor, poor ventilation, or planning a bathroom renovation, knowing how to remove bathroom ceiling fan units properly ensures your safety and prevents unnecessary ceiling damage. This guide delivers precise instructions for tackling both common plug-in models and more complex hard-wired installations, with special attention to those frustrating situations where the housing seems permanently stuck in place.
Before you reach for your tools, recognize that bathroom fans typically connect in one of two ways: hard-wired units requiring electrical disconnection or plug-in models that simply unplug from a receptacle inside the housing. The correct removal approach depends entirely on identifying your specific fan type first—making this critical step the difference between a 30-minute job and hours of frustration. Most removal projects take between one to three hours depending on your access situation and whether you encounter hidden fasteners securing the housing to ceiling joists.
Verify Electrical Power Is Completely Off
Never skip this life-saving step when you need to remove bathroom ceiling fan units. Locate your home’s electrical panel and flip the breaker controlling your bathroom circuit to the OFF position. Even after turning off what you believe is the correct breaker, always use a voltage tester to confirm power is completely disconnected at the fan housing. Place the tester near the wires visible through the fan cover opening—this simple verification prevents potentially fatal electrical shocks that occur when DIYers assume the power is off without testing.
Check your local building codes before starting work, as some municipalities require permits for electrical modifications. While many areas allow homeowners to replace bathroom fans without professional licensing, failing to obtain required permits could jeopardize your homeowner’s insurance coverage if electrical issues arise later. Contact your city building department for clarification if you’re unsure about local requirements.
Protect yourself with proper gear before beginning the removal process. Wear work gloves, long sleeves, safety goggles, and a respirator mask to shield against falling insulation that inevitably cascades down when disturbing ceiling-mounted units. Lay a drop cloth across your bathroom floor to catch debris and simplify cleanup—this small preparation step saves significant time when the project concludes.
Assemble All Necessary Removal Tools First
Gather these essential tools before removing any components to avoid frustrating mid-project interruptions. A Phillips screwdriver serves as your primary tool for removing fan covers and housing fasteners, while a flathead screwdriver provides gentle leverage for stubborn snap-fit covers. Keep a pry bar handy for housing components resisting simple removal, and have a utility knife ready to cut duct tape securing vent connections.
For situations requiring access to above-ceiling fasteners, include a mini hacksaw to cut through nails or screws attaching the housing to joists. A drill/driver with appropriate bits helps remove stubborn retaining screws, while cutting/stripping pliers prepare wires during disconnection. Don’t forget your essential voltage tester, flashlight for inspecting dark ceiling spaces, and duct tape for temporarily sealing vent openings during the process.
Identify Your Specific Fan Connection Type Immediately

Determining how your fan receives power shapes your entire removal strategy. Remove the fan cover to inspect the power connection method. If you see a standard electrical cord plugging into a receptacle inside the housing, you have a plug-in model that disconnects with simple unplugging. If only bare wires connect directly to housing terminals, your fan is hard-wired and requires proper electrical disconnection procedures.
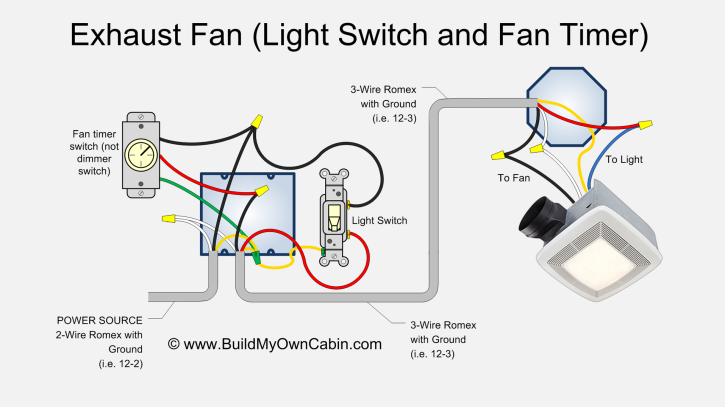
Plug-in fans offer significantly simpler removal since you avoid working with exposed electrical connections. After removing the cover, simply unplug the cord and proceed with extracting the mechanism. Hard-wired fans require additional steps to safely disconnect wires before removal—this process involves identifying corresponding colored wires (black to black, white to white, ground to ground) and properly disconnecting wire nuts or terminal screws.
Properly Remove Fan Cover Without Damage
The visible cover attaches in one of three common configurations that determine your removal approach. Screw-attached covers feature visible perimeter screws—carefully inspect the entire edge as some may be painted over or less obvious. Use the appropriate screwdriver to remove all fasteners before attempting to lower the cover.
Snap-fit covers lack visible fasteners and instead use plastic tabs that clip into place. Look for a subtle lip or raised section indicating the release point. For covers without obvious release tabs, gently insert a flathead screwdriver at the edge where cover meets ceiling and apply controlled outward pressure to pop clips loose. Work systematically around the perimeter to avoid breaking plastic clips that could compromise the cover’s reinstallation.
Apply firm but controlled pressure when releasing snap-fit covers—excessive force often breaks plastic clips, creating ceiling damage that requires repair. Take your time with this step to preserve the cover if you plan to reuse it or avoid creating additional work.
Safely Disconnect Electrical Components
With the cover removed, verify power remains off using your voltage tester near the exposed wires—even if you previously confirmed the circuit was dead. This double-check prevents shocks from electrical feedback or accidentally turning off the wrong breaker.
For plug-in fans, locate the receptacle inside the housing and disconnect the plug. Most models pull straight out with moderate force, though some require pressing a release tab first. Support the fan mechanism with one hand while disconnecting to prevent it from falling unexpectedly.
Hard-wired fans require careful wire disconnection. Open the receptacle cover and identify standard connections using wire nuts that twist together corresponding colored wires. Turn wire nuts counterclockwise to disconnect, or loosen terminal screws if your model uses screw terminals instead. Label wires with tape if you’ll need to remember positions for reinstallation.
Extract Fan Mechanism From Housing Correctly
Once electrical connections are safely disconnected, locate and remove retaining screws holding the mechanism in place. These typically appear on the sides or top of the mechanism where it connects to the housing. Keep these screws organized if you plan to reinstall them later.
For mechanisms clipped rather than screwed into position, apply upward pressure while supporting from below. Once clips release, lower the mechanism carefully while guiding wires out of the receptacle. Be prepared for insulation to cascade down from above the housing—this is why your protective gear and drop cloth prove essential during this stage.
Remove Stubborn Housing Units With Hidden Fasteners
Many homeowners encounter situations where the fan mechanism is removed but the housing remains stuck with no visible screws. This typically indicates hidden spring clips around the housing perimeter or fasteners installed from above through ceiling joists.
Use a flashlight to examine the housing edge for spring clips or tabs. Gently press these inward while applying steady downward pressure on the housing. If clips don’t release, try rotating the housing slightly while pulling down—this motion often releases friction-held housings.
When no fasteners are visible and clips don’t seem to be the issue, the housing was likely attached from above. In this situation, you’ll need to enlarge the ceiling hole slightly to access fasteners from below. Trace the outline of your new fan’s housing against the ceiling and cut along this line with a drywall knife to create proper access.
Disconnect Vent Pipe Without Creating Mess
Locate where the vent duct connects to the fan housing and detach it properly to prevent debris from entering your ductwork. Use a utility knife to cut through duct tape or remove clamps securing the vent pipe to the housing.
Have a shop vac ready to temporarily seal the duct opening and prevent insulation from entering the ventilation system. Alternatively, seal the opening with plastic sheeting and HVAC tape during the remaining removal process. Guide wires and vent pipe carefully as you lower the housing to avoid damaging connected components.
Cut Through Above-Ceiling Fasteners When Necessary
When attic access isn’t available and the housing is attached from above, a mini hacksaw becomes essential. Carefully cut through stubborn fasteners attaching the housing to joists, taking extreme caution to avoid damaging the joist structure or cutting through hidden electrical wiring.
Some homeowners successfully remove stubborn housings by working the unit back and forth in a rotating motion while applying steady downward pressure. This technique often releases friction-held housings or spring clips that aren’t immediately visible, potentially avoiding the need to enlarge the ceiling opening.
Decide Between Full Replacement or Motor Assembly Swap
For many bathroom fans, complete housing removal isn’t necessary. NuTone and similar brands allow replacing only the internal fan motor assembly, which minimizes ceiling damage. If your current fan has a replaceable motor and you can find a compatible replacement, this approach saves significant time and repair work.
If replacement parts are unavailable or the housing itself is damaged, you’ll need to replace the entire unit. When doing so, consider upgrading to a fan with a lower sone rating (0.5 is nearly silent) and higher CFM rating for better ventilation capacity in your specific bathroom size.
Complete Final Cleanup and Prepare for New Installation
After removing the old housing, inspect your vent duct for proper connection to the roof vent and check for leaks or damage. Access your attic to verify the duct vents air outdoors rather than into the attic space—improper venting causes costly mold problems.
If you’re not installing a replacement immediately, seal the ceiling opening with plastic sheeting and tape to prevent air leakage and pest entry. When installing your new fan, fill gaps between housing and ceiling with spray foam insulation to limit air leakage and reduce fan noise for better energy efficiency.
Test Your New Fan Installation Immediately
Restore power at the electrical panel and test your new fan immediately. Listen for unusual noises that might indicate improper installation or debris in the fan blades. Verify smooth operation at all speed settings and proper exhaust airflow through the duct system.
If issues arise, cut power immediately and check wire connections, housing security, and potential debris in the fan mechanism. For plug-in models, ensure the cord is fully inserted; for hard-wired units, confirm all wire nuts are securely tightened with no exposed bare wire.
Removing a bathroom ceiling fan requires patience and attention to safety details, but following these precise steps ensures success while avoiding common pitfalls. Whether you’re replacing a malfunctioning unit or preparing for bathroom renovations, mastering this process empowers you to handle future ventilation projects with confidence.
Leave a Reply