Is your ceiling fan blowing the wrong direction for the season but lacks a visible reverse switch? You’re not alone—many homeowners struggle with this common problem, especially in older homes or with basic fan models. The good news is that most ceiling fans can be reversed using alternative methods, even without a dedicated switch. Understanding how to reverse a ceiling fan without switch functionality is crucial for optimizing your home’s energy efficiency year-round. In summer, counterclockwise rotation creates that refreshing cooling breeze, while clockwise rotation in winter gently redistributes warm air trapped near the ceiling. This guide reveals practical techniques to flip your fan’s direction regardless of whether your model came with a convenient reverse switch.
Most modern ceiling fans actually have reversible motors, but the control mechanism might be hidden or non-standard. Before you consider replacing your fan or calling an electrician, try these proven methods to reverse your ceiling fan without switch access. You’ll discover that with a bit of investigation and the right approach, you can master seasonal airflow adjustments and potentially save on heating and cooling costs throughout the year.
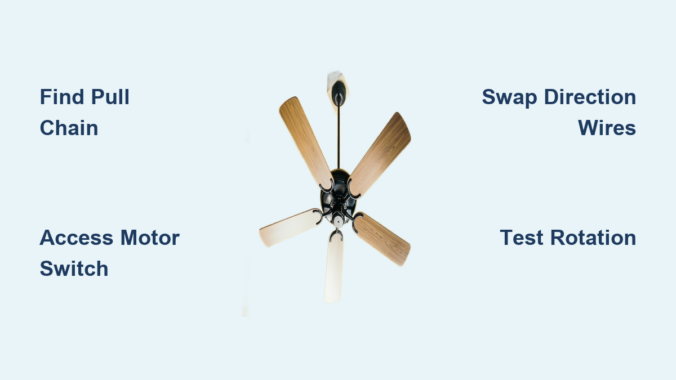
Locate Hidden Pull Chain Direction Controls
Many fans without wall switches use pull chains for both speed control and direction reversal, but the direction chain can be easily overlooked.
Identify the Shorter Direction Control Chain
Examine your fan’s pull chains carefully—most models feature two chains, with the direction control chain typically shorter than the speed control chain. The direction chain often has a different colored bead or handle to distinguish it. Stand on a stable ladder with the fan turned off, and gently pull this shorter chain once. Listen for a distinct “click” inside the motor housing, which indicates the direction has changed. Wait until the fan completely stops before turning it back on to check the new rotation direction. If you accidentally pull the speed chain instead, simply cycle through the speeds until you return to your preferred setting. Remember that some fans require the fan to be completely stopped before the direction change takes effect, so be patient during testing.
Test Multiple Pull Chain Combinations
Some ceiling fan models use a single pull chain that cycles through multiple functions including direction reversal. With these systems, you’ll need to pull the chain multiple times to reach the reverse setting. Start with the fan off, then pull the chain once to turn it on low speed, twice for medium, three times for high, and four times to activate reverse mode at low speed. Keep a notepad nearby to document how many pulls are needed to reach reverse mode on your specific model. If your fan has two chains but neither seems to control direction, try turning the fan off completely, waiting 10 seconds, then pulling both chains simultaneously—some manufacturers use this combination for direction changes. Always move deliberately to avoid damaging the internal mechanism with excessive pulling.
Access the Motor Housing Reverse Switch

When pull chains don’t solve the problem, the reverse switch is likely hidden inside the motor housing, requiring careful access but no electrical work.
Safely Remove the Fan Canopy for Switch Access
Before touching any components, turn off power to the fan at your circuit breaker panel—not just the wall switch—and verify it’s off with a voltage tester. Using a sturdy ladder, locate the canopy (the dome-shaped cover where the fan connects to the ceiling). Most canopies detach by twisting counterclockwise or by removing small screws on the underside. Lower the canopy carefully to expose the motor housing while supporting its weight. Inside, look for a small toggle switch approximately the size of a pencil eraser, usually positioned on the side of the motor housing near the downrod connection point. This switch might be recessed or the same color as the motor, making it difficult to spot. Wear safety glasses during this process to protect your eyes from dust or debris dislodged during access.
Toggle the Internal Motor Switch Correctly
Once you’ve located the internal reverse switch, use a small flat-head screwdriver or your fingernail to slide it to the opposite position. The switch typically has “SUMMER” and “WINTER” markings or uses arrows to indicate direction. If no markings are visible, make a mental note of its original position before moving it. After toggling the switch, carefully reattach the canopy without pinching any wires, restore power at the breaker, and test the fan’s rotation direction. If the fan spins in the wrong direction, simply repeat the process to flip the switch back. Some fans require the switch to be in the exact center position during power-up, so ensure it’s fully engaged in either direction for reliable operation.
Modify Wire Connections as Last Resort Solution
When no reverse switch exists internally or externally, swapping specific wires provides a permanent direction change—but requires electrical knowledge and caution.
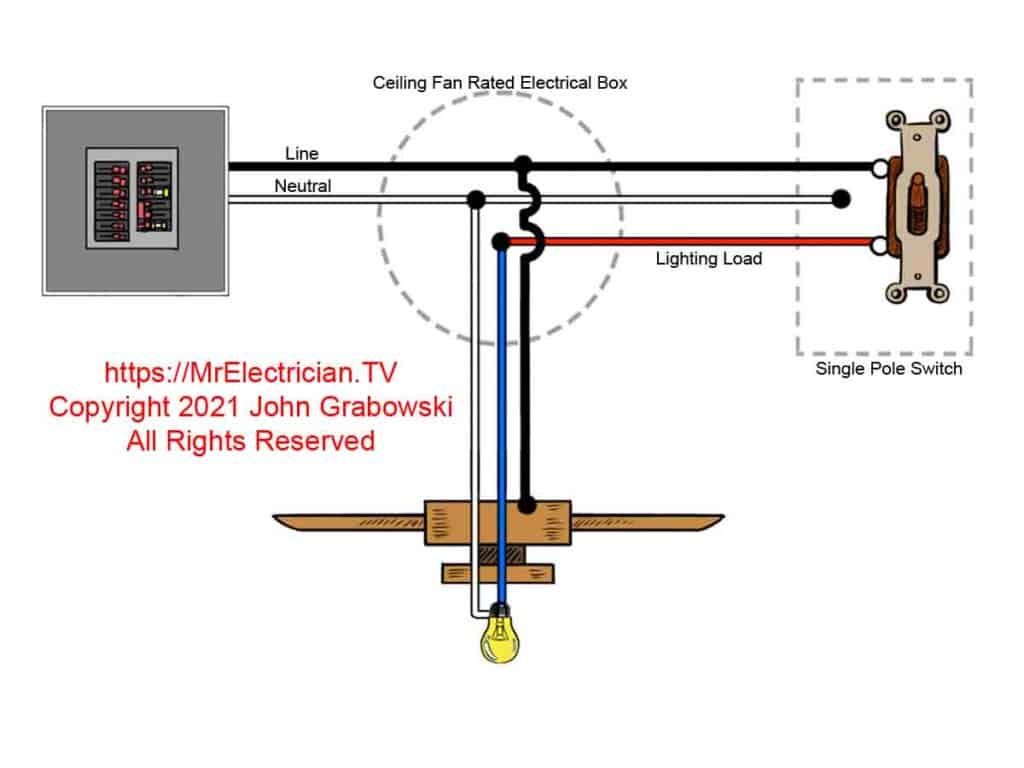
Identify Critical Direction Control Wires
With power confirmed OFF at the breaker, remove the canopy to access the wiring compartment. Locate the wire connections where the fan’s downrod meets the motor housing. Most fans have three primary wires: black (hot), white (neutral), and green/bare (ground). Some reversible models include an additional red wire specifically for direction control. Look for two wires connected to the black supply wire—one for forward rotation and one for reverse. These are typically labeled “FWD” and “REV” or use color coding (black for forward, blue for reverse). Take a clear photo of the original wiring configuration before making any changes—this documentation is crucial for restoring proper connections if needed.
Execute Safe Wire Reconfiguration
Using wire nuts, carefully disconnect the two direction control wires from the black supply wire. Swap their positions so that the wire previously connected to the forward terminal now connects to the reverse terminal, and vice versa. Secure each connection tightly with new wire nuts to prevent loose connections. Tuck all wires neatly back into the housing before reinstalling the canopy, ensuring no bare wire is exposed. Restore power at the breaker and test the fan—successful reconfiguration should produce the opposite rotation direction. If the fan doesn’t operate after reconnection, immediately turn off the power and verify all connections match your documentation photo. This method permanently changes the fan’s default direction, so you’ll need to repeat the process when seasonal changes require direction reversal.
Verify Proper Operation and Seasonal Airflow
After any reversal method, thorough testing ensures your fan delivers optimal performance for current seasonal conditions.
Confirm Rotation Direction Visually and Tactilely
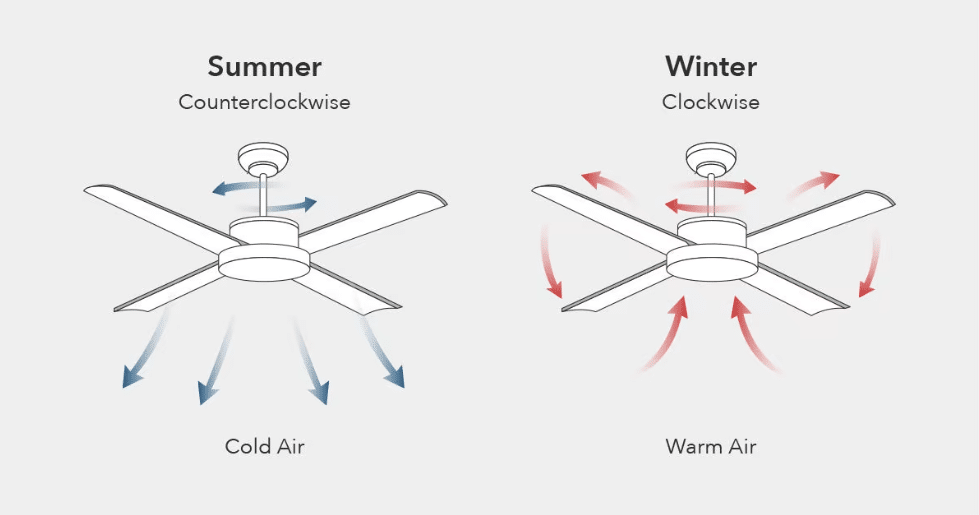
Stand directly beneath the operating fan and observe blade movement—counterclockwise rotation (summer mode) pushes air downward, creating that familiar cooling breeze, while clockwise rotation (winter mode) pulls air upward, redistributing warm air without a noticeable draft. For definitive verification, hold a lightweight tissue near the blades; in summer mode, the tissue should be pulled downward toward the floor, while in winter mode it should be drawn upward toward the ceiling. Test at multiple speed settings to ensure consistent direction across all speeds. Listen for unusual noises like grinding or humming that might indicate improper installation or motor strain requiring correction.
Establish Seasonal Reversal Reminders
Create a simple system to remember when to reverse your fan direction—mark your calendar for March 1st (spring transition to cooling mode) and September 1st (fall transition to heating mode). During these seasonal checkups, verify your fan’s direction matches current needs and clean blades to maintain optimal airflow. If you used the wire reconfiguration method, note the exact date of your last reversal in your home maintenance journal to avoid confusion. Consider placing a small sticker near the fan’s pull chains indicating the current season’s correct direction (an upward arrow for winter, downward arrow for summer) as a visual reminder for household members.
Troubleshoot Failed Reversal Attempts
When standard methods don’t work, systematic troubleshooting identifies whether your fan can actually be reversed.
Confirm Your Fan Has a Reversible Motor
Not all ceiling fans support direction changes—some budget models and very old units have single-direction motors. Check your fan’s documentation or manufacturer website for specifications; if unavailable, search online using your fan’s model number (typically found on a sticker inside the motor housing). If your fan lacks reversible motor capability, no amount of switch manipulation or wire swapping will change direction. In this case, consider installing a compatible replacement motor or upgrading to a modern fan with proper reverse functionality—this investment often pays for itself through energy savings within a few seasons.
Address Common Post-Reversal Issues
If your fan runs poorly after reversal, check for loose wire connections or improperly seated switch components. A fan that vibrates excessively after direction change likely has unbalanced blades—clean all blades thoroughly and ensure they’re equally tight. If the fan won’t start in one direction but works in the other, the direction control mechanism may be faulty and require professional attention. Fans that reverse direction spontaneously often have worn internal switches that need replacement. When in doubt, consult a licensed electrician rather than risking electrical hazards from repeated troubleshooting attempts.
Reversing a ceiling fan without a dedicated switch requires methodical investigation but delivers significant comfort and energy savings when mastered. By exploring hidden pull chains, accessing internal switches, or carefully modifying wire connections, you can optimize your fan’s performance year-round. Remember to prioritize safety with every step—always work with power disconnected and use proper ladder techniques. Once you’ve identified your fan’s specific reversal method, document the process for future seasonal adjustments. With these techniques, you’ll transform your ceiling fan from a simple air mover into a sophisticated climate control tool that works with your home’s natural physics rather than against it.
Leave a Reply