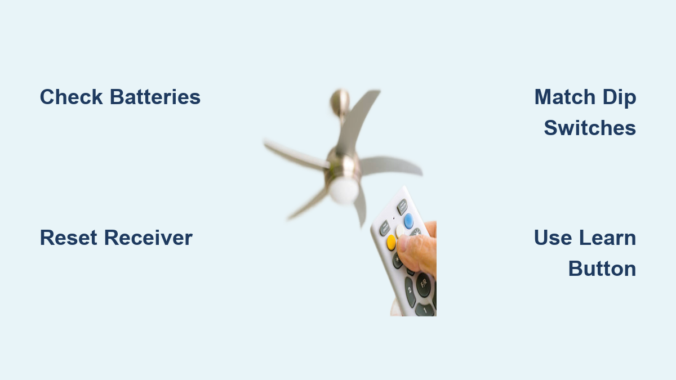
Your ceiling fan remote suddenly stops working mid-summer, leaving you sweltering while you search for the pull chain in the dark. You’re not alone—millions of homeowners face this frustrating problem each year. Learning how to sync ceiling fan remote systems is one of the most common home maintenance challenges, yet most can fix it themselves in under 15 minutes with the right guidance. Whether you’ve just installed a new fan, replaced a broken remote, or your fan has stopped responding to commands, establishing a solid connection between your remote and the fan’s receiver is essential for restoring convenient control over your home’s airflow.
This synchronization process—sometimes called pairing or linking—creates a unique communication channel between these two components so that your remote commands are the only ones your fan obeys. Without proper syncing, your remote becomes little more than a decorative paperweight, forcing you to rely on pull chains or wall switches for basic operation. In this guide, you’ll discover exactly how to sync ceiling fan remote systems for every major type of fan on the market today, with step-by-step instructions that eliminate guesswork and get your fan responding immediately.
Gather Essential Tools Before Remote Syncing
Before attempting to sync your ceiling fan remote, assemble these critical items to avoid interruptions mid-process. Most failed synchronization attempts happen because homeowners overlook simple preparations like dead batteries or inaccessible components.
Fresh alkaline batteries are non-negotiable for successful pairing—install new AA or AAA batteries in your remote, matching the positive and negative indicators precisely. Weak batteries cannot transmit a strong enough signal for the receiver to learn, even if they still power the remote’s buttons. Never use rechargeable batteries for this process, as their slightly lower voltage often compromises signal strength.
Locate your fan’s receiver inside the ceiling fan housing—a small black box typically positioned near the motor that contains the circuitry interpreting remote commands. You’ll need a sturdy ladder to reach it safely, and the receiver’s Learn or Sync button (usually recessed) must be accessible. Some fan designs require removing the canopy cover, so keep a screwdriver handy. Gather your fan’s user manual if available, as manufacturer-specific instructions often differ from general procedures.
Ensure the fan has power at the wall switch or circuit breaker before starting. The fan should operate normally when controlled by pull chains, confirming that electrical issues aren’t interfering with the remote synchronization process. If the fan doesn’t respond to any control method, address the power supply problem first—attempting to sync an unpowered fan wastes valuable troubleshooting time.
Identify Your Ceiling Fan Remote System Type

Ceiling fan remotes fall into two primary categories based on their frequency system, and identifying which type you have determines the synchronization method you’ll use. Understanding this distinction prevents wasted time attempting procedures that won’t work for your specific setup.
The 65,000-frequency learning system represents modern ceiling fan remote technology. These remotes use a “learn” function where the receiver captures and stores the remote’s unique identification code during pairing. Look for a small button on your remote labeled “Learn” or featuring a fan/light icon—the absence of visible dip switches typically indicates a learning-system remote. This system offers superior interference protection with 65,000 possible frequency combinations, making it the standard for most fans manufactured in the past decade.
The 16-frequency dip switch system uses physical switches on both the remote and receiver that must be set to matching codes. These small sliding switches, usually four to five in number, can be set to up or down positions. If you see these switches on your remote (typically on the back or bottom) and inside the fan’s receiver, you have a dip-switch system. This older technology requires manual code matching rather than automatic learning.
How to Determine Your Fan Motor Type
Additionally, determine whether your fan has an AC or DC motor, as DC motor fans often use modified synchronization procedures. DC motors are typically quieter and more energy-efficient, often marketed as such. Check your fan’s documentation or examine the motor housing—DC motor fans usually require using the airflow direction button rather than a traditional Learn button during pairing. If your fan has multiple speed settings with exceptionally smooth transitions, it likely has a DC motor requiring the specialized pairing process we’ll cover next.
Sync 65K Frequency Learning Remotes in 3 Steps
The 65k-frequency learning system provides the most straightforward synchronization process for modern ceiling fans. Follow these steps precisely, paying close attention to the timing requirements that many homeowners overlook.
Step 1: Turn off power to your ceiling fan at the circuit breaker and wait exactly 60 seconds—this reset allows the receiver’s electronics to discharge fully. Shorter periods may not fully reset the receiver, while longer waits offer no additional benefit.
Step 2: Restore power and begin the pairing sequence within 60 seconds, as the receiver only remains receptive to new codes briefly after power-up. This narrow window catches many homeowners off guard, so work efficiently.
Step 3: Press and hold the Learn button on your remote for approximately 5 seconds. You may see a small indicator light blink, confirming transmission. After releasing the button, test the connection by pressing various buttons—the fan should respond immediately to speed adjustments and light controls. If nothing happens, repeat the entire process, ensuring you meet all timing requirements exactly.
Configure 16-Frequency Dip Switch Remotes Correctly
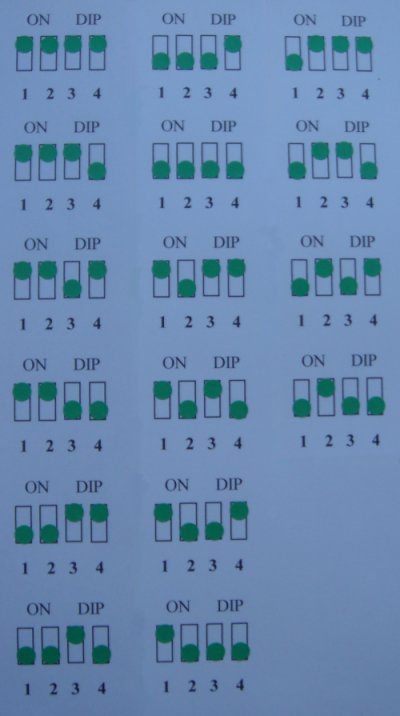
Dip switch remotes require manually setting matching frequency codes on both the receiver and remote. This process involves more hands-on configuration but offers predictable results once the correct code is established.
Start by turning off power to the ceiling fan at the circuit breaker. Locate the dip switches on both the receiver (inside the fan canopy) and the remote control. Set the dip switches on both components to identical positions—every single switch must correspond exactly. Use a small flathead screwdriver to slide each switch carefully into position, then double-check your work before proceeding.
Once both components have matching dip switch settings, restore power to the fan. Test the remote by pressing and holding the fan button—the fan should respond immediately. If the fan doesn’t respond, power it off again and re-examine all dip switches; even a single mismatched switch will break the connection. If multiple attempts fail, try a different dip switch combination, as your initial setting may experience interference from another nearby device.
Pair DC Motor Fan Remotes Using Direction Button
DC motor ceiling fans use a specialized pairing procedure that differs from standard AC motor synchronization. Turn on power to your ceiling fan, then locate the airflow direction button on your remote.
Press and hold the airflow direction button continuously. After a few moments, you should see visual confirmation—the lights will blink twice if your fan has a light kit, or the fan blade will perform a quarter turn back and forth and begin spinning automatically. Once you see this confirmation, release the button and allow the fan to complete its programming sequence (10-30 seconds).
After the fan stops completely, test the connection by pressing and holding the fan button. The fan should respond to all speed settings and control functions. If any functions don’t work, repeat the pairing process from the beginning—DC motors require precise timing during this sequence.
Troubleshoot Unresponsive Remote After Syncing
When your remote fails to respond after attempted synchronization, systematic troubleshooting identifies the specific cause. First, verify you’re within effective range of the fan—most remotes operate reliably within 20 feet with clear line of sight. Thick walls, metal objects, and electronic interference from Wi-Fi routers can significantly reduce range.
Recheck battery status even with new batteries—some discount brands provide lower voltage than expected. Remove batteries and test them in another device, or replace them with quality alkaline batteries. Clean battery contacts with a dry cloth if you notice corrosion.
If the remote still doesn’t respond, the receiver may not have entered learn mode. Turn off power at the circuit breaker, wait 10 seconds, and restore power. Immediately begin the pairing process again, paying careful attention to all timing requirements. Some systems require pressing the Learn button on both the remote and receiver in sequence.
Prevent Multiple Fans Responding to One Remote
A single remote controlling multiple ceiling fans creates frustrating confusion, especially in open-concept homes. This occurs when different fans use identical frequency codes. To resolve this:
Turn off power to all ceiling fans except the one you wish to pair. Follow the standard pairing procedure for that specific fan and its designated remote. Once pairing is successful, move to the next fan, turn its power on, and repeat the pairing process with its specific remote.
Label each remote with the room it controls after pairing completes. This simple step prevents future confusion and ensures household members use the correct remote for each fan. If remotes have been mixed between fans, all fans may need to be re-paired using this individual approach.
Maintain Reliable Remote Performance Long-Term
Replace remote batteries every 6-12 months depending on usage frequency. Mark your calendar or associate battery changes with seasonal transitions. When replacing batteries, use fresh alkaline batteries from reputable brands—cheaper batteries often have shorter lifespans and may leak.
Periodically access the receiver inside the fan housing to inspect and clean it. With power turned off, remove the canopy cover and gently dust the receiver with compressed air. Check wire connections for tightness and signs of corrosion.
Protect your remote from environmental damage—avoid leaving remotes in direct sunlight, near heat sources, or in humid locations. Store remotes at consistent room temperature when not in use, and clean them periodically with a dry cloth. These habits prevent internal electronics from degrading and maintain clear signal transmission to your fan’s receiver.
By following these precise steps for how to sync ceiling fan remote systems, you’ll restore convenient control over your home’s airflow in minutes rather than hours. Remember that successful synchronization depends on matching your specific fan type with the correct procedure—whether you’re working with a 65k-frequency learning system, dip switches, or DC motor technology. When all troubleshooting steps have been exhausted without success, component replacement may be necessary to restore remote functionality.
Leave a Reply