
Your Hunter ceiling fan has served you well, but now it’s time to remove it for replacement, repair, or renovation. Many homeowners hesitate to tackle this project, fearing electrical hazards or dropping heavy components. The reality? With proper preparation and methodical execution, you can safely remove your Hunter ceiling fan in under an hour. This guide walks you through every critical step, focusing specifically on Hunter models which feature unique mounting systems and blade attachment methods. By following these instructions, you’ll avoid common pitfalls like severed wires, damaged ceilings, or injured fingers—plus save $100+ compared to hiring a professional.
Before you grab a ladder, understand that Hunter ceiling fans typically weigh between 15-30 pounds. That’s substantial weight suspended overhead, making proper support during removal absolutely critical. The electrical component demands equal attention—ceiling fans remain connected to live wires even when the wall switch is off. Getting this wrong could result in serious shock or fire hazards. But don’t worry; by following this guide’s sequence, you’ll complete the job safely and efficiently.
Gather Essential Tools Before Starting
Having the right tools within arm’s reach prevents dangerous ladder descents mid-process. Your core toolkit must include a Phillips head screwdriver (both standard and stubby versions for tight spaces), a flathead screwdriver for prying decorative caps, and a non-contact voltage tester—never skip this critical safety device. Wire strippers and needle-nose pliers help manage electrical connections, while a magnetic screw tray keeps tiny hardware organized.
A sturdy ladder appropriate for your ceiling height is non-negotiable. Eight to ten-foot step ladders work for standard rooms, but vaulted ceilings require extension ladders with proper stabilization. Bring your smartphone to photograph wiring configurations before disconnection—this simple step prevents hours of confusion during reinstallation. If your fan has a light kit, include a bulb removal tool or soft cloth to handle fragile glass components safely.
Turn Off Power at the Source
Flipping the wall switch doesn’t isolate electrical current—it only breaks the switch loop. You must disconnect power at the circuit breaker panel. Locate the correct breaker by turning the fan on, then systematically switching off breakers until the fan stops. Once identified, turn off that breaker and label it clearly with tape to prevent accidental restoration.
Return to the fan with your voltage tester and confirm no electricity flows through the system. Test the tester on a known live source first to verify functionality, then check all fan wires and metal components. Repeat this test after removing the canopy—electrical conditions can change unexpectedly. This verification step takes two minutes but prevents life-threatening accidents. Never proceed without absolute certainty that power is disconnected.
Document Wire Connections Before Disconnecting
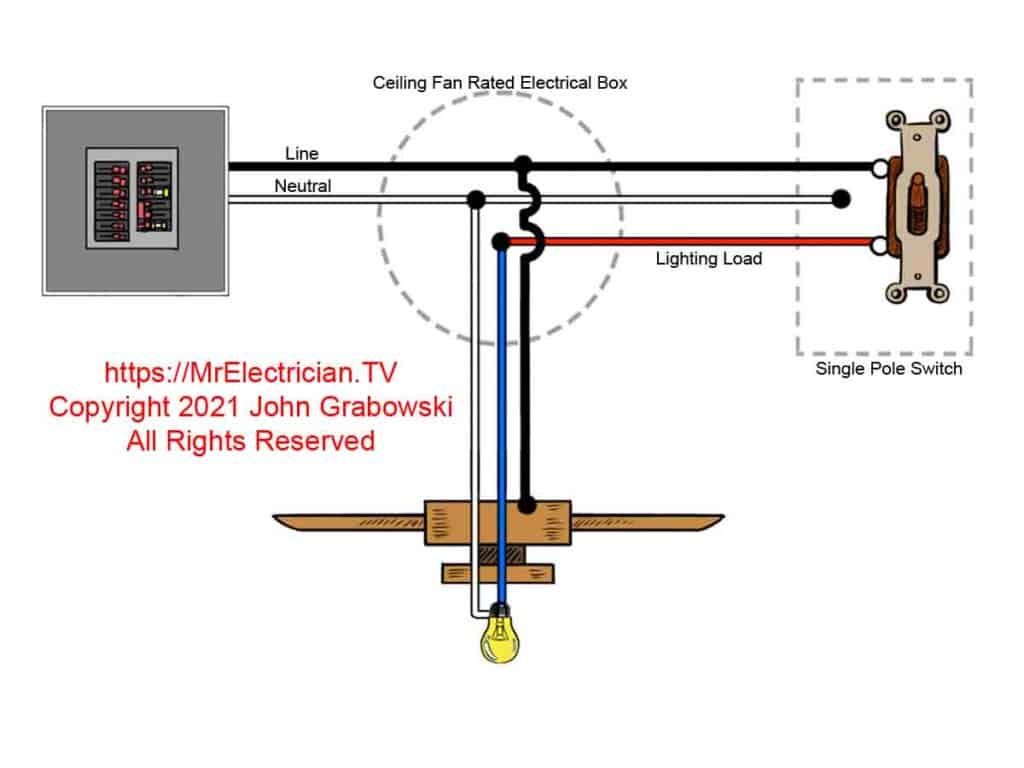
Before touching a single wire, capture the existing configuration with multiple smartphone photos. Focus specifically on wire colors and connections: black-to-black (hot), white-to-white (neutral), and green/bare-to-green/bare (ground). Note any blue wires if your fan has a light kit. Photograph the entire junction box from different angles to preserve spatial relationships.
This documentation serves as your electrical roadmap during reinstallation. Hunter fans often use wire nuts to connect components, but older models might have push-in connectors or terminal screws requiring different handling. If you’re removing the fan temporarily—perhaps for painting—you’ll need this visual reference to restore proper connections. Don’t rely on memory; lighting conditions change, and wire colors can fade over time.
Remove Fan Blades Without Damage

Hunter fan blades attach to blade arms with two to three concealed screws per blade. Start by gently prying off any decorative caps covering the screws using your flathead screwdriver. Support each blade with one hand while loosening screws with the other—this prevents sudden drops when the final screw releases.
Work clockwise around the fan to maintain systematic progress, placing removed blades flat on a protected surface. Never stack blades vertically, as this can cause warping. If reinstalling later, note each blade’s position; some Hunter models have directional airflow patterns requiring specific blade orientations. Keep screws organized by location in your magnetic tray—blade screws often differ slightly from motor assembly hardware.
Detach Blade Arms from Motor Housing
With blades removed, focus on the blade arms connecting to the motor hub. These typically secure with three to four larger screws arranged in a triangular pattern. Apply steady pressure with your Phillips screwdriver—these connections withstand significant torque from fan operation and may resist initial loosening.
Support each arm as you work to prevent it from falling once the final screw releases. Some Hunter models use locking pins instead of screws; consult your manual if resistance feels unusual. Store blade arm screws separately from blade screws, as they’re often longer and coarser. This separation prevents confusion during reinstallation and ensures proper torque application where needed.
Lower Canopy to Access Wiring
The canopy—the bell-shaped cover concealing wiring—attaches via two to four screws along its rim. Loosen these partially before attempting full removal; this allows the canopy to slide down the downrod while remaining partially secured. Some Hunter models feature a small set screw near the top that must be loosened first.
As the canopy descends, support its weight with one hand while guiding it down the rod. This exposes the junction box and electrical connections while keeping the motor assembly temporarily supported. If your fan has a light kit, disconnect its wiring harness now before proceeding. The canopy often contains delicate components like pull-chain switches that require careful handling to avoid breakage.
Disconnect Electrical Connections Safely
Hunter fans typically connect via three wire groups: black (hot), white (neutral), and green/bare (ground). Some models include a blue wire for light kits. Grip each wire nut firmly and twist counterclockwise—never pull on the wires themselves. Separate corresponding wires immediately after disconnection to prevent accidental contact.
Take additional photos of the disconnected state for reference. If you encounter push-in connectors instead of wire nuts, press the release tab with a small screwdriver while gently pulling the wire free. Never force connections; if resistance exceeds reasonable effort, double-check for hidden set screws or secondary connectors. Keep your voltage tester nearby to periodically verify no power has been accidentally restored.
Support Motor Before Final Removal
The motor assembly weighs 15-30 pounds—dropping it causes serious injury or damage. Before disconnecting the final support, ensure proper stabilization. Have a helper support the motor from below, or temporarily reattach mounting bracket screws to provide partial support. The downrod connects to the motor via set screws on the coupling—typically two screws requiring an Allen wrench.
Loosen these set screws completely before attempting separation. Support the motor with both hands as you gently lower it away from the mounting bracket. The weight distribution shifts unexpectedly during this process, so maintain a firm grip throughout descent. Place the motor assembly on a protected surface immediately—never set it on furniture that could be scratched by metal components.
Handle Flush Mount Fans Differently
Flush mount Hunter fans attach directly to ceilings without downrods, requiring modified techniques. Their canopies often secure through hidden mechanisms accessed only after removing light kits or center caps. Work slowly to avoid damaging cosmetic elements—many homeowners mistakenly force components that actually require specific rotation sequences.
Blade removal follows similar principles, but reduced clearance increases drop risks. Consider having a helper catch components as they release. The motor housing typically disconnects via a hook-and-tab system rather than set screws. After electrical disconnection, rotate the housing slightly to release locking tabs before lowering. These fans often have integrated components requiring simultaneous support during removal.
Manage Sloped Ceiling Installation Challenges

Fans on angled ceilings use specialized mounting brackets with ball-and-socket joints. Never force the downrod away from the bracket—this can damage the pivotal mechanism. Locate all securing elements including secondary clips or set screws that might be hidden from view. Some sloped installations require loosening an adapter plate between the junction box and mounting bracket.
Photograph the entire assembly before disassembly, as reinstallation requires precise component orientation. The ball joint often resists separation until all tension is released—gently wiggle the downrod while applying downward pressure. If resistance persists, double-check for overlooked fasteners rather than applying excessive force that could damage the mounting system.
Cap Wires for Safe Storage
If permanently removing the fan, properly cap all exposed wires in the junction box. Twist appropriate-sized wire nuts clockwise onto each house wire (black, white, ground), then tug gently to confirm security. Wrap electrical tape around connections for added protection against accidental dislodging.
Ensure no bare copper remains visible below the wire nuts. Gently push capped wires back into the junction box and install a proper cover plate. This prevents accidental contact with live components if power is restored. If the junction box shows signs of overheating (discoloration, melting), consult an electrician before proceeding—this indicates serious electrical issues needing professional attention.
Troubleshoot Common Removal Problems
Seized screws often resist removal due to corrosion or paint buildup. Apply penetrating oil and wait 10 minutes before retrying—never force the screwdriver, as this strips the head. For rounded screws, grip the edges with needle-nose pliers while turning counterclockwise. Frozen set screws may require gentle heating with a hair dryer to expand surrounding metal.
Electrical complications arise when encountering aluminum wiring (dull gray color). This requires special CO/ALR connectors and often professional handling due to fire risks. If wiring methods differ from standard wire nuts, refer to your documentation photos before proceeding. When in doubt about any electrical aspect, stop work and consult a licensed electrician—safety always trumps completion speed.
Complete Your Project Successfully
Successfully removing your Hunter ceiling fan comes down to three fundamentals: absolute electrical safety, methodical documentation, and proper component support. Never rush the electrical verification steps—this single precaution prevents most serious accidents. Keep all hardware organized by location to simplify reinstallation or disposal.
If reinstalling elsewhere, inspect components for wear during removal—replace damaged blades or frayed wires before reassembly. For permanent removal, ensure proper wire capping and junction box coverage. When uncertainty arises about electrical connections, professional assistance provides the safest resolution. With these steps completed, you’ve safely conquered what many consider a complex DIY project—saving money while gaining valuable home maintenance skills.
Leave a Reply