Your ceiling fan isn’t just spinning aimlessly—it’s either working for you or against you depending on its rotation direction. Knowing how to turn your ceiling fan counter clockwise transforms it from a simple decorative element into a powerful cooling tool that can make rooms feel up to 8°F cooler without lowering your thermostat. This single adjustment leverages the fan’s ability to create a wind-chill effect that evaporates moisture from your skin, tricking your body into feeling significantly cooler. Most homeowners waste hundreds of dollars annually on unnecessary AC usage simply because they’ve never flipped this critical switch.
If your fan seems ineffective during summer months, there’s a 90% chance it’s running clockwise instead of counter-clockwise—the exact opposite of what you need for cooling. The good news? Changing your fan’s rotation takes less than 30 seconds once you know where to look. In this guide, you’ll discover exactly how to locate your fan’s reverse switch, verify proper counter-clockwise operation, and maximize your cooling efficiency while avoiding common mistakes that render this simple fix ineffective.
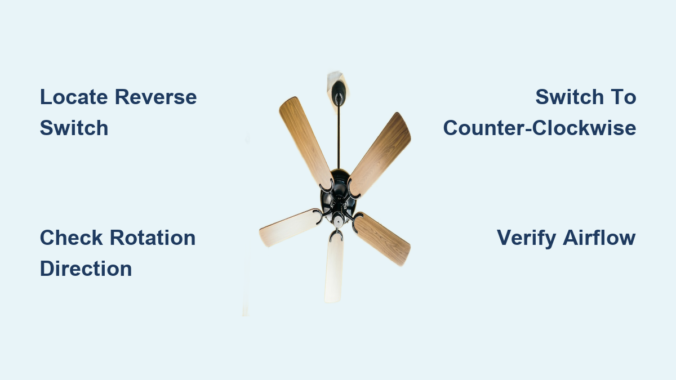
Locate Your Ceiling Fan’s Reverse Switch Without Ladder Hassles
Finding your fan’s reverse switch requires knowing exactly where manufacturers hide this essential control. For 85% of ceiling fans, the switch sits on the motor housing just above the blades, but its precise location varies by model and mounting style. Flush-mounted fans (those attached directly to the ceiling) typically have the switch positioned on the rim of the motor housing where the blades connect—look for a small toggle about the size of your thumbnail.
Hanging fans (those with downrods) usually place the switch on the bottom of the motor housing where it’s more accessible. The switch often resembles a small rocker or slide mechanism with opposing arrows clearly indicating rotation directions. Some newer smart fans integrate this function into their remote controls or mobile apps, eliminating the physical switch entirely. If you own a Hunter or Hampton Bay model, check for a small access panel on the motor housing that slides open to reveal the switch.
Pro tip: Stand on a stable chair rather than stretching from a ladder—this gives you better visibility and control when manipulating the switch. If you still can’t find it, consult your fan’s manual using the model number stamped on the motor housing. Never force a switch you can’t identify, as this could damage internal wiring.
Confirm Current Rotation Direction with Simple Visual Tests
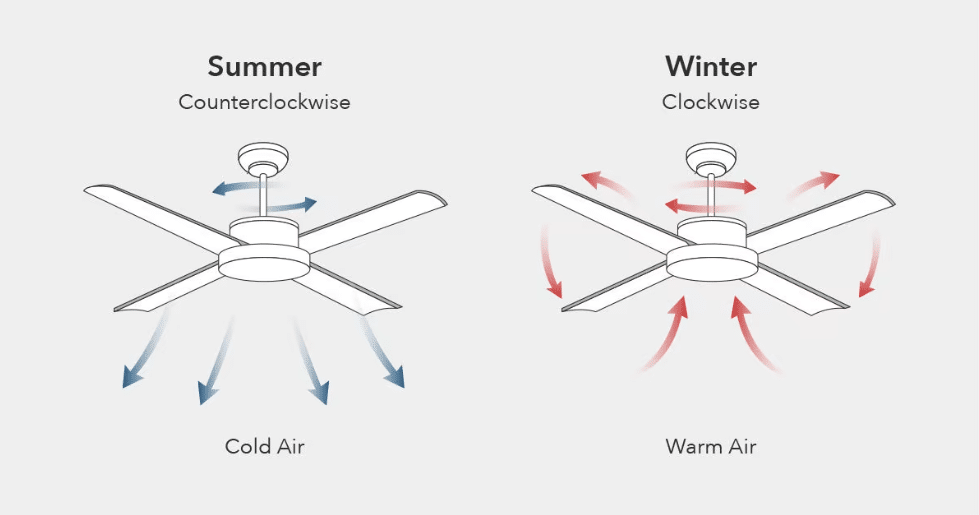
Before changing anything, verify your fan’s current rotation to avoid unnecessary adjustments. The most reliable method requires watching the blades for 10-15 seconds while the fan runs at medium speed. Stand directly beneath the fan and observe: if the leading edge of each blade (the front corner as it moves) travels from your left to right, your fan runs counter-clockwise—exactly what you want for summer cooling.
For a more precise test, hold a piece of tissue paper vertically about 6 inches below the blade tips. Counter-clockwise rotation will push the paper downward toward the floor, while clockwise rotation will pull it upward toward the ceiling. You can also use your smartphone’s slow-motion video feature to capture the blade movement and play it back frame by frame for definitive confirmation.
Warning: Never use your hand to test rotation direction while blades are moving—this creates serious injury risk. If you consistently feel no breeze beneath your fan during summer, it’s almost certainly running clockwise. This common mistake wastes 30-40% of your fan’s cooling potential while making you crank the AC unnecessarily.
Execute the Counter-Clockwise Switch with Safety First
Changing rotation direction requires strict adherence to electrical safety protocols before touching any component. First, turn off power at the wall switch, then verify it’s off by testing the fan’s operation. For absolute safety, flip the circuit breaker controlling the fan—this prevents accidental activation while your hands are near the motor housing.
With power confirmed off, locate the reverse switch and prepare to slide it toward the counter-clockwise indicator (usually marked with a downward arrow). Most switches require firm pressure to overcome the internal spring mechanism—don’t be surprised if it feels stiff. If your switch sticks midway, gently work it back and forth several times to clear any debris before setting it firmly in position.
Critical step: After switching, wait 30 seconds before restoring power to allow the motor’s internal components to reset. When you turn the fan back on, immediately verify counter-clockwise rotation using the tissue paper test. If blades move clockwise despite correct switch positioning, your fan likely has a wiring issue requiring professional attention.
Verify Cooling Effectiveness with Scientific Precision
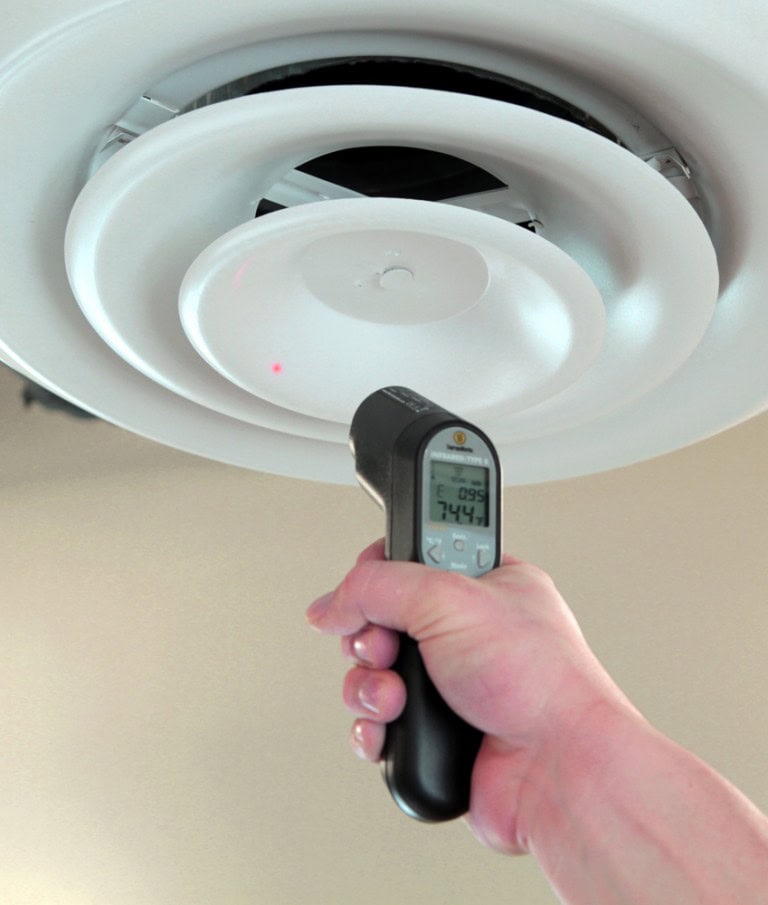
Proper counter-clockwise operation creates measurable cooling effects beyond just “feeling cooler.” Stand directly beneath the fan with arms extended upward—the optimal cooling zone extends from floor level up to about 7 feet. You should feel consistent airflow across your entire body, not just at head level. Use an infrared thermometer to measure surface temperature differences: skin temperature should drop 2-4°F within 90 seconds of fan activation.
For rooms with high ceilings (over 9 feet), position a standing fan on the floor pointing upward to help push the cooled air downward where you can feel it. The ideal counter-clockwise fan creates a “tornado effect” where air accelerates as it descends, maximizing the wind-chill factor. If you only feel breeze at head height but not below chest level, your fan may be spinning too slowly or have blade pitch issues.
Troubleshooting tip: Weak airflow despite correct rotation often indicates dirty blades—dust accumulation can reduce cooling efficiency by up to 35%. Clean blades with a microfiber duster while the fan is off to restore optimal performance.
Optimize Speed Settings for Maximum Energy Savings
Your fan’s speed setting dramatically impacts both cooling effectiveness and energy consumption. Counter-clockwise rotation at low speed creates gentle airflow suitable for mild days (75-80°F), while medium speed (60-70 RPM) delivers the sweet spot for most summer conditions. High speed becomes necessary only during extreme heat (above 90°F) or in rooms with poor air circulation.
Smart fans with automatic sensors adjust speed based on room temperature, but manual fans require your intervention. Create a simple speed guide taped inside your fan’s canopy: “Low = Pleasant days, Medium = Typical summer, High = Heat wave.” Remember that each speed increase consumes about 25% more electricity, so avoid running on high when medium provides sufficient cooling.
Energy hack: Pair your counter-clockwise fan with AC set 4°F higher than usual—you’ll feel equally comfortable while reducing cooling costs by 15-20%. The fan’s wind-chill effect makes 78°F feel like 74°F, creating instant savings without sacrifice.
Prevent Seasonal Switching Oversights with Visual Reminders
Forgetting to change fan direction with the seasons wastes year-round efficiency. Install colored indicator dots near each fan’s switch: blue for summer (counter-clockwise) and red for winter (clockwise). Alternatively, program your smart home system to send seasonal reminders when temperature trends shift consistently.
Create a fan maintenance calendar noting when you last switched directions, cleaned blades, and checked for wobble. Most manufacturers recommend direction changes around the spring and fall equinoxes—March 20 and September 22. If your fan has a wobble during counter-clockwise operation but runs smoothly clockwise, check for unbalanced blades using a wing balancing kit available at hardware stores.
Pro insight: Fans in rooms with consistent year-round usage (like home gyms) should remain counter-clockwise permanently—you can still benefit from the cooling effect even during mild winters.
Troubleshoot Direction Failures Before Calling a Professional

When your fan refuses to switch to counter-clockwise rotation, diagnose these common issues before scheduling service. First, check if the reverse switch moves freely—if it feels gritty or stuck, spray electrical contact cleaner around the mechanism (power off first). For remotes that won’t change direction, replace batteries and reset according to manufacturer instructions.
If the fan runs counter-clockwise but produces weak airflow, inspect blade pitch—most blades should angle 12-15 degrees for optimal cooling. Use a pitch gauge or smartphone app to verify. Loose blade screws create dangerous wobble that reduces efficiency; tighten all screws with a Phillips head while supporting each blade.
Urgent warning: If you smell burning or hear grinding noises during direction changes, turn off power immediately and consult an electrician—these indicate serious motor issues that could become fire hazards.
Maximize Cooling Coverage with Strategic Room Setup
Your counter-clockwise fan’s effectiveness depends heavily on room layout and complementary cooling strategies. Position seating areas directly beneath the fan’s airflow cone—the optimal cooling zone forms a 6-8 foot diameter circle centered below the fan. For rectangular rooms, install multiple fans spaced evenly rather than relying on one oversized unit.
Close south and west-facing curtains during peak sun hours to prevent heat buildup that overwhelms your fan’s cooling capacity. Pair your counter-clockwise fan with box fans in windows to create cross-ventilation that flushes hot air from the room. In open floor plans, use ceiling height differences to your advantage—position fans over lower seating areas where cooling is most needed.
Design tip: Paint ceilings light colors to reflect cool air downward, and avoid hanging objects (like plants or lights) that disrupt the fan’s downdraft pattern. For rooms with vaulted ceilings, install fans at the lowest point where people gather rather than at the peak.
By making counter-clockwise rotation a deliberate summer habit rather than an afterthought, you transform your ceiling fan from a simple appliance into a precision cooling tool that enhances comfort while reducing energy bills. The next time you feel summer heat building, take 30 seconds to verify your fan’s direction—you might just discover the simple fix that’s been missing from your comfort equation all along.
Leave a Reply