Replacing a basic ceiling light with a fan that includes lighting requires precise wiring knowledge and safety awareness. When you learn how to wire a ceiling fan with light properly, you’ll enjoy both improved air circulation and enhanced illumination in your space. This upgrade delivers significant comfort benefits while adding visual appeal to any room. However, combining two electrical functions—a fan motor and lighting circuit—in one unit demands careful attention to wiring details that differ from standard light fixture installations. Many homeowners encounter problems when they don’t understand the specific wiring requirements for dual-function fixtures, leading to improper connections or safety hazards.
Before you begin this electrical project, recognize that working with household electricity carries serious risks requiring respect and proper precautions. The satisfaction of a successful DIY installation comes with the responsibility to follow safety protocols rigorously and verify all connections. Whether you’re replacing an existing light fixture or installing a fan where none existed before, this guide provides the essential knowledge to complete your ceiling fan wiring safely and correctly.
Gather Essential Tools and Materials
Your ceiling fan installation begins with assembling the right equipment before touching any wires. Having everything on hand prevents mid-project interruptions and ensures you can work efficiently and safely.
Your voltage tester serves as the most critical tool, verifying power disconnection before you handle wires. Test it on a known live circuit first to confirm it functions properly—you never want to rely on a faulty tester when working with electricity. Wire strippers designed for 14 and 12 AWG wire prepare wire ends without damaging conductors, while a quality screwdriver set handles mounting hardware and terminal connections. Needle-nose pliers help with bending wires and making compact connections within the electrical box.
Don’t forget the fan-rated electrical box rated to support dynamic loads—standard light fixture boxes cannot safely support ceiling fans. The weight of a ceiling fan with light kit typically ranges from 15 to 30 pounds, demanding secure mounting that exceeds light fixture requirements. Working at height requires a stable ladder appropriate for your ceiling height with three points of contact maintained at all times.
Prioritize Electrical Safety First
Verifying power disconnection before touching any wires is the single most important safety rule when you wire a ceiling fan with light. Never assume a circuit breaker is off based solely on its labeling—breakers are frequently mislabeled, and junction boxes sometimes contain wires from multiple circuits.
Follow this verification sequence: turn off the identified circuit breaker, test your voltage tester on a known live circuit, test the ceiling wires by touching one probe to hot and the other to neutral then ground, and re-test after initial connections. This multi-step process is your only reliable protection against electrocution.
Physical safety matters too. Your ladder must be stable on a firm surface, never standing on the top two rungs. Remember that a fan falling from the ceiling can cause serious injury—making the integrity of the mounting system absolutely critical. Always wear safety glasses to protect against falling debris and work with one hand in your pocket to reduce current path through your heart if accidental contact occurs.
Identify Your Wiring Configuration
Understanding your existing wiring configuration determines your installation complexity and available control options. Electrical boxes for ceiling fans may receive power through several different arrangements.
The most basic configuration provides power directly at the ceiling box with a single cable containing black (hot), white (neutral), and ground wires. In this setup, pull chains on the fan assembly control both fan and light functions, and any wall switch may be a dummy switch or control only one function. This offers simplicity but requires pull-chain operation, inconvenient for high ceilings.
More sophisticated configurations route power through wall switches. A single-wall-switch configuration interrupts the hot wire for either the fan or light, with the other function controlled by pull chain. The most flexible arrangement provides independent wall-switch control of both fan and light, requiring three-conductor cable between switch and ceiling with black (fan switched hot), red (light switched hot), and white (neutral) conductors.
Examine cables entering your electrical box carefully before beginning work. Count the cables and identify conductors within each to determine your configuration. Take photographs of existing wiring for reference during installation—this documentation proves invaluable when disconnecting and reconnecting wires.
Prepare the Electrical Box
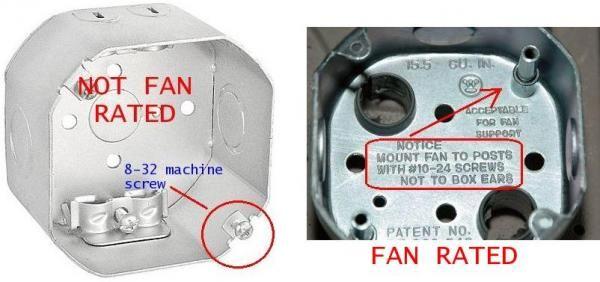
Your electrical box must be specifically rated for fan support, as standard boxes designed for light fixtures cannot safely handle dynamic loads. Fan-rated boxes either mount directly to a ceiling joist or use a support brace spanning between joists, with ratings supporting fans weighing 35 to 70 pounds.
If your existing box isn’t fan-rated, it must be replaced. Locate the circuit breaker controlling the ceiling location, turn it off, and verify power disconnection. Remove the existing fixture and examine the current box for labeling like “For Use With Ceiling Fans.” Standard boxes have mounting holes unsuitable for fan support and must be replaced.
Installing a fan-rated box in existing ceilings requires either accessing a ceiling joist directly or installing a support brace spanning between joists. Insert the brace through the ceiling hole and expand it until it contacts and engages both joists securely. Follow manufacturer instructions for your specific brace model to ensure proper installation.
Install the Mounting Bracket
The mounting bracket creates the physical connection between the electrical box and fan motor assembly. Position it against the fan-rated box, align mounting holes, and secure with provided screws. These should be tightened firmly but not overtightened, which could strip threads or crack the bracket.
Verify the bracket is perfectly level before proceeding—use a spirit level to check. Many brackets include a temporary hanging hook that allows you to suspend the fan motor assembly while making electrical connections. If your bracket has this feature, ensure it can support the fan’s weight before letting go of the motor.
For down-rod mounted fans, the bracket includes a hook or ball mounting point that accepts the down-rod ball. Ensure the assembly is fully engaged and cannot release before letting go of the fan motor—the consequences of a falling fan include property damage and personal injury.
Connect Electrical Connections Properly
With the bracket installed, prepare to make electrical connections that power both fan motor and light kit. Strip approximately 3/8 to 1/2 inch of insulation from each conductor, avoiding nicks in copper wires that create weak points.
Organize wires by function: house wiring (black/hot, white/neutral, ground) and fan wiring (black/motor hot, blue/light hot, white/motor neutral, green/ground). Make ground connections first—connect all bare copper or green wires together and to the bracket ground screw. Ground connections are critical for safety.
Connect neutral wires by joining the house white wire with the fan motor white wire and light kit white wire. Use appropriate wire connectors—push wires together with stripped ends aligned, twist the connector clockwise until secure, and gently tug each wire to confirm solid connections. Connect hot wires according to your control configuration: house black to fan black for basic operation, with house red connecting to the light blue wire for separate light control.
Assemble and Mount the Fan
With electrical connections complete, mount the fan motor assembly to the bracket. For down-rod mounts, thread the down-rod into the fan motor hub and secure with set screws on the motor housing. The down-rod should thread in fully until flush with the hub top, then tighten set screws to prevent loosening.
Lift the fan assembly and engage the down-rod ball with the bracket mounting point, ensuring it’s fully engaged before letting go. Secure the canopy to the bracket using provided screws, tightening until flush against the ceiling with no visible gaps.
Install fan blades by attaching blade arms to the motor hub first, then mounting blades to the arms. Ensure all screws are tightened securely but not overtightened, which can crack blade arms or warp blades. Check that all blades are at the same distance from the ceiling to minimize vibration.
Install the Light Kit
Most light kits connect to the fan’s light wiring through plug-in connectors that click together when properly seated. Ensure correct orientation as these connectors are typically keyed to prevent incorrect installation.
For direct-wire connections, match the light kit hot wire (typically black or blue) to the fan light hot wire and the light kit neutral (white) to the fan light neutral. Make these connections with wire connectors, ensuring stripped wire ends are fully covered. Install appropriate light bulbs, noting maximum wattage ratings—never exceed these as overheating creates fire hazards.
Test Your Installation
Restore power at the circuit breaker to test your work. Test the fan at each speed setting, listening for unusual noises, excessive vibration, or wobbling. Test the light at all control points—wall switches, pull chains, and any remote control.
If the light fails to operate, verify bulbs are installed correctly and functioning, pull-chain switches are on, and all wire connections are secure. Listen carefully for clicking or grinding sounds that might indicate mechanical interference—some noise during initial operation is normal, but persistent issues require investigation.
Verify all mounting hardware remains tight after the first few hours of operation. Check that the canopy is flush against the ceiling with no gaps, and ensure no wires are visible outside the electrical box.
Troubleshooting Common Issues

Wobble is the most frequent issue with installed ceiling fans, typically caused by blades mounted at different angles or distances from the ceiling. To diagnose wobble, turn off the fan and visually inspect blade angles, adjusting any blades not parallel to others. Check that all blade screws are tight and blade arms are securely mounted.
If wobble persists, the fan may be out of balance. Most fans include balancing kits with adhesive weights—attach a weight to a blade center, test operation, and reposition until wobble minimizes. Light flickering may result from loose bulb connections or incompatible dimmer switches—verify bulbs are firmly seated and appropriate for the fixture.
Fans that won’t start or run at only one speed often indicate capacitor failure. Remote control malfunctions typically stem from dead batteries or signal interference—replace the remote battery and ensure no obstructions exist between remote and receiver.
Extend Your Installation with Smart Options
Modern technology offers paths to integrate your ceiling fan with smart home systems. Smart switches replace traditional wall switches and provide control through apps and voice assistants. These typically require neutral wire connections at the switch location, which may not exist in older construction.
Smart modules installed in the fan canopy provide similar functionality while maintaining existing wall switches. Voice assistant integration through Amazon Alexa, Google Assistant, or Apple HomeKit allows control through smart speakers. Verify compatibility before purchasing if smart features are important to your installation goals.
Leave a Reply