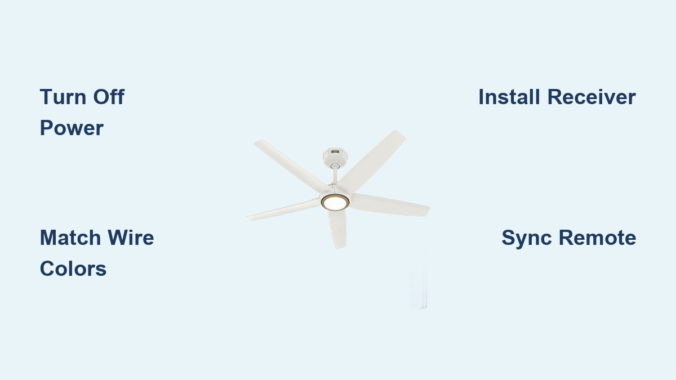
Installing a ceiling fan with remote control functionality transforms your home comfort experience, eliminating the need for pull chains and wall switches. The ability to adjust fan speed and lighting from your couch or bed adds significant convenience to daily living. However, correctly wiring a ceiling fan with remote control requires careful attention to electrical safety and proper configuration. Whether you’re installing a new fan or retrofitting an existing one, this guide provides the essential steps to wire your ceiling fan with remote control correctly and safely. Understanding the relationship between the receiver module, handheld remote, and your home’s electrical system ensures reliable operation for years to come.
Critical Safety Steps Before Wiring Your Remote-Controlled Fan
Verify Power Disconnection at the Circuit Breaker
Never begin fan installation without confirming the circuit is completely de-energized. Turn off the breaker controlling the fan circuit—don’t rely on wall switches alone, as they only interrupt one conductor. After switching off the breaker, use a non-contact voltage tester to verify all wires in the ceiling box are dead. Test the tester on a known live circuit first to ensure it’s working, then methodically check all conductors before touching them. If your tester indicates voltage, return to the breaker panel and identify the correct circuit before proceeding.
Essential Tools and Preparation Checklist
Gather these tools before starting: wire strippers, flat-head and Phillips screwdrivers, appropriately sized wire connectors, electrical tape, and your voltage tester. Inform household members you’re working on the electrical system to prevent accidental breaker resets. Before installing the remote receiver, set the fan’s pull chains to HIGH speed and turn the light ON—this ensures the fan’s internal controls are in the proper state for the remote system to take over. Fans with manual speed control require the chain set to HIGH or the remote may not access all speed settings.
Identifying Your Ceiling Wiring Configuration
Standard Single-Switch Wiring Setup
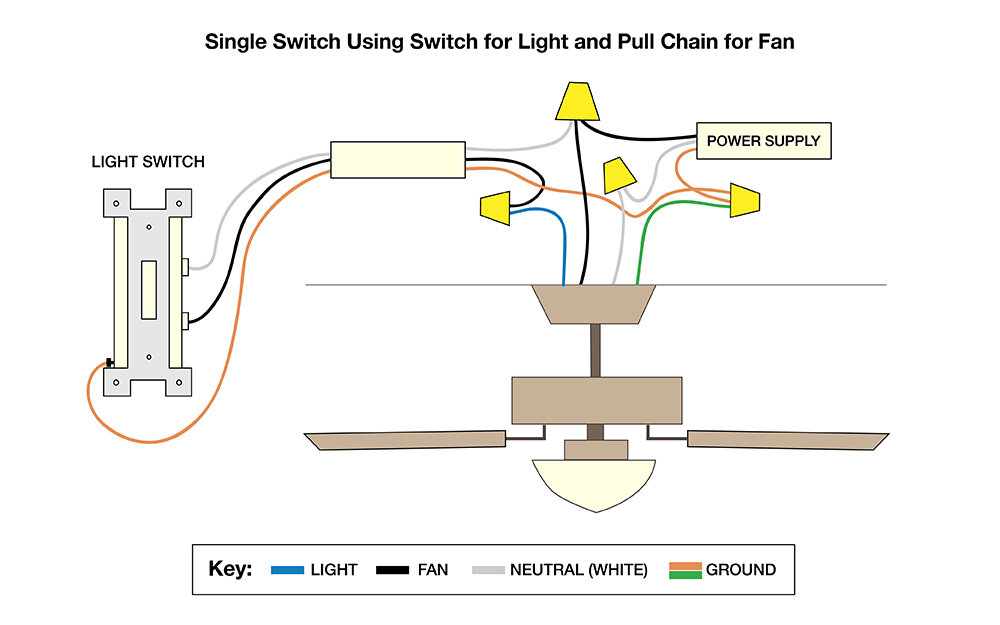
Most ceiling boxes contain four wires: black (hot), white (neutral), bare copper or green (ground), and sometimes red (switched hot). The fan itself has corresponding wires: black for motor, blue for light, white neutral, and green ground. In single-switch installations (only black, white, and ground wires present), the remote receiver controls both fan and light functions. You cannot independently control the light from a wall switch without running new 3-conductor wire.
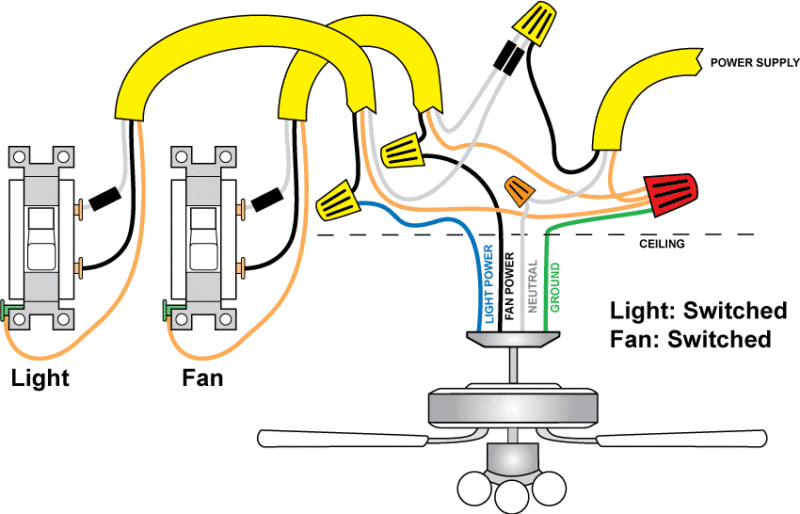
Dual-Switch Configuration Identification
Homes with two wall switches controlling the same fixture have more complex wiring, typically using 3-conductor cable between switch and ceiling boxes. One switch usually controls the fan motor while the other controls the light kit. Critical verification step: check which wire serves which function before disconnecting anything. Some installations reverse the standard convention—red ceiling wire might connect to fan motor while black controls light. Always verify your existing wiring configuration against the documentation for your specific fan and remote system.
Remote Receiver Installation Process
Correct Receiver Placement and Orientation
Install the receiver module in the fan’s canopy before making electrical connections. For new installations, insert the receiver into the mounting bracket with the antenna end facing into the bracket first and the flat side facing the ceiling. This orientation ensures proper signal reception and fits within canopy space constraints. Never compress or fold the antenna—this significantly reduces wireless range and reliability. For retrofit installations, lower the canopy by removing screws or retaining clips, then disconnect existing wire connections before proceeding.
Input Wiring Connections: Powering the Receiver
Begin by connecting all grounding conductors: join the green wire from the downrod, green/bare wire from the mounting bracket, and bare/green supply wire using a wire connector. Next, connect the white ceiling wire to the white input wire on the remote receiver—this provides the neutral return path. Finally, connect the black ceiling wire to the black input wire on the receiver (labeled “AC IN L”), providing primary power. In dual-switch configurations, the black typically provides constant power while red serves as switched, though this varies by installation.
Output Wiring Connections: Connecting to Fan Components
On the output side, connect the blue receiver wire (labeled “FOR LIGHT”) to the blue fan wire controlling the light kit. Connect the black receiver output wire (labeled “TO MOTOR L”) to the black fan wire controlling the motor. Some receivers have additional output wires for specific functions—cap off any unused wires with wire nuts. Pro tip: wrap electrical tape around each wire connector down to the wire itself for additional security and strain relief. Carefully push connections into the outlet box, placing white connections opposite black/blue wires to reduce potential interference.
Dual-Switch Configuration Wiring Options

Maintaining Independent Switch Control with Remote
For homes with two wall switches, you can maintain one switch as a master power source while using the remote for most functions. Connect the white ceiling wire to both the white receiver input and fan white wire. Connect the black ceiling wire (constant hot) to the black receiver input. On the output side, connect the blue receiver wire to the blue fan wire and the red ceiling wire to the black fan wire.
Critical functionality note: One wall switch must remain ON to power the receiver, while the other switch directly controls the fan motor. When this second switch is OFF, the fan won’t run regardless of remote commands, though the light may still function. When both switches are ON, the remote has full control.
Alternative Configuration for Light Switch Independence
If you prefer manual light control with remote fan operation, reverse the functions. Connect the black ceiling wire to the black receiver input, the red ceiling wire to the blue receiver output (light control), and the blue receiver output to the black fan wire (motor control). This setup allows the remote to control fan speed while the light operates independently from the wall switch—a practical solution for those who frequently adjust lighting but want fan speed convenience.
Remote Synchronization Process
Initial Pairing and Troubleshooting
Most remotes sync with receivers at the factory, but power surges or battery changes can disrupt this connection. If the remote LED illuminates but the fan doesn’t respond, resynchronize by turning power OFF at the breaker, then restoring power. Within 30 seconds, press and hold both HIGH and LOW SPEED buttons (or the LEARN button) for 5 seconds. The fan should turn on at low speed with lights off, confirming successful pairing.
Addressing Common Remote Issues
If the LED doesn’t illuminate when pressing buttons, check battery orientation—most remotes require positive poles facing up. Replace with fresh CR2032 batteries if needed. For rapid battery drain, inspect for stuck buttons that continuously draw power. If the remote controls multiple fans, desynchronize unintended fans by turning off their power during the synchronization process for your desired fan.
Troubleshooting Common Wiring Problems
Fan Won’t Operate at High Speed
This common issue usually occurs because the pull chain speed setting overrides remote commands. Many fans require the manual pull chain to be set to HIGH SPEED for the remote to access all speed settings. Check the chain position with a ladder—if set to LOW or MEDIUM, the remote cannot override this limitation.
Light Function Not Working
Verify the light is switched ON at the remote (separate button from fan control). Check bulb compatibility—non-dimmable LED or CFL bulbs may not function with standard dimming systems. Inspect wiring connections between the receiver’s blue output and fan light wire. Crucial check: ensure the wall switch is in the ON position, as the receiver requires constant power to operate.
Remote Range and Consistency Issues
If the remote works intermittently, ensure the receiver’s antenna hangs freely without compression. Metal objects between remote and receiver can interfere with signals—avoid storing items on top of the canopy. Electrical interference from other devices may also cause issues; try resynchronizing the remote or consult manufacturer support for frequency adjustment options if available.
Critical Power Requirements You Must Know
Wall Switch Position Requirements
This is the most commonly overlooked requirement: the wall switch must remain in the ON position at all times for the remote control system to function. When the switch is OFF, power is completely disconnected from the receiver, making the fan and light inoperable regardless of remote battery status. In dual-switch configurations, ensure at least one switch provides constant power to the receiver while the other may control a specific function.
Battery Specifications and Maintenance
Standard ceiling fan remotes use CR2032 lithium coin cell batteries (typically two). Lithium batteries last longer than alkaline and perform better in temperature variations. Under normal use, batteries last 6-12 months—replace when the LED indicator dims or fails to illuminate. Keep spare batteries on hand to avoid inconvenience when the remote stops functioning.
Long-Term Performance Tips
Regular Maintenance Practices
Inspect the remote periodically for stuck buttons, debris in crevices, and battery leakage. Clean with a soft, dry cloth—avoid moisture that could damage internal components. Check the receiver module annually for loose wire connections, as vibration from fan operation can occasionally cause connectors to loosen over time.
Independent Light Control Solutions
If running new wiring isn’t practical but you want independent light control, consider Lutron fan/light controls that work with existing wiring. These replace standard switches and provide intuitive control without remote batteries. Another effective solution mounts the remote receiver’s bracket directly over the existing light switch, keeping the switch ON while using the remote for both functions—a setup users report success with for multiple years.
Final Note: Properly wiring a ceiling fan with remote control delivers years of convenient comfort when installed correctly. By following these safety protocols, understanding your specific wiring configuration, and maintaining proper power requirements, you’ll enjoy seamless wireless control of your fan and lighting without common installation pitfalls. Remember to keep spare CR2032 batteries on hand and periodically check connections for optimal long-term performance.
Leave a Reply