Your Minka Aire ceiling fan suddenly stopping mid-rotation disrupts airflow in your home and creates unnecessary frustration, especially during extreme weather. Whether your fan won’t start at all, operates erratically, or only the light fixture has failed while the blades remain motionless, understanding the systematic approach to diagnosing these issues saves you time, money, and the inconvenience of waiting for professional service. This comprehensive guide provides step-by-step troubleshooting techniques specifically for Minka Aire ceiling fans that have stopped working, helping you identify whether the problem requires a simple DIY fix or professional intervention.
Verify Electrical Power to Your Minka Aire Fan
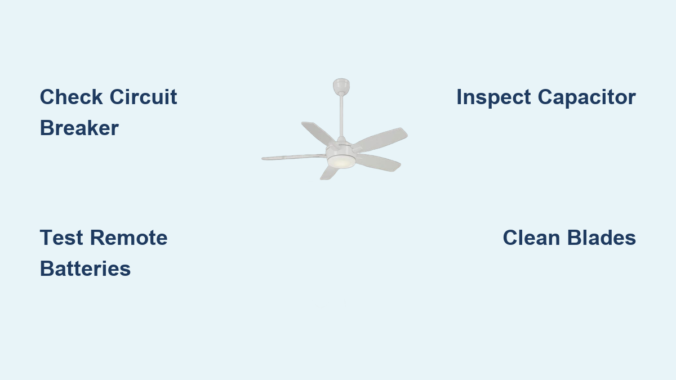
Before dismantling your ceiling fan, confirm that electricity actually reaches the unit—a step that resolves many “not working” complaints in under five minutes without tools.
First, check your home’s electrical panel for a tripped circuit breaker controlling the fan circuit. Locate the breaker labeled for your living area or specifically for ceiling fans (some homes have dedicated circuits). If the breaker has shifted to the middle position or shows a red indicator, flip it completely to the OFF position before firmly switching it back to ON. This reset process clears temporary overloads that commonly cause fans to stop working after power surges or when multiple appliances share the same circuit.
Next, test the wall switch controlling your Minka Aire fan. Many homeowners mistakenly believe their fan has failed when the actual issue lies with the wall switch. Toggle the switch several times while listening for any clicking sounds from the fan housing. If the switch feels loose or produces no audible feedback, remove the switch plate and check for loose wire connections at the switch terminals—this simple fix resolves numerous fan operation issues.
For remote-controlled Minka Aire models, replace the remote’s batteries with fresh ones. Weak batteries often cause intermittent operation that homeowners misdiagnose as fan failure. After installing new batteries, point the remote directly at the fan’s receiver unit (typically located in the canopy housing) and press buttons while observing for any indicator lights. No response despite fresh batteries suggests either remote pairing issues or problems with the receiver module.
Interpret Minka Aire Fan Indicator Light Signals
Minka Aire ceiling fans with integrated control systems communicate diagnostic information through LED indicator lights, providing crucial clues about why your fan has stopped working.
When you restore power but see no indicator lights whatsoever, the problem exists somewhere between your home’s electrical system and the fan’s receiver. This complete absence of lights typically indicates a wiring connection failure at the ceiling junction box, a blown fuse within the fan’s internal circuitry, or a completely failed receiver module that requires replacement.
Blinking or flashing light patterns convey specific fault conditions. A single blink might indicate the remote control is in pairing mode or experiencing signal reception issues, while rapid continuous blinking often signals motor overheating protection activation or capacitor failure. Different Minka Aire models use specific color codes—amber or red lights typically indicate faults, while green lights denote normal operation—so consult your model’s documentation for precise pattern interpretations when lights don’t match common failure scenarios.
Solid indicator lights that remain constantly illuminated without fan operation suggest the control system receives power but fails to initiate motor rotation. This situation most frequently points to capacitor failure, motor winding issues, or physical obstruction within the fan mechanism preventing proper startup. Before proceeding to internal components, ensure no objects obstruct blade rotation and verify all blade arms remain securely attached.
Remote Control System Troubleshooting

Remote control malfunctions represent one of the most frequent reasons homeowners believe their Minka Aire ceiling fan has failed when the actual problem lies with the control system.
Perform a hard reset of the remote control system by cutting power at the circuit breaker for 5-10 minutes. During this period, press and hold multiple buttons on the remote to discharge residual power. After restoring power, immediately attempt to operate the fan—many Minka Aire models enter automatic pairing mode during the first 30 seconds after power restoration, allowing the receiver to re-establish communication with the transmitter.
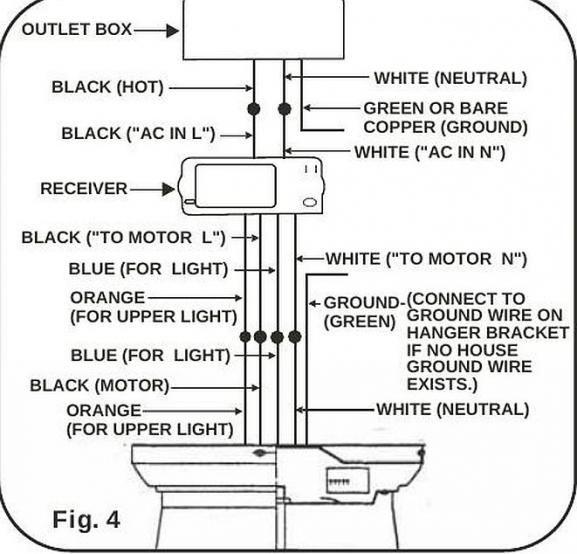
If the remote still fails to respond, examine the receiver module inside the fan’s canopy housing. Some models allow you to temporarily bypass the receiver by connecting the fan’s motor wires directly to the house wiring (with power completely shut off at the breaker). If the fan operates when bypassing the receiver, the remote system requires replacement rather than the fan motor itself. Always label wires and take photos before disconnecting anything to ensure proper reconnection.
Electromagnetic interference from nearby devices can disrupt remote operation. Cordless phones, WiFi routers, and baby monitors operating on similar frequencies may prevent your remote’s signal from reaching the receiver. Test operation when potential interference sources are powered off, or consider having an electrician install a remote receiver operating on a different frequency.
Diagnose Motor and Capacitor Failures
When power reaches your Minka Aire fan and remote controls function properly but the blades refuse to spin, internal motor components—particularly the capacitor—typically require attention.
Capacitor failure prevents the motor from generating the initial rotational force needed for startup. Telltale signs include fans that hum when switched on but don’t spin, blades requiring manual pushing to start rotating, or fans that run at reduced speeds despite maximum settings. Failed capacitors often show visible swelling, leakage, or burn marks, though internal failures sometimes occur without external symptoms.
Capacitor replacement represents an affordable and straightforward repair for many DIYers. When purchasing a replacement, ensure the microfarad (mFD) rating and voltage specifications match your original component exactly—incorrect ratings can damage your fan’s motor or create safety hazards. Always shut off power at the breaker and verify its absence using a non-contact voltage tester before accessing internal components.
Remove the fan’s canopy cover to expose wiring connections and locate the capacitor—typically a cylindrical component mounted near the motor. Photograph the wiring configuration before disconnecting anything, then carefully remove the failed capacitor and install the replacement with identical wire connections. This repair costs under $20 and takes most homeowners less than 30 minutes to complete.
Inspect Mechanical Components for Obstructions
Physical obstructions or installation problems can prevent fan operation even when electrical systems function correctly. Thorough mechanical inspection often reveals issues electrical troubleshooting alone would miss.
Examine fan blades for visible damage, warping, or heavy dust accumulation that could impede rotation. Warped blades create imbalance that the motor’s protection systems detect, causing it to refuse startup to prevent damage from excessive vibration. Clean blades with a damp cloth, checking for straightness by viewing them edge-on from across the room. Significantly curved blades require replacement to restore proper operation.
Verify all blade arms remain securely attached to both the blade and motor hub. Loose mounting screws allow blades to shift out of alignment, creating imbalance issues similar to warped blades. Tighten all visible screws on blade arms carefully—overtightening can strip screw holes in plastic components.
Test the motor hub and bearing assembly by attempting to rotate the fan blades by hand. Rotation should feel smooth with minimal resistance and produce only a soft whirring sound. Grinding, scraping, or rough spots indicate bearing failure that typically requires motor replacement rather than repair. Check the motor shaft for visible rust, corrosion, or debris accumulation that could impede rotation.
Address Light Kit Specific Issues
When your Minka Aire ceiling fan operates normally but the integrated light fixture has stopped working, the problem isolates to the lighting circuit rather than the fan motor itself.
Begin light kit troubleshooting by installing a fresh bulb in the affected socket—bulbs fail without warning and testing with a known-working bulb eliminates the simplest explanation. If multiple bulbs have stopped simultaneously, check whether your model uses a separate transformer or driver component that may have failed. Some Minka Aire models feature integrated LED modules rather than replaceable bulbs, requiring whole-module replacement when they fail.
Examine light kit wiring connections within the fan housing, ensuring all wire nuts remain secure and no connections have pulled loose from vibration over time. Corroded or loose connections prevent power delivery to lighting components even when the fan motor receives adequate power. Clean any corrosion from wire connections and re-secure connections with fresh wire nuts if needed.
Verify that light control buttons function by observing whether indicator lights on the control respond when pressed. If light control appears dead while fan control works, the control system likely has separate circuit paths with one having failed while the other remains functional.
When to Call a Professional Electrician

Certain Minka Aire ceiling fan problems require professional expertise to prevent personal injury and additional equipment damage. Recognize these situations to avoid dangerous DIY attempts.
Any situation involving exposed wiring, damaged insulation, or burnt electrical components demands professional inspection. These signs indicate potential fire hazards that improper handling could exacerbate. Similarly, fans that have experienced water exposure—whether from roof leaks, cleaning accidents, or humidity condensation—need professional evaluation because internal corrosion and electrical damage may not be immediately visible.
Motor replacement, bearing servicing, and complex internal component repairs generally exceed the cost-benefit threshold for DIY intervention. Replacement motors from Minka Aire often cost less than professional labor for complex repairs, and installation typically requires only basic tools and electrical knowledge. When troubleshooting indicates motor failure rather than capacitor or control issues, replacement often makes more sense than repair.
If your Minka Aire ceiling fan remains under warranty, contact Minka Aire customer support before attempting any repairs. Unauthorized modifications or DIY repairs may void warranty coverage, and the manufacturer can provide replacement parts or arrange service at no cost for covered issues. Keep your proof of purchase and model information readily available when contacting support.
Prevent Future Minka Aire Fan Failures
Regular maintenance extends your Minka Aire ceiling fan’s operational lifespan and prevents many common failure modes. Establishing a simple maintenance routine takes minimal time but yields significant benefits in reliability.
Clean fan blades monthly using a lint-free cloth, removing dust accumulation that creates imbalance and motor strain over time. During cleaning, inspect blade screws for tightness and check for damage. Annually inspect all visible electrical connections, tightening loose wire connections and looking for signs of corrosion or overheating.
Schedule professional inspection and service every three to five years, particularly for fans that operate continuously or in challenging environments. Professional technicians can identify developing bearing wear, capacitor degradation, and other issues before they cause complete failure, potentially saving the cost of emergency service calls.
Leave a Reply