Yellowed or cracked ceiling fan light globes can transform your once-inviting space into a dull, unappealing area that feels outdated and neglected. Replacing these worn components gives you an instant room refresh without the expense of buying a whole new fan—typically costing under $50 and taking less than thirty minutes to complete. When you replace ceiling fan light globes, you’re not just fixing a cosmetic issue; you’re restoring optimal light diffusion that reduces harsh glare and creates a more comfortable atmosphere for everyday living.
Over time, constant exposure to heat from bulbs causes many glass shades to yellow, significantly diminishing light output and casting an unflattering amber tint throughout your room. This gradual deterioration often goes unnoticed until you compare it to a newer fixture elsewhere in your home. The good news is that swapping out these compromised globes requires no electrical expertise and minimal tools, making it one of the most accessible home improvement projects you can tackle this weekend.
Cracked or Yellowed Globes Need Immediate Replacement
Hairline fractures in your ceiling fan light globes signal an urgent replacement need before they escalate into complete breakage. These tiny cracks form at stress points and expand over time due to regular fan vibration, eventually causing the globe to shatter unexpectedly—sending glass fragments raining down on furniture or people below. Even minor chips create weak spots that compromise the structural integrity of the entire shade, making replacement essential for safety rather than just aesthetics.
Yellowed glass represents the most common sign that it’s time to replace ceiling fan light globes, especially with older incandescent bulbs that generate significant heat. This discoloration isn’t merely cosmetic; it reduces light transmission by up to 30%, forcing you to use brighter bulbs or additional lighting to achieve the same illumination level. The amber tint also distorts colors in your space, making whites appear dingy and vibrant hues look washed out—a subtle effect that gradually impacts your entire room’s ambiance without you realizing the cause.
Precise Measurements Ensure Perfect Fit
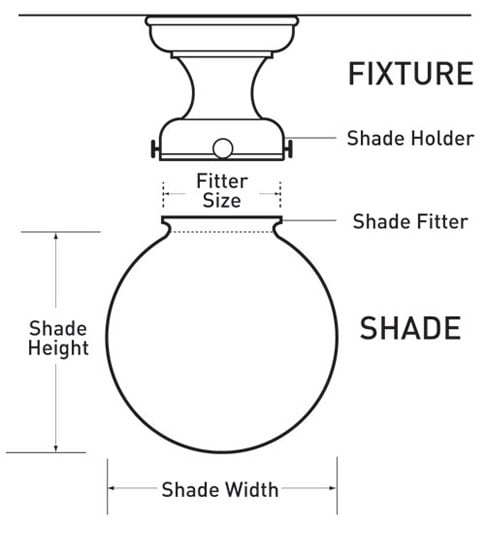
Measuring your current ceiling fan light globes accurately prevents frustrating returns and wasted trips to the hardware store. Start by determining the fitter opening diameter—the critical measurement where the glass connects to the metal holder. Most multi-light configurations use a standard 2.25-inch opening for individual shades, while larger bowl-style globes typically accommodate 8-inch or 10-inch openings. Use a tape measure to record this dimension precisely, as even a 1/4-inch discrepancy can prevent proper seating of your new replacement.
Don’t overlook height clearance when measuring for replacement ceiling fan light globes. Some fan designs position the light kit close to the motor housing, limiting how tall your new shade can be without interfering with pull chains or fan blades. Measure from the fitter mounting surface to the lowest obstruction point, then compare this against potential replacements. Tall shades that contact moving parts create annoying noise, excessive vibration, or even safety hazards that compromise your entire fixture.
Capture Multiple Angles Before Shopping
Take clear photographs of your existing fixture from several perspectives before heading to the store or browsing online. Include close-ups of the fitter mechanism, mounting hardware, and any decorative finials. These images provide crucial context that helps store associates or online retailers identify compatible replacements even when you don’t know your fan’s exact model number. If possible, remove one shade temporarily to photograph the empty fitter—this reveals details often hidden when the globe is in place.
Match Glass Finish to Your Room’s Purpose
Clear glass replacement ceiling fan light globes maximize brightness for task-oriented spaces like kitchens and home offices where sharp visibility matters. These transparent shades deliver the highest light transmission but create sharper shadows and potential glare at eye level, which may feel harsh in relaxation areas. Choose clear glass when you need maximum illumination for detailed work or when pairing with decorative filament-style LED bulbs for vintage appeal.
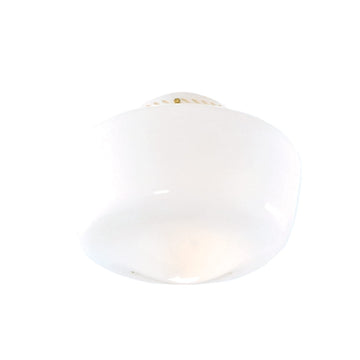
Frosted and linen glass options diffuse light more evenly for comfortable ambient lighting in living rooms and bedrooms. These finishes eliminate hot spots while maintaining good overall brightness—perfect for spaces where creating a warm, inviting atmosphere takes priority over maximum illumination. White and opal glass provide similar diffusion benefits with slightly higher light output than warmer-toned alternatives, making them versatile choices for most residential applications.
Create Cozy Atmospheres with Warm Tones
Amber and tea stain glass shades transform your ceiling fan into a source of warm, inviting illumination perfect for evening relaxation. These finishes reduce overall light transmission slightly while raising the perceived warmth of the illumination, making spaces feel intimate and comfortable. Pair amber globes with warm white LED bulbs (2700K-3000K) to enhance this cozy effect in dining areas, media rooms, or bedrooms where you want to wind down after a long day.
Gather These Tools Before Starting
Assemble these essential tools before attempting to replace ceiling fan light globes to ensure a smooth, uninterrupted process:
- Sturdy step ladder tall enough to reach your fixture comfortably without overreaching
- Non-contact voltage tester to verify power is completely off before touching components
- Soft microfiber cloth to handle glass without scratching or leaving fingerprints
- Screwdriver set (Phillips and flathead) for stubborn mounting hardware
- Needle-nose pliers for gripping small thumb screws or positioning washers
Keep your new replacement ceiling fan light globes unboxed and ready before beginning the removal process. Organize mounting hardware in a small container to prevent small screws from rolling away during installation. Having a helper available adds an extra safety margin, though this project remains manageable for solo completion with proper preparation.
Verify Power Is Completely Off
Never assume the ceiling fan is de-energized based solely on switch positions—always confirm with a non-contact voltage tester. Locate your electrical panel and flip the circuit breaker controlling the fan to the OFF position. Test the wall switch to ensure the fan and lights no longer respond, then use your voltage tester near the fixture to confirm no electrical current remains.
Critical safety warning: Touching live components while replacing ceiling fan light globes can cause severe electrical shock or electrocution. If your voltage tester indicates power is still present after turning off the breaker, do not proceed—consult a licensed electrician before continuing. Inform household members about your work to prevent accidental power restoration during the project.
Remove Old Globes Without Breakage
Support the existing globe with one hand while loosening mounting screws with the other—never let the glass hang by a single screw. Most fixtures use thumb screws that loosen by turning counterclockwise, but some require screwdriver assistance. Work slowly and evenly, alternating between screws if multiple retention points exist to prevent uneven stress on the glass.
As screws loosen, the globe may shift unexpectedly, making your supporting hand crucial for controlled lowering. Carefully lower the old shade straight down and away from the fixture, then set it aside on a protected surface. Inspect the empty fitter for corrosion, rust, or damage—if the mounting surface appears compromised, consider replacing the entire light kit rather than just the glass component for secure installation of your new replacement ceiling fan light globes.
Secure New Globes Without Cracking

Position your new replacement ceiling fan light globes fully within the fitter holder with the rim resting evenly against the mounting surface. Hand-tighten mounting screws using a star pattern—alternate between opposite screws rather than tightening sequentially—to distribute pressure evenly across the glass edge. This technique prevents stress concentrations that cause spontaneous breakage weeks after installation.
Critical installation tip: Avoid overtightening screws at all costs—the globe should feel secure with moderate hand pressure only. Excessive force creates microscopic stress fractures that eventually lead to breakage. Test your installation by gently attempting to rotate the shade; it should remain firmly in position without any movement or wobbling. Once satisfied, restore power and test the fixture operation before considering the project complete.
Pair Globes with Energy-Efficient Bulbs
Select LED bulbs specifically designed for ceiling fan use when replacing ceiling fan light globes—they generate significantly less heat than incandescent alternatives, extending both bulb and globe lifespan. Match the bulb base type (typically medium E26) and stay within the maximum wattage rating specified for your light kit (usually 60 watts equivalent).
Choose warm white bulbs (2700K-3000K) for living areas and bedrooms where cozy atmospheres matter, and cooler white bulbs (3500K-4100K) for task-oriented spaces like kitchens and home offices. Amber and tea stain glass shades pair perfectly with warm white LEDs to enhance their inviting glow, while clear and opal finishes work well across the color temperature spectrum depending on your room’s primary function.
Prevent Future Damage with Proper Care
Maintain your newly installed replacement ceiling fan light globes with monthly dusting using a soft microfiber cloth or electrostatic duster. For deeper cleaning, remove the shade following the installation process and wash with mild dish soap diluted in warm water—never use abrasive cleaners or paper towels that can scratch the surface.
Maintenance schedule:
– Monthly: Quick dusting while globes remain installed
– Quarterly: Thorough cleaning with gentle soap solution
– Annually: Inspect mounting hardware for loosening
– As needed: Replace any damaged globes immediately
Check glass surfaces regularly for chips, cracks, or stress marks that could compromise structural integrity. Store original packaging from new globes in a safe location for future reference or potential returns. Proper maintenance extends the life of your replacement ceiling fan light globes while preserving optimal light quality and appearance.
Leave a Reply