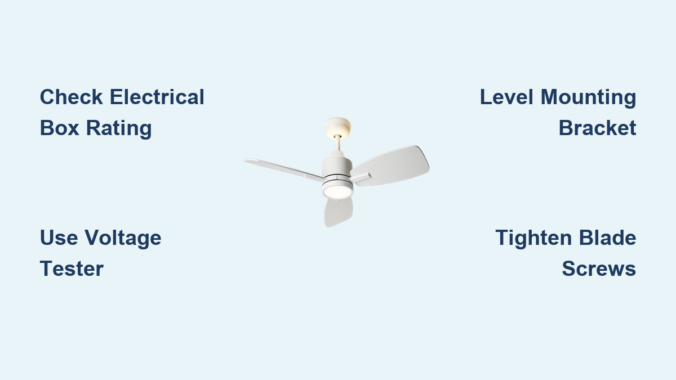
Nothing ruins a DIY victory faster than a wobbling ceiling fan that sounds like a helicopter taking off. When you’ve chosen a Taloya ceiling fan for your living room or bedroom, proper installation determines whether you’ll enjoy silent operation for years or spend weekends troubleshooting annoying vibrations. This guide reveals the exact steps Taloya-certified installers follow to mount these fans correctly the first time—without dangerous electrical mistakes or frustrating wobble issues that send many homeowners scrambling for professional help.
Most Taloya ceiling fan problems stem from skipped preparation steps rather than complex technical failures. By understanding the specific requirements of Taloya’s mounting system and electrical connections, you can complete your installation safely and confidently. Whether you’ve purchased a 42-inch model with integrated lighting or a simpler fan-only version, this guide covers every critical step from verifying your electrical box rating through final testing.
Why Your Existing Electrical Box Might Fail During Taloya Fan Installation
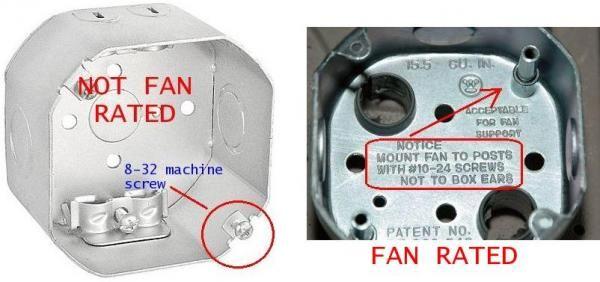
Standard electrical boxes designed for lightweight fixtures cannot handle the vibration and weight of a running ceiling fan. When installed in an inadequate box, your Taloya fan may develop dangerous wobbling or, worse, detach completely from the ceiling. This isn’t theoretical—improper mounting causes thousands of ceiling fan accidents annually.
How to Identify a Non-Fan-Rated Electrical Box in Seconds
Look for a stamped rating label on your existing electrical box that says “Acceptable for Fan Support” or lists a weight capacity of at least 50 pounds. If you see no label or it specifies “For Lighting Fixtures Only,” you need a replacement before proceeding. Never install a Taloya ceiling fan in a box not explicitly rated for fan support—the risk of failure increases dramatically with each use.
Replacing Your Electrical Box: When DIY Becomes Dangerous
Installing a new ceiling fan-rated electrical box requires cutting ceiling material, fishing new cable, and making panel connections—tasks that often exceed DIY capabilities. If your home has aluminum wiring or knob-and-tube systems, special procedures and connectors are mandatory for safe operation. When in doubt, schedule a professional assessment before starting your Taloya ceiling fan installation.
Must-Have Tools for Safe Taloya Ceiling Fan Installation (No Trips to the Store)
Gathering complete tools before starting prevents dangerous ladder climbs mid-installation. Taloya ceiling fan installation requires more than basic screwdrivers—specialized tools ensure secure connections and safe handling of heavy components.
The Voltage Tester: Your Most Important Safety Tool
Always verify power is off at the circuit breaker using a voltage tester before touching any wires. Simply turning off the wall switch isn’t sufficient, as ceiling fans connect directly to house wiring. Test both wire leads and existing connections—any indication of live current means you must stop immediately and consult an electrician.
Why Standard Light Fixture Tools Won’t Suffice for Taloya Fans
Unlike light fixtures, Taloya ceiling fans require wire strippers for precise electrical connections and pliers for twisting secure wire nuts. The fan’s weight demands a sturdy ladder rated for at least 300 pounds, plus a helper to hold the assembly during mounting. Attempting solo installation often leads to dropped components or unsafe balancing acts on ladders.
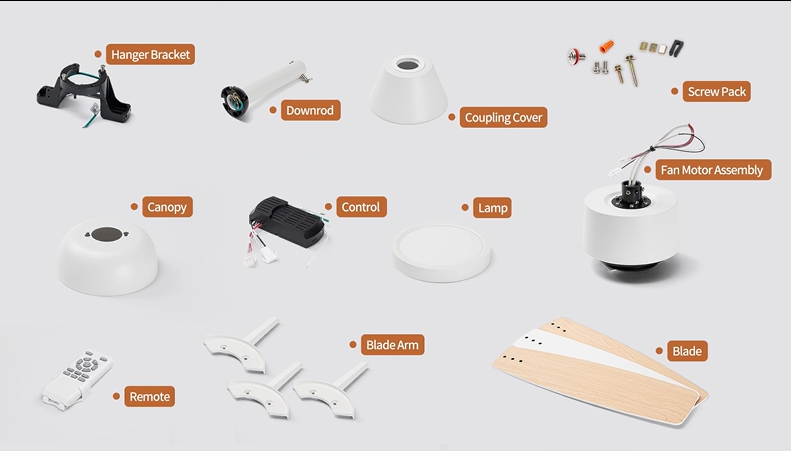
How to Verify Your Taloya Fan Package Has All Necessary Components
Missing parts derail installations when you’re halfway through assembly. Before removing packaging materials, verify all components against your model’s parts list—this simple step prevents frustration when you discover a missing downrod coupling or remote control receiver.
Critical Missing Parts That Delay Taloya Installation
Your package must include the motor assembly, blades (typically 4-5), mounting bracket, canopy, hardware kit, and model-specific components like downrods or light kits. If your Taloya fan includes lighting, confirm the presence of all glass shades, diffusers, and appropriate bulbs. Never substitute missing hardware—improper screws can strip threads or create unsafe mounting points.
When to Contact Taloya Support Before Starting Installation
If components are missing or damaged, contact Taloya support immediately with your model number and proof of purchase. Most manufacturers ship replacement parts within 48 hours, but attempting repairs with non-standard hardware voids your warranty and creates safety hazards. Keep all packaging until you’ve completed successful installation testing.
Step-by-Step: Securing the Mounting Bracket for Wobble-Free Operation
The mounting bracket is your Taloya ceiling fan’s foundation—any instability here guarantees wobble during operation. Proper attachment requires precise alignment and secure fastening to the electrical box’s mounting points.
Leveling the Mounting Bracket: The Secret to Silent Operation
After positioning the bracket against the electrical box, place a carpenter’s level across it in multiple directions. An unlevel bracket creates immediate vibration that worsens at higher speeds. Adjust bracket position incrementally until perfectly level before tightening all screws completely. This extra attention prevents hours of troubleshooting later.
Testing Bracket Stability Before Hanging Your Taloya Fan
Apply firm pressure to the mounted bracket from multiple angles—any movement indicates insufficient attachment. The bracket must remain completely rigid when you shake it vigorously. If movement occurs, remove the bracket and verify electrical box integrity before reattaching with longer screws or a fan-rated box replacement.
Taloya Downrod Assembly: Avoiding the #1 Installation Mistake
Forgetting to slide the canopy onto the downrod before motor attachment is the most common Taloya installation error. This mistake forces you to disassemble everything when you realize the canopy won’t fit over the connected motor.
Proper Canopy Positioning on the Downrod
Insert the downrod through the canopy before connecting it to the motor shaft. Most Taloya models use a keyed coupling system that only allows correct alignment—never force connections. The canopy should rest at its proper position covering the motor coupling when viewed from below after installation.
Set Screw Tightening: How Tight Is Tight Enough?
Secure the downrod to the motor shaft using the provided hex wrench, tightening each set screw firmly but avoiding overtightening that might crack the coupling. The connection should feel solid with no rotation when you twist the downrod by hand. Recheck tightness after initial operation, as vibration may require slight adjustment.
Correct Wire Color Matching for Taloya Ceiling Fan Electrical Connections
Improper wiring creates immediate operational problems and serious safety hazards. Taloya follows standard color coding, but verifying each connection prevents dangerous mistakes that could damage your fan or cause electrical issues.
Why Wire Nut Security Matters More Than You Think
After twisting matching wires together (black to black, white to white, green to ground), secure connections with wire nuts and wrap each with electrical tape. Loose connections cause arcing that generates heat and fire risk—tug gently on each wire to verify it won’t pull free from the nut. Tuck wires neatly into the electrical box without pinching or crimping.
Troubleshooting Common Wiring Mistakes That Cause Fan Failure
If your Taloya fan doesn’t operate after installation, first verify all connections match color coding exactly. Some models have additional wires for light kits that must connect to corresponding house wires. Check that wire nuts fully cover all exposed copper—any exposed conductor creates shock risk. When in doubt, disconnect power and recheck all connections before testing again.
Blade Attachment Secrets for Silent Taloya Fan Operation
Unevenly tightened blades cause 80% of wobble complaints with new ceiling fan installations. Proper blade attachment requires methodical tightening in a star pattern to maintain even tension across all mounting points.
The Gradual Tightening Method for Perfect Blade Alignment
Start all blade screws by hand to prevent cross-threading, then tighten incrementally in a star pattern rather than sequentially. After initial tightening, run the fan at medium speed for 5 minutes, then retighten all screws completely. This process allows components to seat properly while maintaining blade alignment.
Using the Included Balancing Kit to Eliminate Wobble
If wobble persists after proper blade attachment, use the balancing kit included with your Taloya fan. Attach the balancing clip to each blade and run the fan to identify the problematic blade. Add small weights incrementally until wobble disappears—most issues resolve with 1-2 grams of counterweight.
Why Your New Taloya Fan Wobbles (And How to Fix It in 10 Minutes)
Wobbling isn’t normal operation—it indicates a correctable installation issue. Most wobble problems stem from simple causes that you can address without disassembling your entire Taloya ceiling fan installation.
Blade Screw Tightening: The Most Common Culprit
After initial operation, vibration often loosens blade screws. Power down the fan and systematically check each blade screw, tightening incrementally in a star pattern. Uneven tension between blades creates immediate wobble that worsens at specific speeds. Recheck tightness after the first 24 hours of operation.
When to Use the Balancing Kit vs. Rechecking Mounting Hardware
If blade screw tightening doesn’t resolve wobble, verify mounting bracket security before using the balancing kit. A loose bracket creates significant vibration that balancing weights can’t correct. Only use the balancing kit after confirming all hardware is properly tightened and the bracket is completely secure.
When to Call an Electrician for Taloya Ceiling Fan Installation
While many homeowners successfully install Taloya ceiling fans themselves, certain situations demand professional expertise. Recognizing these scenarios prevents dangerous mistakes and ensures code-compliant installation.
Aluminum Wiring: Why Special Connectors Are Non-Negotiable
Homes with aluminum wiring require special procedures and connectors for safe ceiling fan installation. Attempting DIY connections with standard wire nuts creates fire hazards due to aluminum’s expansion and contraction properties. Never connect aluminum wiring without COPALUM or AlumiConn connectors—this specialized work requires electrician expertise.
High Ceiling Safety: The Hidden Risks of Solo Installation
Installing a Taloya ceiling fan on 10+ foot ceilings introduces significant fall risks when using extension ladders. Professional installers use specialized scaffolding and safety equipment that most homeowners lack. The fan’s weight combined with awkward positioning makes high-ceiling installations particularly dangerous for DIYers—when safety is compromised, professional installation costs ($100-$250) provide valuable peace of mind.
Proper Taloya ceiling fan installation transforms your space with efficient comfort and quiet operation. By following these specific steps and recognizing when professional help is needed, you’ll enjoy reliable performance for years while avoiding common installation pitfalls. Regular seasonal adjustments and simple maintenance keep your fan operating at peak efficiency throughout its lifespan.
Leave a Reply