Is your kitchen exhaust fan louder than your blender? You’re not alone. A noisy kitchen exhaust fan disrupts conversation, stresses your ears, and often gets avoided, defeating its purpose. But excessive noise is not normal. Most fans become loud due to preventable issues like clogged filters, poor ductwork, or vibration. The good news: in over 80% of cases, you can significantly reduce the noise with simple fixes. This guide shows you how to fix a noisy kitchen exhaust fan using proven, step-by-step solutions.
You will learn what is really causing the racket, how to fix it safely, and when it is time to upgrade. Let us turn that roar into a whisper.
Clean Grease Filters and Fan Blades to Restore Quiet Operation
A buildup of grease is the most common cause of increased noise and reduced airflow. As grime accumulates on the fan blades, it throws the assembly out of balance and forces the motor to work harder, creating strain and sound.
Remove and Clean Grease Filters
Turn off power at the circuit breaker before starting any work. Slide or unclip the metal mesh filters from under the hood and soak them in a degreasing solution.
Use trisodium phosphate (TSP) or a commercial kitchen degreaser for best results. Alternative solutions include mixing 1 part baking soda with 2 parts vinegar and hot water. Let the filters soak for 20 to 30 minutes, then scrub with a non-abrasive brush. Rinse thoroughly and dry completely before reinstalling.
Clean filters every 1 to 3 months. Heavy cooking families should clean them monthly.
Clean the Fan Blades and Housing
Access the fan by removing the grease filters and any cover panel. Some models swing down with a single release screw while others require full disassembly. Use a soft brush or cloth to wipe grease off each blade, but never soak the motor.
For stubborn buildup, apply degreaser with a sponge, then wipe clean. Check for debris like food particles or nesting materials that may have accumulated.
Never run the fan with filters missing or improperly seated. This increases turbulence and actually makes noise worse.
Upgrade Undersized Ductwork to Eliminate Turbulence Noise
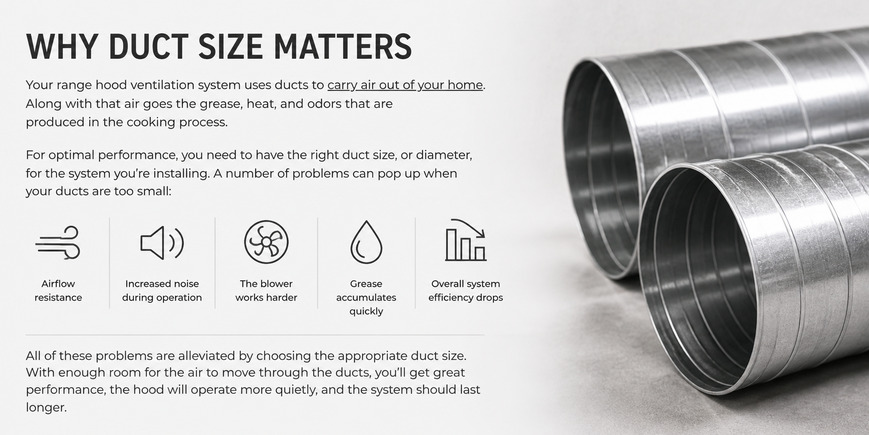
Poor duct design is the second biggest cause of noise, often worse than a dirty fan. Restrictive or undersized ducting creates turbulence, back pressure, and loud whistling or howling sounds.
Replace 4-Inch Duct with 6-Inch or Larger
Most over-the-range hoods are rated for 335 to 560 CFM, but builders often use 4-inch ducting, which maxes out at approximately 250 CFM. The result is air moving too fast, over 1,800 feet per minute, creating howling noise and reducing real-world performance.
Upgrade to 6-inch, 10-inch, or 12-inch rigid ducting. Larger ducts lower air velocity and eliminate turbulence. One user switched to 10-inch ducting with a remote blower and the fan became nearly silent at low speed.
If your duct is hidden in a wall or ceiling, upgrading may require drywall work. The payoff in quiet, powerful ventilation makes it worth the effort.
Replace Step Reducers with Gradual Tapered Reducers
A step reducer, which is a flat transition from 6 inches to 4 inches, causes air to slam into a wall, creating significant noise. Install a tapered, sloped reducer that smoothly narrows the duct instead.
This reduces turbulence and noise by up to 50%. Tapered reducers are available at HVAC supply stores or online.
Look inside your duct connection. If you see a flat metal plate, you have a step reducer that needs replacing.
Remove or Fix Restrictive Dampers and Louvers
Internal or external flaps can block airflow, forcing the fan to work harder and generate more noise.
Remove Internal Damper Flaps
Some hoods have spring-loaded half-moon flaps inside the duct collar. These often open only partially, sometimes only 45 degrees, severely restricting exhaust.
Carefully remove them with pliers or a screwdriver. Ensure the exterior louver still functions to prevent backdrafts and pests.
Only remove internal dampers if the outdoor louver opens freely when the fan runs.
Inspect and Clean Exterior Louvers
Go outside and check the exhaust termination point. Make sure the louver opens fully when the fan is on. Clean off dirt, bird nests, or ice buildup. Replace corroded or stuck flaps with a gravity damper or backdraft preventer.
Run the fan and feel for strong, steady airflow. Weak or pulsing air means a blockage is present.
Stop Vibration and Rattling from Transmitting Noise
Even a clean, well-ducted fan can be noisy if vibrations travel through cabinets or walls.
Install Vibration Isolators
Most over-the-range hoods are mounted directly to wood or metal, transmitting motor shake throughout the kitchen. Add neoprene mounts, rubber grommets, or spring isolators between the hood and frame to fix this.
These are available as retrofit kits or built into high-end models. Tighten mounting screws, but do not over-tighten, as this can worsen vibration.
Place thin rubber washers between the hood and screws as a DIY shortcut to dampen noise.
Secure Loose Components
Check for rattling filters, loose screws, or wobbly duct connections. Ensure grease filters are fully seated and locked in place. Use foil tape, not duct tape, to seal joints in rigid ducting, which reduces air leaks and noise.
Run the fan and gently press on different parts. If noise drops when you touch the cabinet, vibration is the culprit.
Diagnose and Repair Motor and Fan Mechanical Issues

If the fan makes grinding, humming, or screeching sounds, the problem may be mechanical.
Check for Worn Bearings or Imbalanced Wheel
Grinding or screeching often means worn motor bearings. Rhythmic thumping suggests an imbalanced fan wheel, usually from grease buildup or physical damage.
Clean blades thoroughly. If noise persists, the motor may need lubrication or replacement. Most modern motors are sealed and not serviceable, so replace the unit if faulty.
Test for Motor Hum with No Spin
If the fan hums but does not turn, the motor is likely seized. The common cause is grease infiltration into the motor housing over time.
Replace the motor if available as a spare part, or replace the entire hood. A humming motor can overheat, so turn it off immediately to avoid fire risk.
Install a Remote Blower for Near-Silent Operation
For a permanent, dramatic noise reduction, relocate the fan away from the kitchen.
Why Remote Blowers Work
The noisiest part, the motor and impeller, is moved to the attic, soffit, or exterior wall. Only quiet airflow passes through the kitchen hood.
This setup allows use of larger ducting and straighter runs, reducing resistance and noise dramatically.
Installation Considerations
Running electrical wiring to the new blower location is required. A relay or control module may be needed to sync with existing hood switches. Choose a blower rated for high static pressure if ducts are long or have bends.
One user with a 1,000 CFM external blower and 12-inch duct reported near-silent operation at low speed, effective across all burners. Installation can cost $500 to $1,500, but it is often cheaper than a full hood replacement with similar performance.
Replace the Hood When Design Limitations Cannot Be Fixed
Sometimes repair is not enough. Many over-the-range hoods are simply poorly designed, small, loud, and under-ducted.
When to Replace the Hood
Replace if ducting cannot be upgraded to 6 inches or larger, if the motor is failing or excessively noisy, if there is no vibration isolation built in, or if manufacturer noise claims are false.
Choose a Quieter, Better-Designed Hood
Look for models with remote blower compatibility, 6-inch or larger duct collar, sound-dampening insulation, and squirrel cage (centrifugal) blowers, which are quieter than axial fans.
Consider island hoods or downdraft systems with vertical exhaust paths. Z-Line and Best hoods with external blowers offer excellent airflow with minimal noise, even at high speeds.
Use Smart Controls to Automatically Reduce Fan Noise
Run the fan only as hard as needed and only when needed.
Install a Demand Control Ventilation System
Automatically adjust fan speed based on cooking activity. Temperature sensors detect heat from burners. Humidity or VOC sensors in advanced models detect steam and fumes.
This reduces fan speed by 20 to 70% during light cooking, cutting noise dramatically while saving energy and reducing makeup air loss.
Use Variable Speed or Timer Controls
Replace basic on/off switches with dial or touch controls for low, medium, and high settings. Set a delayed shutoff timer to run 5 to 10 minutes after cooking.
Run the fan on low speed for background ventilation, which is much quieter than high. Use low speed during simmering and high only for frying or boiling.
Maintain Your Fan to Prevent Future Noise Problems
A quiet fan stays quiet with simple upkeep.
Maintenance Schedule
Clean grease filters every 1 to 3 months. Inspect fan blades every 6 months. Check duct for blockages annually. Test exterior louver seasonally. Lubricate bearings if accessible annually.
Ignoring maintenance leads to grease buildup, imbalance, and early motor failure.
Upgrade to Low-Noise Filters
Some manufacturers offer patented filters that reduce static pressure and noise. Look for models with NC (Noise Criterion) ratings of 40 to 50, equivalent to a quiet office environment.
Frequently Asked Questions About Fixing a Noisy Kitchen Exhaust Fan
Why did my kitchen exhaust fan suddenly get louder?
Sudden increases in noise are usually caused by grease buildup on the fan blades, which throws the assembly out of balance. Clogged filters or debris in the ductwork can also restrict airflow and increase strain on the motor.
Can I fix a noisy exhaust fan without replacing it?
Yes, most noisy exhaust fans can be fixed without replacement. Start by cleaning the grease filters and fan blades. Then inspect ductwork for restrictions, check for vibration issues, and ensure dampers are opening properly.
How much does it cost to fix a noisy kitchen exhaust fan?
Basic cleaning costs nothing beyond cleaning supplies. Ductwork upgrades vary by accessibility, typically $100 to $500 for materials. Remote blower installation costs $500 to $1,500 including labor.
What is the quietest type of kitchen exhaust fan?
Hoods with remote (inline) blowers and squirrel cage (centrifugal) fans are the quietest. Look for models with 6-inch or larger duct collars and sound-dampening insulation. Z-Line and Best brands offer excellent quiet performance.
How often should I clean my kitchen exhaust fan filters?
Clean grease filters every 1 to 3 months. Heavy cooking families should clean monthly. Neglected filters cause increased noise, reduced airflow, and potential motor damage over time.
Is a noisy exhaust fan dangerous?
A noisy fan may indicate a problem that could become dangerous. A humming motor that does not spin can overheat. Excessive vibration may loosen mounting hardware. Reduced airflow means poor ventilation of harmful cooking emissions.
Key Takeaways for Fixing Your Noisy Kitchen Exhaust Fan
A noisy kitchen exhaust fan is fixable in most cases. Start with cleaning the grease filters and fan blades, as this addresses the most common cause of excess noise. Next, inspect your ductwork. Undersized 4-inch ducts create turbulence and howling that makes even well-functioning fans sound terrible.
Upgrade to 6-inch or larger ducting when possible, and replace flat step reducers with gradual tapered reducers to smooth airflow. Stop vibration by adding isolators between the hood and cabinet. Consider a remote blower for near-silent performance if your current setup has inherent design limitations.
A quiet hood means you will actually use it. This protects your health, improves air quality, and makes your kitchen a more peaceful place. Fix it right, and you will enjoy cooking without the roar.
Leave a Reply