
Installing a kitchen hood exhaust fan improves air quality, removes cooking odors and grease, and protects your home from moisture damage. Whether you’re upgrading an old unit or adding ventilation to a new kitchen, proper installation is crucial for performance and safety. This guide covers every step, from selecting the right hood and planning ductwork to electrical connections and code compliance.
You’ll learn how to install a ducted range hood correctly, avoid common mistakes, and ensure your system meets building codes, especially if you’re using a high-CFM model that requires makeup air. By the end, you’ll know exactly what tools to use, how to vent properly, and when to call in a licensed contractor.
Choose the Right Range Hood Type for Your Kitchen
Select Based on Your Cooktop Layout
Your kitchen layout determines the best hood type. Wall-mounted hoods fit above standard cooktops against a wall and offer strong suction with direct vertical ducting. Under-cabinet models save space and blend into cabinetry, ideal for smaller kitchens. Island hoods hang from the ceiling over a central cooking station and require overhead support and ceiling-to-roof duct runs. Insert hoods are built into custom cabinetry for seamless, high-end finishes.
Match the hood width to your cooktop. Ideally, the hood should be at least as wide as the cooking surface, or up to 6 inches wider for better capture efficiency. For gas ranges, especially high-BTU models, choose a hood rated for 600+ CFM to handle heavy smoke and steam.
Pick Ducted Over Ductless Whenever Possible
A ducted hood vents air outside, removing contaminants completely. This is the preferred option for health, cleanliness, and long-term performance. Ductless hoods filter air through charcoal or mesh filters and blow it back into the kitchen. They’re easier to install but less effective, especially at controlling humidity and strong odors.
Only use ductless if exterior venting isn’t feasible, such as in rental units or apartments where structural modifications aren’t allowed. Even then, expect more frequent filter replacements and reduced air quality compared to ducted systems.
Size the Fan by Your Cooking Needs
Airflow is measured in CFM (cubic feet per minute). A higher CFM means stronger suction. Use these guidelines:
- Electric cooktops: Minimum 400 CFM
- Gas cooktops: 600+ CFM
- Commercial-grade gas ranges: 760+ CFM
Some models allow upgrading from 400 to 760 CFM for gas compatibility. However, hoods over 400 CFM trigger code requirements. IRC Section M1503.4 mandates a motorized makeup air system to prevent negative pressure, which can cause dangerous backdrafting of carbon monoxide from furnaces or water heaters.
Gather the Required Tools and Materials

Essential Tools for Installation
You’ll need specific tools to complete this installation properly. A 6-inch hole saw cuts through drywall and siding. An oscillating multi-tool or reciprocating saw handles precise cuts around obstructions. A drill with reverse function is critical when drilling through aluminum siding. A laser level or bubble level ensures straight, balanced mounting. A stud finder locates framing for secure fastening. A voltage tester confirms power is off before electrical work. A measuring tape provides accurate layout and alignment. A vacuum controls dust during drilling. A caulking gun applies weatherproof sealant.
Having a helper is highly recommended, especially when lifting and aligning heavy stainless steel hoods.
Required Materials by System Type
For ducting, use 6-inch rigid metal duct. It resists grease buildup and maintains airflow better than flexible duct. Limit flexible aluminum duct to short runs under 10 feet and avoid it entirely if possible. Seal all joints with aluminum HVAC foil tape, never duct tape, which degrades over time.
For exterior components, include a 6-inch wall cap or vent cover, a PVC or metal mounting block that is rot-resistant for wet climates, a beveled block (optional) with angled top to shed water, and exterior-grade silicone caulk to prevent moisture intrusion.
Electrical supplies include 12-AWG wire for hardwired units, wire nuts or quarter-inch yellow connectors, and a junction box inside the hood.
Finishing touches include stainless steel crown molding (approximately 18½ inches) to blend the hood with cabinetry and a paint-matched vent cap for aesthetic continuity.
Turn Off Power and Prepare Wiring Safely
Shut Off the Circuit Before Electrical Work
Before touching any wires, turn off the breaker powering the range hood circuit. Verify the line is dead using a non-contact voltage tester. Never work on live circuits. This is a critical safety rule that cannot be emphasized enough.
If you’re replacing an existing hood, check for a nearby junction box or existing wiring behind the wall. Most modern hoods connect via a knockout panel in the back, accessed with a flathead screwdriver.
Run a New Circuit If Needed
For new installations without existing power, a licensed electrician should install a dedicated 15-amp circuit with 12-AWG wire from the breaker panel. Route wire separately from ducting to prevent interference and meet code. Feed the wire through the hood’s knockout before mounting the unit.
Connect wires inside the hood’s terminal block: black to black (hot), white to white (neutral). Secure with wire nuts or connectors. No bare copper should be exposed. Only restore power after all connections are complete and insulated.
Set the Correct Mounting Height and Locate Wall Studs
Follow Recommended Clearance Standards
Mounting height affects performance and safety. For electric cooktops, mount the hood 24 to 30 inches above the surface. For gas cooktops, mount it 30 to 36 inches above the surface.
Too low, and pots may hit the hood. Too high, and smoke escapes before capture. Use a laser level to mark a level line across the wall. Align with visual cues like tile grout lines or cabinet edges for a clean look.
Find and Mark Wall Studs
Use a stud finder to locate framing behind drywall. Mark screw points approximately 7 inches apart. These will support the mounting flange.
If studs don’t align with mounting holes, install quarter-inch yellow wall plugs (drywall anchors) for secure fastening. Ensure the flange is perfectly level before driving screws. This prevents misalignment and stress on the hood.
Plan the Vent Path and Avoid Common Obstructions
Choose the Shortest, Straightest Route
Three common vent paths exist. Through an exterior wall is most efficient for wall-mounted hoods. Through the ceiling and roof is required for island hoods. Through cabinetry to a side wall works as an alternative when direct access is blocked.
The goal is to minimize bends and length. Each 90-degree elbow reduces effective airflow by up to 25 percent. Keep total duct run under 30 feet if possible.
Use Rigid Duct and Minimize Bends
Always prefer 6-inch rigid metal duct. It maintains shape, resists grease, and allows easy cleaning. Avoid flexible duct. It collapses slightly, traps grease, and restricts airflow.
If a bend is necessary, use a smooth-radius 90-degree elbow with at least 2 to 3 inches of clearance in the wall cavity. Keep duct runs short and straight. Avoid flexible ducting, as it traps grease and restricts airflow.
Do not route duct through cold attics without insulation, as condensation can form and drip back into the hood.
Cut the Exterior Wall Opening Properly
Locate and Mark the Vent Exit Point
Measure from a fixed interior reference such as a window frame. For example, 27 inches horizontally and 6 inches up, centered between wood battens.
Drill a pilot hole from inside using a long 1/8-inch or 1/4-inch bit to confirm alignment on the exterior. Check for obstructions like studs, pipes, or wiring.
Cut a Clean 6-Inch Hole
Use the pilot hole to position a 6-inch hole saw. For aluminum siding, start the drill in reverse to cut cleanly through the metal without tearing. Switch to forward once past the siding to cut through sheathing.
For wood or vinyl, drill multiple half-inch dot-to-dot holes around the perimeter, then connect with a reciprocating saw. Work on a dry day to prevent brittle siding from cracking.
Use flexible duct as a template to mark the correct size. After cutting, vacuum debris and inspect from both sides.
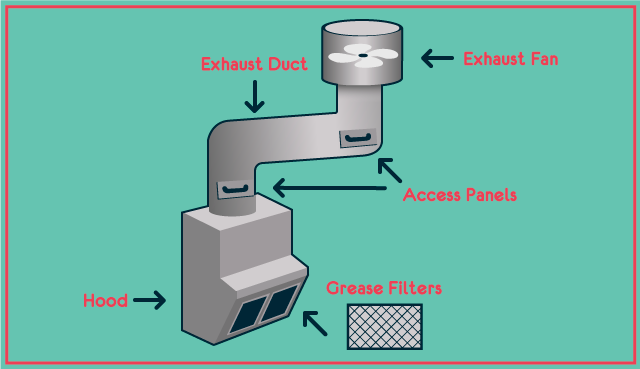
Install Ducting and Seal Every Joint
Connect Interior and Exterior Duct Sections
Insert rigid 6-inch duct through the wall opening. Connect one end to the hood’s exhaust outlet and the other to the exterior wall boot.
For models with adjustable exhaust extensions, unscrew, measure, and reattach for perfect fit.
Route flexible duct only if unavoidable and keep under 10 feet. Never compress it. Maintain full diameter.
Seal Every Connection with Foil Tape
Use aluminum HVAC-rated foil tape on all joints. This is heat- and moisture-resistant. Never use duct tape. It dries out, cracks, and fails within months.
Fill the cavity around the duct with expansion foam to insulate and act as a fireblock. Maintain at least 2 inches of clearance behind the hood for connections.
Ensure the exterior vent cap opens outward and isn’t blocked by wind or debris.
Mount the Hood and Secure the Flange
Lift and Align with a Helper
Have a partner hold the hood in place while you align it with the mounting marks. Heavy stainless steel units are awkward and can scratch surfaces if dropped.
Ensure the mounting flange is level and fits snugly against the wall.
Fasten with Weather-Resistant Screws
Secure the flange using exterior deck screws. Hide the caulk bead behind the flange for a clean, professional finish.
If wiring from the back, feed the electrical cable through the knockout before final tightening.
Do not overtighten screws. This can warp the flange or crack tile.
Complete Electrical Connections Safely
Wire the Hood to the Terminal Block
Inside the hood, connect black (hot) to black and white (neutral) to white. Secure with quarter-inch yellow connectors or wire nuts.
Tuck wires neatly into the junction box. Ensure no copper is exposed. For plug-in models, leave the plug accessible. Never bury it behind walls.
Restore Power Only After Final Check
Double-check all connections, mounting, and duct seals before turning the breaker back on. Test the fan and lights.
If the hood doesn’t power on, recheck wire connections, confirm power at the breaker, and verify switch functionality.
Finish and Weatherproof the Installation
Install Crown Molding and Trim
Attach stainless steel crown molding (approximately 18½ inches) to cover the top edge and blend with upper cabinets. This hides the mounting hardware and improves aesthetics.
Seal Exterior Gaps Against Weather
On the outside, press the mounting block (PVC or metal) into the opening. Cut a 6-inch hole in the block to match the duct. For clapboard siding, cut a beveled top edge so water runs off.
Fasten the block to framing and caulk all edges with exterior-grade silicone. This prevents water intrusion, rot, and pest entry.
Match the vent cap color to siding for a seamless look.
Address Air Pressure and Safety Risks
Understand Negative Pressure Hazards
High-CFM hoods over 400 CFM remove large volumes of air. If not replaced, they create negative pressure, pulling unconditioned air through cracks, attics, or crawlspaces.
Worse, they can cause carbon monoxide backdrafting from gas furnaces or water heaters. For every cubic foot of air exhausted, one must enter the home.
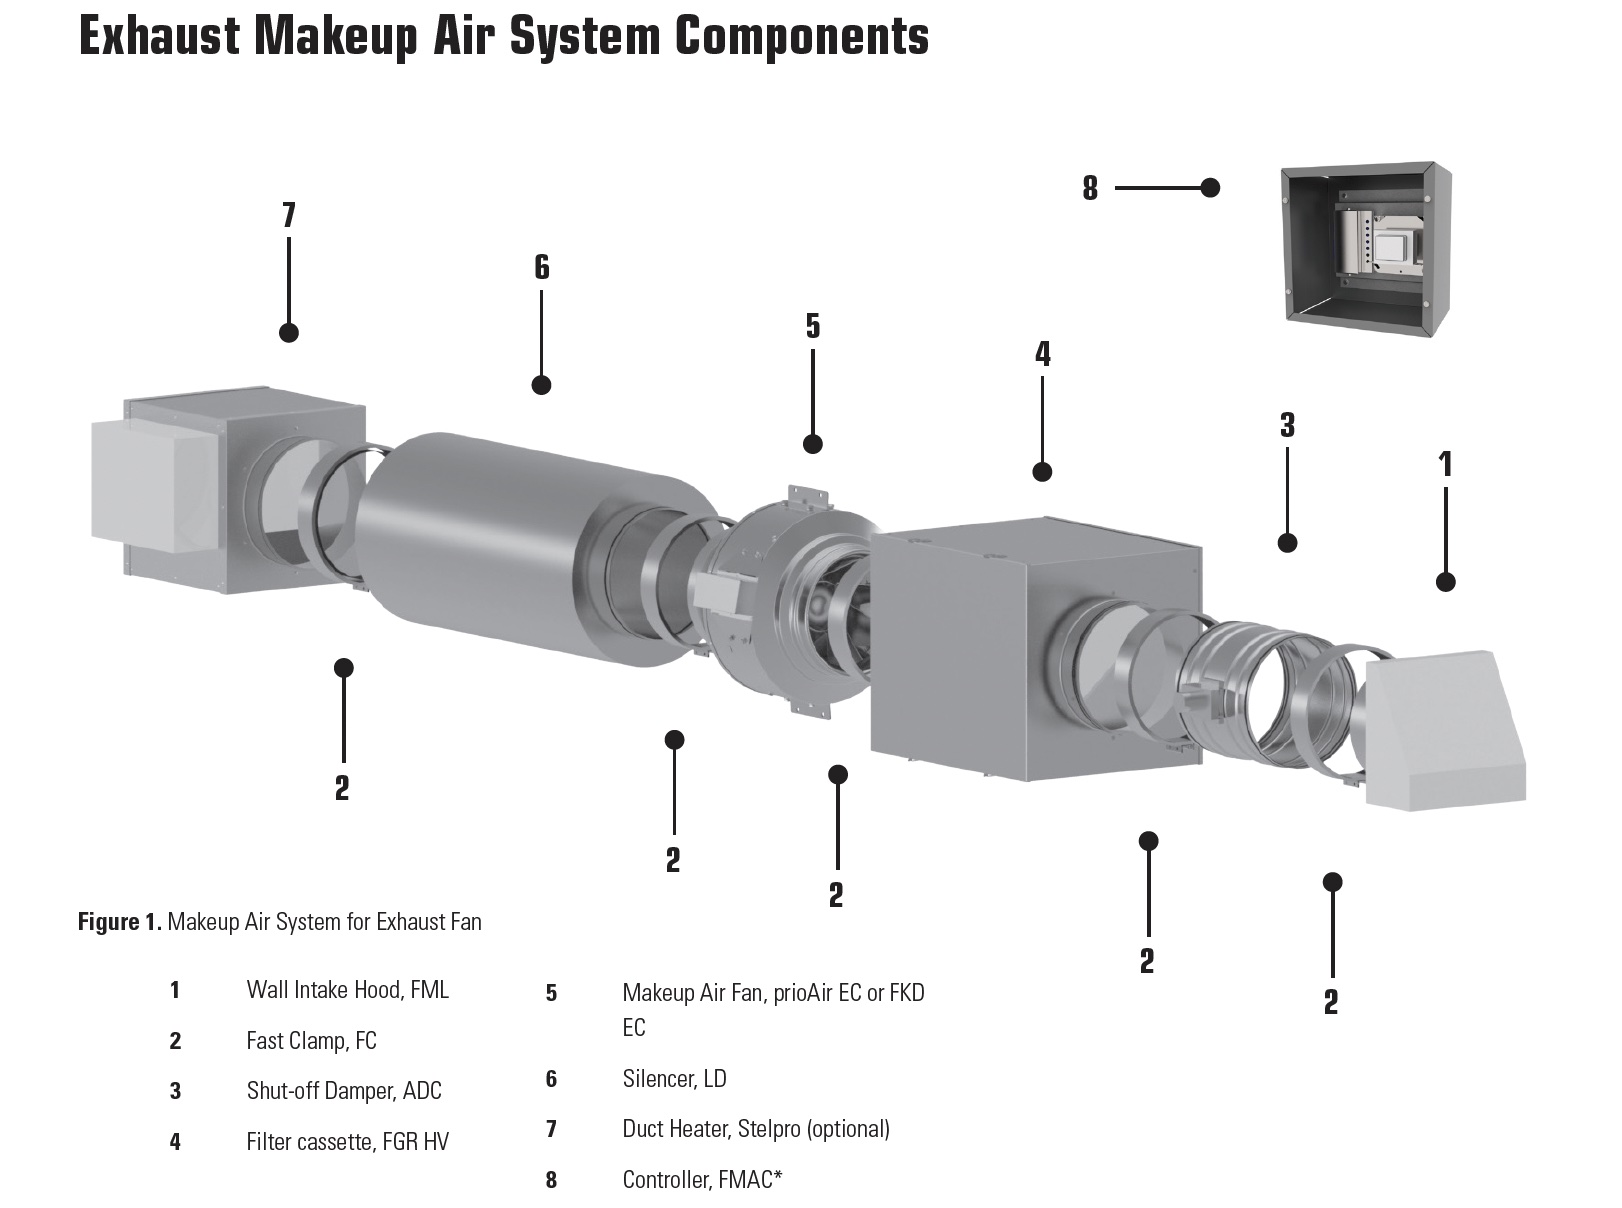
Install Makeup Air for High-CFM Hoods
Per IRC M1503.4, any exhaust system over 400 CFM must have a motorized makeup air system. This delivers fresh, conditioned air when the hood runs, maintaining neutral pressure.
Components include a dedicated makeup air unit, ductwork to living space, and a motorized damper activated by hood operation.
Have an HVAC professional design and install this system, especially in tight, energy-efficient homes built after 2000.
Test Performance and Prevent Common Issues
Conduct Post-Installation Checks
After setup, turn on the fan and feel for strong, consistent airflow at the exterior cap. Check for air leaks at joints by listening for whistling. Look for vibrations or rattling and tighten loose screws or ducts. Confirm the exterior vent cover opens outward.
If airflow feels weak, inspect for long or bent duct runs, replace flexible duct with rigid, and clean grease filters.
Monitor for Moisture and Noise
Condensation around the exterior cap may indicate poor sealing or backdrafting. Re-caulk and ensure proper slope. Beveled blocks help shed water.
Noise usually means loose hardware. Tighten mounting screws and duct connections. Ensure the fan wheel isn’t hitting the housing.
Maintain Your Hood for Long-Term Performance
Clean Filters Monthly
Wash grease filters in warm, soapy water or dishwasher monthly. Clogged filters reduce airflow and increase fire risk.
For ductless models, replace charcoal filters every 6 to 12 months.
Inspect Annually
Once a year, check ductwork for blockages, pests, or condensation. Clean interior fan blades. Test exterior cap operation. Re-caulk if needed.
Clean stainless steel with a buffing pad to maintain finish. Avoid abrasive cleaners.
Register your hood and keep installation and maintenance records for warranty claims, typically 1 to 5 years.
When to Hire a Professional Installer
Know Your Limits
DIY installation is feasible when replacing an existing hood with pre-existing duct and power and when you’re comfortable with drilling, leveling, and wiring.
Call a professional for cutting new wall or roof penetrations, running new electrical circuits, installing island hoods with overhead supports, and homes with tight construction needing combustion safety testing.
Professionals can perform blower door tests and CO monitoring to ensure safe operation, especially critical with hoods over 1,000 CFM.
Final Thoughts on Installing Your Kitchen Hood
A properly installed kitchen hood enhances comfort, protects your home, and keeps air clean. Follow these steps to ensure safe, code-compliant, and efficient ventilation. Prioritize ducted systems over ductless whenever possible. Use rigid metal ducting, seal every joint with foil tape, and install makeup air when required by code, especially for hoods over 400 CFM.
With the right tools and careful attention to air pressure safety, you can achieve professional-grade results. If your project involves new electrical circuits, roof penetrations, or high-CFM systems in tight homes, don’t hesitate to bring in a licensed contractor. The investment in proper installation pays off in performance, safety, and peace of mind.
Frequently Asked Questions About Installing Kitchen Hood Exhaust Fans
Can I install a kitchen hood exhaust fan myself, or do I need a professional?
DIY installation is feasible if you’re replacing an existing hood with pre-existing ductwork and electrical connections and are comfortable with basic carpentry, drilling, leveling, and electrical wiring. Call a professional for new wall or ceiling penetrations, running new electrical circuits, or installing island hoods.
What is the minimum CFM I need for a gas cooktop?
For gas cooktops, minimum recommended airflow is 600 CFM or higher. For high-output commercial-grade gas ranges, choose 760 CFM or higher for adequate smoke and steam capture.
Do I need a makeup air system for my range hood?
Yes, IRC Section M1503.4 requires a motorized makeup air system for any exhaust system rated over 400 CFM. This prevents negative pressure that can cause carbon monoxide backdrafting from gas appliances.
Should I choose a ducted or ductless range hood?
Choose ducted (exterior-exhaust) whenever possible. Ducted hoods remove smoke, steam, grease, and odors completely outside, providing far better indoor air quality. Only use ductless if exterior venting isn’t feasible due to rental restrictions or structural limitations.
How far should a range hood be mounted above the cooktop?
For electric cooktops, mount the hood 24 to 30 inches above the cooking surface. For gas cooktops, mount it 30 to 36 inches above the surface. Too low creates a fire hazard, and too high reduces capture efficiency.
What type of duct should I use for my range hood?
Use 6-inch rigid metal duct whenever possible. It maintains airflow, resists grease buildup, and allows easy cleaning. Avoid flexible ducting, which traps grease and restricts airflow. If flexible duct is unavoidable, keep runs under 10 feet.
Leave a Reply