An open exhaust fan hole can turn a cozy room into a drafty nightmare. Whether you’ve removed a kitchen hood, decommissioned a bathroom fan, or are renovating a space, leaving that hole exposed invites cold air, pests, moisture, and energy loss. The good news is you can seal it effectively, whether you need a permanent fix or a removable solution for future use.
This guide covers every proven method, from drywall patching to clever DIY hacks, so you can choose the right approach based on your wall type, climate, and long-term plans. You’ll learn how to safely remove old units, block drafts without damaging walls, and even hide your repair so it looks like it was never there.
Permanent Drywall Patch for Interior Walls
For interior walls where the exhaust fan will not return, a seamless drywall repair is the gold standard. This method hides the hole completely and matches your ceiling or wall finish.
Turn Off Power and Remove the Fan Unit
Before touching anything, turn off electricity at the breaker. Most exhaust fans are hardwired, and working near live wires is dangerous. Once powered down, unscrew and remove the fan unit and its mounting frame. Set aside screws for potential reuse.
Install Wooden Backing Support
Drywall alone cannot support patching material. Cut a wooden backing board slightly wider than the hole. Slide it inside the opening and secure it with screws through the drywall on both sides. This creates a stable base for your patch.
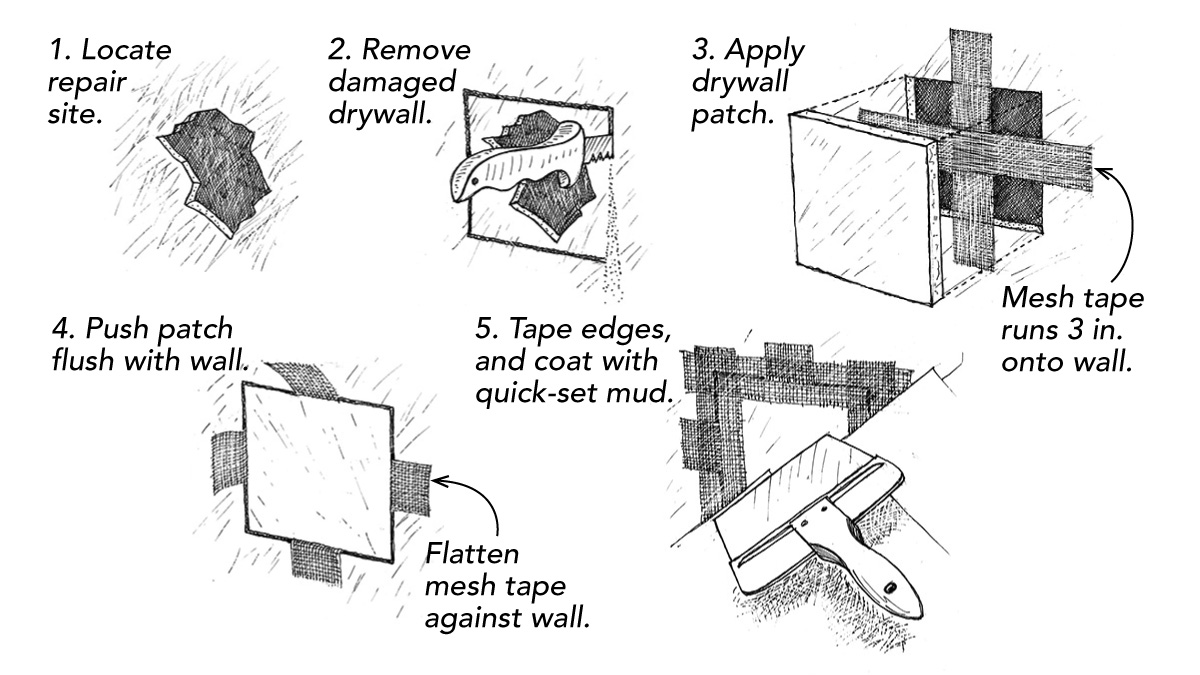
Cut and Secure Drywall Patch
Measure the hole precisely. Use a utility knife or drywall saw to cut a plasterboard patch that fits snugly. Position it over the hole and screw it into the wooden support. Ensure the surface is flush with the surrounding area.
Seal and Finish the Surface Smoothly
Cover seams and screw heads with joint compound. Apply with a trowel in thin layers, feathering edges outward. Let dry completely, typically 24 hours. Lightly sand with fine-grit sandpaper until smooth. Wipe away dust.
Prime and Paint to Match
Apply a coat of primer to seal the patch. Then paint with the same color and texture as the rest of the wall or ceiling. For best results, test paint on a small area first. Use stippling or rolling techniques to mimic existing texture.
Pro Tip: For bathrooms, use moisture-resistant drywall and mildew-resistant paint to prevent future damage.
Masonry Wall Repair for Exterior Vents
Exterior kitchen vents in older homes often pass through brick or breeze block walls. A structural, weatherproof fix is essential here.
Prepare and Cut Breeze Block to Fit
Trace the hole’s shape onto a half breeze block. Use a handsaw to cut along the lines, then refine edges with a rasp file. Make sure the cut piece fits tightly into the opening from the inside.
Insert Block and Seal from Both Sides
Tap the block gently into place from indoors using a hammer. Remove any debris that could prevent a snug fit. From the outside, fill gaps around the block with mortar mix using a trowel. Smooth the surface and let it cure for 24 to 48 hours.
Apply Weatherproof Finish
Once cured, sand rough spots. Apply exterior-grade waterproof paint to both sides to prevent moisture ingress and blend with surrounding masonry. This ensures long-term protection against rain, wind, and thermal leakage.
Warning: Never use standard caulk or drywall on external masonry. These degrade quickly in weather exposure.
Removable Solutions for Future Fan Reactivation
Need to seal the hole now but might reactivate the fan later? These non-permanent methods are fast, reversible, and effective.
Use Removable Sealing Putty
Adhesive putty is ideal for light-duty sealing. Press it around or over the vent cover to block airflow. It is reusable, requires no tools, and leaves no residue when removed.
• Best for rental units, children’s rooms, or seasonal sealing
• Limitation is less effectiveness against strong drafts
User Hack: Combine putty with a folded washcloth pressed into the vent for extra insulation.
Apply Aluminum Foil Tape
Metal tape creates an airtight, heat-resistant seal. Cut a piece to cover the grille completely and press firmly onto clean, dry surfaces.
• Pros include easy installation and removal plus heat reflection
• Cons include visible appearance and potential peeling in humid areas
Pro Tip: Use on plastic or metal grilles. Avoid on painted walls where adhesive might damage paint upon removal.
Install a Neoprene Sheet Insert
For superior draft control, cut a 3 to 6 mm neoprene sheet to fit behind the vent cover. Remove the cover, slide the neoprene into the opening, and reattach the cover to hold it in place. This flexible rubber material conforms tightly, blocking cold air while allowing future removal.
Expert Verdict: According to user experience, neoprene plus the original cover offers effective draft reduction without permanent modification.
DIY Foam Plug Method for Airtight Sealing

This clever hack creates a solid, removable plug using expanding foam. It is perfect for disused ducts in walls.
Prepare the Hole and Lubricate
Remove the fan mechanism entirely. Spray WD-40 or silicone lubricant inside the duct to prevent foam from bonding permanently. This makes future removal possible.
Insert Bag and Inject Foam
Take a reusable bag for life. Push it halfway into the hole. Slowly inject expanding spray foam into the bag. Do not overfill, as foam expands 3 to 5 times its initial volume.
Trim and Conceal the Plug
After 6 to 24 hours of curing, trim any excess foam flush with the wall. Gently push the solidified bag deeper into the cavity. Reinstall the vent cover to hide the plug.
Removal Trick: Leave a small tab of the bag exposed or mark the location. To reopen, simply pull it out, as the lubricated surface allows clean extraction.
Caution: Avoid forcing the bag past duct joints, as expansion pressure can rupture the bag or lock it in place.
Thermal and Insulation Upgrades
Closing the hole is not enough if you want energy savings. Boost performance with added insulation.
Add Fiberglass Behind the Cover
After inserting a neoprene sheet or foam plug, stuff fiberglass insulation into the remaining cavity behind the vent cover. Wear gloves and a mask to avoid skin or respiratory irritation.
• Benefit increases R-value and reduces heat loss
• Risk involves loose fibers entering the room if not contained
Fix: Wrap insulation in breathable fabric or house wrap before insertion.
Use Foam Board Insulated Covers
Create a custom insulated cover by cutting rigid foam board to match the vent size. Wrap with vapor barrier or house wrap. Seal edges to the wall with construction adhesive or caulk. This method is ideal for large kitchen hood openings and improves overall wall U-value.
Sealing External Vent Penetrations

Outdoor exposure demands airtight, waterproof solutions to prevent damage and energy loss.
Seal Both Inside and Outside
Inside, patch with drywall and backing board. Outside, apply exterior-grade silicone sealant or polyurethane caulk around the perimeter. Optionally install a weatherproof cover plate over the exterior vent.
Prevent Moisture and Pest Entry
An unsealed exterior hole invites mold, rodents, and insects. Always use closed-cell spray foam for gap filling, as it resists moisture. Apply waterproof paint on masonry surfaces. Check annually for cracks or peeling sealant.
Energy Impact: An open vent can cause 2 to 5 degree Celsius temperature drop in adjacent rooms and increase heating costs by 10 to 15 percent.
Creative Solutions for Special Cases
Some situations call for unconventional but effective solutions.
Magnetic Cloth Cover for Rental Properties
For plastic vents where magnetic tape will not stick, glue small metal strips around the vent frame. Cut a magnetic fabric cover and attach securely. It is removable and washable.
Low-Cost Hack: Use a folded pillowcase held by ring magnets. Surprisingly effective for light drafts.
Quick Fix for Vents in Shower Cubicles
One user faced a freezing draft from a plastic vent in a shower wall with no exterior access. Their quick fix involved removing the cover, inserting cardboard wrapped in disused flannel, and reattaching the cover. It worked until they upgraded to neoprene for better longevity.
Upgrade Path: Replace cardboard with closed-cell foam for moisture resistance.
Essential Safety Precautions
Avoid common pitfalls with these essential precautions.
Turn Off Power Before Starting
Always shut off the circuit breaker before removing fan units. Even low-voltage fans can pose risks when wires are exposed.
Test for Asbestos in Older Homes
Homes built before the 1980s may have asbestos in insulation or wall materials. Do not cut or sand without professional testing.
Wear Protective Gear
Use gloves when handling fiberglass or foam. Wear a mask or respirator when spraying foam or sanding. Use safety goggles during cutting or drilling.
Label Temporary Seals
If the fan might be reused, label the sealed vent clearly. Example: “Do Not Paint Over, Vent May Reactivate.”
Inspect Annually
Check sealed vents yearly for cracks in sealant, mold or condensation, and pest activity. Early detection prevents bigger issues.
Achieving a Seamless Visual Finish
A repair is only as good as its appearance. Make it invisible.
Match Paint and Texture Exactly
Use paintable caulk along edges for seamless blending. Test paint samples before full application. Replicate texture using a stipple roller or crumpled cloth dabbing.
Hide All Hardware
Sink screw heads slightly and cover with joint compound. Avoid visible tape or mismatched patches in high-visibility areas.
Choosing the Best Method for Your Situation
Permanently Remove Fan: Use Drywall Patch
For renovated rooms with no ventilation need, patch with drywall plus wooden backing. Finish with joint compound and matching paint.
Might Reactivate Later: Try Neoprene or Foam Plug
Future-proof your fix with a neoprene insert that is easy, quiet, and removable. Alternatively, use a bag-and-foam plug for airtight, high-performance, reversible sealing.
Rental Property: Opt for Non-Destructive Methods
Choose landlord-friendly options including aluminum tape, sealing putty, or magnetic fabric cover. No damage means no arguments.
Exterior Wall: Go Masonry Plus Mortar
For kitchen vents through brick, use breeze block and mortar. Seal outside with silicone and weatherproof paint.
Frequently Asked Questions About Closing Exhaust Fan Holes
How do I permanently close an exhaust fan hole in drywall?
Turn off power at the breaker, remove the fan unit, install a wooden backing board inside the hole, secure a drywall patch to the backing, apply joint compound to seams, sand smooth, prime, and paint to match. This creates a seamless, permanent seal.
Can I temporarily seal an exhaust fan hole without damaging walls?
Yes. Use removable sealing putty, aluminum foil tape, or a neoprene sheet insert behind the vent cover. These methods block drafts without permanent modification and can be easily removed if the fan is reactivated.
What is the best way to seal an exhaust fan hole in an exterior wall?
For masonry walls, use the breeze block method. Cut a half block to fit the hole, tap it into place from inside, and fill exterior gaps with mortar. Apply exterior-grade waterproof paint on both sides for long-term weather resistance.
How much can I save on energy by sealing an exhaust fan hole?
An open vent can lower indoor temperature by 2 to 5 degrees Celsius in adjacent rooms and increase heating costs by 10 to 15 percent. Sealing the hole provides immediate energy savings.
Is the foam plug method reversible for future duct use?
Yes, if you prepare properly. Spray lubricant inside the hole before inserting the bag, leave a small tab exposed for grabbing, and do not overfill with foam. The lubricated surface allows clean extraction when needed.
Final Thoughts on Sealing Your Exhaust Fan Hole
Closing an exhaust fan hole is not just about comfort. It is about energy efficiency, moisture control, and long-term home health. Whether you choose a seamless drywall repair or a clever removable plug, the key is matching the method to your specific needs. Consider whether you might reactivat the fan later, whether you rent or own, and whether the vent is on an interior or exterior wall. Seal it right, and you will stop the draft, save on heating costs, and enjoy a quieter, warmer space. The old vent will disappear completely, and your home will be more comfortable than ever.
Leave a Reply