
Is your bathroom still foggy long after you finish showering? Excess moisture leads to mold, mildew, and potential wall damage. Installing a timer switch for your exhaust fan solves this problem by running the fan long enough to clear humidity, even if you forget to turn it off. This upgrade costs around $20, takes under an hour with basic tools, and dramatically improves indoor air quality. In this guide, you will learn how to safely replace a standard switch with a timer-controlled one, wire connections correctly, and choose the right model for your bathroom setup.
Turn Off Power and Verify Safety
Electricity poses serious hazards, so cutting power before installation is essential. Head to your main electrical panel and locate the breaker controlling the bathroom fan. Switch it off completely. Label the breaker with tape or a marker to prevent accidental reactivation while you work. Never assume power is off always verify it yourself.
Test for Live Voltage
Use a non-contact voltage tester to confirm no electricity reaches the switch. First, test the tool on a known live outlet in another room to ensure it functions properly. Hold the tester near the exposed switch wires after removing the wall plate. If the tester beeps or lights up, return to the panel and find the correct breaker. Proceed only when the tester shows zero voltage.
When to Call an Electrician
Skip DIY installation if your home has aluminum wiring, common in houses built during the 1960s and 1970s. These wires expand and contract differently than copper, creating fire hazards if not properly connected. Use only timer switches rated for aluminum wiring, apply anti-oxidant cream to connections, and consider hiring a professional. If you feel uncertain about wiring colors or circuit layout, consult a licensed electrician.
Gather Required Tools and Materials
Having the right supplies makes installation smooth and safe. You do not need advanced equipment, but gathering everything beforehand prevents mid-project trips to the hardware store.
Tools and Parts List
- Timer switch compatible with exhaust fans
- Phillips and flathead screwdriver
- Wire stripper
- Needle-nose pliers
- Wire nuts (typically included with switch)
- Non-contact voltage tester
- Electrical tape for extra insulation
- Smartphone or camera for photographing wiring
Choose a timer switch rated for your fan load. Most bathroom fans draw under 1 amp, well within standard 15A to 20A switch ratings. Never use dimmer switches unless specifically labeled for fan use, as these can damage the motor.
Remove Old Switch and Document Wiring
Start by removing the wall plate with a screwdriver. Set aside the screws and plate in a safe place. Gently pull the old switch from the electrical box. Before disconnecting any wires, take a clear photograph of the wiring arrangement. This reference prevents confusion when connecting the new timer.
Identify Your Wiring Type
Examine how wires connect to the existing switch. Screw terminals involve wires wrapped around metal screws. Back-stab connections feature wires pushed into holes in the switch back. Side-wire clamps hold wires under set screws. Back-stab connections are less reliable and prone to loosening over time. If your old switch uses this method, consider switching to screw terminals during replacement.
Handle Multi-Switch Setups
Bathrooms with separate light and fan switches often use a jumper wire to share power between both switches. One wire might be back-stabbed while another connects via screw terminal. When replacing only the fan switch with a timer, connect the timer’s line wire to the same hot source feeding the light switch. This keeps the light functioning normally while automating fan runtime.
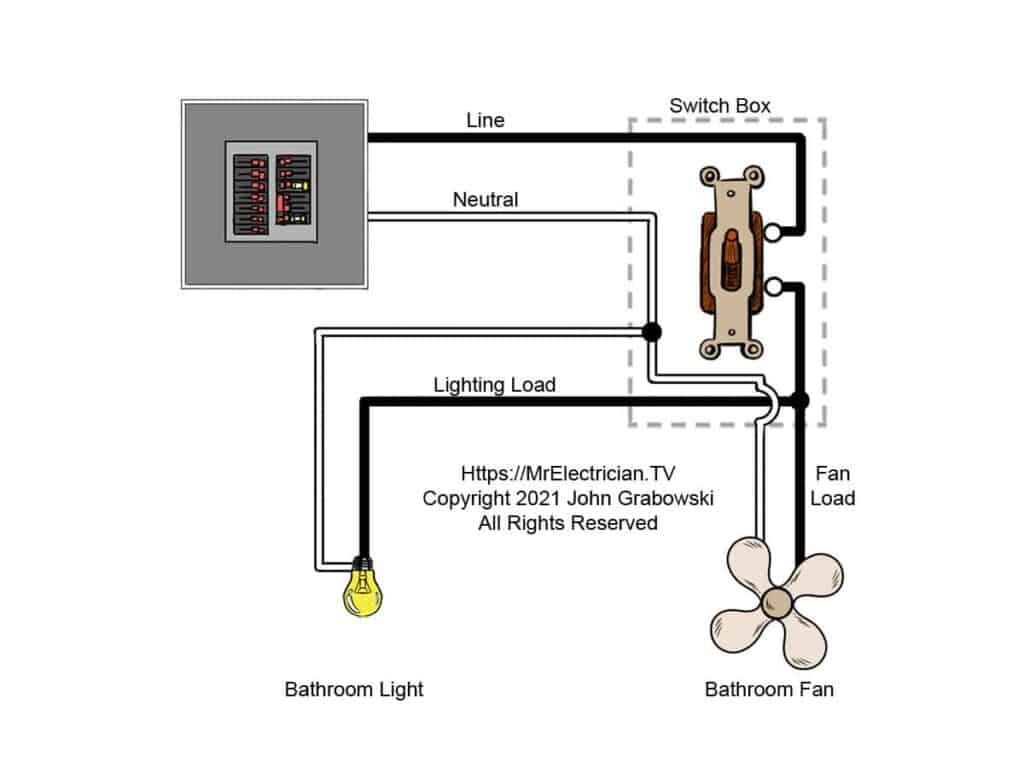
Identify Circuit Wires in the Box
Understanding your wiring configuration is crucial before connecting the timer. Most single-pole switch setups include several key wires.
Standard Wire Functions
- Black wire carries hot power from the breaker panel
- White wire serves as neutral to complete the circuit
- Bare copper or green wire provides the ground connection
- Red or second black wire acts as switched hot connecting to the fan
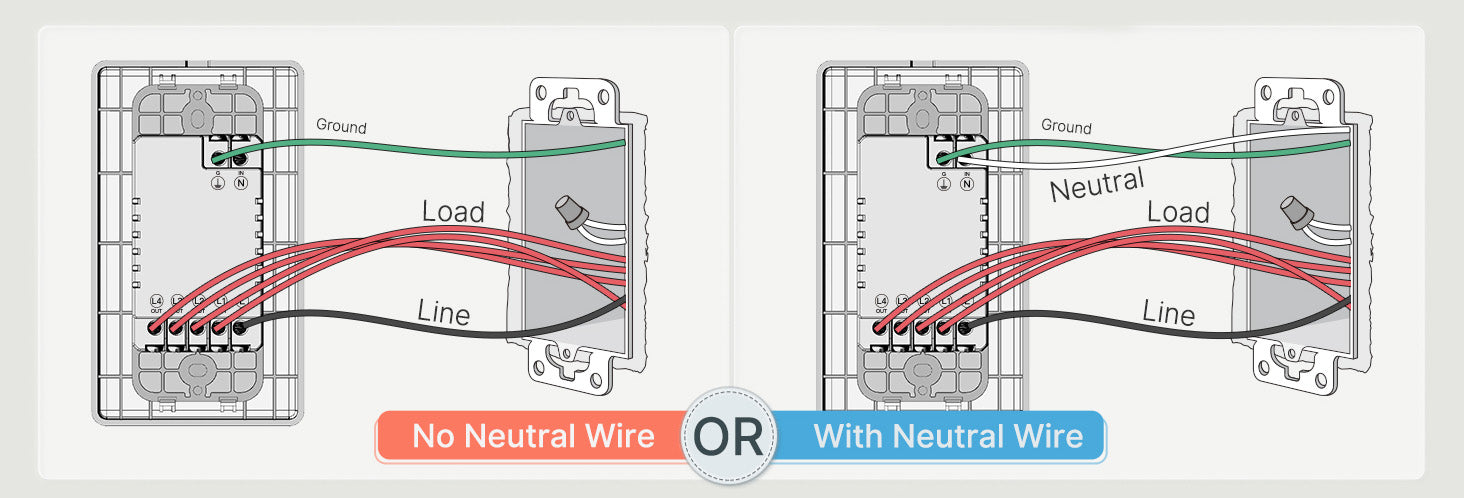
Check Neutral Wire Requirements
Many digital and smart timers require a neutral wire to power internal electronics like displays or countdown timers. Mechanical dial timers typically do not need a neutral. If your electrical box lacks a neutral wire, verify whether a neutral-free timer model is available for your setup. Some timer switches use minimal current leakage to power internal circuits without a neutral, which works safely for fan loads.
Connect the Timer Switch Correctly
Follow the manufacturer’s wiring diagram for your specific model. General connection steps apply to most timer switches available today.
Ground the Timer
Attach the bare copper or green ground wire from the box to the green ground wire on the timer using a wire nut. Twist clockwise and secure tightly. If your electrical box is metal and grounded, some local codes allow grounding the switch to the box screw, but only verify this with a voltage tester first.
Attach Neutral Wire If Required
If your timer needs a neutral connection, join the white wire from the box to the white timer wire. Twist the ends together clockwise, cap with a wire nut, and wrap with electrical tape for added security. Skip this step if your timer does not require a neutral.
Connect Line and Load Wires
Connect the black hot wire from the power source to the black or labeled line wire on the timer. Connect the red or second black wire leading to the fan as the load connection. The line wire brings power in, and the load wire sends power out to the fan. Reversing these connections causes malfunction or safety hazards.
Handle Stranded Wires
Electronic timer switches often use stranded wires with multiple thin strands. Before inserting into wire nuts, gently twist the strands clockwise to prevent fraying and ensure solid contact with the wire nut interior.
Mount and Secure the Timer
Carefully fold the wired connections back into the electrical box. Avoid pinching or damaging wire insulation. Align the timer switch with mounting holes and secure with screws. Reattach the wall plate.
Verify Clearance
Ensure no wires get trapped between the switch and the box. If the timer has a dial or digital face, confirm it sits flush and turns freely. Overcrowded boxes increase heat buildup and can cause premature failure.
Restore Power and Test Operation
Return to the breaker panel and restore power. Remove any tape or labels from the breaker. Test the timer according to your model instructions.
Activate and Verify Function
For mechanical dial timers, turn the knob to set runtime such as 15 or 20 minutes. For digital switches, press the button or touch sensor to start. Listen for the fan to turn on. Confirm it runs for the full duration and shuts off automatically.
Troubleshoot Basic Problems
If the fan does not start, check power, wiring connections, and verify the line and load wires are not reversed. If the fan runs continuously, the line and load wires are likely swapped. If a digital display remains dark, the neutral wire may be missing or loose. Turn off the breaker immediately if you notice sparks, heat, or burning smells, then inspect all connections.
Choose the Right Timer Type
Not all timer switches work the same way. Selecting the correct type ensures compatibility with your wiring and meets your needs.
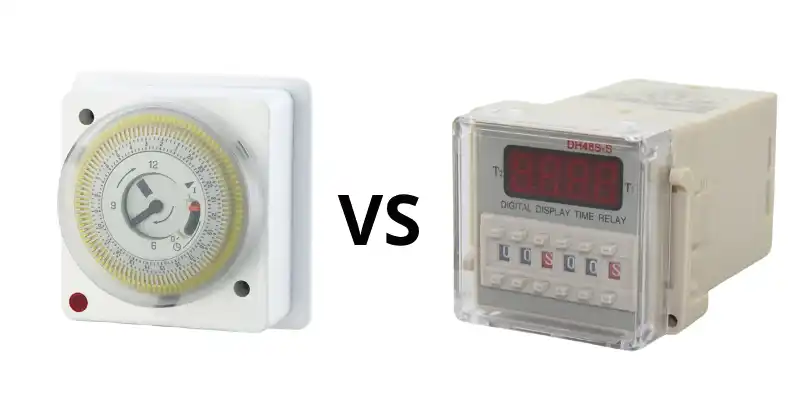
Mechanical Dial Timers
These timers feature a simple rotating knob for operation. They do not require a neutral wire, making them ideal for older homes. Mechanical timers are durable, low-cost, and reliable, though timing is less precise than digital options.
Digital and Electronic Timers
Digital timers offer precise countdown settings from 5 to 30 minutes. They feature LED displays and programmable settings but typically require a neutral wire for internal electronics. These work best in modern homes with neutral wire access.
Smart and Sensor-Based Timers
These advanced timers activate automatically through motion detection or humidity sensing. They may require neutral wires and Wi-Fi connection. While convenient, they cost significantly more and offer features overkill for basic bathroom ventilation.
Solve Neutral Wire Problems
Many older homes lack a neutral wire in the switch box. Several solutions address this common issue.
Use Neutral-Free Timers
Some mechanical and newer electronic timer models operate without a neutral wire. Check product specifications before purchasing. These switches use minimal current leakage to power internal circuits safely for fan loads.
Add a Neutral Wire
To bring neutral to the box, run a new cable from the fan or light fixture. Connect the neutral at the fixture and extend it to the switch box. This requires opening walls and is best handled by a professional electrician.
Never Use Ground as Neutral
Never use the ground wire as a neutral substitute. This practice violates electrical code and creates serious shock hazards. Ground wires serve a critical safety function and must never carry circuit current.
Ensure Compatibility with Your Fan
Not all switches work with all exhaust fans. Verifying compatibility before buying prevents wasted money and installation frustration.
Check Load Ratings
Most residential exhaust fans draw less than 1 amp. Standard timers handle 15A to 20A loads, so rating compatibility is rarely an issue. However, confirm the timer is rated for inductive loads like motors, not just resistive loads like lights.
Avoid Fan Dimmers
Standard dimmer switches disrupt motor speed and can cause overheating. Only use fan-rated dimmers if speed control is necessary. For timer functionality, standard timer switches work perfectly with exhaust fan motors.
Set Appropriate Run Times and Educate Users
Once installed, household members need to understand how the timer works. Proper use maximizes the benefits of your upgrade.
Set Ideal Run Times
Small bathrooms typically need 10 to 15 minutes of fan runtime after showering. Large or poorly ventilated bathrooms may require 20 to 30 minutes. Adjust based on your specific situation. Too short leaves moisture behind; too long wastes energy.
Post Usage Instructions
Place a small note near the switch explaining that the fan runs automatically and shuts off after the set time. This prevents confusion and accidental breaker trips from household members thinking the fan is stuck on.
Maintain and Inspect Regularly
Timer switches require minimal maintenance, but periodic checks prevent problems and extend device life.
Check for Heat or Discoloration
Every six months, feel the switch plate while the fan is running. If it feels warm or the wall shows discoloration, turn off power and inspect connections. Loose wires cause overheating and potential fire hazards.
Tighten Connections Periodically
Turn off power and check wire nuts for tightness. Re-tighten any loose connections. Replace frayed, corroded, or damaged wires immediately. Following these simple steps keeps your timer functioning safely for 5 to 10 years.
Frequently Asked Questions About Installing Timer Switch for Exhaust Fan
Can I install a timer switch on any exhaust fan?
Most residential exhaust fans work with timer switches. Verify the timer is rated for inductive loads like motors. Standard timers handle 15A to 20A, well above the under-1-amp draw of typical bathroom fans.
What happens if my switch box has no neutral wire?
Use a mechanical dial timer that does not require a neutral wire. These timers work by allowing small current leakage through the fan motor to power internal timing mechanisms. Alternatively, hire an electrician to run a neutral wire to your box.
How long should I set the timer runtime?
Set runtime based on bathroom size and ventilation. Small bathrooms need 10 to 15 minutes. Larger or poorly ventilated bathrooms need 20 to 30 minutes. Adjust until moisture clears completely after showering.
Why does my digital timer display not turn on?
The neutral wire is likely missing or loose. Digital timers require neutral connections to power internal electronics. Check all white wire connections at both the timer and wire nuts.
Can I use a dimmer switch instead of a timer?
Never use standard dimmer switches with exhaust fans. Dimmers control light bulb brightness by varying voltage, which disrupts motor speed and can cause overheating or damage. Use only timer switches specifically rated for fan control.
Key Takeaways for Installing Timer Switch for Exhaust Fan
Installing a timer switch for your exhaust fan is a straightforward project that dramatically improves bathroom ventilation and prevents mold growth. The process involves turning off power, documenting your existing wiring, connecting the timer according to manufacturer instructions, and testing operation. Most homeowners complete this upgrade in under an hour with basic tools.
Choosing the right timer type matters significantly. Mechanical dial timers work in older homes without neutral wires, while digital timers offer precise timing but require neutral connections. Always verify compatibility with your specific fan model before purchasing.
Safety remains paramount throughout the process. Always verify power is off with a voltage tester before touching wires. If your home has aluminum wiring or you feel uncertain about any step, hire a licensed electrician. Proper installation ensures years of reliable, automatic bathroom ventilation.
Leave a Reply