If your Broan exhaust fan is making noise, underperforming, or needs replacement, removing it is the essential first step. Many homeowners struggle with this process because Broan units feature tricky wire hangers, hidden fasteners, and fragile plastic components that can break easily if handled incorrectly. Whether you’re cleaning the motor, replacing a light lens, or upgrading to a newer model, knowing the correct removal technique for your specific unit prevents frustration and costly mistakes.
This guide provides a clear, step-by-step approach to removing any Broan exhaust fan cover or full housing. You’ll learn how to identify your model type, avoid common pitfalls like broken mounting tabs, and use proven techniques that make removal and reinstallation faster and safer.
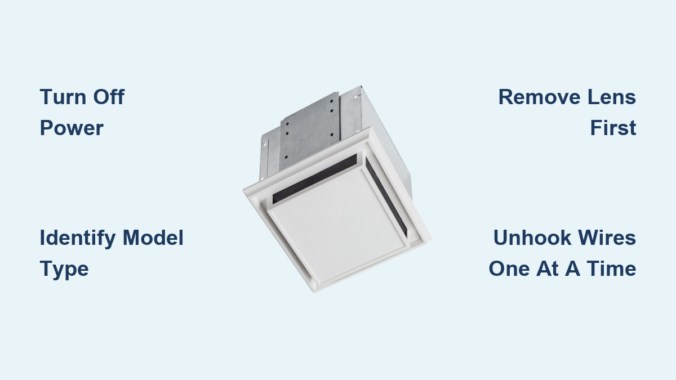
Turn Off Power Before Starting
Electrical safety must be your first priority when removing any Broan exhaust fan. These units are hardwired into your home’s electrical system, so simply turning off the wall switch is not sufficient. A live wire can cause shock, injury, or damage during the removal process.
Before touching any component, turn off power at the circuit breaker that supplies electricity to the fan. Use a non-contact voltage tester to verify the power is off. Hold the tester near the light socket or wiring compartment after removing the bulb or lens. If the tester beeps or lights up, return to the breaker and try again.
Essential safety steps include:
- Locate the correct circuit breaker and turn it off
- Label the breaker once off to prevent accidental reactivation
- Verify no voltage is present before proceeding with any removal
Once power is confirmed dead, you can safely proceed with the removal process.
Identify Your Broan Model Type
Broan manufactures several exhaust fan designs, and the removal method depends heavily on your specific unit. Understanding what you have prevents unnecessary force and broken parts during the process.
Common Broan unit types include:
- Fan-only models: Basic ventilation with no light or heat
- Fan/light combos: Include a replaceable bulb, typically halogen or incandescent
- Fan/light/heat units: Combine all three functions, commonly found in bathrooms
- Recessed ceiling-mounted units: Installed above drywall with a visible grille or cover
Check for a model number, which is usually printed on a label around the housing or inside the cover frame. Use this number to search Broan’s official support site for schematics or installation manuals specific to your unit.
Visual clue: If your unit has a removable lens over a light, start there. Many fasteners are hidden behind the bulb socket, and this is often the key to accessing the entire cover.
Remove Light Lens or Bulb First
On many Broan fan and light combination models, the cover won’t come off until you remove the light lens or bulb assembly. This step often reveals a hidden screw or nut that secures the entire grille to the housing.
Step-by-step removal process:
- Unscrew or unplug the bulb from its socket (common bases include E26 and GU10)
- Inspect the socket area for a small metal nut or Phillips screw hidden behind it
- If a fastener is present, remove it using a screwdriver or nut driver
- Gently pull down on the lens or diffuser as it may be held by friction clips
Pro tip: Use a plastic putty knife to avoid scratching the lens or damaging the ceiling paint. Never pry with metal tools, which can crack or scratch plastic components.
Once the lens is removed, you may have enough access to clean the fan blade or inspect the motor without performing a full removal.
Unhook Wire Hangers One at a Time
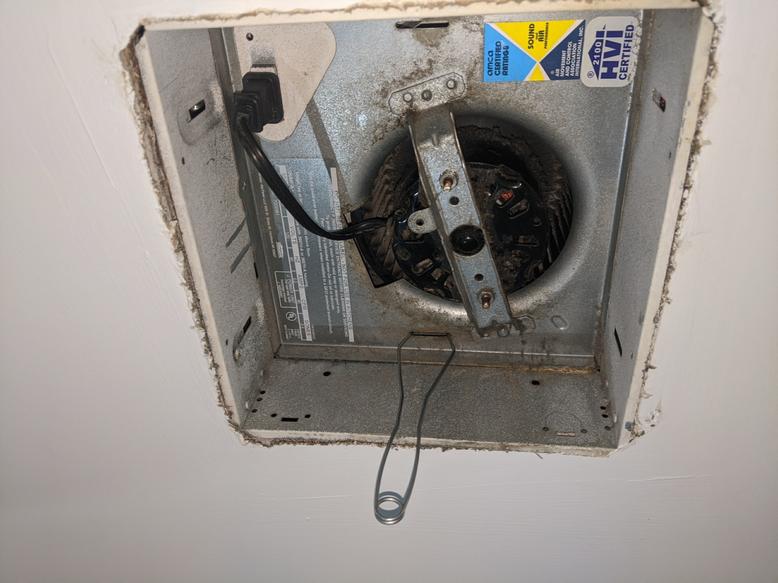
Most older Broan exhaust fans use spring steel wire hangers that snap into slots in the housing. These wire clips are the primary source of frustration during removal, and using the wrong technique often leads to broken plastic tabs.
The correct removal method:
- Support the cover with both hands to prevent it from falling
- Pull down slightly on one side of the cover
- Slide one wire hanger sideways out of its slot using your fingers
- Repeat on the opposite side to release the second wire
- Fully lower the cover to expose wiring and internal components
Critical warning: Do not try to pinch both wires together at the bottom. The Y-shaped flare of these wire hangers limits finger space to approximately 2 inches, making compression nearly impossible. Forcing both wires inward breaks the plastic mounting tabs, which cost approximately $25 to replace and render OEM covers unusable.
Think of this like putting on pants one leg at a time rather than trying to force both legs in simultaneously. The same logic applies here.
Address Difficult Reinstallation Issues

Putting the cover back on can often be harder than taking it off, especially with older models. The narrow 1-inch slots and flared wire design make alignment and reinstallation challenging for many homeowners.
Proven solutions for reinstallation:
- Hook one side first, then compress the second wire and insert it into the slot
- Slightly bend the wire hangers inward with pliers to reduce the flare, which Broan and Nutone customer service confirms is an acceptable modification
- Consider non-OEM replacement covers with straighter, easier-to-compress wires. Users report installation taking as little as ten seconds with these alternatives
Third-party covers perform identically to OEM parts and solve long-term maintenance issues. If reassembly remains difficult after trying these methods, consider upgrading to a newer Broan model with a twist-and-lock or tool-free release mechanism.
Remove Full Fan Housing for Replacement
If the motor is noisy, seized, or inefficient, you may need to remove the entire housing rather than just the cover. This is also the ideal time to upgrade to a higher-CFM, quieter, or more energy-efficient model.
Complete removal steps:
- Turn off power at the breaker and verify with a voltage tester
- Remove the cover using the wire hanger method described earlier
- Locate wire nuts connecting black (hot), white (neutral), and green or bare (ground) wires
- Disconnect all wires carefully, taking a photo first for reference
- Find mounting screws or clips securing the housing to joists or the mounting frame
- Unscrew or unclip the brackets and gently lower the unit through the ceiling opening
Modern Broan units feature modular designs where replacement fan units simply bolt or plug in, making this process straightforward for DIYers.
Clean and Maintain After Removal
Once the fan is accessible, take advantage of the open housing to perform essential maintenance that improves performance and extends motor life.
Recommended maintenance actions:
- Vacuum dust and lint from the fan blade and housing interior
- Wipe down components with a damp cloth, avoiding harsh chemicals that can damage plastic
- Inspect the motor for overheating signs such as discoloration or a burnt smell
- Lubricate oil ports if present using lightweight machine oil
- Check ductwork for kinks, blockages, or improper termination (should vent outside, not into the attic)
Dust buildup is a leading cause of rattling or grinding sounds in exhaust fans. Regular cleaning every 6 to 12 months maintains strong airflow and extends the motor’s operational life.
Upgrade to Modern Broan Models

Broan has significantly improved its designs in recent years. If you’re replacing an older unit, consider upgrading to a newer model with user-friendly features that make future maintenance simpler.
Benefits of newer models:
- Twist-and-lock covers: No wire hangers, simply rotate to release
- Wider access slots: Easier installation and maintenance access
- Tool-free removal: Designed for fast cleaning and inspection
- Higher CFM ratings: Better ventilation with less runtime
- Energy-efficient operation: Lower electricity consumption
These models reduce future maintenance hassle and are often more energy efficient and quieter during operation. Check Broan’s current lineup for models compatible with your existing ceiling cutout size.
Use Recommended Tools and Supplies
Having the right tools makes removal smoother, safer, and faster. While no specialty tools are required, a basic kit speeds up the process significantly.
Essential toolkit:
- Non-contact voltage tester to confirm power is off
- Needle-nose pliers to manipulate stiff wire hangers
- Plastic putty knife to pry lenses without causing damage
- Flashlight or headlamp to see into dark ceiling cavities
- Screwdrivers (Phillips and flathead) to remove fasteners
- Replacement cover (OEM or non-OEM) for easier future access
- New fan unit if upgrading, priced by CFM and features
Keep a spare non-OEM cover on hand for quick maintenance access in the future.
Follow Best Practices Summary
Use this quick-reference checklist to ensure you complete every critical step:
| Step | Action |
|---|---|
| 1 | Shut off power at the breaker |
| 2 | Verify no voltage with tester |
| 3 | Identify model type and fasteners |
| 4 | Remove bulb or lens first if applicable |
| 5 | Unhook wire hangers one side at a time |
| 6 | Avoid excessive force on plastic tabs |
| 7 | Disconnect wiring and remove housing if needed |
| 8 | Clean fan, inspect motor, check ducts |
| 9 | Consider non-OEM cover for easier reinstallation |
| 10 | Upgrade to modern Broan model for long-term ease |
Following these steps ensures a smooth, damage-free removal every time.
Learn From Real User Experiences
Real-world feedback confirms what works and what doesn’t when removing Broan exhaust fans. These verified experiences help you avoid common mistakes.
What users report:
- “Video tutorials helped more than the manual.” Visual guidance clarifies the one-at-a-time wire release technique that works best.
- “I broke the tab trying to pinch both wires.” This common mistake costs time and money, as replacement tabs are expensive.
- “Non-OEM covers install in seconds.” Third-party alternatives solve long-term frustration with the original design.
- “First removal took 20 minutes, now it’s under a minute.” Familiarity with the mechanism makes all the difference.
Search YouTube for “Broan fan cover removal” and find a video matching your specific model for additional visual guidance.
Frequently Asked Questions About Removing a Broan Exhaust Fan
Can I remove a Broan exhaust fan without turning off the power?
No, you must turn off power at the circuit breaker. Broan exhaust fans are hardwired into your home’s electrical system, and relying on a wall switch alone is dangerous. Use a non-contact voltage tester to confirm power is off before beginning any work.
Why won’t the cover come off my Broan fan?
The cover is likely held by hidden fasteners behind the light bulb or lens. Remove the bulb first and check for screws or nuts securing the lens. On older models, spring-loaded wire hangers may also be holding the cover in place.
How do I fix broken plastic tabs on my Broan exhaust fan cover?
Broken tabs cannot be repaired. You must replace the entire cover. OEM replacement covers cost approximately $25, though many users find non-OEM alternatives easier to install and equally effective.
What tools do I need to remove a Broan exhaust fan?
A basic toolkit suffices. You need a non-contact voltage tester, needle-nose pliers, plastic putty knife, flashlight, and screwdrivers. No specialty tools are required for most removal jobs.
How often should I clean my Broan exhaust fan?
Clean your exhaust fan every 6 to 12 months to prevent dust buildup that causes noise and reduces performance. More frequent cleaning may be needed in high-humidity bathrooms or kitchens.
Should I upgrade to a newer Broan model when replacing my fan?
Yes, modern Broan models feature improved designs including twist-and-lock covers, wider access slots, and tool-free removal mechanisms. These improvements make future maintenance significantly easier and are worth the investment.
Key Takeaways for Removing Your Broan Exhaust Fan
Removing a Broan exhaust fan doesn’t have to be a frustrating experience. The most important steps are turning off power at the breaker, identifying your specific model type, and using the one-at-a-time wire hanger release technique rather than attempting to pinch both wires together. Avoid excessive force, which breaks the plastic mounting tabs and creates additional repair costs.
After removal, take time to clean the fan blade and housing, inspect the motor for wear, and check ductwork for blockages. Consider upgrading to a newer Broan model if your current unit is old, as modern designs feature tool-free access and improved reliability. Keep a spare non-OEM cover on hand for easier future maintenance access.
With the right knowledge and approach, removing any Broan exhaust fan becomes a fast, safe, and frustration-free task that you can complete with confidence.
Leave a Reply