Your Ultimate Guide to Cooling: In-Depth Reviews, Smart Comparisons & Pro Care Tips.

Author: Fan Guide (Page 19 of 38)

How to Install a Bathroom Exhaust Fan


Adding a bathroom exhaust fan is one of the most effective upgrades you can make to protect your home from moisture damage. Without proper ventilation, steam from showers lingers on walls and ceilings, creating the perfect environment for mold growth, peeling paint, and even structural rot over time. A well-installed exhaust fan removes humid air outside, maintaining indoor humidity between 30% and 50% to keep your bathroom dry and healthy. This guide walks you through selecting the right fan, planning venting, routing ductwork, making safe electrical connections, and completing the installation yourself.

Choose the Right Exhaust Fan for Your Bathroom

bathroom exhaust fan CFM chart comparison

Selecting the correct fan ensures effective moisture removal without excessive noise or energy costs. The right choice depends on your bathroom size, mounting requirements, and desired features.

Calculate the Correct CFM for Your Space

CFM (cubic feet per minute) measures how much air the fan moves. Match this rating to your bathroom square footage for optimal performance.

Calculation method:

  • Measure your bathroom length and width
  • Multiply to get square footage
  • Multiply square footage by 1.1 for minimum required CFM

Example: An 8 ft × 10 ft bathroom equals 80 sq ft, requiring at least 88 CFM (80 × 1.1).

Quick reference guide:

Bathroom Size Minimum CFM
Up to 50 sq ft 50 CFM
50–100 sq ft 80–100 CFM
Over 100 sq ft 110+ CFM

Code requirement: Most building codes mandate at least 50 CFM for bathrooms with showers or tubs.

Check the Sone Rating for Quiet Operation

The sone rating measures fan noise. Lower values mean quieter operation.

Sone ratings to know:

  • 0.5–1.0 sone: Whisper-quiet, ideal for master bathrooms
  • 1.0–2.0 sone: Quiet, similar to a refrigerator hum
  • 2.0–3.0 sone: Moderate noise, acceptable for guest bathrooms
  • Above 3.0 sone: Noticeably loud, avoid unless necessary

Pro tip: Choose a fan under 3 sones for comfortable daily use in frequently occupied bathrooms.

Select the Best Mounting Style

Your home structure determines which mounting style works best.

Ceiling-mounted fans:

  • Most common installation type
  • Installed between ceiling joists
  • Duct runs vertically through attic
  • Ideal when attic access exists

Wall-mounted fans:

  • Mount directly on exterior walls
  • Duct runs horizontally through wall studs
  • Perfect for homes without attic access
  • Works well when fan location aligns with outside wall

Design note: Modern fans include integrated LED lights, heaters, or humidity sensors—useful for combining functions and saving space.

Plan Proper Venting to the Outside
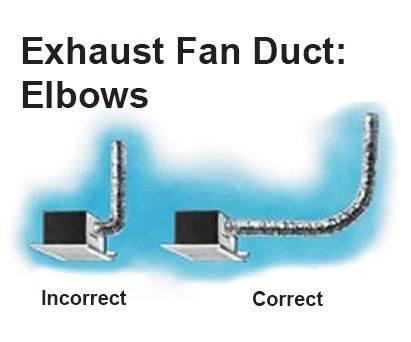
bathroom exhaust fan venting diagram correct vs incorrect

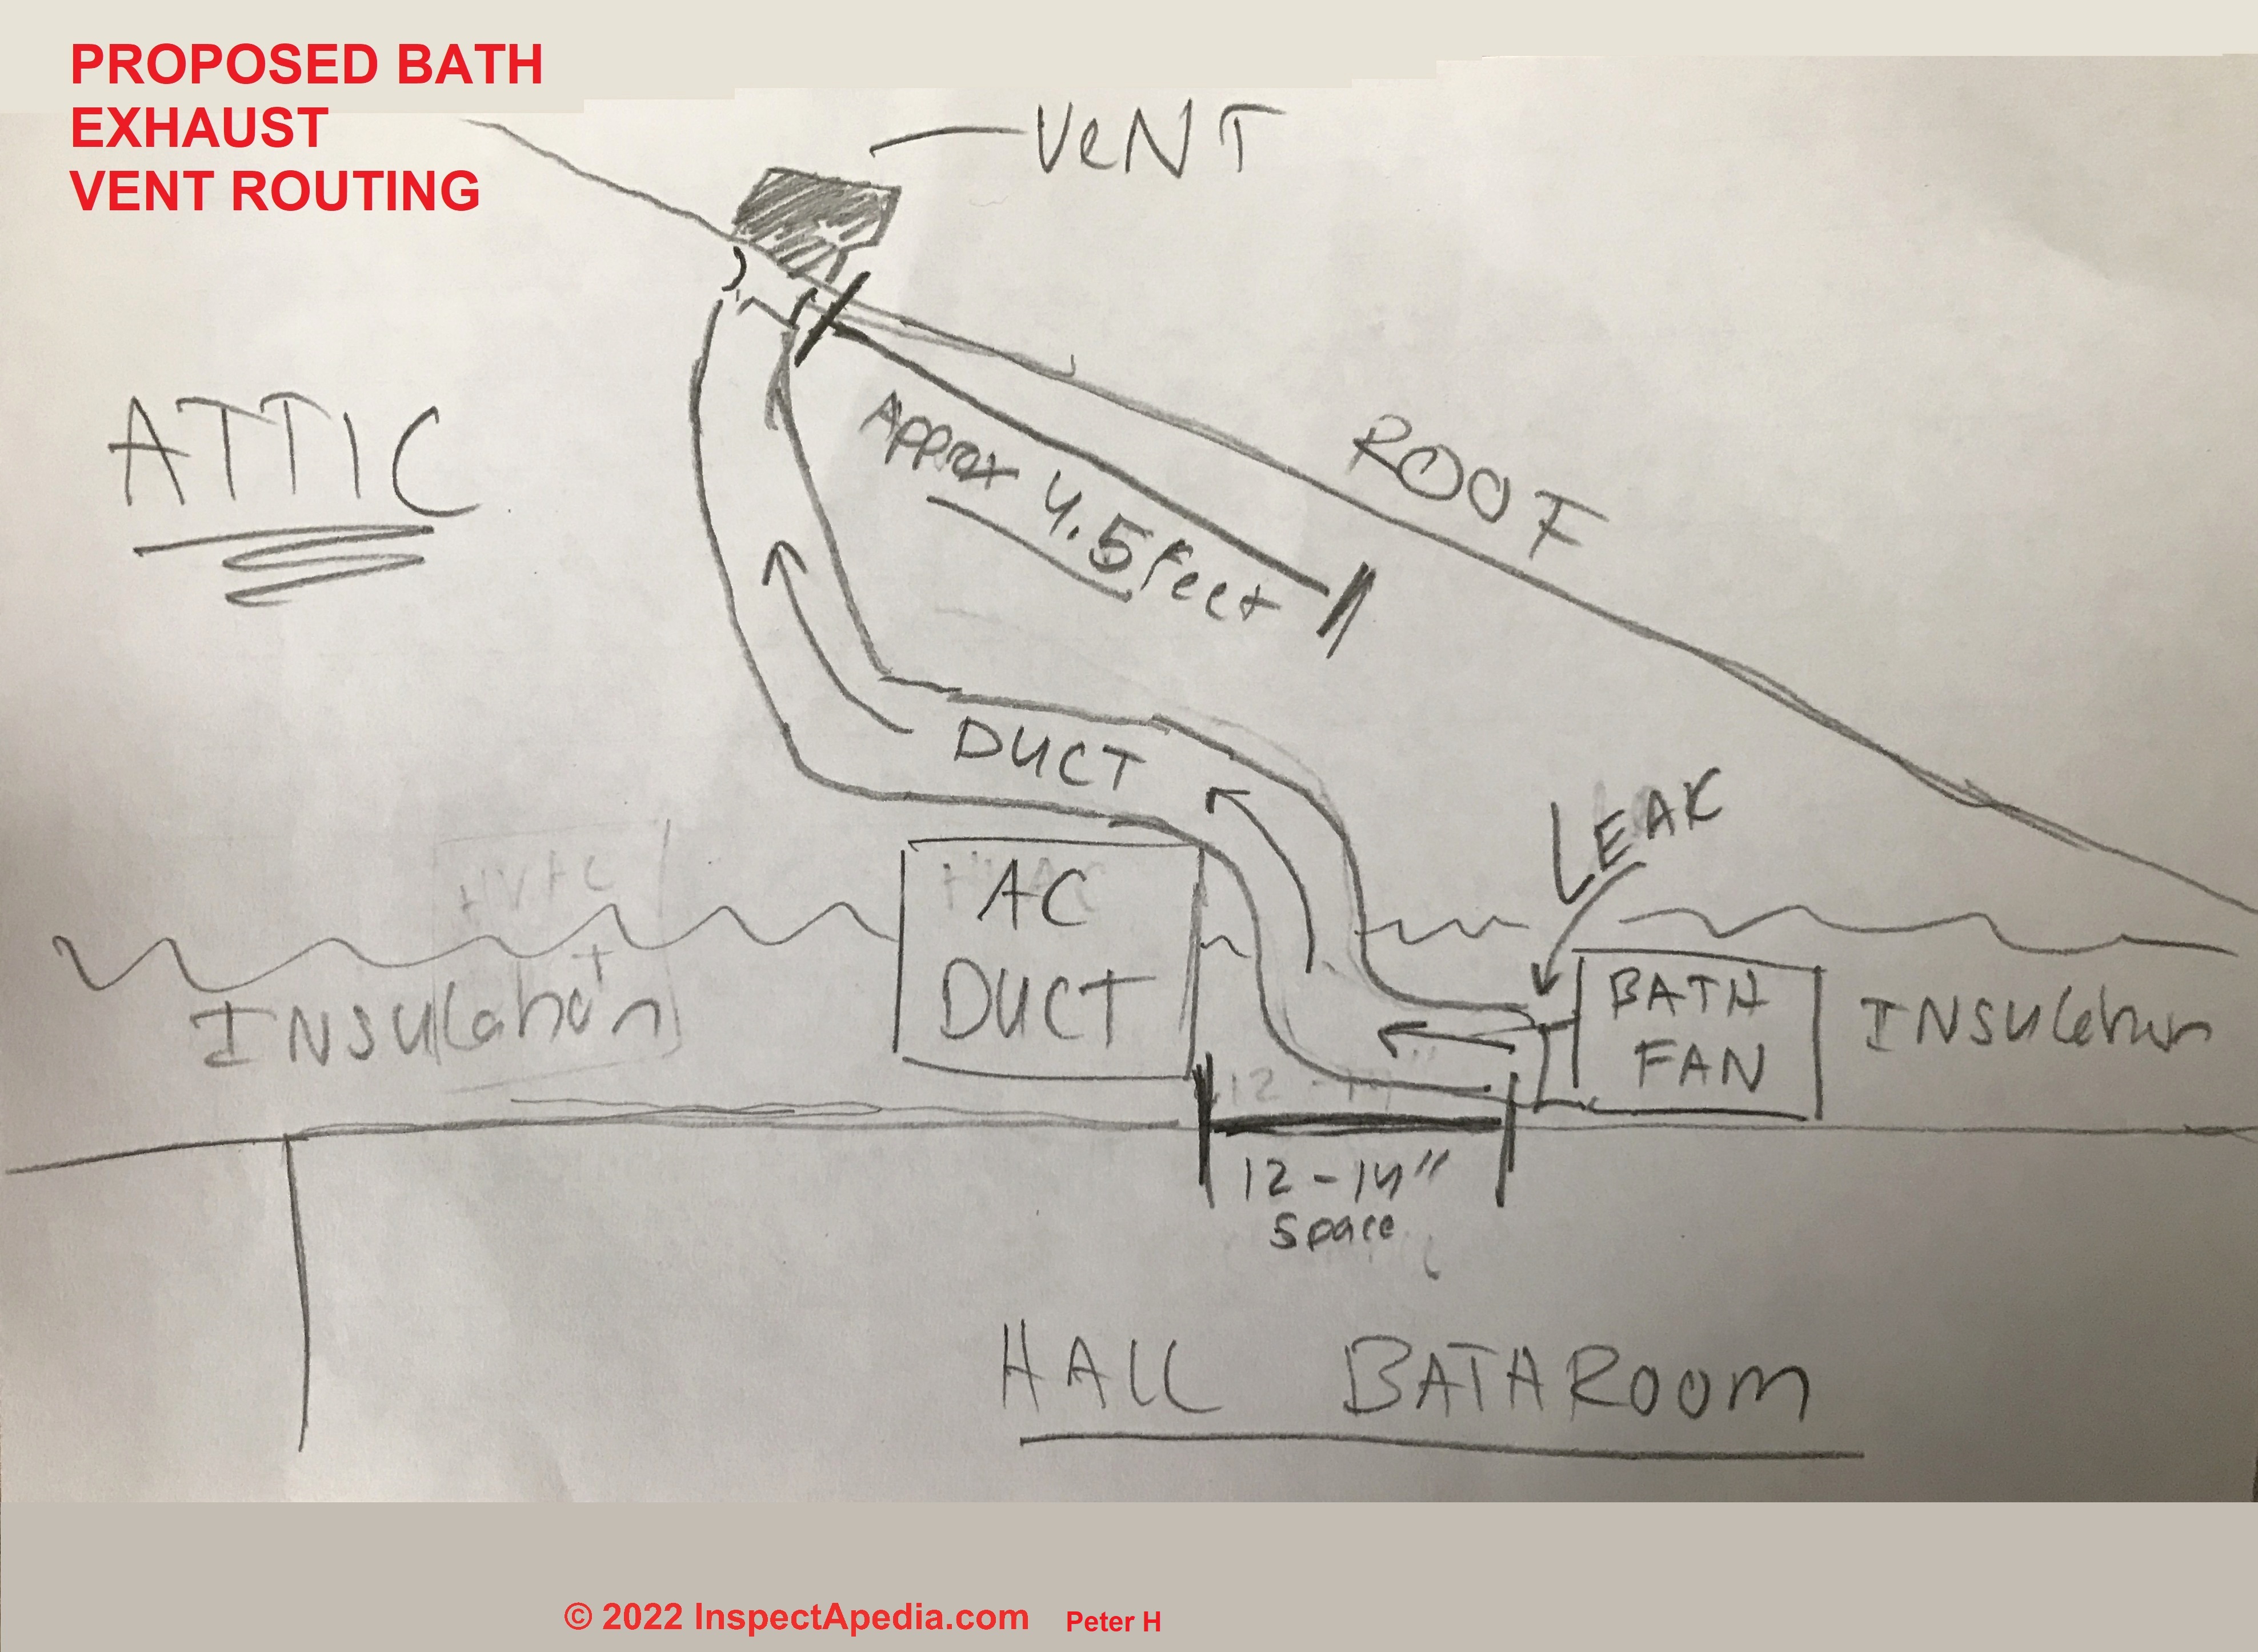
Exhaust must terminate outside your building envelope. Never vent into attics, crawlspaces, or interior walls, as this causes mold, rot, and insulation damage.

Pick the Best Vent Exit Location

Choose an exit point that minimizes duct run length while staying code-compliant.

Recommended exit locations:

  • Sidewall: Easiest and most reliable option
  • Roof: Possible but requires careful flashing
  • Gable wall: Good alternative when accessible
  • Soffit: Only with a proper backdraft damper

Critical rule: Venting indoors is unsafe and violates building codes. Always vent outside.

Use Correct Ducting Materials

Proper ductwork is essential for airflow efficiency. Poor ducting kills performance even with a powerful fan.

Duct specifications:

  • Diameter: 4 inches (standard residential size)
  • Material: Rigid or flexible metal duct (aluminum or galvanized steel)
  • Avoid: Plastic, vinyl, or foil-wrapped ducts—they collapse and are not code-compliant

Duct run limits:

  • Keep total run under 25 feet
  • Each 90-degree bend adds 5 feet of equivalent length
  • Slope duct ¼ inch per foot downward toward exterior to prevent condensation pooling

Efficiency tip: Use smooth rigid ducts instead of flexible ducting when possible for better airflow and less resistance.

Gather Tools and Materials for the Job

Having everything ready before starting prevents mid-project delays.

Tools You Will Need

  • Drill/driver
  • Jigsaw or drywall saw
  • Hole saw (4½ inch)
  • Extended spade bit (3/8 inch)
  • Tape measure
  • Layout square
  • Circuit tester
  • Wire strippers and wire nuts
  • Caulk gun
  • Safety goggles
  • Respirator mask
  • Ladder

Materials Checklist

  • Bathroom exhaust fan unit
  • 4-inch metal duct (rigid or flexible)
  • 90-degree duct elbow
  • Wall cap or roof vent cap
  • Foil duct tape or HVAC mastic
  • Cable clamp
  • Roofing cement (for roof venting)
  • Screws, spackling compound, and paint

Install a Bathroom Exhaust Fan with Attic Access

This method works best for unfinished attics and standard ceiling installations.

Mark Location and Drill Reference Hole

Choose a spot between ceiling joists, ideally centered between the shower and toilet for optimal air capture. Drill a 3/8-inch reference hole through the ceiling into the attic. Access the attic, locate the hole, and clear insulation to expose the joists.

Tip: Avoid plumbing vents and electrical wires running through the ceiling cavity.

Cut the Ceiling Opening

Measure the fan housing intake size and transfer those measurements to the ceiling using the reference hole as your guide. Draw a rectangle with a layout square, then cut with a jigsaw. Support the drywall as you cut to prevent it from falling.

Mount the Fan Housing in the Attic

Attach a 4-inch 90-degree elbow to the fan exhaust port and seal with foil duct tape (not regular duct tape). Slide the housing into the ceiling hole and expand mounting brackets against the joists. Screw securely to prevent vibration and noise.

Warning: Ensure the fan is level and tight. A loose unit causes annoying vibrations and operational noise.

Run Ductwork to the Exterior

Route metal duct from the fan to an exterior wall. Select a spot between two studs and drill through the wall sheathing with a 5-inch hole saw. Install the wall cap and secure with screws. Connect the duct to the cap and seal all joints with foil tape or HVAC mastic.

Cold climate tip: Use HVAC mastic instead of tape—it won’t crack in freezing temperatures.

Make Safe Electrical Connections

Turn off power at the breaker and verify with a circuit tester. Remove the blower motor from the housing and save the screws. Knock out the wiring knockout on the housing and install a cable clamp. Feed house wires through and connect black to black (hot), white to white (neutral), and green or bare to the ground screw. Secure with wire nuts, tuck wires inside, and replace the cover.

Safety note: If no existing switch or power source exists, hire a licensed electrician before proceeding.

Reinstall Motor and Test the Fan

Plug the blower motor back into the housing and secure with screws. Snap on the grille, restore power, and turn on the switch.

Test for success:

  • Fan runs smoothly without unusual sounds
  • No loud vibrations
  • Tissue held near the exterior vent cap gets pulled outward

Finish with Drywall Repair

Patch any gaps around the cutout with spackling compound. Sand smooth, repaint to match the ceiling, and clean the grille. Your installation is complete.

Install an Exhaust Fan Without Attic Access

No attic? No problem. Install from below in finished ceilings or cathedral-style designs.

Prepare the Ceiling Opening

Remove the old fan or test fit the new housing. If the opening is too small, enlarge it with a jigsaw. If too large, install a wood support block between joists and patch the drywall.

Attach Duct Connector from Below

Connect the duct adapter to the fan exhaust port and seal with HVAC tape. Anchor the connector to the ceiling hole with a screw for stability.

Route Duct Through Wall or Roof

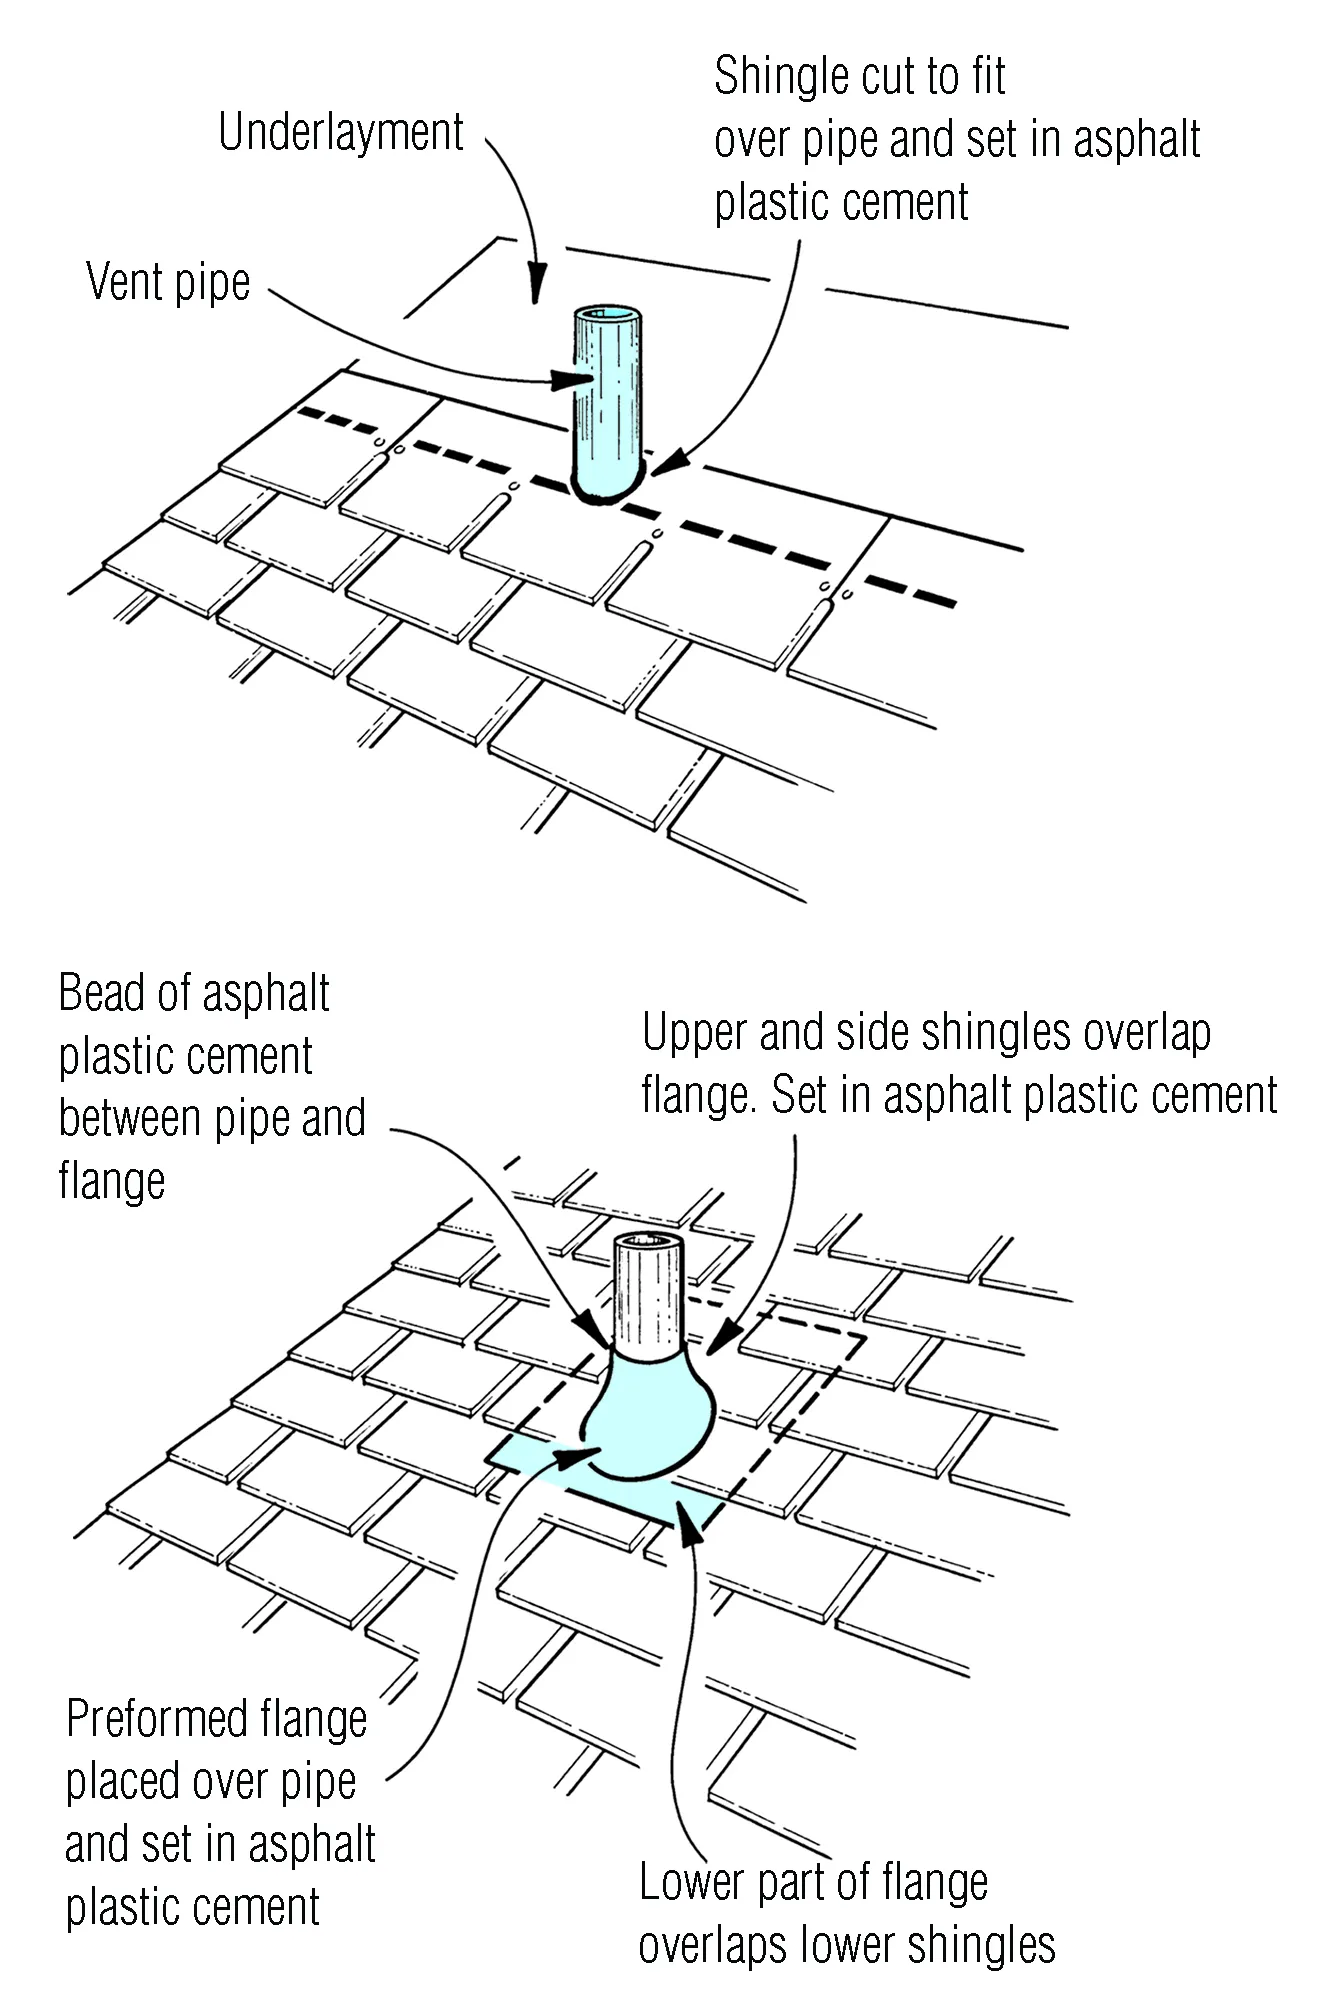
Drill through the exterior wall between studs. Install the wall cap and connect the duct. For roof venting, cut through shingles with a hole saw, install the roof cap, and seal with roofing cement.

Pro tip: Use rigid duct for roof runs—it’s sturdier and easier to support than flexible duct.

Handle Wiring in Confined Space

Remove the wiring cover and knockout plug. Install a cable clamp and feed wires through. Connect by color (black-black, white-white, ground-ground), tuck wires inside, and reattach the cover.

Mount Fan and Finalize

Insert the fan into the housing and secure with screws. Install the grille, test operation, and patch drywall as needed.

Replace an Existing Exhaust Fan

Upgrading an old or noisy fan? Reuse existing ducts and wiring to save significant time.

Remove the Old Fan

Turn off power at the breaker. Remove the grille and unscrew the blower motor. Unplug the motor from the housing. Detach the old housing if replacing it entirely.

Install the New Fan

Place the new housing between joists and expand mounting brackets. Screw brackets securely. Reconnect the existing duct to the exhaust port. Feed wires through the cable clamp and connect by color. Plug in the new motor, secure it, and snap on the grille.

Time-saver: Full replacement takes 1–2 hours with existing infrastructure.

Vent Through the Roof When Needed

Sidewall venting isn’t always possible. Roof venting works but requires careful installation.

Cut the Roof Opening

Drill a pilot hole from the attic and mark the location outside. Use a 5-inch hole saw to cut through shingles and sheathing. Slide the roof vent cap under the shingles, nail in place, and seal edges with roofing cement.

Connect and Insulate the Duct

Attach the duct to the cap with HVAC tape. Insulate the duct in the attic to prevent condensation buildup. Ensure the backdraft damper opens and closes freely.

Caution: Roof flashing must be watertight. If unsure about proper installation, hire a professional roofer.

Avoid Common Installation Mistakes

Small errors reduce performance or create safety hazards. Steer clear of these common pitfalls.

Never Vent Into the Attic

Moist air in the attic causes mold, rot, and insulation collapse—a costly mistake that violates building codes.

Do Not Use Plastic or Vinyl Ducts

These materials collapse over time and are not fire-rated. Use metal ducts only for code-compliant installation.

Minimize Bends and Length

Each bend restricts airflow. Keep duct runs short and straight for maximum efficiency.

Seal All Joints Properly

Leaky joints mean moist air escapes into walls or ceilings. Use foil tape or mastic—never standard duct tape.

Always Include a Backdraft Damper

Without one, cold air flows back into your bathroom when the fan is off. Always use a self-closing damper.

Maintain Your Fan for Long-Term Performance

A well-maintained fan lasts 10–15 years. Regular upkeep keeps it running efficiently.

Clean the Grille Monthly

Remove dust and soap scum with mild soap and water. Clogged grilles reduce airflow and force the fan to work harder.

Inspect Duct and Vent Annually

Check the exterior vent cap for birds’ nests, ice, or debris. Inspect attic ductwork (if accessible) for sagging or disconnected sections.

Know When to Replace

Signs it’s time for a new fan:

  • Loud grinding or rattling sounds
  • Weak airflow compared to new performance
  • Fan won’t turn on
  • Visible moisture damage on the ceiling around the unit

Alternatives When Ducting Is Not Possible

Sometimes running ductwork isn’t feasible. Limited options exist, though they’re not ideal substitutes.

Ductless Recirculating Fans

These units filter air and blow it back into the room using charcoal filters for odor control. They do not remove moisture, so mold risk remains.

Not recommended unless paired with a dehumidifier or consistent window ventilation.

Portable Solutions

Run a dehumidifier after showers. Open windows during and after use. Use a window exhaust fan temporarily.

Best for renters or short-term fixes—not permanent solutions.

Frequently Asked Questions About Adding a Bathroom Exhaust Fan

Can you add an exhaust fan to any bathroom?

Yes—most bathrooms can be retrofitted with an exhaust fan, though complexity varies based on access and structural constraints.

Do bathroom exhaust fans need to vent outside?

Yes. Venting indoors (into attics, crawlspaces, or walls) is unsafe and violates building codes. Always vent outside the building envelope.

Can you install a bathroom exhaust fan without a duct?

Only with a recirculating fan, but it won’t reduce humidity. Proper moisture control requires a ducted system venting outside.

How much does it cost to install a bathroom exhaust fan?

DIY installation costs $120–$175 for the fan and materials. Professional installation runs $300–$600 depending on ductwork complexity, electrical needs, and roofing.

Do ductless bathroom exhaust fans work?

They reduce odors but do not remove moisture. They are not a substitute for proper ducted ventilation in moisture-prone bathrooms.

What if there is no exhaust fan in the bathroom currently?

Open windows while showering, use a portable dehumidifier, and install a fan as soon as possible to prevent mold and moisture damage.

Key Takeaways for Installing Your Bathroom Exhaust Fan

Adding a bathroom exhaust fan pays off in comfort, air quality, and home protection. Follow these essential points for a successful installation.

Size correctly: Calculate CFM using the 1.1 multiplier method (square footage × 1.1) to ensure adequate airflow.

Vent outside only: Never vent into attics, crawlspaces, or interior walls. This causes serious mold and structural damage.

Use proper materials: Install metal ducts only—avoid plastic or vinyl. Keep duct runs short and minimize bends.

Hire professionals when needed: For electrical work or complex roof venting, a licensed electrician or roofer ensures safe, code-compliant installation.

Test your work: Hold a tissue at the exterior vent cap. If it pulls inward, your fan is working correctly.

With proper planning and tools, most homeowners complete this project in one weekend. The result is a drier, healthier bathroom that stays mold-free for years to come.

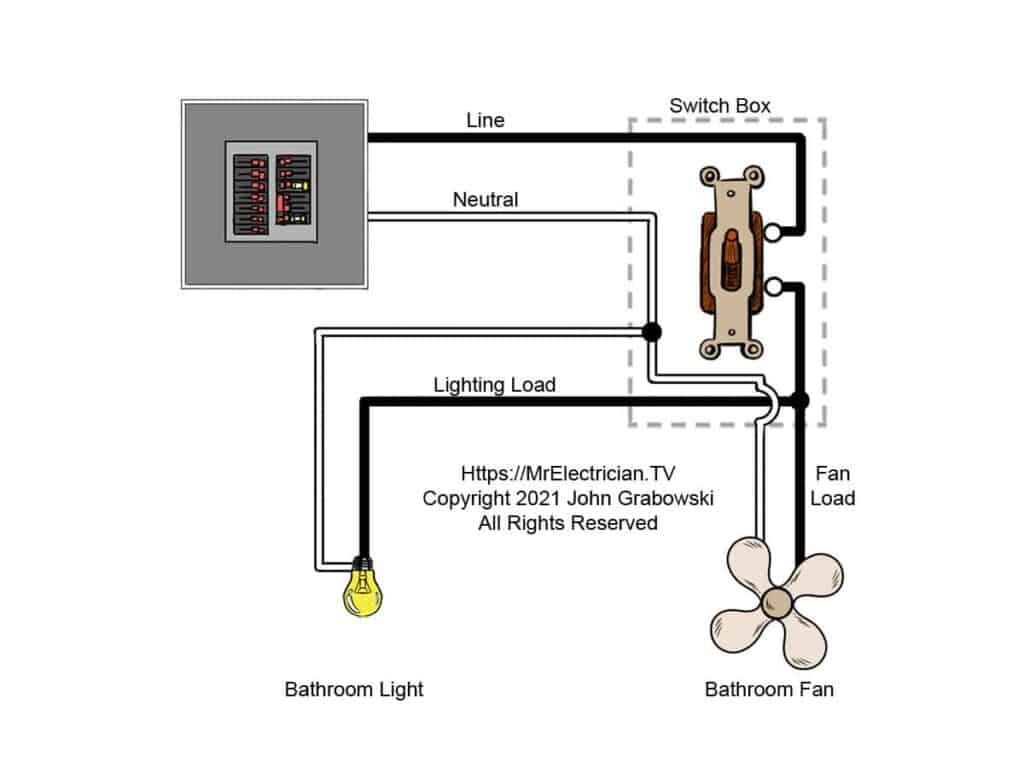
How to Install Timer Switch for Exhaust Fan


Is your bathroom still foggy long after you finish showering? Excess moisture leads to mold, mildew, and potential wall damage. Installing a timer switch for your exhaust fan solves this problem by running the fan long enough to clear humidity, even if you forget to turn it off. This upgrade costs around $20, takes under an hour with basic tools, and dramatically improves indoor air quality. In this guide, you will learn how to safely replace a standard switch with a timer-controlled one, wire connections correctly, and choose the right model for your bathroom setup.

Turn Off Power and Verify Safety

Electricity poses serious hazards, so cutting power before installation is essential. Head to your main electrical panel and locate the breaker controlling the bathroom fan. Switch it off completely. Label the breaker with tape or a marker to prevent accidental reactivation while you work. Never assume power is off always verify it yourself.

Test for Live Voltage

Use a non-contact voltage tester to confirm no electricity reaches the switch. First, test the tool on a known live outlet in another room to ensure it functions properly. Hold the tester near the exposed switch wires after removing the wall plate. If the tester beeps or lights up, return to the panel and find the correct breaker. Proceed only when the tester shows zero voltage.

When to Call an Electrician

Skip DIY installation if your home has aluminum wiring, common in houses built during the 1960s and 1970s. These wires expand and contract differently than copper, creating fire hazards if not properly connected. Use only timer switches rated for aluminum wiring, apply anti-oxidant cream to connections, and consider hiring a professional. If you feel uncertain about wiring colors or circuit layout, consult a licensed electrician.

Gather Required Tools and Materials

Having the right supplies makes installation smooth and safe. You do not need advanced equipment, but gathering everything beforehand prevents mid-project trips to the hardware store.

Tools and Parts List

  • Timer switch compatible with exhaust fans
  • Phillips and flathead screwdriver
  • Wire stripper
  • Needle-nose pliers
  • Wire nuts (typically included with switch)
  • Non-contact voltage tester
  • Electrical tape for extra insulation
  • Smartphone or camera for photographing wiring

Choose a timer switch rated for your fan load. Most bathroom fans draw under 1 amp, well within standard 15A to 20A switch ratings. Never use dimmer switches unless specifically labeled for fan use, as these can damage the motor.

Remove Old Switch and Document Wiring

bathroom switch wiring before removal diagram

Start by removing the wall plate with a screwdriver. Set aside the screws and plate in a safe place. Gently pull the old switch from the electrical box. Before disconnecting any wires, take a clear photograph of the wiring arrangement. This reference prevents confusion when connecting the new timer.

Identify Your Wiring Type

Examine how wires connect to the existing switch. Screw terminals involve wires wrapped around metal screws. Back-stab connections feature wires pushed into holes in the switch back. Side-wire clamps hold wires under set screws. Back-stab connections are less reliable and prone to loosening over time. If your old switch uses this method, consider switching to screw terminals during replacement.

Handle Multi-Switch Setups

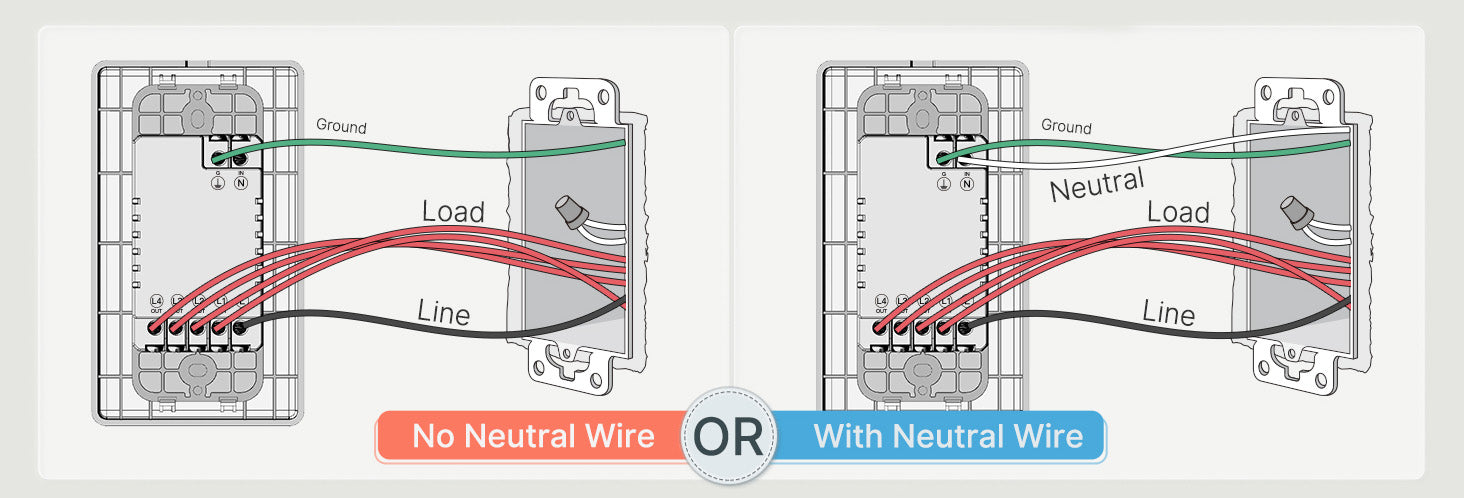
Bathrooms with separate light and fan switches often use a jumper wire to share power between both switches. One wire might be back-stabbed while another connects via screw terminal. When replacing only the fan switch with a timer, connect the timer’s line wire to the same hot source feeding the light switch. This keeps the light functioning normally while automating fan runtime.

Identify Circuit Wires in the Box

residential electrical wiring color codes switch box

Understanding your wiring configuration is crucial before connecting the timer. Most single-pole switch setups include several key wires.

Standard Wire Functions

  • Black wire carries hot power from the breaker panel
  • White wire serves as neutral to complete the circuit
  • Bare copper or green wire provides the ground connection
  • Red or second black wire acts as switched hot connecting to the fan

Check Neutral Wire Requirements

Many digital and smart timers require a neutral wire to power internal electronics like displays or countdown timers. Mechanical dial timers typically do not need a neutral. If your electrical box lacks a neutral wire, verify whether a neutral-free timer model is available for your setup. Some timer switches use minimal current leakage to power internal circuits without a neutral, which works safely for fan loads.

Connect the Timer Switch Correctly

Follow the manufacturer’s wiring diagram for your specific model. General connection steps apply to most timer switches available today.

Ground the Timer

Attach the bare copper or green ground wire from the box to the green ground wire on the timer using a wire nut. Twist clockwise and secure tightly. If your electrical box is metal and grounded, some local codes allow grounding the switch to the box screw, but only verify this with a voltage tester first.

Attach Neutral Wire If Required

If your timer needs a neutral connection, join the white wire from the box to the white timer wire. Twist the ends together clockwise, cap with a wire nut, and wrap with electrical tape for added security. Skip this step if your timer does not require a neutral.

Connect Line and Load Wires

Connect the black hot wire from the power source to the black or labeled line wire on the timer. Connect the red or second black wire leading to the fan as the load connection. The line wire brings power in, and the load wire sends power out to the fan. Reversing these connections causes malfunction or safety hazards.

Handle Stranded Wires

Electronic timer switches often use stranded wires with multiple thin strands. Before inserting into wire nuts, gently twist the strands clockwise to prevent fraying and ensure solid contact with the wire nut interior.

Mount and Secure the Timer

Carefully fold the wired connections back into the electrical box. Avoid pinching or damaging wire insulation. Align the timer switch with mounting holes and secure with screws. Reattach the wall plate.

Verify Clearance

Ensure no wires get trapped between the switch and the box. If the timer has a dial or digital face, confirm it sits flush and turns freely. Overcrowded boxes increase heat buildup and can cause premature failure.

Restore Power and Test Operation

Return to the breaker panel and restore power. Remove any tape or labels from the breaker. Test the timer according to your model instructions.

Activate and Verify Function

For mechanical dial timers, turn the knob to set runtime such as 15 or 20 minutes. For digital switches, press the button or touch sensor to start. Listen for the fan to turn on. Confirm it runs for the full duration and shuts off automatically.

Troubleshoot Basic Problems

If the fan does not start, check power, wiring connections, and verify the line and load wires are not reversed. If the fan runs continuously, the line and load wires are likely swapped. If a digital display remains dark, the neutral wire may be missing or loose. Turn off the breaker immediately if you notice sparks, heat, or burning smells, then inspect all connections.

Choose the Right Timer Type

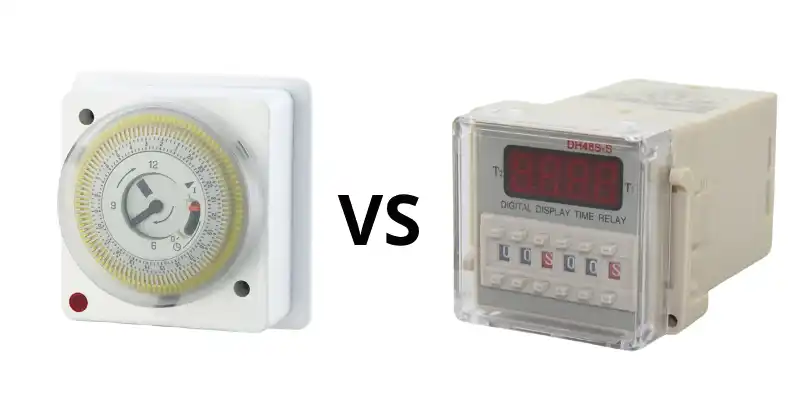
mechanical vs digital timer switch comparison

Not all timer switches work the same way. Selecting the correct type ensures compatibility with your wiring and meets your needs.

Mechanical Dial Timers

These timers feature a simple rotating knob for operation. They do not require a neutral wire, making them ideal for older homes. Mechanical timers are durable, low-cost, and reliable, though timing is less precise than digital options.

Digital and Electronic Timers

Digital timers offer precise countdown settings from 5 to 30 minutes. They feature LED displays and programmable settings but typically require a neutral wire for internal electronics. These work best in modern homes with neutral wire access.

Smart and Sensor-Based Timers

These advanced timers activate automatically through motion detection or humidity sensing. They may require neutral wires and Wi-Fi connection. While convenient, they cost significantly more and offer features overkill for basic bathroom ventilation.

Solve Neutral Wire Problems

Many older homes lack a neutral wire in the switch box. Several solutions address this common issue.

Use Neutral-Free Timers

Some mechanical and newer electronic timer models operate without a neutral wire. Check product specifications before purchasing. These switches use minimal current leakage to power internal circuits safely for fan loads.

Add a Neutral Wire

To bring neutral to the box, run a new cable from the fan or light fixture. Connect the neutral at the fixture and extend it to the switch box. This requires opening walls and is best handled by a professional electrician.

Never Use Ground as Neutral

Never use the ground wire as a neutral substitute. This practice violates electrical code and creates serious shock hazards. Ground wires serve a critical safety function and must never carry circuit current.

Ensure Compatibility with Your Fan

Not all switches work with all exhaust fans. Verifying compatibility before buying prevents wasted money and installation frustration.

Check Load Ratings

Most residential exhaust fans draw less than 1 amp. Standard timers handle 15A to 20A loads, so rating compatibility is rarely an issue. However, confirm the timer is rated for inductive loads like motors, not just resistive loads like lights.

Avoid Fan Dimmers

Standard dimmer switches disrupt motor speed and can cause overheating. Only use fan-rated dimmers if speed control is necessary. For timer functionality, standard timer switches work perfectly with exhaust fan motors.

Set Appropriate Run Times and Educate Users

Once installed, household members need to understand how the timer works. Proper use maximizes the benefits of your upgrade.

Set Ideal Run Times

Small bathrooms typically need 10 to 15 minutes of fan runtime after showering. Large or poorly ventilated bathrooms may require 20 to 30 minutes. Adjust based on your specific situation. Too short leaves moisture behind; too long wastes energy.

Post Usage Instructions

Place a small note near the switch explaining that the fan runs automatically and shuts off after the set time. This prevents confusion and accidental breaker trips from household members thinking the fan is stuck on.

Maintain and Inspect Regularly

Timer switches require minimal maintenance, but periodic checks prevent problems and extend device life.

Check for Heat or Discoloration

Every six months, feel the switch plate while the fan is running. If it feels warm or the wall shows discoloration, turn off power and inspect connections. Loose wires cause overheating and potential fire hazards.

Tighten Connections Periodically

Turn off power and check wire nuts for tightness. Re-tighten any loose connections. Replace frayed, corroded, or damaged wires immediately. Following these simple steps keeps your timer functioning safely for 5 to 10 years.

Frequently Asked Questions About Installing Timer Switch for Exhaust Fan

Can I install a timer switch on any exhaust fan?

Most residential exhaust fans work with timer switches. Verify the timer is rated for inductive loads like motors. Standard timers handle 15A to 20A, well above the under-1-amp draw of typical bathroom fans.

What happens if my switch box has no neutral wire?

Use a mechanical dial timer that does not require a neutral wire. These timers work by allowing small current leakage through the fan motor to power internal timing mechanisms. Alternatively, hire an electrician to run a neutral wire to your box.

How long should I set the timer runtime?

Set runtime based on bathroom size and ventilation. Small bathrooms need 10 to 15 minutes. Larger or poorly ventilated bathrooms need 20 to 30 minutes. Adjust until moisture clears completely after showering.

Why does my digital timer display not turn on?

The neutral wire is likely missing or loose. Digital timers require neutral connections to power internal electronics. Check all white wire connections at both the timer and wire nuts.

Can I use a dimmer switch instead of a timer?

Never use standard dimmer switches with exhaust fans. Dimmers control light bulb brightness by varying voltage, which disrupts motor speed and can cause overheating or damage. Use only timer switches specifically rated for fan control.

Key Takeaways for Installing Timer Switch for Exhaust Fan

Installing a timer switch for your exhaust fan is a straightforward project that dramatically improves bathroom ventilation and prevents mold growth. The process involves turning off power, documenting your existing wiring, connecting the timer according to manufacturer instructions, and testing operation. Most homeowners complete this upgrade in under an hour with basic tools.

Choosing the right timer type matters significantly. Mechanical dial timers work in older homes without neutral wires, while digital timers offer precise timing but require neutral connections. Always verify compatibility with your specific fan model before purchasing.

Safety remains paramount throughout the process. Always verify power is off with a voltage tester before touching wires. If your home has aluminum wiring or you feel uncertain about any step, hire a licensed electrician. Proper installation ensures years of reliable, automatic bathroom ventilation.

How to Install Exhaust Fan Cover


If your bathroom ceiling fan cover looks yellowed, cracked, or dusty, you’re not alone. Over time, heat and humidity take a toll on plastic covers, leaving them brittle and unsightly. The good news is that installing an exhaust fan cover is a quick, affordable DIY fix that takes less than 10 minutes. With just a few simple steps, you can refresh your bathroom’s look, improve airflow efficiency, and make cleaning easier. In this guide, you’ll learn how to safely remove the old cover, choose the right replacement, and install it securely. No electrician required.

Safety First: Turn Off Power

Before touching the fan, protect yourself by cutting power to the unit. Even though replacing the cover does not involve wiring, turning off the circuit prevents accidents if you accidentally bump into wires or decide to clean the fan housing.

Locate the Correct Circuit

Go to your home’s switchboard and turn off the breaker that powers the bathroom. If you are unsure which one, turn on the fan before switching off breakers one by one until the fan stops.

Confirm Power Is Off

Flip the bathroom light and fan switch to test. No response means it is safe to proceed.

Warning: Never skip this step. Electrical safety should always come first, even for simple tasks.

Remove the Old Exhaust Fan Cover

exhaust fan cover removal spring clips

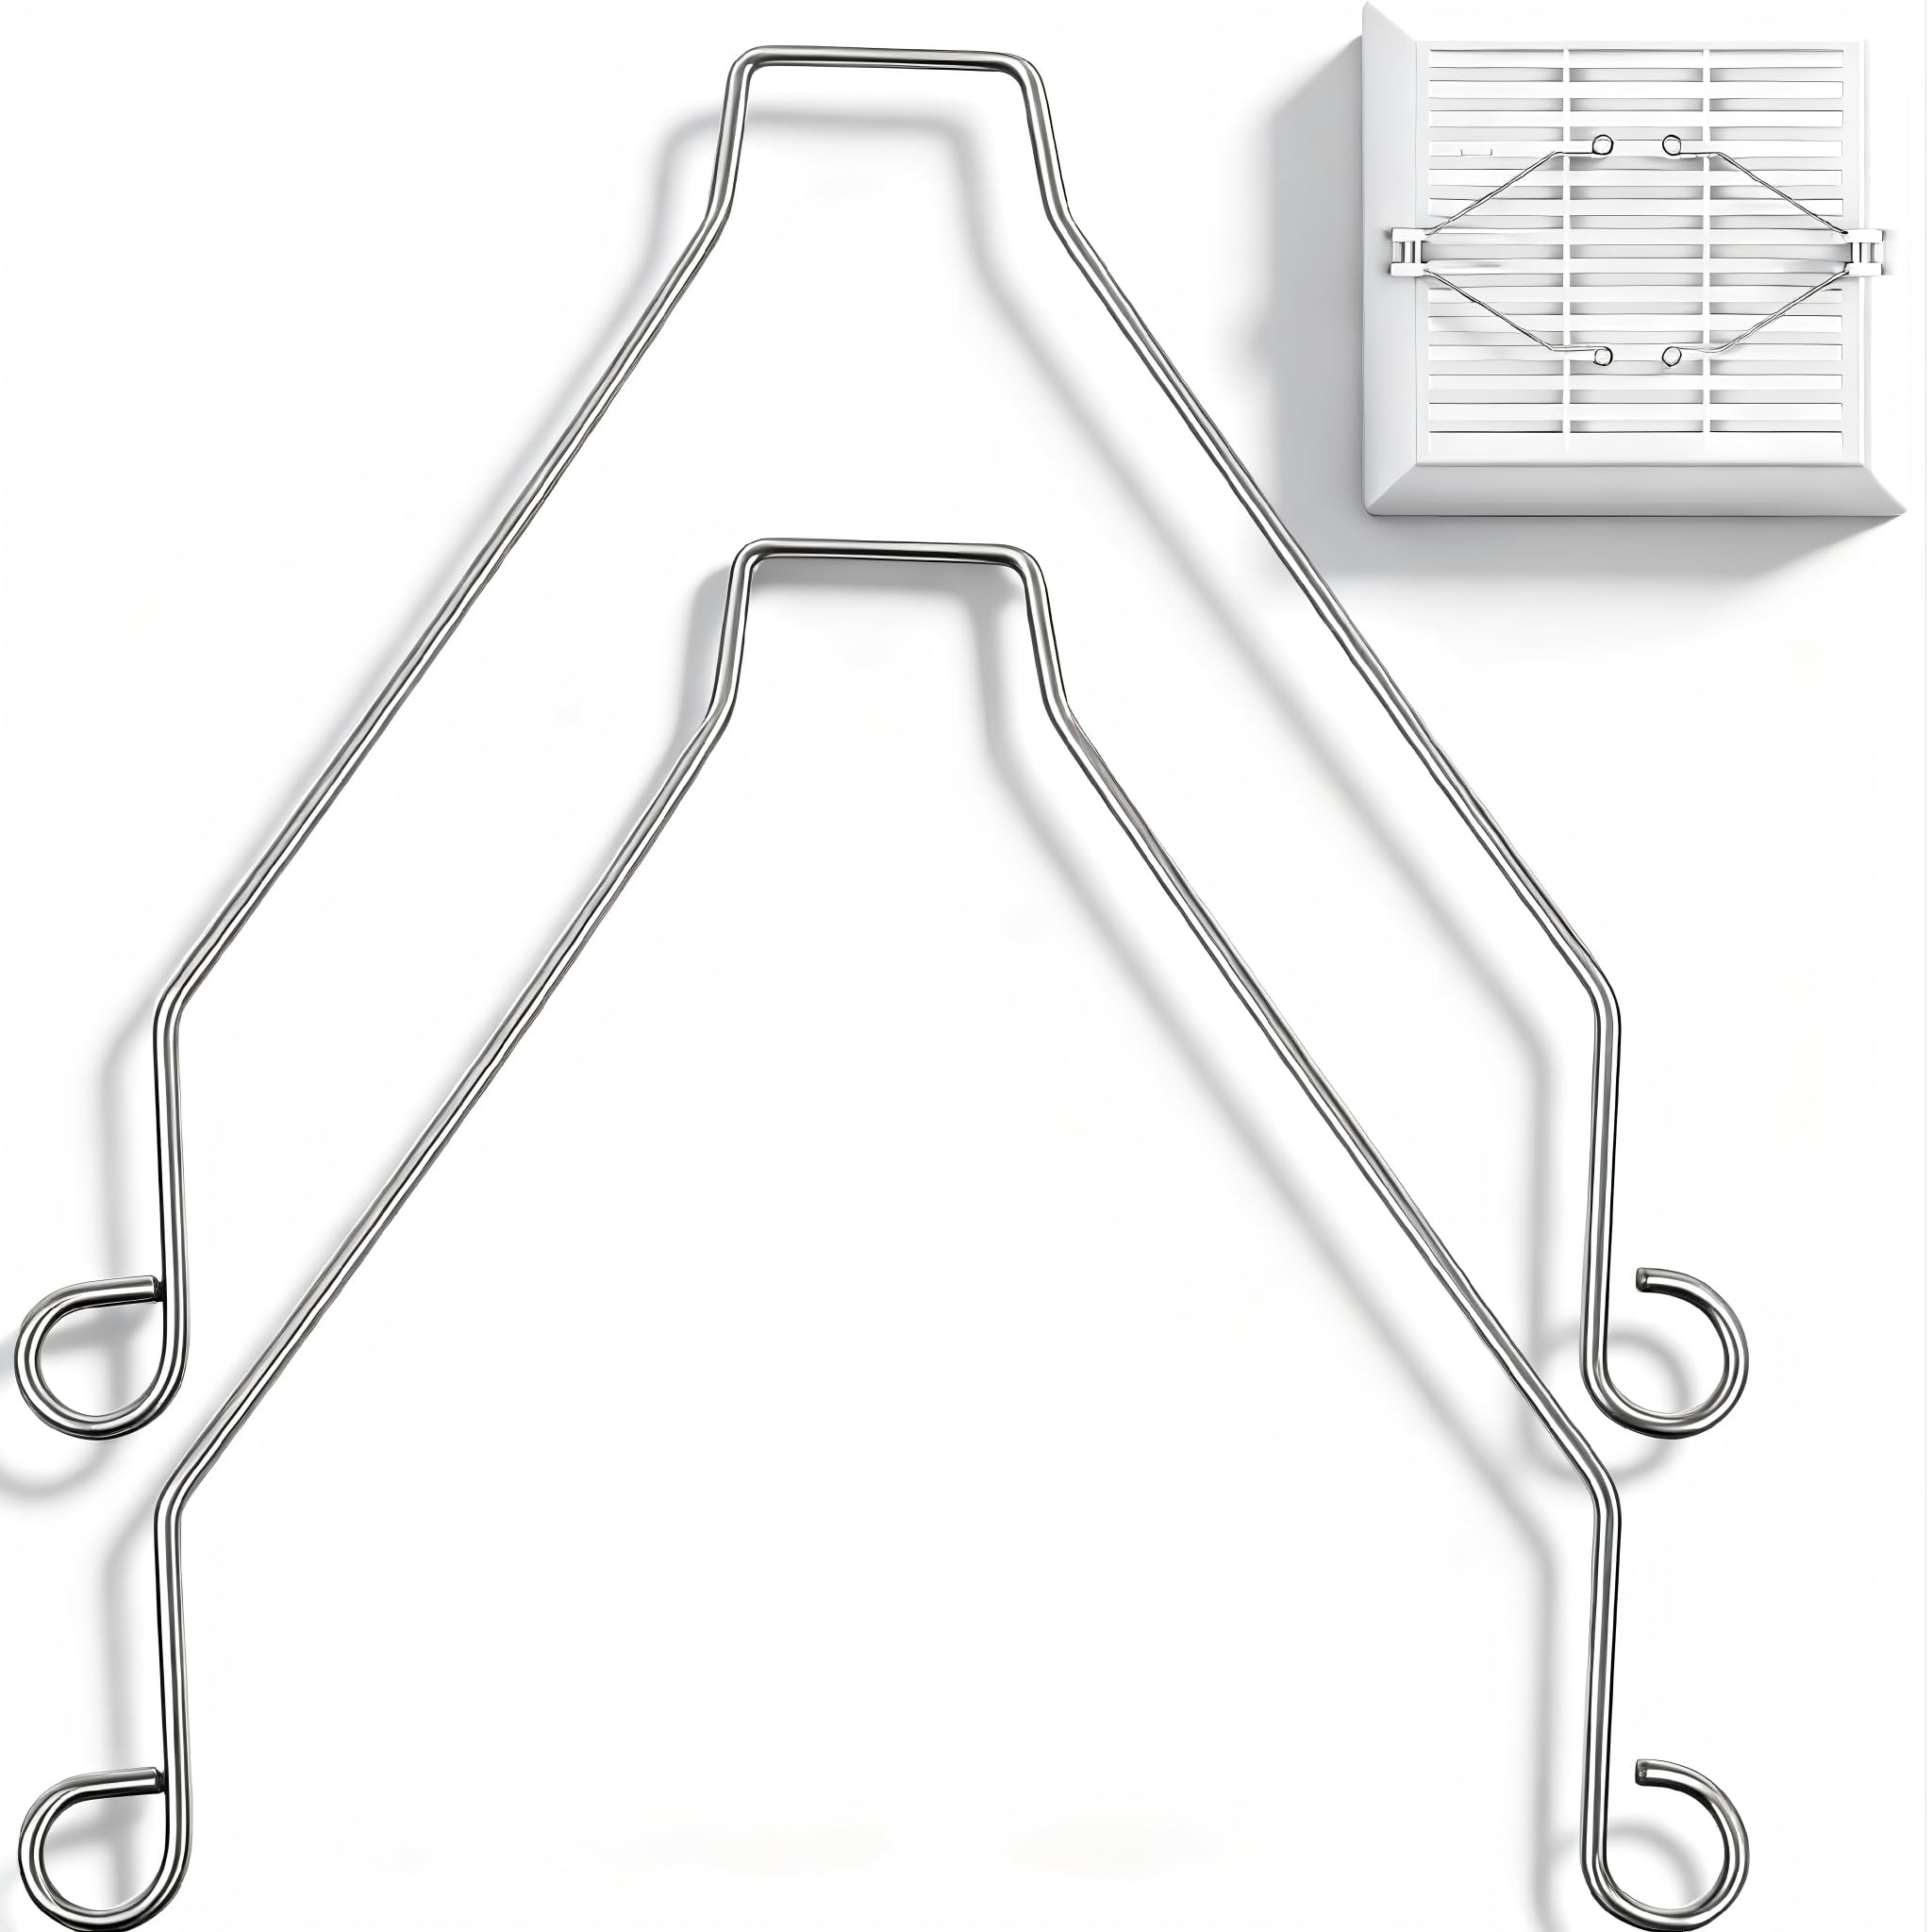
Most exhaust fan covers are held in place with spring clips that slide into slots in the housing. Understanding how these clips work makes the removal process much easier.

Pull the Cover Down Gently

Use both hands and apply even pressure. Pull the cover straight down about 5 to 10 centimeters. Do not yank or twist because it could break the clips or damage the ceiling.

Release the Spring Clips

Once the cover is loose, you will see two metal spring clips attached to the sides. Squeeze them inward slightly and guide the cover out of the mounting slots.

Pro Tip: If the cover is stuck, gently wiggle it side to side while pulling down. Avoid using tools that could scratch or crack the plastic.

Clean the Fan Housing and Blades

bathroom exhaust fan cleaning dust buildup

Now that the cover is off, take advantage of the access to remove built-up dust and lint. This step improves fan performance and extends the life of your equipment.

Use a Vacuum With Brush Attachment

Turn on your vacuum and use the soft brush nozzle to clean the fan blades, the inside of the metal housing, and around the edges where dust accumulates. Wipe gently to avoid bending the blades.

Check for Warning Signs

While cleaning, inspect for rattling noises when the fan runs, loose or damaged wiring, and corrosion or oil buildup. If you notice any of these, stop the process because this is not a cover issue. It is a motor or electrical problem that requires a licensed electrician.

Measure for the Correct Replacement Cover

exhaust fan cover dimensions measuring tape

Not all exhaust fan covers are the same size or shape. Installing the wrong one will not fit or could create a gap in the ceiling, reducing efficiency.

Take Accurate Dimensions

Use a tape measure to record the length and width of the old cover and the distance between the two spring clip slots. This critical measurement ensures your new cover will fit properly. Most standard covers are 15 by 15 centimeters or 10 by 15 centimeters, but sizes vary by model and brand.

Bring the Old Cover When Shopping

The easiest way to ensure a perfect match is to take the old one with you. Hold it next to potential replacements at the store to verify fit, clip placement, and design.

Expert Note: Look for modern covers made from heat-resistant, easy-to-clean plastic. Some have antimicrobial coatings or sleek matte finishes that resist yellowing.

Install the New Exhaust Fan Cover

With the correct replacement in hand, installation is simple and straightforward.

Compress the Spring Clips

Hold the new cover with both hands and gently squeeze the spring clips toward the center. This narrows the width so they can slide into the mounting slots.

Insert and Push Into Place

Align the clips with the slots in the housing and slide the cover upward until it is fully seated. Release the clips so they expand behind the mounting points and gently push the cover until it sits flush with the ceiling.

Visual Cue: The cover should sit flat with no gaps or tilting. If it wobbles, reseat it and ensure both clips are locked securely.

Test the Fan and Restore Power

Now it is time to make sure everything works properly after the installation.

Turn the Breaker Back On

Return to the switchboard and restore power to the bathroom circuit.

Switch On the Fan

Listen for smooth, quiet operation. There should be no scraping, rattling, or delayed start-up.

Checklist After Installation:
* Cover is level and secure
* No visible gaps around edges
* Fan runs normally
* Light (if connected) works

If anything seems off, turn off the power and recheck alignment.

Choose the Right Cover for Your Model

Not all covers are universal. Matching the right one to your fan ensures safety and optimal performance.

Know Your Fan Brand

Popular brands like Panasonic, Broan, and Vent-Axia often use proprietary designs. Check the manufacturer’s website or product label for compatible replacement parts.

Look for OEM or Certified Replacements

OEM (Original Equipment Manufacturer) parts offer an exact match and the best fit. Aftermarket options are often cheaper, but verify dimensions carefully before purchasing.

Avoid: Generic covers that claim to fit most without specific model numbers. These can warp, discolor, or not clip in securely.

Troubleshoot Common Fit Issues

exhaust fan cover not clipping in

Even with correct measurements, problems can occur during installation. Knowing how to address these saves time and frustration.

Cover Will Not Clip In

This issue usually means the spring clips are too stiff or misaligned. Compress clips fully and angle slightly during insertion. Once one side is in, pivot the other into place.

Gaps Around the Edges

Wrong size or warped cover causes this problem. Double-check measurements. If the cover is bent, return it and get a new one.

Cover Sags or Drops

Weak or broken spring clips are the culprit. Replace the clips or the entire cover. Never use tape or glue as a workaround because this creates safety hazards.

When to Call a Professional

Replacing the cover is safe for DIYers, but some issues go beyond a simple swap. Recognizing these signs protects your home and family.

Motor Is Failing

Signs include loud grinding or screeching sounds, slow spin or no movement, and a burning smell. These require full fan replacement, which involves electrical work.

Wiring Looks Damaged

Exposed wires, fraying, or melted insulation are serious hazards. A licensed electrician must handle repairs.

Rule of Thumb: If you need to touch wires, the motor, or the housing unit, hire a professional. Your safety is worth more than the savings.

Maintain Your New Exhaust Fan Cover

Keep your upgrade looking fresh with simple regular care.

Clean Every 3 to 6 Months

Remove the cover using the same method from Step 2. Wipe with a damp cloth and mild detergent, then dry completely before reinstalling.

Avoid harsh chemicals like bleach or ammonia because they can cloud or weaken plastic over time.

Prevent Yellowing and Dust Buildup

Run the fan for 15 to 20 minutes after showers to reduce steam buildup. Use a ceiling fan duster monthly to remove surface dust before it accumulates.

Frequently Asked Questions About Installing Exhaust Fan Cover

Can I replace my exhaust fan cover without turning off the power?

While the cover itself does not have electrical connections, it is still recommended to turn off the power at the breaker. This prevents accidental contact with wires inside the housing and ensures safe handling during installation.

How do I know if my exhaust fan cover is the right size?

Measure the length, width, and the distance between the spring clip slots on your existing cover. Take these measurements or the old cover itself when shopping for a replacement to ensure a proper fit.

Why does my new exhaust fan cover have gaps after installation?

Gaps usually indicate the wrong size cover or a warped piece. Remeasure your old cover and verify the new one matches exactly. If gaps persist, the cover may be defective and should be replaced.

How often should I clean my exhaust fan cover?

Clean the cover and the fan blades every 3 to 6 months. Regular cleaning prevents dust buildup, maintains airflow efficiency, and extends the life of your fan motor.

What should I do if the fan makes noise after replacing the cover?

Turn off the fan immediately and check that the cover is seated properly. If noise persists, there may be a motor issue or debris inside the housing. Consult a licensed electrician for diagnosis.

Are all exhaust fan covers universal?

No, covers vary by brand, model, and size. Some manufacturers use proprietary designs. Always check compatibility with your specific fan model before purchasing.

Key Takeaways for Installing Your Exhaust Fan Cover

Installing an exhaust fan cover is one of the easiest bathroom upgrades you can do yourself. With the right measurements, a quality replacement, and proper safety precautions, you can complete the job in under 10 minutes. The process involves turning off power, removing the old cover by releasing spring clips, cleaning the fan blades, installing the new cover, and testing that everything works properly.

Choosing the right cover matters significantly for long-term performance. OEM replacements offer the best fit, while generic covers often cause fit problems or warp over time. Regular maintenance, including cleaning every 3 to 6 months and running the fan after showers, keeps your bathroom ventilation working efficiently and prevents mold growth.

For best results, inspect your fan annually to catch problems early. If you encounter motor noise, damaged wiring, or persistent fit issues, do not attempt repairs yourself. Call a licensed electrician to handle any work beyond simple cover replacement. Your safety is always worth the investment.

How to Install Kitchen Hood Exhaust Fan


Installing a kitchen hood exhaust fan improves air quality, removes cooking odors, and prevents grease buildup. Whether you’re upgrading your current setup or installing one for the first time, a properly vented exhaust fan makes a major difference in kitchen performance and comfort. This guide walks you through every step of installing a kitchen hood exhaust fan, specifically focusing on range hood inserts, which are the functional core built into custom cabinetry or enclosures.

You’ll learn how to frame the hood, position the insert, connect ductwork, and vent it outside safely and efficiently. We’ll also cover pro tips for accessibility, proper clearance, and airflow optimization. By the end, you’ll know exactly how to install your kitchen hood exhaust fan for maximum performance and easy maintenance.

Build the Custom Hood Frame

Before installing the exhaust fan insert, you need a sturdy frame to house it. This structure supports both the insert and the outer finish materials like wood, tile, or drywall.

Choose Your Frame Material

Use 2×4 lumber for strength and ease of assembly. It provides enough depth to accommodate most inserts and duct connections. Ensure the wood is straight and free of warping to avoid alignment issues later.

Measure Clearance From Cooktop

Mount the hood between 28 and 36 inches above the cooktop. This range ensures optimal smoke and grease capture without interfering with visibility or cookware. Gas ranges typically require higher clearance, while electric stoves can go as low as 28 inches.

Cut and Assemble the Frame

Construct a rectangular frame that fits between your upper cabinets or against the wall. If replacing cabinets, build the frame to match cabinet width and depth. Secure corners with wood screws and reinforce with wood glue for stability.

Add Support Cleats for Mounting

Attach horizontal cleats inside the top of the frame where the insert will rest. These provide a stable base and help align the unit. For hanging models, install two screws extending slightly from the frame, allowing the insert to hook securely into place.

Prepare the Insert for Installation

The exhaust fan insert is the working component that pulls air out of your kitchen. Proper prep ensures it fits perfectly and functions efficiently.

Unpack and Preassemble the Insert

Follow the manufacturer’s instructions to assemble control panels, filters, and mounting brackets. Doing this before installation helps you confirm fit and avoid surprises once the frame is in place.

Check Duct Orientation

Determine whether your insert vents vertically through the ceiling or horizontally through the wall. Most wall-mounted hoods vent through an exterior wall, while island hoods require ceiling ducting. Make sure your frame allows space for the chosen path.

Dry-Fit the Insert Into the Frame

Slide the insert into the frame to verify fit. There should be minimal gaps but enough room for vibration isolation. Adjust the frame if necessary, especially if using thick finish materials like tile or stone.

Install the Ductwork System

kitchen range hood ductwork installation diagram

Proper ducting is critical for performance. Leaky or poorly routed ducts reduce airflow and increase noise.

Cut the Exterior Wall or Ceiling Opening

For wall venting, use a reciprocating saw to cut an opening in the exterior wall. Make the hole one-half inch larger than your duct diameter. Angle the exterior side slightly downward to prevent water intrusion.

For ceiling venting, cut through the drywall and frame carefully. Ensure attic or roof space allows room for duct routing to the outside.

Run Rigid Ductwork With Minimal Bends

Use rigid metal ducts instead of flexible ducts. They resist crushing and minimize airflow resistance. Allow at least 18 inches of straight duct before the first elbow. Keep elbows to a minimum, no more than two 90-degree turns. Seal all joints with aluminum foil tape, not duct tape.

Avoid Common Ducting Mistakes

Do not connect duct directly to the top of the hood without a straight run. Do not compress flexible duct, as it restricts airflow by up to 50 percent. Do not vent into an attic or crawl space, as this causes moisture and fire hazards.

Mount the Hood Insert

Now that the frame and ducting are ready, it is time to install the exhaust fan insert.

Lift the Insert Into the Hood Frame

Have a helper assist you in lifting the unit into position. Align it with the support cleats or hanging screws. Most inserts slide in from below and lock into place.

Secure the Insert With Screws

Once seated, fasten the insert to the frame using provided screws. Do not overtighten, as this can damage housing or misalign the blower. Some models have quick-release clips for future access.

Connect Power Supply

Run a dedicated electrical circuit, 120V and 15-amp, from your breaker panel to the hood location. Connect wires using wire nuts or a junction box. Follow local electrical codes and consider hiring a licensed electrician if unsure. Test the lights and fan before sealing everything up.

Finish the Custom Hood Enclosure

With the insert installed, complete the outer appearance of your hood.

Install Bottom Access Panel

Cut a removable panel for the underside of the hood. This allows future access to the insert and duct connections. Use finish-grade plywood or MDF, and secure it with hidden screws or magnetic catches.

Add Side and Top Panels

Attach your chosen finish material, whether wood, drywall, tile, or metal, to the frame. Ensure all seams are tight and aligned. If tiling, use cement board backing for durability.

Seal Gaps With Caulk

Apply heat-resistant silicone caulk around edges where the hood meets the wall or cabinets. This prevents air leaks and improves aesthetics.

Vent the Exhaust Outside

kitchen range hood exterior vent cap installation

The final step is ensuring all air exits safely outdoors.

Install the Wall or Roof Cap

Attach a weatherproof exterior hood cap to the duct exit point. Use caulk to seal around the edges and prevent water entry. Choose a cap with a backdraft damper to stop cold air from entering when the fan is off.

Test Airflow and Seal Leaks

Turn on the fan and check airflow outside. Place your hand near the cap. You should feel strong, steady exhaust. Recheck all duct joints and reseal with aluminum tape if needed. Listen for rattling or whistling, as these indicate loose parts or airflow restrictions.

Optimize Performance With Pro Tips

Maximize efficiency and simplify future maintenance with these expert recommendations.

Add a Side Access Panel for Maintenance

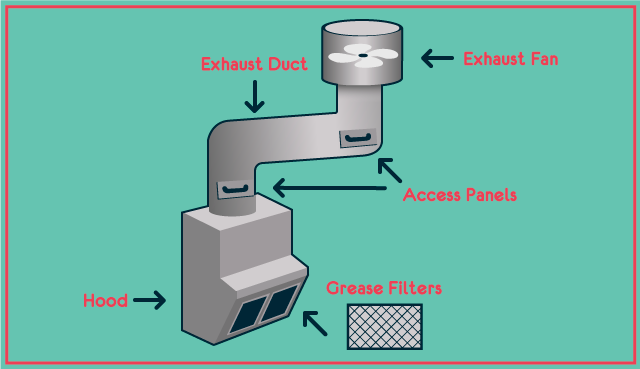
Cut a removable panel into the side of your custom hood. This gives you direct access to the duct connection and insert without dismantling the entire unit. This is great for cleaning, filter replacement, or troubleshooting.

Match Insert Depth to Burner Coverage

Ensure the hood extends at least to the middle of your front burners. A typical insert is 15 to 21 inches deep. Make sure your enclosure provides full coverage. Undersized hoods let smoke escape.

Use Aluminum Tape on All Joints

Never rely on sheet metal screws alone. Seal every duct joint with UL 181-rated aluminum tape. This creates an airtight seal and boosts suction power.

Paint or Finish After Installation

Wait until the insert is installed before painting or staining wood panels. This protects finishes from dust and accidental damage during construction.

Troubleshoot Common Installation Issues

Even with careful planning, problems can arise. Here is how to fix them fast.

No Power to the Fan or Lights

Check the circuit breaker and GFCI outlets. Verify wire connections inside the junction box. Consult the manual for reset procedures, as some models have internal fuses.

Weak Airflow or Noisy Operation

Inspect duct for kinks, crushing, or excessive bends. Clean grease filter, as clogged filters reduce performance. Replace flexible duct with rigid if used.

Smoke Not Being Captured

Recheck hood height, as being too high reduces efficiency. Confirm fan speed setting, using high for frying or boiling. Ensure hood is wide enough, as it should extend beyond cooktop edges.

Key Takeaways for Installing Your Kitchen Hood Exhaust Fan

kitchen range hood installation checklist

Installing a kitchen hood exhaust fan does not have to be complicated. With the right tools, planning, and attention to detail, you can achieve professional results. Focus on building a solid frame, routing straight ductwork, sealing all joints, and positioning the insert correctly. Include an access panel for easy maintenance, and always vent outside.

When done right, your kitchen hood will operate quietly, efficiently remove smoke and odors, and blend seamlessly with your custom design. Whether you are building from scratch or using a kit, this guide gives you everything you need to install a kitchen hood exhaust fan that performs flawlessly for years.

Frequently Asked Questions About Installing Kitchen Hood Exhaust Fans

What is the ideal height for installing a kitchen hood exhaust fan?

Mount the hood between 28 and 36 inches above your cooktop. Gas ranges typically require 30 to 36 inches of clearance, while electric stoves can be as low as 28 inches. This range ensures optimal smoke and grease capture.

Can I install a kitchen hood exhaust fan myself, or do I need a professional?

The average homeowner can install a wall-mounted kitchen hood exhaust fan in one to two hours. However, electrical work may require a licensed electrician, and complex custom hood installations benefit from professional help.

What type of ductwork should I use for my kitchen hood exhaust fan?

Use rigid metal ducts, either galvanized steel or aluminum. Avoid flexible ducts, as they can restrict airflow by up to 50 percent when compressed or kinked. Seal all joints with aluminum foil tape.

How do I vent a kitchen hood exhaust fan through the ceiling?

For island hoods, route ductwork through the ceiling and out through the roof or an exterior wall. Use rigid ducts with minimal bends, allowing at least 18 inches of straight run before the first elbow.

What maintenance does a kitchen hood exhaust fan require?

Clean grease filters regularly, typically every one to three months depending on use. Check duct joints annually for leaks and reseal with aluminum tape if needed. Access panels make filter replacement and ductwork maintenance much easier.

How to Install Shutter Exhaust Fan: Step-by-Step Guide


Is your garage stuffy, smelly, or filled with fumes after using power tools or lawn equipment? A shutter exhaust fan can transform it into a safer, more comfortable space. This ventilation solution actively pulls stale air, heat, and dangerous vapors outside while self-closing shutters seal tight when the fan is off to keep out pests, rain, and cold drafts.

Installing a shutter exhaust fan isn’t just for professionals. With the right planning, tools, and step-by-step guidance, most homeowners can complete the job in one weekend for under $400. This guide walks you through choosing the right CFM-rated fan, cutting the wall opening, building a secure frame, weatherproofing with J-channel, wiring safely, and ensuring long-term performance.

Choose the Right Shutter Exhaust Fan Size

CFM calculation chart garage exhaust fan

The success of your exhaust system depends on airflow capacity, measured in Cubic Feet per Minute (CFM). Too small, and the fan won’t clear fumes; too large, and it wastes energy.

Calculate Required CFM

Use this formula to determine the right fan size for your space:

Required CFM = (Room Volume × Air Changes per Hour) ÷ 60

First, calculate room volume by multiplying floor area by ceiling height. For example, a 20′ × 20′ garage with 8-ft ceilings equals 3,200 cubic feet. Next, decide how often you want the air replaced. Standard workshops need 5 air changes per hour (ACH), while heavy-duty use like painting or welding requires 10 to 15 ACH.

For a 3,200 cubic foot garage at 5 ACH, the calculation is (3,200 × 5) ÷ 60, which equals approximately 267 CFM. Always round up and consider doubling CFM if you regularly run high-fume activities.

Match Fan to Your Garage Size

Use these guidelines when selecting your shutter exhaust fan:

Garage Type Recommended CFM
1-Car Garage 160–360 CFM
2-Car Garage 240–550 CFM
3-Car Garage 450–1,050 CFM
Large Workshop (2,400+ sq ft) 3,000–8,000+ CFM

Choose a 120V model for residential garages. For shops or industrial spaces needing over 500 CFM, consider 240V fans for better efficiency. Look for TEFC motors (sealed against dust and moisture), built-in polypropylene shutters (resist corrosion), and low noise ratings under 3 sones for frequent use.

Plan the Installation Location

Mounting your shutter exhaust fan in the right spot ensures maximum airflow and performance.

Pick High and Opposite

Hot air and fumes rise, so mount the fan near the ceiling, ideally within 6 to 12 inches of the top plate. Place it on an exterior wall, far from the main door or windows to promote cross-flow ventilation.

Ensure fresh air enters from the opposite side, creating a full air exchange. If the garage has no intake vents, leave a half-inch gap under the door or install a wall vent.

Avoid Hidden Hazards

Use a stud finder to map out framing. Install between 16-inch or 24-inch on-center studs, and never cut into load-bearing headers or beams.

Check both sides of the wall before cutting. Use a voltage tester to avoid electrical wires. Look for plumbing, gas lines, or HVAC ducts inside the cavity. Avoid areas behind outlets or switches.

For aesthetics, pick a less visible wall (back or side of house) and keep the exterior vent clear of landscaping or obstructions.

Cut the Wall Opening for Your Fan

Accurate cutting ensures a proper fit for your shutter exhaust fan.

Mark and Drill Starter Holes

Follow the fan manufacturer’s template. If none is provided, measure the housing and add quarter-inch clearance on all sides.

Use a pencil and level to draw a square or rectangular outline on the drywall. Drill a half-inch hole in each corner to give the jigsaw blade room to start.

Cut with Jigsaw or Reciprocating Saw

Insert the jigsaw blade into one hole and cut along the lines. Move slowly to avoid splintering. Remove drywall, insulation, and sheathing as you go.

If working with vinyl siding, use a siding removal tool to lift and remove panels above and below the cut zone. Cut through the exterior sheathing from inside to maintain control.

Pro Tip: Cut slightly undersized first, test-fit the fan or spacer frame, then trim as needed.

Build a Solid Mounting Frame

exhaust fan mounting frame 2x4 construction

A proper frame prevents damage and ensures shutters operate freely.

Install Header and Saddle

Cut two pieces of 2×4 or 2×6 lumber to fit horizontally between the studs at the top and bottom of the opening. The top header supports the fan’s weight, while the bottom saddle prevents sagging and aligns the frame.

Secure both with 3-inch deck screws driven into the vertical studs. This reinforced box creates a stable base and prevents wall damage during installation.

Add a Wooden Spacer Frame

Many shutter exhaust fans bind if mounted flush against the wall. To prevent this, build a spacer frame from 2×4s that extends 2 to 3 inches past the wall surface. Attach it to the header and saddle using lag bolts (three-quarter-inch diameter, 3 to 4 inches long). Countersink holes with a Forstner bit for a clean finish.

This protrusion ensures shutters open and close freely, no pressure warps the housing, and proper airflow clearance is maintained.

Warning: A tight fit can jam shutters open, causing drafts, energy loss, and pest entry.

Install J-Channel and Weatherproofing

Proper weatherproofing prevents water damage and drafts.

Fit J-Channel for a Clean Finish

J-channel creates a weathertight seal and gives the exterior a professional look. Cut four lengths to fit around the opening. Miter corners at 45 degrees for seamless joints. Install with aluminum or PVC nails, overlapping upper pieces over lower ones like shingles. Slide existing siding into the channel.

Ensure the opening remains fully exposed and unobstructed.

Seal Against Water Intrusion

Apply butyl flashing tape behind all J-channel edges and around the hole. This self-adhering membrane stops water from seeping behind the wall.

Optional but recommended additions include installing a drip cap above the opening to direct rain away and using DAP DynaFlex Ultra caulk between J-channel and siding for flexibility.

Test: Spray water around the area after installation. No leaks should appear inside.

Mount the Fan Housing

Proper mounting ensures long-term stability and performance.

Position and Test Before Securing

Slide the fan into the spacer frame or against the wall. Confirm the airflow arrow points outward. Check that shutters open when pulled slightly away and blades spin freely.

Temporarily connect power and run the fan. Watch for vibration, noise, or shutter binding.

Fix Now: If shutters stick, adjust the frame or add shims before permanently securing.

Secure Fan with Heavy-Duty Screws

Once aligned, fasten the housing using quarter-inch lag screws or structural screws with washers under each head to distribute pressure. Drive screws through the flange into the spacer frame or studs. Do not overtighten, as this can warp the plastic housing.

Double-check that the unit is level and stable before proceeding.

Wire the Exhaust Fan Safely

Electrical work requires careful attention to safety.

Run Correct Gauge Electrical Cable

Most 120V fans draw 5 to 7 amps. Use 14/2 NM-B wire for 15A circuits or 12/2 for 20A. Run the cable from the power source (breaker panel, junction box, or nearby outlet) to the fan location.

Feed the wire through the knockout on the fan housing. Leave 12 inches of slack inside.

Connect Wires and Install Switch

Inside the housing, connect black (hot) to black, white (neutral) to white, and bare copper (ground) to the ground terminal. Use wire nuts rated for outdoor use. Tug each connection to ensure it’s tight.

Mount a wall switch or timer switch in a nearby electrical box. A 2-hour auto-off timer prevents accidental overuse and saves energy.

Safety First: Turn off power at the breaker. Test wires with a voltage tester before touching. Hire an electrician if unsure.

Seal and Finish the Installation

Complete weatherproofing ensures years of trouble-free operation.

Weatherproof Exterior Joints

Apply flexible exterior caulk where the fan meets the J-channel. Seal all seams and screw heads. Avoid covering shutter blades or hinges, as this could restrict movement.

Insulate and Patch Interior

On the inside, fill gaps around the housing with acoustic sealant or spray foam. This reduces noise, prevents air leaks, and improves insulation.

Patch drywall if needed. Sand and paint to match the wall.

For extra draft protection, install a backdraft damper or ensure the fan has dual internal shutters.

Test Fan Operation and Airflow

Verification ensures your installation works correctly.

Verify Outward Airflow

Turn on the fan and go outside. Hold your hand near the shutters. You should feel strong airflow pushing out.

If air is pulling in, reverse the wiring (swap hot and neutral at the switch). Never operate a fan blowing inward.

Check Shutter Function

When powered off, shutters must close completely within seconds. If they remain open, inspect for debris or ice. Adjust the spacer frame or lubricate hinges lightly with silicone spray.

Test Intake: Open a door or window on the opposite side. Without fresh air entering, the fan will struggle to move air.

Maintain Your Fan for Longevity

Regular maintenance extends the life of your shutter exhaust fan.

Clean Blades and Shutters Every 6 Months

Dust, grease, and spider webs reduce airflow and strain the motor. Turn off power, remove the grille if present, wipe blades with a damp cloth or use compressed air, and clean shutters and hinges gently.

Avoid harsh chemicals that can degrade plastic components.

Inspect Seals and Fasteners Annually

Check exterior caulk for cracks, screws for tightness, J-channel for damage, and shutters for smooth operation. Reapply sealant or replace worn parts as needed.

Lubricate motor bearings only if the manufacturer recommends it.

Troubleshoot Common Issues

Knowing how to diagnose problems saves time and money.

Shutters Won’t Close

This issue typically stems from a warped housing due to over-tightening or missing spacer frame. Install a 2 to 3-inch spacer frame to relieve pressure.

Fan Is Noisy or Vibrating

Loose mounting or unbalanced blades causes this problem. Tighten all screws, clean blades, and ensure the frame is solid.

Water Leaking Inside

Poor J-channel installation or missing flashing leads to water intrusion. Reinstall J-channel with proper overlap and add butyl tape.

No Airflow Despite Running

Inadequate intake air (closed doors) prevents proper airflow. Open a door or install an intake vent.

Fan Cycles On/Off Rapidly

A faulty thermostat or humidistat causes erratic cycling. Bypass the sensor temporarily to test.

Frequently Asked Questions About Installing Shutter Exhaust Fans

What CFM size do I need for a 2-car garage?

For a standard 2-car garage (approximately 400 sq ft with 8-ft ceilings), you need a minimum of 240 to 550 CFM. If you use the space for painting, welding, or running gas-powered equipment, double this to 500+ CFM for effective fume removal.

Can I install a shutter exhaust fan myself?

Yes, most homeowners can install a shutter exhaust fan with basic tools and electrical knowledge. The project takes 6 to 10 hours spread over one to two days and costs $120 to $400 in materials.

Where should I mount the shutter exhaust fan?

Mount the fan high on an exterior wall near the ceiling (within 6 to 12 inches of the top plate). Place it on the opposite wall from doors and windows to create cross-flow ventilation.

Do I need a spacer frame for my shutter exhaust fan?

Yes, a wooden spacer frame (2 to 3 inches proud of the wall surface) is critical. Without it, the housing can warp and bind the shutters open, causing drafts, energy loss, and pest entry.

How do I weatherproof the installation?

Install J-channel around the opening with proper overlap (like shingles), apply butyl flashing tape behind all edges, and seal seams with flexible exterior caulk. Add a drip cap above the opening for extra rain protection.

What electrical requirements does a shutter exhaust fan need?

Most residential fans run on 120V power and draw 5 to 7 amps. Use 14/2 NM-B wire for 15A circuits or 12/2 for 20A circuits. A timer switch is recommended to prevent accidental overuse.

Key Takeaways for Installing Your Shutter Exhaust Fan

Installing a shutter exhaust fan dramatically improves air quality, safety, and comfort in garages and workshops. The most critical success factors are selecting the correct CFM based on room size and intended use, building a proper mounting frame with a spacer to prevent shutter binding, and thoroughly weatherproofing with J-channel, flashing tape, and caulk.

Safe electrical wiring with a timer switch prevents accidental overuse and saves energy. With typical DIY costs of $150 to $400 and a one-day installation timeline, this project pays for itself in cleaner air and peace of mind. Once installed, simple semi-annual maintenance keeps your fan running efficiently for years to come.

How to Install Bathroom Exhaust Fan Without Attic Access


Installing a bathroom exhaust fan without attic access can feel like solving a puzzle. You have limited overhead space, no way to see inside the ceiling cavity, and must work through tight clearances. Yet this is a common upgrade that thousands of homeowners complete successfully every year. Whether you are replacing a noisy builder-grade unit or adding ventilation to a bathroom that has never had proper exhaust, it is entirely possible with the right approach.

This guide walks you through every step of the process. You will learn how to align ducts blindly, choose between roof and wall venting, and secure your fan without joist access. The methods covered here work for vaulted ceilings, cathedral roofs, and any situation where you cannot reach the space above your bathroom ceiling.

Measure Ceiling-to-Roof Clearance First

Before purchasing a fan or cutting any drywall, you must determine how much space exists between your bathroom ceiling and the roof. This single measurement dictates your entire installation strategy.

Determine Available Depth

Use a stud finder to locate ceiling joists, then drill a small exploratory hole between them near the intended fan location. Insert a stiff wire or depth gauge to estimate the cavity depth.

  • Less than 12 inches: You likely have a cathedral or vaulted ceiling. Work quickly because space is extremely tight.
  • 12 to 36 inches: Moderate clearance allows flexible duct routing or even dropped rigid duct.
  • More than 36 inches: Possible to run longer ducts, but you still need indirect methods for alignment.

Visual cue: If your drill bit hits roofing nails or sheathing within 12 inches, you are in a low-clearance zone.

Select Vent Route Based on Clearance

  • Low clearance: Vent through the roof using a short duct run.
  • Moderate clearance: Either roof or wall venting works. Wall venting is typically easier.
  • No roof access possible: Switch to wall venting near the ceiling.

Drill a Pilot Hole to Align Roof Vent

bathroom exhaust fan roof vent pilot hole drilling technique

Without attic access, you need a way to perfectly align the interior fan housing with the exterior roof vent. A long drill bit solves this problem.

Use an Extra-Long Drill Bit

  • For low clearance (12 inches or less): Use a 12-inch extension bit.
  • For deeper cavities (up to 6 feet): Use a 48- to 72-inch flexible or rigid auger bit.
  • Attach the bit to a powerful drill. A corded drill is preferred for better torque.

Drill Straight Up from Fan Location

  1. Mark the center of your planned fan housing.
  2. Drill upward through the roof sheathing.
  3. Confirm plumb alignment by using a level on the drill or bit guide.

Pro tip: Wrap tape around the bit at your measured depth to avoid over-penetration into the roof cavity.

Locate the Pilot Hole on the Roof

Go outside and find the protruding tip of the drill bit. If it is not visible, use a flathead screwdriver to probe the roof felt or shingles nearby.

Once found:
* Cut a 5-inch hole using a hole saw.
* Install a roof cap with flashing and backdraft damper.
* Seal edges with roofing cement to prevent leaks.

Mount the Fan Without Joist Access

Securing the fan is challenging when joists are not accessible or blocking is missing.

Install Blocking for Stability

If the fan does not align with ceiling joists:
1. Cut a rectangular access hole (12 inches by 12 inches) between joists.
2. Insert 2×4 blocking and secure with screws or nails.
3. Mount the fan to the blocking using side flanges or hanger bars.

Alternative: Use toggle bolts or adhesive-mounted brackets if wood framing is completely unreachable.

Use Adjustable Hanger Bars

Most modern fans include telescoping hanger bars that span between joists. Expand them until snug, then tighten the set screws.

  • Ensure bars rest on solid wood, not just drywall.
  • Test stability before connecting any wiring.

Run Ductwork Blindly

bathroom exhaust fan ductwork routing flexible duct support

Routing duct without seeing the cavity requires strategy and the right materials.

Choose Flexible Duct for Tight Spaces

  • UL-listed aluminum flex duct (4-inch diameter) is ideal for concealed runs.
  • Fully stretch it to avoid sagging.
  • Support every 4 feet with wire or straps, even if hidden.

Avoid: Plastic or foil duct not rated for continuous flex. These collapse and restrict airflow.

Use Rigid Duct When Alignment Is Certain

  • Galvanized metal or PVC pipe offers better airflow performance.
  • Drop it from the roof: After cutting the roof hole, lower the rigid duct into the cavity and guide it over the fan outlet.
  • Secure with foil tape or duct clamps. Never use duct tape.

Vent Through Wall Instead

If roof access is unsafe or impractical, vent through an exterior wall near the ceiling. This method is often easier and results in shorter duct runs.

Cut Wall Opening Near Ceiling

  1. Locate a spot within 12 inches of the ceiling.
  2. Use a stud finder to avoid wall studs.
  3. Drill a pilot hole outside to confirm placement.
  4. Cut a 4- to 5-inch hole through siding and sheathing.

Install Wall Cap with Damper

  • Use a weatherproof wall vent cap with a backdraft damper.
  • Seal edges with exterior-grade caulk.
  • Connect duct directly from fan to cap.

Advantage: Shorter duct runs mean better airflow, less condensation buildup, and no roof penetration.

Connect Wiring Safely and Correctly

Electrical work must meet code, even in retrofit situations.

Turn Off Power at Breaker

  • Shut off the bathroom circuit at the main panel.
  • Test wires with a non-contact voltage tester before touching.

Reuse Existing Wiring if Possible

Most fans connect using standard wiring:
* Black (hot) to black
* White (neutral) to white
* Ground (bare or green) to ground

Use wire nuts and tuck connections into the housing. No exposed copper should remain.

Warning: If the circuit powers a GFCI outlet or nearby sink, ensure the fan is on the load side or protected by GFCI.

Add Junction Box if Splicing

  • Any wire splice must be in an accessible junction box.
  • Mount it nearby, such as in a closet ceiling, if attic access is unavailable.

Select the Right Fan for Tight Spaces

Not all fans fit in low-clearance ceilings. Choose wisely.

Prioritize Low-Profile Models

  • Depth: 3 to 4 inches maximum
  • Recommended brands: Panasonic FV-0511VQ1, Broan 688, NuTone 678RP
  • Sone rating: 0.7 to 1.0 for quiet operation

Match CFM to Bathroom Size

  • Under 50 square feet: 50 CFM minimum
  • Over 50 square feet: 1 CFM per square foot
  • With shower or tub: 80 to 110 CFM

Example: A 6×8 bathroom (48 square feet) needs at least 50 CFM.

Avoid Common Installation Mistakes

Even experienced DIYers make errors that reduce performance or create hazards.

Do Not Use Duct Tape on Joints

  • Duct tape melts over time and fails under heat.
  • Use aluminum foil tape or duct clamps instead.

Do Not Allow Sagging Flexible Duct

  • Sagging creates airflow resistance and traps moisture.
  • Stretch fully and support every 4 feet.

Do Not Vent Into Attic or Soffit

  • This violates building code and causes mold growth.
  • Vent must exit outside the building, at least 12 inches from windows or doors.

Do Not Ignore Backdraft Damper

  • Without a working damper, cold air flows back into the bathroom during winter.
  • Ensure roof or wall cap includes a functional backdraft damper.

Test and Finish the Installation

Final steps ensure performance and aesthetics.

Test Fan Before Closing Up

  1. Temporarily install the grille.
  2. Turn on power and verify:
    * Strong airflow at vent exit
    * No unusual noise or vibration
    * Damper opens when fan runs

Pro tip: Hold a tissue near the grille. It should stick when the fan is running.

Patch and Paint Drywall

If you enlarged the opening:
* Cut along stud lines for clean edges.
* Reuse the original drywall piece if possible.
* Tape, mud, and sand smooth.
* Prime and paint to match.

Maintain for Long-Term Performance

A well-installed fan lasts 10 to 15 years, but only with proper care.

Clean Every 6 to 12 Months

  1. Remove the grille.
  2. Wipe blades and housing with a damp cloth.
  3. Vacuum dust from intake and duct entrance.

Inspect Roof or Wall Vent Annually

  • Clear leaves, animal nests, or ice buildup.
  • Confirm damper moves freely.
  • Re-seal roof flashing if leaks appear.

Replace Motor if Needed

  • Some brands, such as Broan, offer replaceable motors.
  • This extends the life of your fan without requiring new ductwork or wiring.

When to Call a Professional

Consider professional help in these situations:
* You are uncomfortable working on a roof.
* Electrical wiring needs upgrading.
* The cavity has obstructions such as pipes or existing wires.
* You are unsure about vent alignment.

Cost note: Professional installation averages $300 to $600, but ensures code compliance and maintains warranty coverage.

Frequently Asked Questions About Installing a Bathroom Exhaust Fan Without Attic Access

Can I install a bathroom exhaust fan if my bathroom has a vaulted ceiling?

Yes. Vaulted ceilings often have very limited clearance between the ceiling and roof, but you can still install a fan. Use a low-profile fan (3 to 4 inches deep) and route ducting through a short vertical run to the roof. The key is using a long drill bit to create a pilot hole for precise alignment.

What is the best venting option when I cannot access the attic?

Wall venting is often the best alternative when attic access is impossible. Cut a hole through an exterior wall near the ceiling, install a wall cap with damper, and connect a short duct run. This method eliminates the need for roof penetration and results in better airflow due to shorter duct runs.

How do I secure the fan when there are no ceiling joists nearby?

Install 2×4 blocking between existing joists to create a secure mounting surface. Cut a small access hole between joists, insert the blocking, secure with screws, then mount the fan. Alternatively, use toggle bolts or adhesive-mounted brackets if wood framing is completely unreachable.

What type of duct should I use for hidden ceiling spaces?

Use UL-listed aluminum flex duct for tight, invisible cavities. Fully stretch it to prevent sagging, and support every 4 feet with wire or straps. For short, straight runs where alignment is certain, rigid duct offers better airflow performance.

Do I need a permit to install a bathroom exhaust fan?

Permit requirements vary by location. Most jurisdictions require a permit for electrical work, and some require permits for any exhaust fan installation. Check with your local building department before starting the project.

Key Takeaways for Installing a Bathroom Exhaust Fan Without Attic Access

Installing a bathroom exhaust fan without attic access requires different techniques than standard installations, but it is absolutely achievable with the right approach.

The most critical steps are measuring your ceiling-to-roof clearance first, then choosing between roof venting (using a long pilot hole for alignment) or wall venting (easier and shorter runs). Secure the fan using blocking between joists or adjustable hanger bars, and always use aluminum foil tape or duct clamps instead of standard duct tape.

Remember to select a low-profile fan that fits your clearance (3 to 4 inches deep), match CFM to your bathroom size (50 CFM minimum for small bathrooms), and choose ultra-quiet models (0.7 to 1.0 sone) for comfortable operation. Finally, vent must always terminate outside the building with a backdraft damper to prevent cold air from entering during winter months.

Now that you understand the techniques professionals use, you can tackle this project with confidence. Take your time with the pilot hole alignment, and test the fan before closing up the ceiling. Your bathroom will stay dry, mold-free, and properly ventilated for years to come.

How to Install an Exhaust Fan: Step-by-Step Guide


Is your garage stuffy, humid, or filled with lingering fumes from paint, gasoline, or lawn equipment? Installing an exhaust fan is one of the most effective ways to improve air quality, reduce moisture, and keep temperatures under control. Whether you use your garage as a workshop, storage space, or parking area, knowing how to install an exhaust fan properly can make a dramatic difference in comfort and safety.

This guide walks you through every step, from selecting the right fan to sealing the exterior like a pro. You will learn how to choose the correct CFM, cut a wall opening safely, prevent leaks, wire controls, and avoid common installation mistakes.

Choose the Right Fan for Your Garage Size

garage exhaust fan CFM chart

Before picking up tools, select an exhaust fan that matches your garage size and usage. The wrong fan can underperform or waste energy.

Calculate Required CFM

The fan airflow capacity measured in Cubic Feet per Minute (CFM) must match your space. Use this formula:

(Garage Volume × Air Changes per Hour) ÷ 60 = Required CFM

For general use, aim for 5 air changes per hour. For workshops with fumes, dust, or solvents, target 8 to 10 air changes per hour.

Garage Size Square Footage Recommended CFM
1-Car Garage 240 to 540 200 to 450
2-Car Garage 360 to 660 300 to 550
3-Car Garage 600 to 1,260 500 to 1,050

Pro tip: For 10-foot ceilings, increase CFM by 25 percent. Double it for heavy-duty fume applications.

Select the Fan Type

Wall-mounted fans with built-in shutters offer the best balance of performance and simplicity for most garage installations. They exhaust directly outside without requiring attic venting.

Type Best When
Wall-mounted Direct exterior access is available
Ceiling-mounted Wall access is limited
Roof-mounted No wall or ceiling options exist

Pick the Installation Location

Your fan position affects efficiency and durability. Mount the fan high on an exterior wall because hot air and fumes rise.

Ideal Spot Criteria

The fan should be mounted between wall studs, above head height (6.5 feet or higher), on a wall with direct outdoor access, and away from insulation, wiring, or beams. It should be on the opposite side from any intake vents you plan to install.

Avoid: South-facing walls (overheating risk), street-visible locations (aesthetics), or areas near garage doors (obstruction risk).

Cut the Wall Opening Safely

This step requires precision to avoid structural or moisture issues.

Mark and Cut Steps

  1. Turn off power to nearby circuits.
  2. Use a stud finder to locate framing on both sides of the wall.
  3. Mark the cutout using the fan template (typically 14 by 14 inches for a 14-inch fan).
  4. Drill starter holes in each corner.
  5. Cut through interior drywall, insulation, sheathing, and exterior siding using a jigsaw.

Warning: If you have vinyl siding, use a siding removal tool to pop out panels first, then reinstall them after mounting.

Seal and Frame the Interior Opening

Prevent air from leaking into wall cavities instead of exiting outside.

Install the Backing Frame

  1. Cut two horizontal 2x4s to fit the top and bottom of the opening.
  2. Screw them into the wall studs to create a solid base for the fan.
  3. Seal edges with flashing tape or peel-and-stick membrane.

Why it matters: Without this step, air escapes into the wall, reducing efficiency and risking moisture buildup.

Build a Weatherproof Exterior Frame

exhaust fan exterior flashing installation

Keep rain out and ensure long-term durability with proper exterior framing.

Install J-Channel for Waterproofing

  1. Cut four pieces of J-channel (vinyl or metal) to form a rectangular frame around the opening.
  2. Nail or screw the frame to wall studs, overlapping the cut siding edges.
  3. Add a drip cap above the top channel to shed water.
  4. Seal all joints with silicone caulk.

Result: A clean, professional finish that prevents water intrusion and protects insulation.

Mount the Exterior Vent and Shutter

Ensure unobstructed airflow and automatic closure when the fan is not in use.

Insert and Secure the Shutter

  1. From the outside, insert a 14-inch aluminum shutter vent into the opening.
  2. Fasten with corrosion-resistant screws into the wall studs.
  3. Test that shutters open freely and close tightly when the fan is off.
  4. Apply caulk around the perimeter to seal gaps.

Common issue: If shutters bind, the hole may be too tight. Build a spacer frame to fix this.

Fix Shutter Binding with a Spacer Frame

A common problem occurs when compressed housing prevents shutters from closing properly.

Build a Wooden Spacer Frame

  1. Cut four 2x4s to match fan dimensions (such as 14 by 14 inches).
  2. Join corners with pocket hole screws.
  3. Attach the frame to wall studs using lag bolts (countersink with a Forstner bit).
  4. Mount the fan onto the spacer.

Benefit: This creates clearance, improves sealing, and allows smooth shutter operation.

Mount the Exhaust Fan Unit

garage exhaust fan mounting bracket installation

Now install the fan securely and correctly.

Final Mounting Steps

  1. Hold the fan against the spacer or wall opening.
  2. Verify airflow direction. The fan must push air out, not pull it in.
  3. Secure with heavy-duty screws into the 2×4 frame.
  4. Manually test internal and external shutters to ensure they operate smoothly.

Check: Look for an arrow on the fan label indicating exhaust direction.

Wire the Fan and Add Controls

Choose a safe, convenient way to operate the fan.

Electrical Options

Option Best For
Plug-in model DIYers avoiding electrical work
Hardwired Permanent setup with junction box

Safety first: Turn off the circuit breaker before handling wires.

Recommended Control Upgrades

Consider adding a timer switch for auto-shutoff after 30 minutes, one hour, or two hours. A wireless remote allows control from across the garage. A humidistat or thermostat can auto-activate the fan at set conditions.

User tip: Adding a timer two years post-install improved convenience and cut energy use significantly.

Seal, Test, and Verify Performance

Complete final checks to ensure efficiency, safety, and weather resistance.

Complete the Installation

  1. Caulk all gaps around the fan housing.
  2. Restore power and turn on the fan.
  3. Test airflow by holding a tissue near the exterior shutter. It should blow outward.
  4. Listen for smooth, quiet operation (3 sones or less is ideal).
  5. Check for leaks after rain or with a hose test.

Pro tip: Install a louvered intake vent on the opposite wall to balance airflow and boost efficiency.

Maintain the Fan for Long Life

A little upkeep keeps your system running strong for years.

Annual Maintenance Checklist

Clean blades and shutters with a damp cloth or soft brush. Inspect seals and caulk for cracks or wear. Check electrical connections for looseness. Lubricate motor bearings only if specified by the manufacturer.

Lifespan: Expect 8 to 15 years with proper care. Aluminum shutters resist rust while vinyl may degrade in extreme cold.

Avoid These Common Mistakes

Even small errors can reduce performance or cause damage.

Top Installation Errors

Cutting the hole too tight distorts the housing and jams shutters. Skipping J-channel leads to water leaks, rot, and mold. Not sealing wall edges lets air escape into the cavity. Installing the fan backward pulls air in instead of out. Omitting an intake vent limits airflow due to negative pressure. Skipping safety gear risks injury during cutting.

Fix: Always plan for intake by adding a passive louvered vent on the opposite wall.

Cost and Time Estimate

This project is affordable and manageable for most DIYers.

Item Cost
14-inch Exhaust Fan (800 CFM) $80 to $120
Exterior Shutter Vent $20 to $40
J-Channel and Flashing Tape $10 to $20
Timer or Wireless Switch $15 to $30
Total (DIY) $130 to $200

Time required is approximately one full day (8 hours). DIY installation avoids $200 to $400 in professional labor costs.

Frequently Asked Questions About Installing an Exhaust Fan

What size exhaust fan do I need for a 2-car garage?

A 2-car garage (360 to 660 square feet) typically requires 300 to 550 CFM. Calculate your exact needs using the formula: (garage volume × air changes per hour) ÷ 60. Multiply by 1.25 for 10-foot ceilings or double it for heavy workshop use.

Can I install an exhaust fan myself, or do I need an electrician?

You can install a plug-in exhaust fan yourself without electrical work. For hardwired models, you need basic electrical knowledge or an electrician. Always turn off the circuit breaker if doing any wiring yourself.

Where should I mount the exhaust fan?

Mount the exhaust fan high on an exterior wall (near the ceiling) to capture rising hot air and fumes. It should be between wall studs, on the opposite side from intake vents, and away from obstructions like garage doors.

How do I know if my exhaust fan is working properly?

Turn on the fan and hold a tissue near the exterior shutter. The tissue should blow outward forcefully. Shutters should open fully when running and close completely when off. The motor should run quietly without rattling or buzzing.

Do I need an intake vent for my exhaust fan to work?

Yes, an intake vent is essential. Without one, the fan creates negative pressure that limits airflow. Install a louvered intake vent on the opposite wall to allow fresh air to enter while the fan exhausts stale air.

How often should I maintain my exhaust fan?

Clean the shutters and blades every 6 to 12 months. Inspect seals and caulking annually. Check electrical connections yearly. Proper maintenance extends the fan lifespan to 8 to 15 years.

Key Takeaways for Installing Your Exhaust Fan

Installing an exhaust fan transforms a stuffy garage into a fresh, functional workspace. The most critical steps are choosing the correct CFM for your space size, mounting the fan high on an exterior wall, and installing proper weatherproofing with J-channel and flashing. Always add an intake vent on the opposite wall to ensure balanced airflow. Use a timer or wireless switch for convenience and energy savings. With proper installation and annual maintenance, your exhaust fan will provide 8 to 15 years of reliable ventilation.

Now you know how to install an exhaust fan the right way: efficiently, safely, and without leaks. Start planning your installation today and breathe easier in your garage tomorrow.

How to Install a Roof Exhaust Fan: Step-by-Step Guide


Installing a roof exhaust fan is one of the most effective ways to improve attic ventilation, reduce indoor temperatures, and prevent moisture damage. Whether you’re upgrading your home’s energy efficiency with a solar-powered attic fan or installing a commercial upblast exhaust system, proper installation ensures long-term performance and leak-free operation. This guide walks you through every critical step, from site selection and cutting the roof opening to waterproofing, wiring, and final testing.

Choose the Right Roof Exhaust Fan

Remington 20-watt solar attic fan vs Jet Fan 727 electric attic fan comparison

Selecting the correct roof exhaust fan depends on your specific application. For residential attics, you have two primary options: powered electric fans or solar-powered models. Solar fans like the Remington 20-watt require no wiring, operate at zero electricity cost, and are perfect for DIYers. Electric models such as the Jet Fan 727 offer continuous operation with thermostat control but must be hardwired by a licensed electrician.

For commercial kitchens, upblast exhaust fans are required to remove smoke, heat, and grease-laden vapors. These units mount on prefabricated curbs, comply with NFPA 96, and often include hinged access for cleaning and fire suppression integration. Match your fan type to your application before purchasing.

Power and Placement Considerations

Solar fans only run during daylight, so ensure your roof has full sun exposure, ideally on a south-facing slope in the Northern Hemisphere. Electric models need a dedicated circuit, GFCI protection, and compliance with NEC outdoor wiring codes. Always verify voltage and amperage match the motor nameplate before installation.

Find the Optimal Installation Location

Installing the fan in the right spot directly impacts performance. Install the unit within 2 feet below the ridge line to maximize hot air extraction, since heat rises and accumulates near the peak. Avoid installing over living areas unless noise insulation is added.

Ensure the unit fits between two rafters, typically spaced 16 inches on center. Cutting into rafters compromises structural integrity. Use the ridge vent as a guide since no rafter runs directly underneath, simplifying framing clearance. Drive a screw from inside the attic through the sheathing to mark the exact center point for perfect alignment when cutting.

Maintain Required Clearances

Keep the discharge outlet at least 40 inches above the roof surface for commercial units per NFPA 96. Maintain 10 feet clearance from air intakes to prevent contaminated air recirculation. Provide adequate space for maintenance access, especially for commercial fans requiring regular grease trap cleaning.

Gather Essential Tools and Materials

Before starting, collect all required tools and materials. Essential tools include a drill with paddle bit for starter holes, a jigsaw or reciprocating saw for cutting decking, a pry bar to lift shingles, a tape measure and level, a chalk line, a caulking gun, and a ladder with stabilizer. You also need fall protection harness for roofs steeper than 4:12.

Required materials include the roof exhaust fan unit, manufacturer-provided flashing, silicone-based roofing sealant, stainless steel screws or roofing nails, Romex wiring for electric models, wire nuts, a grounding screw, and an electrical box. A thermostat is needed if not built into the unit. Confirm all hardware and flashing are included before starting.

Mark and Cut the Roof Opening

Use the manufacturer’s template to mark the opening. For Jet Fan 727, draw a 16-inch diameter circle; for Remington solar fans, use a 14.5-inch diameter. Trace with a white Sharpie or crayon for visibility on dark shingles. Double-check that the circle fits entirely between rafters with at least 1 inch clearance on all sides.

To cut the opening safely, drill a starter hole near the edge using a paddle bit. Insert the jigsaw blade and cut along the line, cutting through shingles first, then roof decking. Acceptable shapes are a perfect circle or square with rounded corners if the unit design allows. Hold the saw at a 45-degree angle initially to avoid cutting too deep into rafters. Work in dry, calm weather to prevent water intrusion.

Install Base and Flashing Correctly

Roof vent flashing installation details diagram

Slide the fan base into the opening, guiding any integrated electrical box through the hole. Center the unit and align it with the roof slope. For commercial curb-mounted fans, install a prefabricated curb at least 14 inches high, securing it with anchor bolts and sealing flanges with silicone. Fasten the fan to the curb with at least eight stainless steel fasteners.

Flashing is your primary defense against leaks. At the top, slide flashing under upper shingles so water flows over it. At the bottom, place flashing over lower shingles, never under, to allow proper drainage. Use wide flashing to cover the full base and provide ample overlap. Fasten the base every 4 inches along the bottom edge, positioning nail heads just inside the vertical edge to avoid water paths.

Wire Electric Models Safely

Before starting electrical work, turn off the breaker and lock out/tag out the disconnect. Use a multimeter to confirm no voltage is present. Remove the electrical box cover using a flat-blade screwdriver. Pull Romex wiring through the base opening and secure the connector at the box base.

Connect the ground wire to the grounding screw, the black hot wire to the black terminal using a wire nut, and the white neutral wire to the white terminal. Tug wires to ensure connections are tight, then tuck them neatly without blocking the cover or thermostat. Insert the built-in thermostat into its slot; it activates the fan at 90 to 110 degrees Fahrenheit depending on adjustment. Use Type TW wire if replacing original wiring, and ensure the power supply matches motor nameplate specs on a dedicated circuit.

Optimize Airflow and Ductwork

Minimize bends, transitions, and flexible ducts as they increase static pressure and reduce CFM by up to 50 percent. Use rigid metal ducts with smooth, gradual turns and ensure the fan outlet and duct are aligned and sealed tightly. For commercial kitchen exhaust, NFPA 96 bans dampers in grease-laden systems unless explicitly permitted by local code.

Seal and Secure the Installation

Apply a continuous bead of silicone around all fastener heads and base edges. Silicone remains flexible, resists UV, and bonds better than plastic cement. Reapply annually during inspections if cracking or shrinkage occurs. Tighten screws until snug, not forced, as over-tightening warps the housing or damages the roof deck. Use shims under commercial curbs to level the unit before fastening.

Test and Inspect Before Use

Before startup, confirm all fasteners are tight, reinstall the motor dome after checking for debris, ensure the blower wheel spins freely, and verify no tools or materials are left inside. Restore power and for solar fans, expose the panel to sunlight; the fan should start automatically. For thermostatic models, wait for attic temperature to rise or use a heat gun; the fan should engage at the set point. Listen for smooth operation with no vibration, rattling, or grinding.

Conduct a water flow inspection by observing how water runs over the flashing during rain or with a hose. Water must flow downhill without pooling, with no gaps or lifted shingles, and drainage channels must be clear of obstructions.

Maintain for Long-Term Performance

Schedule routine maintenance to extend your fan’s lifespan. Clean the exterior screen every 6 to 12 months to remove leaves, dust, and nests. Inspect sealant and fasteners annually, reapplying silicone as needed. Check for corrosion, shifting, or storm damage. For commercial fans, clean blades, housing, and grease traps monthly, and verify fire suppression system integration.

High-quality units last 15 to 20 years, with motors lasting over 10 years with seasonal use. Solar panels remain functional after 25 years though efficiency declines gradually. Most brands offer 5 to 10 year warranties.

Avoid Common Installation Mistakes

Several mistakes can compromise your installation. Placing flashing under shingles at the bottom blocks drainage and causes leaks; only slide flashing under shingles at the top. Trimming top shingles creates entry points for rain and pests; only trim side shingles for drainage. Skipping sealant or using plastic cement leads to cracks and leaks; use silicone and apply generous, continuous beads on all fasteners and joints.

Installing too low on the roof reduces hot air extraction; install within 2 feet of the ridge for maximum efficiency. Ignoring wind direction increases rain entry; angle the flashing away from dominant winds such as southwest in many regions.

Frequently Asked Questions About Installing Roof Exhaust Fans

Can I install a roof exhaust fan myself?

Yes, solar-powered attic fans can be installed as DIY projects since they require no wiring. Electric models require hardwiring by a licensed electrician, but you can handle the structural preparation, cutting, flashing, and mounting yourself.

How do I know if my roof exhaust fan is working properly?

Test by restoring power and observing operation. For solar fans, expose the panel to direct sunlight; the fan should start automatically. For thermostatic models, the fan should engage when attic temperature reaches the set point, typically 90 to 110 degrees Fahrenheit. Listen for smooth operation without vibration or unusual noises.

Where should a roof exhaust fan be placed?

Install the fan within 2 feet below the ridge line on the roof, positioned between rafters spaced 16 inches on center. This location maximizes hot air extraction since heat rises and accumulates near the peak.

How often should I maintain my roof exhaust fan?

Clean the exterior screen every 6 to 12 months to remove debris, dust, and nests. Inspect sealant and fasteners annually and reapply silicone as needed. For commercial kitchen fans, clean blades and grease traps monthly.

What happens if I don’t balance intake and exhaust ventilation?

Without balanced ventilation, negative pressure can develop and pull conditioned air from living spaces into the attic. Maintain a 50/50 ratio between intake vents (such as soffit vents) and exhaust vents for optimal airflow and energy efficiency.

Key Takeaways for Installing Your Roof Exhaust Fan

A properly installed roof exhaust fan delivers continuous ventilation, lower energy bills, and long-term protection against mold, rot, and roof damage. The most critical success factors are installing high on the roof within 2 feet of the ridge, properly flashing under the top shingles and over the bottom shingles, and applying silicone sealant generously around all fasteners and edges.

Whether you’re a homeowner reducing cooling costs with a solar attic fan or a technician installing a commercial kitchen exhaust system, following these steps ensures a professional-grade result. Choose quality materials, maintain proper ventilation balance, and perform annual inspections to maximize performance and extend the lifespan of your roof exhaust fan.

How to Install Kitchen Hood Exhaust Fan


Installing a kitchen hood exhaust fan improves air quality, removes cooking odors and grease, and protects your home from moisture damage. Whether you’re upgrading an old unit or adding ventilation to a new kitchen, proper installation is crucial for performance and safety. This guide covers every step, from selecting the right hood and planning ductwork to electrical connections and code compliance.

You’ll learn how to install a ducted range hood correctly, avoid common mistakes, and ensure your system meets building codes, especially if you’re using a high-CFM model that requires makeup air. By the end, you’ll know exactly what tools to use, how to vent properly, and when to call in a licensed contractor.

Choose the Right Range Hood Type for Your Kitchen

Select Based on Your Cooktop Layout

Your kitchen layout determines the best hood type. Wall-mounted hoods fit above standard cooktops against a wall and offer strong suction with direct vertical ducting. Under-cabinet models save space and blend into cabinetry, ideal for smaller kitchens. Island hoods hang from the ceiling over a central cooking station and require overhead support and ceiling-to-roof duct runs. Insert hoods are built into custom cabinetry for seamless, high-end finishes.

Match the hood width to your cooktop. Ideally, the hood should be at least as wide as the cooking surface, or up to 6 inches wider for better capture efficiency. For gas ranges, especially high-BTU models, choose a hood rated for 600+ CFM to handle heavy smoke and steam.

Pick Ducted Over Ductless Whenever Possible

A ducted hood vents air outside, removing contaminants completely. This is the preferred option for health, cleanliness, and long-term performance. Ductless hoods filter air through charcoal or mesh filters and blow it back into the kitchen. They’re easier to install but less effective, especially at controlling humidity and strong odors.

Only use ductless if exterior venting isn’t feasible, such as in rental units or apartments where structural modifications aren’t allowed. Even then, expect more frequent filter replacements and reduced air quality compared to ducted systems.

Size the Fan by Your Cooking Needs

Airflow is measured in CFM (cubic feet per minute). A higher CFM means stronger suction. Use these guidelines:

  • Electric cooktops: Minimum 400 CFM
  • Gas cooktops: 600+ CFM
  • Commercial-grade gas ranges: 760+ CFM

Some models allow upgrading from 400 to 760 CFM for gas compatibility. However, hoods over 400 CFM trigger code requirements. IRC Section M1503.4 mandates a motorized makeup air system to prevent negative pressure, which can cause dangerous backdrafting of carbon monoxide from furnaces or water heaters.

Gather the Required Tools and Materials

kitchen hood installation tools layout

Essential Tools for Installation

You’ll need specific tools to complete this installation properly. A 6-inch hole saw cuts through drywall and siding. An oscillating multi-tool or reciprocating saw handles precise cuts around obstructions. A drill with reverse function is critical when drilling through aluminum siding. A laser level or bubble level ensures straight, balanced mounting. A stud finder locates framing for secure fastening. A voltage tester confirms power is off before electrical work. A measuring tape provides accurate layout and alignment. A vacuum controls dust during drilling. A caulking gun applies weatherproof sealant.

Having a helper is highly recommended, especially when lifting and aligning heavy stainless steel hoods.

Required Materials by System Type

For ducting, use 6-inch rigid metal duct. It resists grease buildup and maintains airflow better than flexible duct. Limit flexible aluminum duct to short runs under 10 feet and avoid it entirely if possible. Seal all joints with aluminum HVAC foil tape, never duct tape, which degrades over time.

For exterior components, include a 6-inch wall cap or vent cover, a PVC or metal mounting block that is rot-resistant for wet climates, a beveled block (optional) with angled top to shed water, and exterior-grade silicone caulk to prevent moisture intrusion.

Electrical supplies include 12-AWG wire for hardwired units, wire nuts or quarter-inch yellow connectors, and a junction box inside the hood.

Finishing touches include stainless steel crown molding (approximately 18½ inches) to blend the hood with cabinetry and a paint-matched vent cap for aesthetic continuity.

Turn Off Power and Prepare Wiring Safely

Shut Off the Circuit Before Electrical Work

Before touching any wires, turn off the breaker powering the range hood circuit. Verify the line is dead using a non-contact voltage tester. Never work on live circuits. This is a critical safety rule that cannot be emphasized enough.

If you’re replacing an existing hood, check for a nearby junction box or existing wiring behind the wall. Most modern hoods connect via a knockout panel in the back, accessed with a flathead screwdriver.

Run a New Circuit If Needed

For new installations without existing power, a licensed electrician should install a dedicated 15-amp circuit with 12-AWG wire from the breaker panel. Route wire separately from ducting to prevent interference and meet code. Feed the wire through the hood’s knockout before mounting the unit.

Connect wires inside the hood’s terminal block: black to black (hot), white to white (neutral). Secure with wire nuts or connectors. No bare copper should be exposed. Only restore power after all connections are complete and insulated.

Set the Correct Mounting Height and Locate Wall Studs

Follow Recommended Clearance Standards

Mounting height affects performance and safety. For electric cooktops, mount the hood 24 to 30 inches above the surface. For gas cooktops, mount it 30 to 36 inches above the surface.

Too low, and pots may hit the hood. Too high, and smoke escapes before capture. Use a laser level to mark a level line across the wall. Align with visual cues like tile grout lines or cabinet edges for a clean look.

Find and Mark Wall Studs

Use a stud finder to locate framing behind drywall. Mark screw points approximately 7 inches apart. These will support the mounting flange.

If studs don’t align with mounting holes, install quarter-inch yellow wall plugs (drywall anchors) for secure fastening. Ensure the flange is perfectly level before driving screws. This prevents misalignment and stress on the hood.

Plan the Vent Path and Avoid Common Obstructions

kitchen range hood ductwork diagram

Choose the Shortest, Straightest Route

Three common vent paths exist. Through an exterior wall is most efficient for wall-mounted hoods. Through the ceiling and roof is required for island hoods. Through cabinetry to a side wall works as an alternative when direct access is blocked.

The goal is to minimize bends and length. Each 90-degree elbow reduces effective airflow by up to 25 percent. Keep total duct run under 30 feet if possible.

Use Rigid Duct and Minimize Bends

Always prefer 6-inch rigid metal duct. It maintains shape, resists grease, and allows easy cleaning. Avoid flexible duct. It collapses slightly, traps grease, and restricts airflow.

If a bend is necessary, use a smooth-radius 90-degree elbow with at least 2 to 3 inches of clearance in the wall cavity. Keep duct runs short and straight. Avoid flexible ducting, as it traps grease and restricts airflow.

Do not route duct through cold attics without insulation, as condensation can form and drip back into the hood.

Cut the Exterior Wall Opening Properly

Locate and Mark the Vent Exit Point

Measure from a fixed interior reference such as a window frame. For example, 27 inches horizontally and 6 inches up, centered between wood battens.

Drill a pilot hole from inside using a long 1/8-inch or 1/4-inch bit to confirm alignment on the exterior. Check for obstructions like studs, pipes, or wiring.

Cut a Clean 6-Inch Hole

Use the pilot hole to position a 6-inch hole saw. For aluminum siding, start the drill in reverse to cut cleanly through the metal without tearing. Switch to forward once past the siding to cut through sheathing.

For wood or vinyl, drill multiple half-inch dot-to-dot holes around the perimeter, then connect with a reciprocating saw. Work on a dry day to prevent brittle siding from cracking.

Use flexible duct as a template to mark the correct size. After cutting, vacuum debris and inspect from both sides.

Install Ducting and Seal Every Joint

Connect Interior and Exterior Duct Sections

Insert rigid 6-inch duct through the wall opening. Connect one end to the hood’s exhaust outlet and the other to the exterior wall boot.

For models with adjustable exhaust extensions, unscrew, measure, and reattach for perfect fit.

Route flexible duct only if unavoidable and keep under 10 feet. Never compress it. Maintain full diameter.

Seal Every Connection with Foil Tape

Use aluminum HVAC-rated foil tape on all joints. This is heat- and moisture-resistant. Never use duct tape. It dries out, cracks, and fails within months.

Fill the cavity around the duct with expansion foam to insulate and act as a fireblock. Maintain at least 2 inches of clearance behind the hood for connections.

Ensure the exterior vent cap opens outward and isn’t blocked by wind or debris.

Mount the Hood and Secure the Flange

Lift and Align with a Helper

Have a partner hold the hood in place while you align it with the mounting marks. Heavy stainless steel units are awkward and can scratch surfaces if dropped.

Ensure the mounting flange is level and fits snugly against the wall.

Fasten with Weather-Resistant Screws

Secure the flange using exterior deck screws. Hide the caulk bead behind the flange for a clean, professional finish.

If wiring from the back, feed the electrical cable through the knockout before final tightening.

Do not overtighten screws. This can warp the flange or crack tile.

Complete Electrical Connections Safely

Wire the Hood to the Terminal Block

Inside the hood, connect black (hot) to black and white (neutral) to white. Secure with quarter-inch yellow connectors or wire nuts.

Tuck wires neatly into the junction box. Ensure no copper is exposed. For plug-in models, leave the plug accessible. Never bury it behind walls.

Restore Power Only After Final Check

Double-check all connections, mounting, and duct seals before turning the breaker back on. Test the fan and lights.

If the hood doesn’t power on, recheck wire connections, confirm power at the breaker, and verify switch functionality.

Finish and Weatherproof the Installation

Install Crown Molding and Trim

Attach stainless steel crown molding (approximately 18½ inches) to cover the top edge and blend with upper cabinets. This hides the mounting hardware and improves aesthetics.

Seal Exterior Gaps Against Weather

On the outside, press the mounting block (PVC or metal) into the opening. Cut a 6-inch hole in the block to match the duct. For clapboard siding, cut a beveled top edge so water runs off.

Fasten the block to framing and caulk all edges with exterior-grade silicone. This prevents water intrusion, rot, and pest entry.

Match the vent cap color to siding for a seamless look.

Address Air Pressure and Safety Risks

kitchen hood makeup air system diagram

Understand Negative Pressure Hazards

High-CFM hoods over 400 CFM remove large volumes of air. If not replaced, they create negative pressure, pulling unconditioned air through cracks, attics, or crawlspaces.

Worse, they can cause carbon monoxide backdrafting from gas furnaces or water heaters. For every cubic foot of air exhausted, one must enter the home.

Install Makeup Air for High-CFM Hoods

Per IRC M1503.4, any exhaust system over 400 CFM must have a motorized makeup air system. This delivers fresh, conditioned air when the hood runs, maintaining neutral pressure.

Components include a dedicated makeup air unit, ductwork to living space, and a motorized damper activated by hood operation.

Have an HVAC professional design and install this system, especially in tight, energy-efficient homes built after 2000.

Test Performance and Prevent Common Issues

Conduct Post-Installation Checks

After setup, turn on the fan and feel for strong, consistent airflow at the exterior cap. Check for air leaks at joints by listening for whistling. Look for vibrations or rattling and tighten loose screws or ducts. Confirm the exterior vent cover opens outward.

If airflow feels weak, inspect for long or bent duct runs, replace flexible duct with rigid, and clean grease filters.

Monitor for Moisture and Noise

Condensation around the exterior cap may indicate poor sealing or backdrafting. Re-caulk and ensure proper slope. Beveled blocks help shed water.

Noise usually means loose hardware. Tighten mounting screws and duct connections. Ensure the fan wheel isn’t hitting the housing.

Maintain Your Hood for Long-Term Performance

Clean Filters Monthly

Wash grease filters in warm, soapy water or dishwasher monthly. Clogged filters reduce airflow and increase fire risk.

For ductless models, replace charcoal filters every 6 to 12 months.

Inspect Annually

Once a year, check ductwork for blockages, pests, or condensation. Clean interior fan blades. Test exterior cap operation. Re-caulk if needed.

Clean stainless steel with a buffing pad to maintain finish. Avoid abrasive cleaners.

Register your hood and keep installation and maintenance records for warranty claims, typically 1 to 5 years.

When to Hire a Professional Installer

Know Your Limits

DIY installation is feasible when replacing an existing hood with pre-existing duct and power and when you’re comfortable with drilling, leveling, and wiring.

Call a professional for cutting new wall or roof penetrations, running new electrical circuits, installing island hoods with overhead supports, and homes with tight construction needing combustion safety testing.

Professionals can perform blower door tests and CO monitoring to ensure safe operation, especially critical with hoods over 1,000 CFM.

Final Thoughts on Installing Your Kitchen Hood

A properly installed kitchen hood enhances comfort, protects your home, and keeps air clean. Follow these steps to ensure safe, code-compliant, and efficient ventilation. Prioritize ducted systems over ductless whenever possible. Use rigid metal ducting, seal every joint with foil tape, and install makeup air when required by code, especially for hoods over 400 CFM.

With the right tools and careful attention to air pressure safety, you can achieve professional-grade results. If your project involves new electrical circuits, roof penetrations, or high-CFM systems in tight homes, don’t hesitate to bring in a licensed contractor. The investment in proper installation pays off in performance, safety, and peace of mind.

Frequently Asked Questions About Installing Kitchen Hood Exhaust Fans

Can I install a kitchen hood exhaust fan myself, or do I need a professional?

DIY installation is feasible if you’re replacing an existing hood with pre-existing ductwork and electrical connections and are comfortable with basic carpentry, drilling, leveling, and electrical wiring. Call a professional for new wall or ceiling penetrations, running new electrical circuits, or installing island hoods.

What is the minimum CFM I need for a gas cooktop?

For gas cooktops, minimum recommended airflow is 600 CFM or higher. For high-output commercial-grade gas ranges, choose 760 CFM or higher for adequate smoke and steam capture.

Do I need a makeup air system for my range hood?

Yes, IRC Section M1503.4 requires a motorized makeup air system for any exhaust system rated over 400 CFM. This prevents negative pressure that can cause carbon monoxide backdrafting from gas appliances.

Should I choose a ducted or ductless range hood?

Choose ducted (exterior-exhaust) whenever possible. Ducted hoods remove smoke, steam, grease, and odors completely outside, providing far better indoor air quality. Only use ductless if exterior venting isn’t feasible due to rental restrictions or structural limitations.

How far should a range hood be mounted above the cooktop?

For electric cooktops, mount the hood 24 to 30 inches above the cooking surface. For gas cooktops, mount it 30 to 36 inches above the surface. Too low creates a fire hazard, and too high reduces capture efficiency.

What type of duct should I use for my range hood?

Use 6-inch rigid metal duct whenever possible. It maintains airflow, resists grease buildup, and allows easy cleaning. Avoid flexible ducting, which traps grease and restricts airflow. If flexible duct is unavoidable, keep runs under 10 feet.

Commercial Ceiling Fan Installation Guide


Your warehouse staff complains about hot spots near the loading dock while your office workers bundle up near the AC vents. This common scenario in large facilities isn’t just uncomfortable—it’s costing you thousands in wasted energy. Commercial ceiling fan installation solves these problems by creating uniform temperatures across expansive spaces, but only when done correctly. Unlike residential installations that take an afternoon, commercial projects require specialized expertise to handle large-scale equipment, complex electrical systems, and structural considerations. This guide reveals the critical steps you must follow for successful commercial ceiling fan installation that delivers maximum comfort, energy savings, and safety in warehouses, retail spaces, and industrial facilities.

Commercial ceiling fans move dramatically more air than residential models—often 50,000+ CFM compared to 5,000-10,000 CFM in homes. This capacity difference means installation isn’t just about mounting a larger fan; it demands structural reinforcement, electrical upgrades, and precise airflow planning. When properly installed, commercial ceiling fans reduce HVAC energy consumption by up to 30% while extending equipment lifespan. In this guide, you’ll learn exactly how to select, install, and optimize commercial ceiling fans for your specific facility needs.

Why Residential Fan Installations Fail in Commercial Spaces

Commercial ceiling fan installation requires fundamentally different approaches than residential projects. Attempting to install residential-grade fans in large facilities creates immediate performance issues and long-term safety hazards.

Commercial fans weigh significantly more—HVLS models can exceed 200 pounds—demanding structural mounting points that residential installations ignore. Standard ceiling joists supporting residential fans often can’t handle commercial unit weight combined with rotational forces. Installers must locate and reinforce structural elements like roof trusses or add dedicated mounting plates rated for dynamic loads.

Electrical requirements differ substantially. Commercial fans often need 208-240V circuits with dedicated breakers, while residential units typically run on standard 120V circuits. HVLS fans with Variable Frequency Drives (VFDs) introduce additional electrical complexities including harmonic distortion that requires filtering to prevent interference with other equipment.

Blade design and motor engineering create operational differences. Commercial fans use steeper blade pitches (typically 12-14 degrees) optimized for moving massive air volumes across large spaces. Their industrial-grade motors feature sealed bearings and thermal protection for continuous 24/7 operation—a critical consideration for facilities running multiple shifts.

How to Choose & Size Commercial Ceiling Fans for Your Facility

commercial ceiling fan sizing chart warehouse

Selecting the right commercial ceiling fan prevents costly rework and ensures optimal performance from your installation investment. Follow these specific sizing guidelines based on your facility characteristics.

Determine Blade Span Based on Ceiling Height and Square Footage

HVLS fans require specific height-to-blade span ratios for effective air movement. For ceilings 20-30 feet high (common in warehouses), use 8-14 foot diameter fans. Facilities with 30-50 foot ceilings need 14-24 foot fans for proper air displacement. Measure your square footage and divide by the fan’s coverage area (typically 22,000 sq ft per fan for 24-foot models) to determine quantity.

Match Motor Power to Your Environmental Conditions

Industrial environments demand motors with specific protection ratings:
– NEMA 4X rating for washdown areas
– Explosion-proof motors for chemical facilities
– Corrosion-resistant coatings for high-humidity spaces

Verify that your electrical infrastructure supports the motor’s full load amperage plus 25% headroom for startup surges. HVLS fans with VFDs require additional electrical planning to address harmonic distortion.

Certified Commercial Ceiling Fan Installation Prevents Safety Hazards

HVLS fan installation safety checklist

HVLS fan installation demands manufacturer-certified technicians—this isn’t optional for facility safety. Improperly installed commercial ceiling fans create serious risks:

  • Structural failure from inadequate mounting (fans can weigh 200+ pounds)
  • Electrical hazards from improper wiring of high-voltage systems
  • Falling components from vibration-induced fastener loosening

Top manufacturers like Big Ass Fans require installers to complete rigorous certification programs covering:
– Structural mounting protocols for various building types
– Electrical safety standards for commercial power systems
– Load calculation methods for dynamic rotational forces
– Fall protection requirements for elevated installations

Verify installer credentials by requesting proof of current manufacturer certification and checking their insurance coverage for commercial installations. Never proceed without documentation showing certification specific to the fan model you’re installing.

7 Critical Pre-Installation Checks for Commercial Projects

Skip these steps and your commercial ceiling fan installation will face delays, safety issues, or performance failures.

Conduct Airflow Mapping Before Mounting

Identify optimal fan placement by analyzing:
– Building layout and obstruction locations (racking, machinery)
– Existing HVAC airflow patterns
– Problem areas with temperature stratification
– Employee work zones requiring focused comfort

HVLS fans perform best in open areas with minimal obstructions—position them where air can move freely downward and outward. Avoid mounting within 10 feet of walls or large equipment.

Verify Structural Mounting Capacity

Use a stud finder to locate structural elements capable of supporting dynamic loads. Commercial fans require mounting to:
– Roof trusses (not just ceiling joists)
– Steel purlins in metal buildings
– Reinforced concrete structures

When structural elements don’t align with optimal airflow positions, install steel mounting plates spanning between supports. Torque all fasteners to manufacturer specifications—typically 45-60 ft-lbs for commercial applications.

Step-by-Step Commercial Ceiling Fan Installation Process

Follow this sequence for safe, effective installation of commercial ceiling fans in large facilities.

Mounting System Installation Protocol

  1. Mark mounting points based on airflow mapping
  2. Locate and verify structural elements with stud finder
  3. Install mounting plate using grade 8 bolts torqued to 50 ft-lbs
  4. Attach fan mount to plate with vibration-dampening hardware
  5. Double-check level and alignment before proceeding

VFD and Electrical Connection Procedure

  1. Install VFD in accessible, ventilated location per manufacturer specs
  2. Run dedicated circuit from electrical panel with appropriate gauge wire
  3. Connect power supply to VFD inputs following wiring diagram
  4. Program motor parameters using nameplate data
  5. Test operation at low speed before full activation

VFD Installation Cuts Commercial Fan Energy Costs by 50%

Variable Frequency Drive wiring diagram commercial fan

Variable Frequency Drives are essential for maximizing ROI from commercial ceiling fan installation. Proper VFD setup delivers dramatic energy savings through:

  • Soft-start capability reducing electrical stress during startup
  • Precise speed control matching airflow to actual conditions
  • Cubic energy savings relationship (50% speed reduction = 87.5% energy reduction)

Configure VFDs to operate fans at 60-70% speed during normal conditions—this provides adequate airflow while minimizing energy consumption. Program seasonal adjustments that automatically reduce winter speeds to circulate warm air without creating drafts.

Commercial Ceiling Fan Maintenance Checklist

Schedule these maintenance tasks to prevent downtime and extend equipment life:

Monthly:
– Inspect blade balance and alignment
– Check for unusual vibration or noise
– Verify secure mounting hardware

Quarterly:
– Clean blades with non-abrasive cleaner
– Inspect electrical connections for corrosion
– Test emergency stop functions

Annually:
– Perform full torque check on all fasteners
– Verify motor temperature during operation
– Calibrate VFD parameters against baseline

Maximizing ROI: Commercial Fan Speed Settings for Every Season

Optimize your commercial ceiling fan installation with these seasonal adjustments:

  • Summer: Run fans at 70-80% speed with downward airflow (forward rotation) to enhance evaporative cooling
  • Winter: Reduce to 30-40% speed with upward airflow (reverse rotation) to gently circulate warm air
  • Shoulder Seasons: Use demand-based control with occupancy sensors to operate only when spaces are occupied

HVLS fans in warehouses should run continuously at reduced speeds rather than cycling on/off—this maintains consistent temperatures while using less energy than startup surges from frequent cycling.

Commercial Ceiling Fan Installation Cost vs. Energy Savings Breakdown

A typical 20,000 sq ft warehouse installation with two 24-foot HVLS fans costs $12,000-$18,000 including equipment and professional installation. The return comes quickly:

  • 25-35% reduction in HVAC energy consumption
  • $1,500-$2,500 annual savings on a $6,000 cooling bill
  • HVAC equipment lifespan extended by 25-40%

Most commercial ceiling fan installations achieve full payback within 2-3 years through energy savings alone—before accounting for productivity gains from improved worker comfort.

Commercial ceiling fan installation transforms large facilities into more comfortable, efficient spaces when done correctly. Focus on certified installation, proper sizing, and strategic placement to maximize your investment. Start with a professional airflow assessment, choose manufacturer-certified installers, and implement a maintenance schedule to ensure your fans deliver decades of reliable service. The most successful installations treat fans as integrated components of your building’s environmental system—not standalone devices—coordinating them with HVAC operation for maximum comfort and energy savings.

« Older posts Newer posts »

© 2026 Hampton Fan Reviews

Theme by Anders NorenUp ↑